Sort by Category
- May 2026
- March 2026
- December 2025
- November 2025
- October 2025
- September 2025
- August 2025
- June 2025
- August 2024
- July 2024
- June 2024
- May 2024
- February 2024
- January 2024
- December 2023
- November 2023
- October 2023
- September 2023
- August 2023
- July 2023
- March 2023
- February 2023
- January 2023
- December 2022
- November 2022
- October 2022
- September 2022
- August 2022
- June 2022
- May 2022
- April 2022
- March 2022
- February 2022
- January 2022
- December 2021
- November 2021
- October 2021
- September 2021
- August 2021
- July 2021
- June 2021
- May 2021
- April 2021
- March 2021
- February 2021
- January 2021
- December 2020
- November 2020
- October 2020
- September 2020
- August 2020
- July 2020
- June 2020
- May 2020
- April 2020
- March 2020
- February 2020
- January 2020
- December 2019
- November 2019
- October 2019
- September 2019
- August 2019
- July 2019
- June 2019
- May 2019
- April 2019
- March 2019
- February 2019
- January 2019
- December 2018
- November 2018
- October 2018
- September 2018
- August 2018
- July 2018
- June 2018
- May 2018
- April 2018
- March 2018
- February 2018

Harvest Stuffed Acorn Squash
Harvest stuffed acorn squash is an ideal autumn comfort dish that is rich in protein, features seasonal ingredients, and requires minimal kitchen tools!
Harvest stuffed acorn squash is an ideal autumn comfort dish that is rich in protein, features seasonal ingredients, and requires minimal kitchen tools!


Servings: 4 Prep: 15 MIN Cook time: 55 MIN
Ingredients
For the squash:
2 acorn squash
4 tsp olive oil or olive/avocado spray
S+P
For the filling:
1 lb Italian sausage or chicken sausage
4 oz mushrooms (finely chopped)
1/2 small yellow onion (finely diced)
1 medium honeycrisp apple (finely diced) or 1/4 cup dried cranberries
1/2 tsp salt
1/4 tsp black pepper
1/4 tsp cinnamon
1/8 tsp allspice (optional)
2 cloves minced garlic (or 1 tsp garlic powder)
1 Tbsp fresh sage (chopped)
1/2 cup shredded parmesan cheese, divided
Directions
Preheat oven to 400 degrees and line a baking sheet with parchment paper.
To a medium skillet, heat oil over medium heat and sauté onion and peppers for about 5 minutes. Move sauté veggies to the side and add turkey sausage to the center, crumbling the meat. Let cook, stirring and crumbling meat until meat is completely browned, for about 10 minutes. Turn heat off and let mixture to cool.
In a large mixing bowl, whisk together eggs and yogurt. Add in turkey mixture and incorporate. Add in the rest of the dry ingredients: almond and coconut flour, nutritional yeast, baking powder, and seasonings using a spatula until combined.
Using ¼ - ½ cup or large cookie scoop, make 12 evenly sized balls and place them on the sheet pan. Place in the oven for 12-16 minutes until slightly browned all over.
Remove from the oven and let cool completely before storing in an airtight container in the fridge for up to 5 days.

Melon Berry Summer Salad
Melon Berry Summer Salad - A refreshing salad made with seasonal, rich produce to revitalize you on a hot summer day!
Melon Berry Summer Salad - A refreshing salad made with seasonal, rich produce to revitalize you on a hot summer day!

Summer is the prime season for melons, making it the perfect time to savor a refreshing salad filled with summer produce to wrap up the season.
This vibrant salad features a mix of summer produce such as blueberries, cucumbers, avocados, cantaloupe, along with robust veggies like shaved Brussel sprouts and kale forming the base.
For a protein boost, grilled shrimp is a great addition. It complements the citrusy and refreshing flavors of the salad, and you don't even need to use the oven. Leftover cold shrimp also pairs well with the salad.


HOW TO MAKE THE CITRUS VINAIGRETTE
Crafting the Citrus Vinaigrette is simple. Combine oil, herbs, seasonings, Dijon mustard, honey, and any citrus fruit you have on hand. In this recipe, half a grapefruit was squeezed, which adds a perfect touch to the salad.
Use the remaining half of the grapefruit to create a delightful paloma cocktail or mocktail to complement the meal. (recipe here)


If you try this recipe, let us know! Leave a comment, rate it, and don’t forget to tag a photo to #fromtherootsblog on Instagram. We love seeing what you come up with!
Melon Berry Summer Salad - A refreshing salad made with seasonal, rich produce to revitalize you on a hot summer day!
SERVINGS: 4 | PREP TIME: 10 MIN | COOK TIME: 10 MIN
Ingredients
salad components
2 cups shaved brussels sprouts
2-4 cups kale (de-stemmed, leaves torn into bite sized pieces)
1 cup or 3 mini cucumbers, sliced
1 avocado, diced
½ small red onion, sliced
½ cup crumbled feta or goat cheese
1 cup fresh blueberries
¼ cup small cantaloupe, diced
¼ cup sliced almonds
Optional: 1 lb grilled seasoned shrimp
Vinaigrette dressing:
½ grapefruit (juice)
¼ cup avocado oil
1 Tbsp honey
1 Tbsp dijon mustard
1 tsp salt
½ tsp black pepper
½ tsp garlic powder
½ tsp oregano
Directions
1) To prepare the dressing: Combine all ingredients in a small bowl or mason jar. If using a mason jar, seal the lid and shake vigorously for 30 seconds until the dressing is well mixed. If using a bowl, whisk the ingredients together until they are combined.
2) In a large salad bowl, combine shaved Brussels sprouts and kale. Pour the dressing over the greens and toss until they are evenly coated. Finally, add your remaining toppings and serve!
3) Enjoy this dish as a side salad or as a main course alongside grilled shrimp or your preferred protein source!

Air Fryer Honey Mustard Salmon
Not sure what is wrong with me, but I am JUST now getting on the air fryer train! Maybe it’s because fried foods never did it for me, (hello sweet tooth) but now I am a changed woman.
Veggies, desserts, meats, I put EVERYTHING in my air fryer now!
And since air frying salmon has been the recent craze, I knew that was the first recipe I needed to post because it is quite literally the best cooking method for salmon.
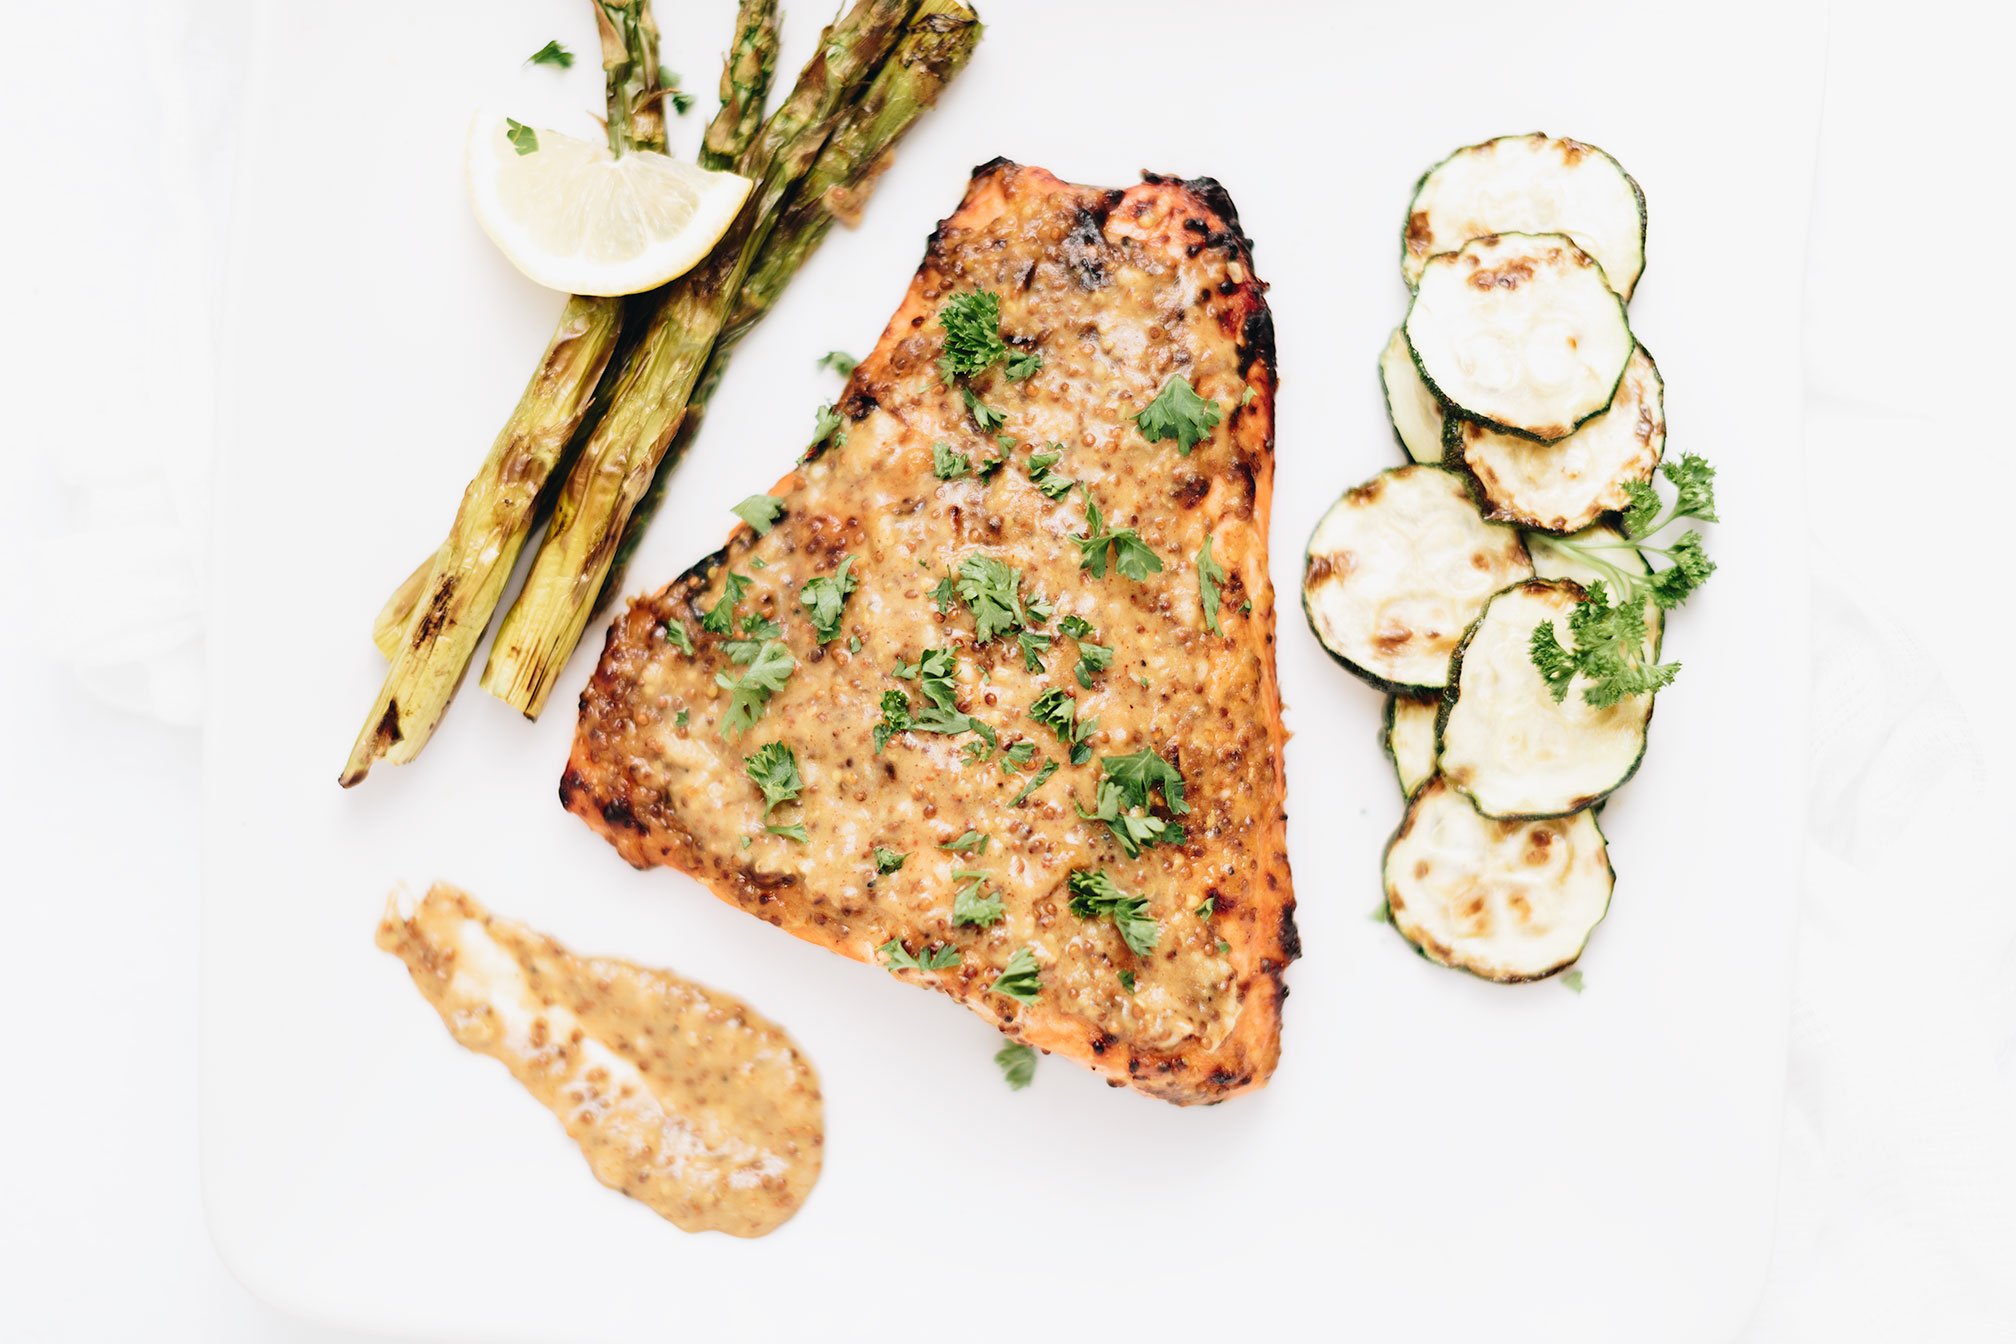
Air Fryer Honey Mustard Salmon - quick and flavorful healthy seafood dinner.
Not sure what is wrong with me, but I am JUST now getting on the air fryer train! Maybe it’s because fried foods never did it for me, (hello sweet tooth) but now I am a changed woman.
Veggies, desserts, meats, I put EVERYTHING in my air fryer now!

And since air frying salmon has been the recent craze, I knew that was the first recipe I needed to post because it is quite literally the best cooking method for salmon.


No need to worry about drying out your salmon or undercooking it, air frying is the foolproof method. Every time. And the best part - it only takes 8 minutes!
So here is a great air fryer salmon recipe that requires 5 ingredients to make a sweet and tangy sauce and that tastes absolutely amazing!

Pair it with some air fryer veggies like zucchini and asparagus, garden salad, starchy carbs like mashed or roasted potatoes, quinoa, or anything your heart desires for a well-balanced and delicious dinner.
More salmon recipes? Check out these on the blog: Healthy Salmon Patties with Lemon Dill Potato Salad, Pecan Crusted Spiced Salmon, Everything Bagel & Lox Socca Pizza, Fresh and Easy Ceviche: 2-Ways
If you try this recipe, let us know! Leave a comment, rate it, and don’t forget to tag a photo to #fromtherootsblog on Instagram. We love seeing what you come up with!
Air Fryer Honey Mustard Salmon - quick and flavorful healthy seafood dinner.
PREP TIME 5 MIN | COOK TIME 8 MIN | MAKES 2 Servings
Ingredients
2 salmon filets (4-8 oz each)
2 Tbsp dijon mustard
1 Tbsp honey
1 Tbsp whole grain mustard
1-2 clove garlic, minced
¼ tsp smoked paprika
Salt and pepper to taste
Garnish: fresh chopped parsley, lemon wedge
Directions
In a small bowl, combine sauce ingredients (dijon and whole grain mustard, honey, garlic, paprika, and salt and pepper).
Marinate the salmon in ⅔ of the sauce for at least 30 minutes in the fridge.
Preheat the air fryer to 400 degrees F and place the salmon filets in the air fryer. Air fry for 7-8 minutes, depending on the salmon’s thickness.
When ready to eat, drizzle the remaining sauce over the cooked salmon and garnish with chopped parsley and juice from a lemon wedge. Enjoy!
SHOP OUR FAVORITE TOOLS + INGREDIENTS FOR THIS RECIPE!


Mexican Harvest Turkey Chili
Okay, I know I just posted a cozy stew recipe last week but as I get older, the need for comfort fall foods (soups, stews, chili’s) has increased so sorry, not sorry! I have needs too, haha!
Just like the veggie beef stew, this chili recipe is a simple and easy way to load up on things healthy while being super affordable.
Harvest vegetables like butternut squash, yams, sweet potatoes, onions, garlic, pumpkin while adding a Mexican twist that also includes harvest ingredients like green chilies, poblano peppers, fire roasted tomatoes, beans, and corn - you are truly getting the best of both worlds!
Mexican Harvest Turkey Chili - A simple to make healthy and hearty recipe that is packed with flavorful and seasonal ingredients. (gluten and dairy-free)

Okay, I know I just posted a cozy stew recipe last week but as I get older, the need for comfort fall foods (soups, stews, chili’s) has increased so sorry, not sorry! I have needs too, haha!
Just like the veggie beef stew, this chili recipe is a simple and easy way to load up on things healthy while being super affordable.
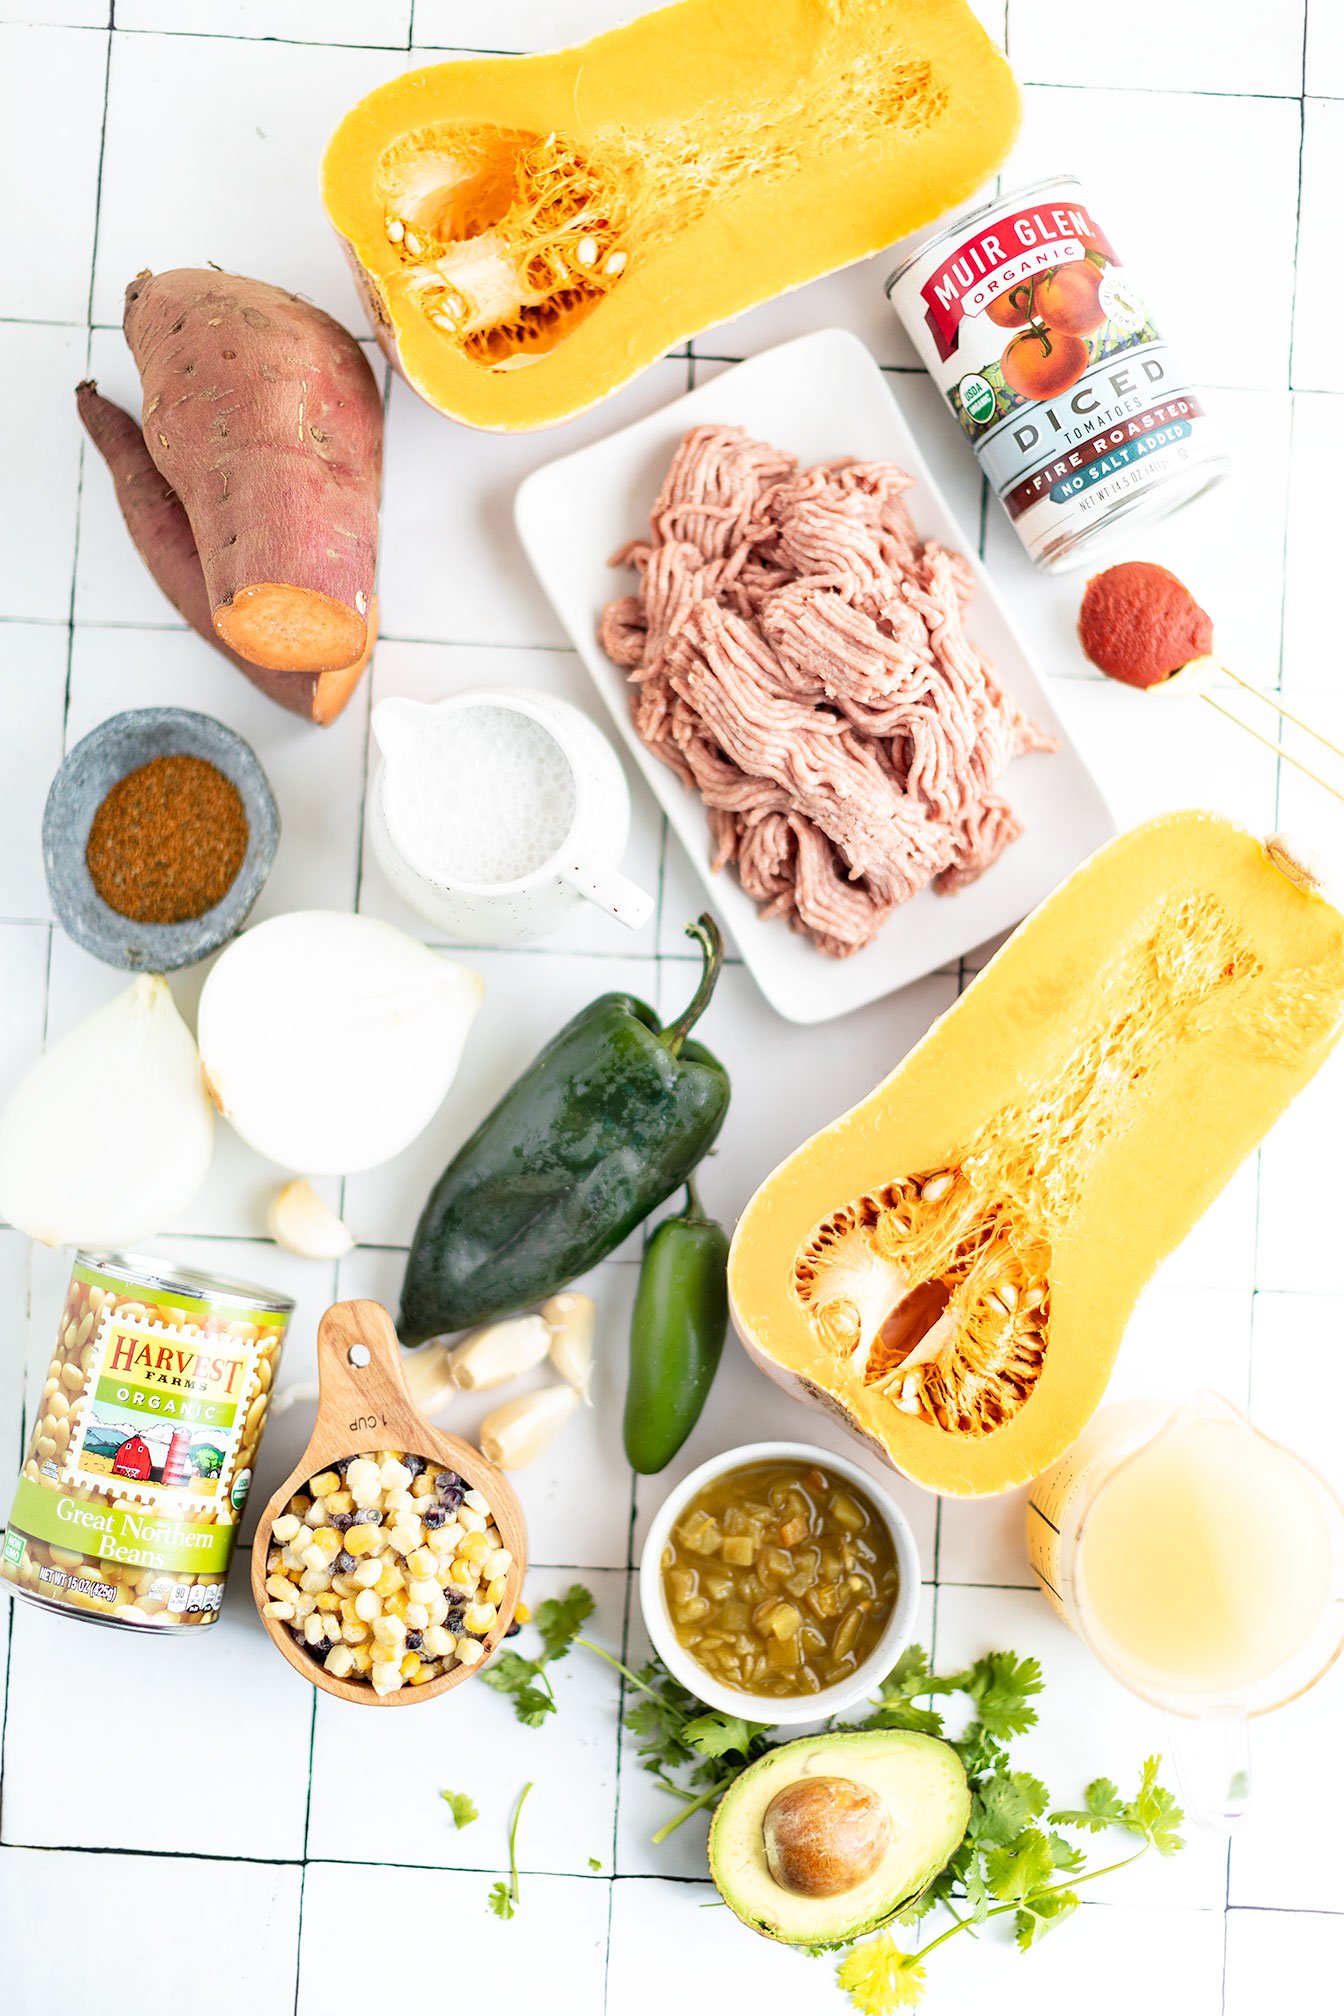
Harvest vegetables like butternut squash, yams, sweet potatoes, onions, garlic, pumpkin while adding a Mexican twist that also includes harvest ingredients like green chilies, poblano peppers, fire roasted tomatoes, beans, and corn - you are truly getting the best of both worlds!

When it comes down to flavor, this chili recipe is a perfect balance of sweet, savory, and spicy. But if you lean more towards spicy, you can refer to the notes section at the bottom.

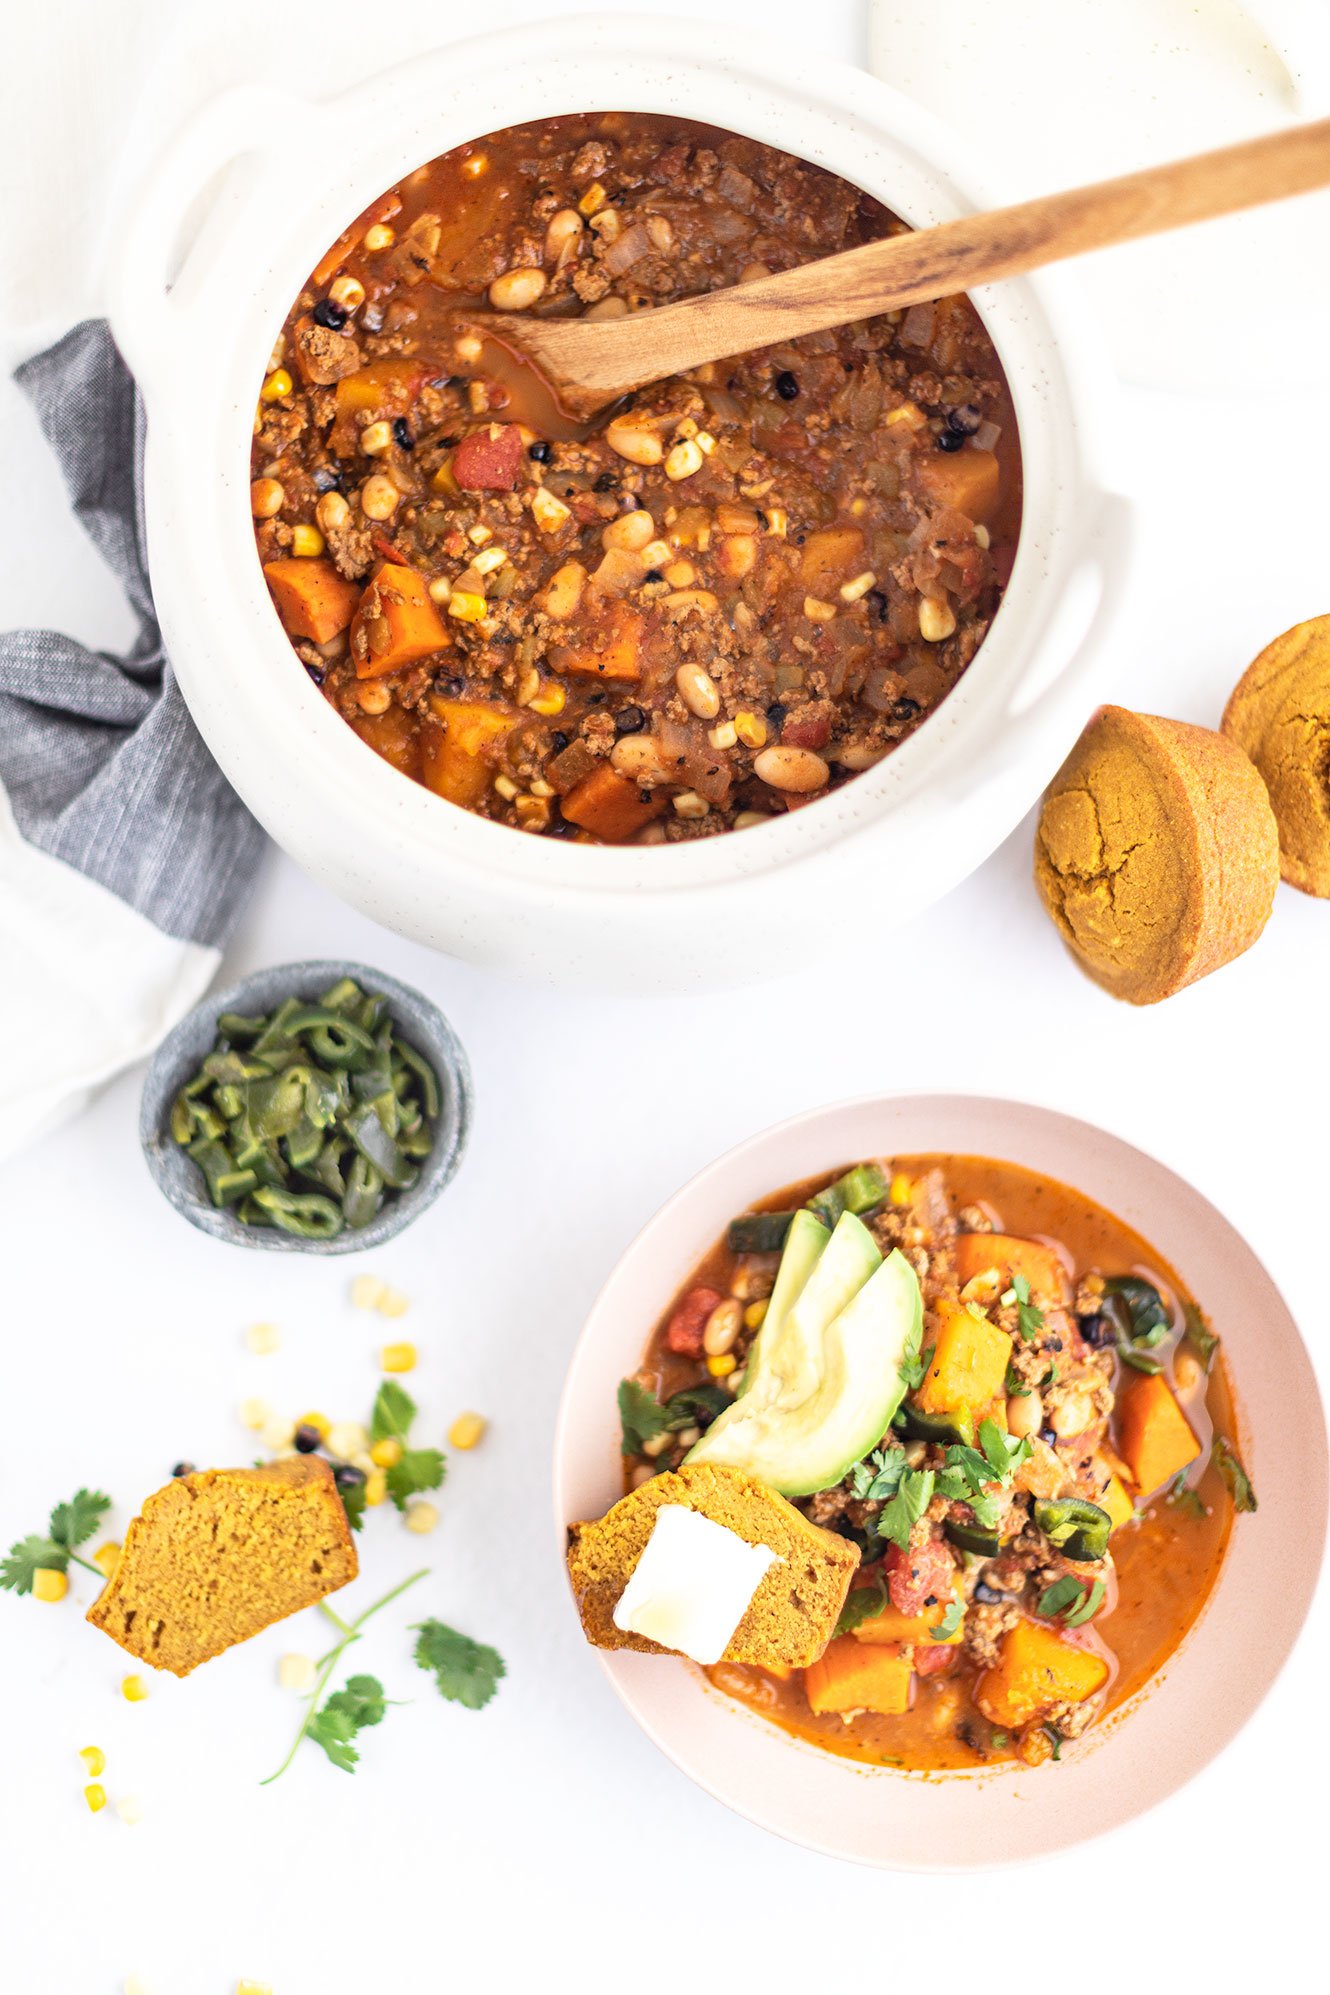
Now, let’s talk about garnishes and sides! For this recipe, I used chopped cilantro, extra roasted poblano slices, pickled jalapeno slices, and avocado. Feel free to follow the same vibe or add plain greek yogurt, green onions, tortilla chips or sliced corn tortilla strips, cotija, lime juice or roasted pepitas!

Pumpkin cornbread muffins are the star side dish for this chili recipe (recipe coming this week!). In the meantime, you can most definitely use the best gluten-free skillet cornbread recipe (*cough*) add sliced jalapenos to the batter!

If you try this recipe, let us know! Leave a comment, rate it, and don’t forget to tag a photo to #fromtherootsblog on Instagram. We love seeing what you come up with!
Mexican Harvest Turkey Chili - A simple to make healthy and hearty recipe that is packed with flavorful and seasonal ingredients. (gluten and dairy-free)
Prep Time: 15 min Cook Time: 45 min Total servings: 6-8
Ingredients
1lb ground turkey
3 cups total (butternut squash, yams, and/sweet potatoes)
peeled, seeded, cut into ½ inch cubes
2 cups low sodium chicken bone broth
1 can (4 oz) green chilies
1 can fire roasted tomatoes, with liquid
1 can northern beans, drained and rinsed
1 medium white onion, diced
1 poblano pepper
1 cup corn (fresh or frozen)
3-5 cloves garlic, minced
¼ cup pumpkin puree
1-3 Tbsp taco seasoning of choice
1 Tbsp tomato paste
S+P
Garnish: jalapeno slices, avocado, cilantro
Directions
Preheat the oven to 425 degrees and line a baking sheet with parchment paper or silicone mat.
Depending on if you are using butternut squash, yams and/or sweet potatoes (I did 1 ½ cup each butternut squash and yam cubes) arrange in a single layer on a prepared baking sheet. Drizzle or spray cooking oil (I like using avocado or coconut oil) over cubes, season with salt, pepper, and cinnamon (optional but so worth it!) and toss to coat. Make room on the baking sheet for the poblano pepper and bake for 20-25 minutes until veggie cubes are tender.
While the veggies are roasting in the oven, heat cooking oil in a large pot over medium high heat.
Add onion and garlic and cook for about 2-4 minutes until fragrant.
Add in the ground turkey, salt and pepper and stir to break it up into small pieces, mixing with the sauteed onion and garlic.
Once turkey is cooked through, add the fire roasted tomatoes, green chilies, tomato paste, broth, pumpkin puree, and spices and stir to combine. Bring to a simmer and cover the pot for 20 minutes.
At this point, the roasted veggies and pepper should be done. Transfer roasted vegetables to the chili pot along with the beans and allow the poblano pepper to cool before handling.
Once roasted poblano pepper is cooled (the skin should appear blackened and blistered) carefully peel away or rub off and discard the charred skins. Cut the stem off, de-seed, chop and add to the chili pot.
Add the frozen corn to the pot and continue to simmer until liquid has reduced to desired “chili” consistency. At this point you will want to adjust salt and pepper to taste.
Serve warm with favorite garnishes and serve with cornbread!
Notes
1| You can really play with the produce in this chili recipe! For example, choose butternut squash, yams, sweet potatoes or a combo - I just use whatever is leftover from batch cooking! Not a northern beans fan? Try pinto, garbanzo, black beans or tri-beans instead.
2| Need more spice? Play around with pepper of choice or add a spicy taco seasoning blend, hot sauce or add jalapenos to your cornbread if adding on the side.

Chicken Sausage and Harvest Veggies Sheet Pan
Sheet Pans - Without a doubt, the easiest thing to prepare if you fall into the categories of: busy, tired, and bored. Simple as that. All you have to do is cut (or use pre-cut/frozen) your veggies, slice sausage links, and place in the oven until ready to eat. While your meal is cooking, prepare a simple 3 ingredient dressing and that is it!
To save even more time, you can prepare the veggies and dressing the day before so when you are ready to heat up the oven, simply spread the veggies and protein on the sheet pan and let it cook. Come on people, I am just spoon feeding how easy this meal is to you! Haha
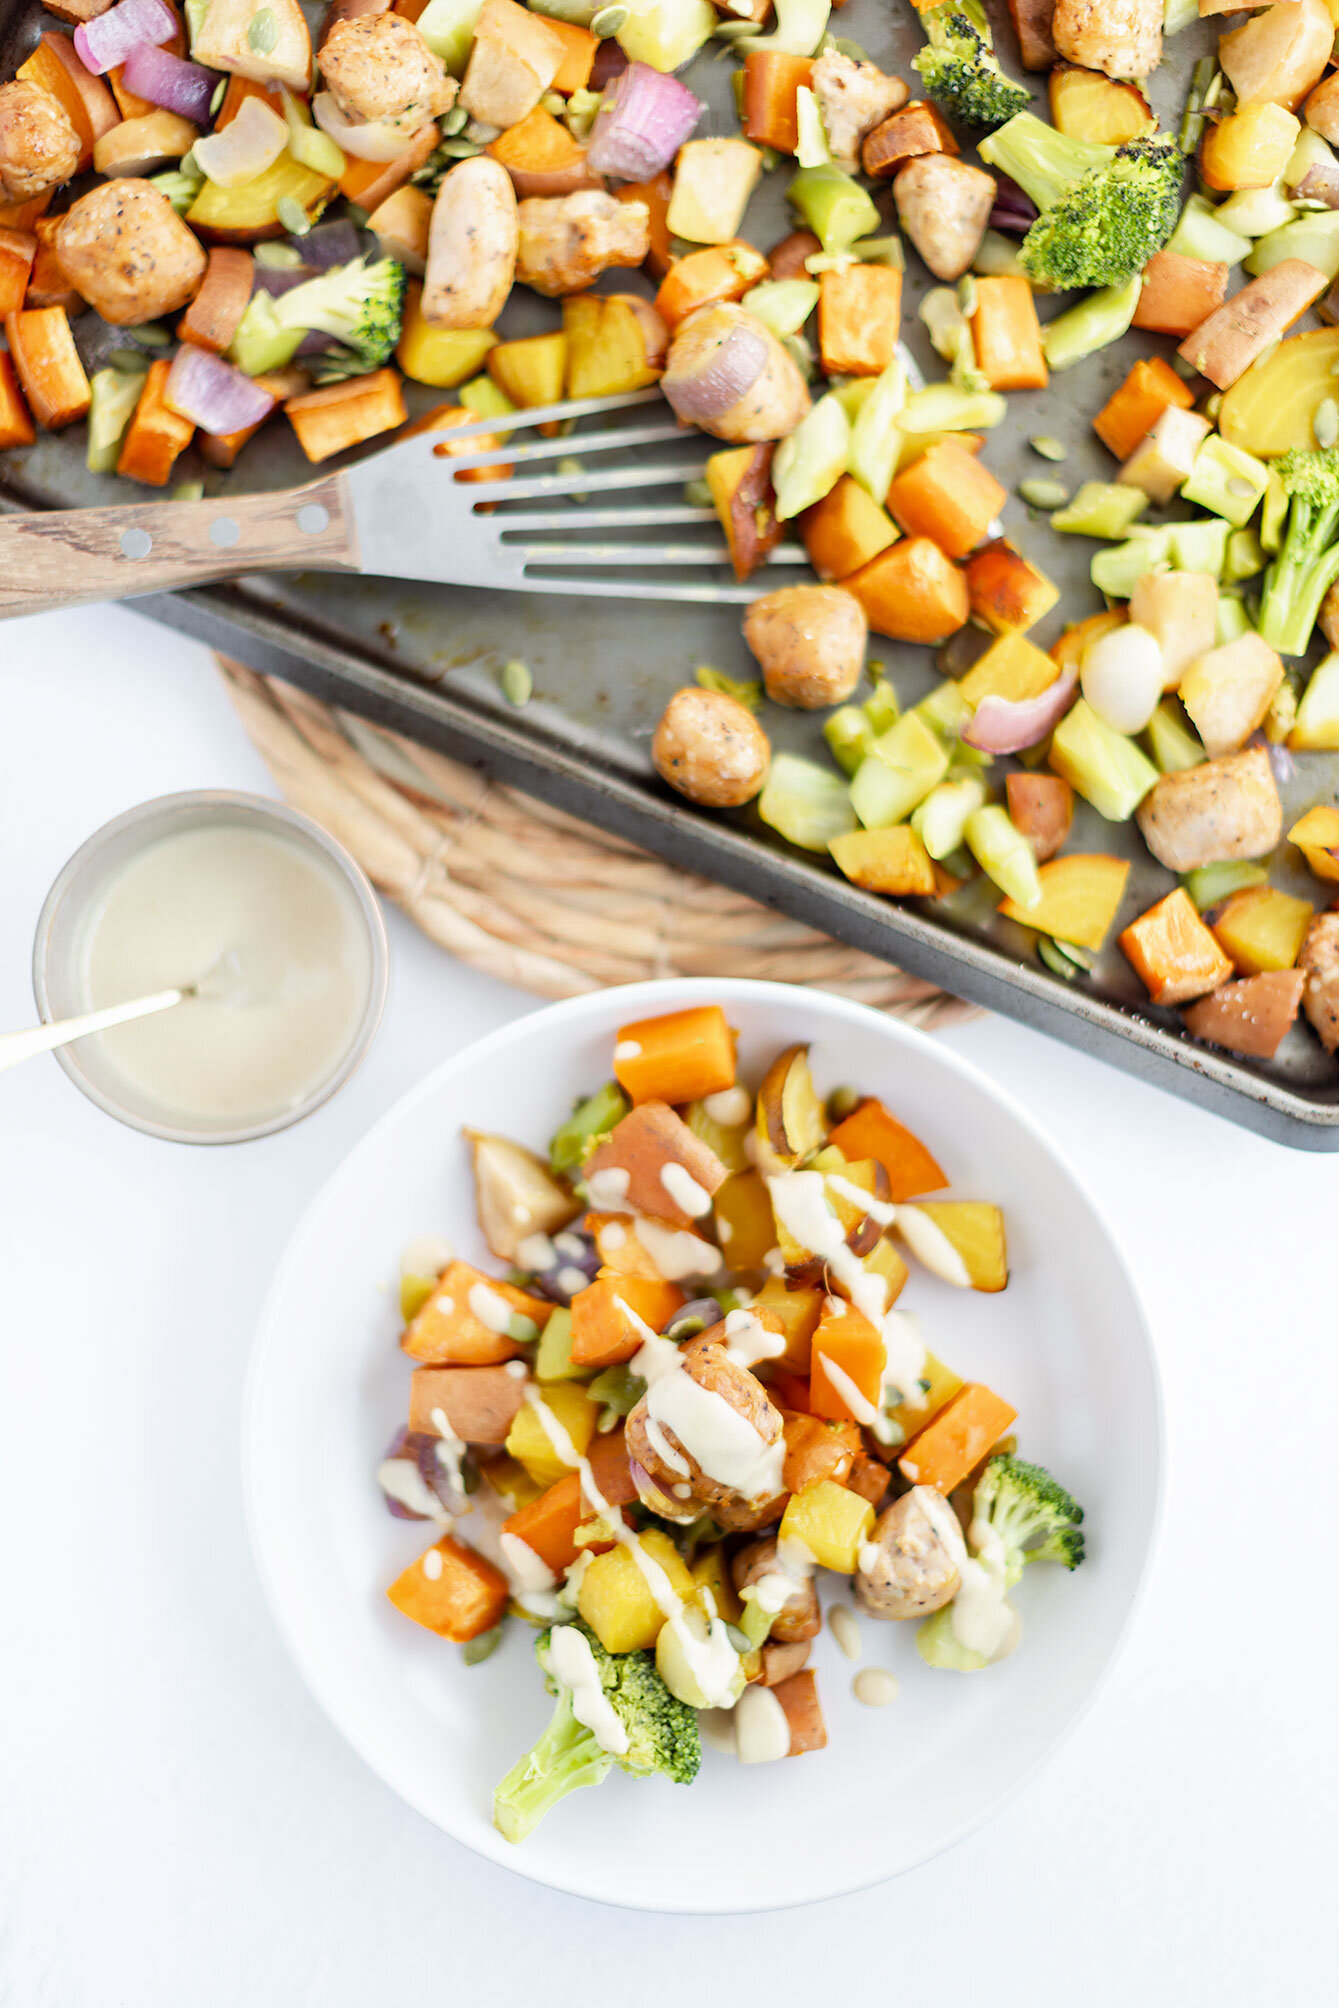
Chicken Sausage + Harvest Veggies Sheet Pan - All the fall feels on one sheet pan. This healthy fall inspired sheet pan recipe includes a sweet maple tahini dressing. Meal-prep, make-ahead, and weeknight friendly.
Sheet Pans - Without a doubt, the easiest thing to prepare if you fall into the categories of: busy, tired, and bored. Simple as that. All you have to do is cut (or use pre-cut/frozen) your veggies, slice sausage links, and place in the oven until ready to eat. While your meal is cooking, prepare a simple 3 ingredient dressing and that is it!

To save even more time, you can prepare the veggies and dressing the day before so when you are ready to heat up the oven, simply spread the veggies and protein on the sheet pan and let it cook. Come on people, I am just spoon feeding how easy this meal is to you! Haha

By using seasonal veggies, you don’t necessarily have to worry about flavor as much as seasonal produce are at its peak!
Meaning, less seasonings = less fuss. For this recipe, I season with little salt (because of the sausage) and use a simple everyday seasoning blend when seasoning the veggies.


To help round this meal out by incorporating healthy fats, I created a sweet and simple maple tahini dressing that pairs perfectly with the dish!

So either add this to your lunch meal prep rotation, weeknight dinner option, or keep it in your back pocket when you need to make something last minute - I promise you, you won’t regret it!

If you try this recipe, let us know! Leave a comment, rate it, and don’t forget to tag a photo to #fromtherootsblog on Instagram. We love seeing what you come up with!
Chicken Sausage + Harvest Veggies Sheet Pan - All the fall feels on one sheet pan. This healthy fall inspired sheet pan recipe includes a sweet maple tahini dressing. Meal-prep, make-ahead, and weeknight friendly.
Ingredients
1 red apple, cored and cubed
12 oz (1 package) chicken sausage, sliced
2-3 medium to large beets, cubed
½ red onion, diced into chunks
2 large sweet potatoes or 1 small butternut squash, cubed
1 head broccoli (or frozen), chopped
¼ cup raw pepitas
Fav seasonings + S|P
Maple Tahini Dressing
2 Tbsp Tahini
1 tsp pure maple syrup
1 tsp dijon mustard
S+P
Directions
Preheat oven to 400 degrees and line a large baking sheet with parchment paper or generously coat with avocado/coconut oil spray
Add sweet potatoes to the sheet pan and toss to coat with oil spray.
Roast for 15 minutes. While sweet potatoes are roasting, prep other veggies/protein.
Remove sweet potatoes from the oven and add the rest of the sheet pan ingredients. Sprinkle seasonings over ingredients, toss to coat, and spread ingredients out in a single layer.
Return to the oven and continue to roast until the veggies are tender, about 25 minutes longer.
While roasting, prepare dressing by simply mixing all ingredients in a small bowl until combined. May need to add 1 Tbsp increments of water to thin dressing until desired consistency.
You can sprinkle pepitas over roasted veggies/protein and return to the oven for an additional 5-10 minutes or sprinkle pepitas after final cooking. Serve with dressing and enjoy!