Sort by Category
- May 2026
- March 2026
- December 2025
- November 2025
- October 2025
- September 2025
- August 2025
- June 2025
- August 2024
- July 2024
- June 2024
- May 2024
- February 2024
- January 2024
- December 2023
- November 2023
- October 2023
- September 2023
- August 2023
- July 2023
- March 2023
- February 2023
- January 2023
- December 2022
- November 2022
- October 2022
- September 2022
- August 2022
- June 2022
- May 2022
- April 2022
- March 2022
- February 2022
- January 2022
- December 2021
- November 2021
- October 2021
- September 2021
- August 2021
- July 2021
- June 2021
- May 2021
- April 2021
- March 2021
- February 2021
- January 2021
- December 2020
- November 2020
- October 2020
- September 2020
- August 2020
- July 2020
- June 2020
- May 2020
- April 2020
- March 2020
- February 2020
- January 2020
- December 2019
- November 2019
- October 2019
- September 2019
- August 2019
- July 2019
- June 2019
- May 2019
- April 2019
- March 2019
- February 2019
- January 2019
- December 2018
- November 2018
- October 2018
- September 2018
- August 2018
- July 2018
- June 2018
- May 2018
- April 2018
- March 2018
- February 2018

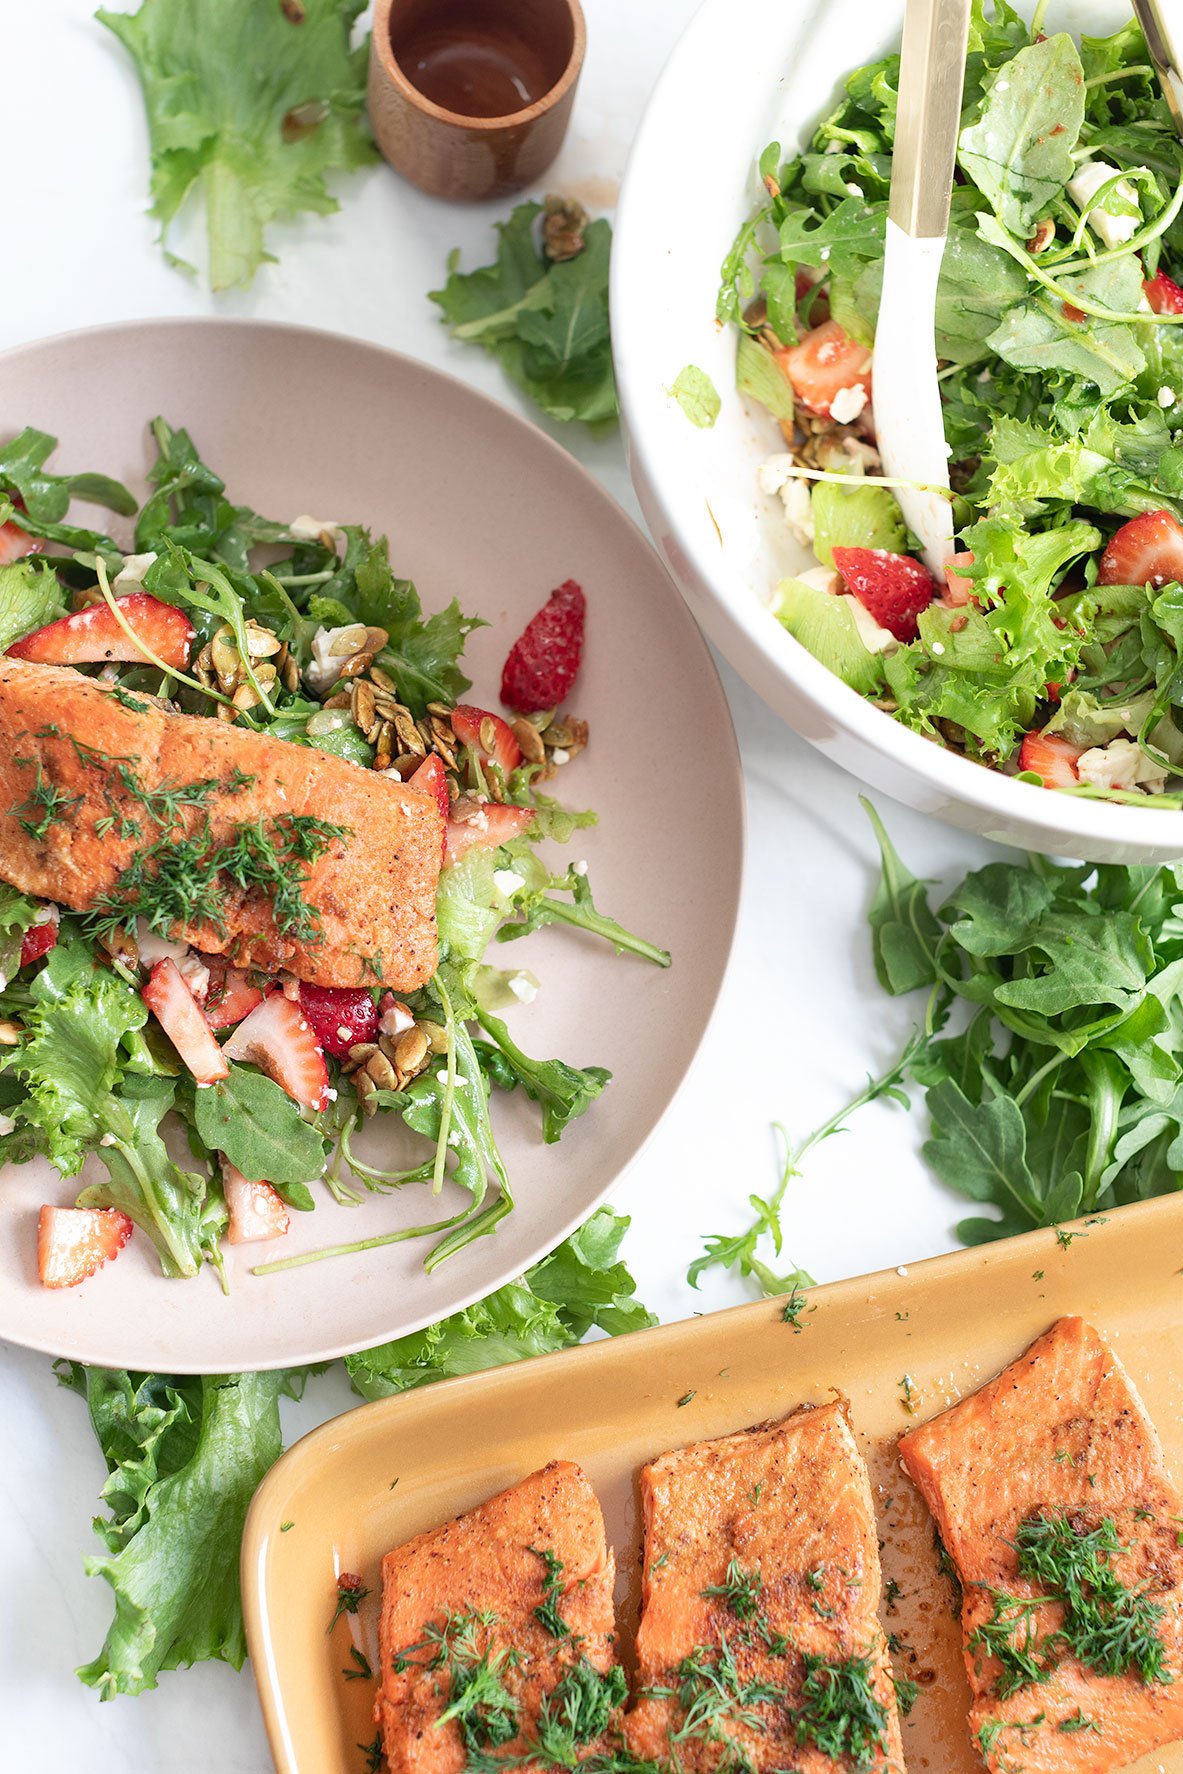
Strawberry Salmon Salad
Simple strawberry salmon salad requires less than six ingredients, your preferred salmon seasoning, and the option of homemade or store-bought dressing - perfect for effortless summer days!
Simple strawberry salmon salad requires less than six ingredients, your preferred salmon seasoning, and the option of homemade or store-bought dressing - perfect for effortless summer days!

I've been preparing this salad throughout the summer! Why? Because it's nutritious, rejuvenating, and incredibly simple to whip up. Everything can be ready in less than 30 minutes, making it an ideal choice for a quick weeknight dinner or for meal prepping for lunch.

TIPS ABOUT STRAWBERRY SALMON SALAD
Simplicity is key! This recipe is all about keeping things easy. I personally opt for my beloved strawberry vinaigrette from the store, but you can also whip up a speedy honey vinaigrette dressing from my alternative strawberry salad recipe.
This salad recipe is simple with just a few ingredients. If you feel like enhancing it, consider incorporating red onions, avocado, or substituting pepitas with pecans or almonds.
In this salad recipe, salmon takes the spotlight due to its quick cooking time and the avoidance of heating up the oven on a hot summer day. To ensure quality and sustainability, opt for wild-caught Alaskan or Sockeye salmon.
To transform this into a lunch meal prep, opt for glass containers when packing salads. This choice helps maintain freshness and prevents sogginess. I would also separate the ingredients like keep the salad undressed and dressing in a separate container and store the cooked salmon separately. (salmon refrigerate up to 3 days).

TO PREPARE THE EASIEST TOASTED HONEY PEPITAS
Heat a skillet over medium-high heat without adding any oil.
Spread pepitas in the skillet to form a single layer and shake occasionally.
Continue shaking until they turn golden brown (4-5 minutes). Transfer the toasted pepitas to a bowl to cool, then add a pinch of salt and 1 tablespoon of honey.
Stir until the seeds are well coated and set aside to cool.

Watch the video below to see how simple it is to prepare this salad!
If you try this recipe, let us know! Leave a comment, rate it, and don’t forget to tag a photo to #fromtherootsblog on Instagram. We love seeing what you come up with!
Simple strawberry salmon salad requires less than six ingredients, your preferred salmon seasoning, and the option of homemade or store-bought dressing - perfect for effortless summer days!
SERVINGS: 4 | PREP TIME: 10 MIN | COOK TIME: 15 MIN
Ingredients
2 - 4 salmon filets
1-2 Tbsp go to salmon seasonings*
4-8 cups favorite salad greens (I used half arugula half mixed)
1 cup strawberries, hulled and sliced
¼ cup pepitas
¼ cup crumbled feta
1 tbsp honey
¼ cup strawberry balsamic vinaigrette*
salt + pepper to taste
fresh dill for garnish, optional
Directions
Prepare Toasted Honey Pepitas:
1) Heat a skillet over medium-high heat without adding any oil. Spread pepitas in the skillet to form a single layer and shake occasionally. Continue shaking until they turn golden brown (4-5 minutes). Transfer the toasted pepitas to a bowl to cool, then add a pinch of salt and 1 tablespoon of honey. Stir until the seeds are well coated and set aside to cool.
To prepare the salmon:
1) Season your salmon with your favorite seasonings (refer to the notes below for my recommendations). Heat oil in a skillet over medium-high heat until it is hot and shimmering. Cook the salmon without moving it, skin side up, until it turns golden and crisp, approx. 4 minutes. Gently flip the fillets and lower the heat to medium. Cook until it reaches your desired level of doneness, around 4-5 minutes. Finally, transfer the salmon to a platter to cool.
Preparing the salad:
1) Coat the salad greens in dressing in a large mixing bowl. Add the remaining ingredients like toasted pepitas, feta, strawberries, salt, and pepper. Top it off with a salmon filet and savor the dish!
Notes:
Choose whatever greens you would like. I used arugula and mixed greens but you can also use spinach, butter lettuce, kale or romaine.
When it comes to my salmon, I favor a classic garlic powder, smoked paprika, salt, pepper and splash lemon juice and chopped fresh dill over. If you need more guidance, there are many salmon or fish focus seasonings that you can use.
Asian Mason Jar Salad with Peanut Sauce
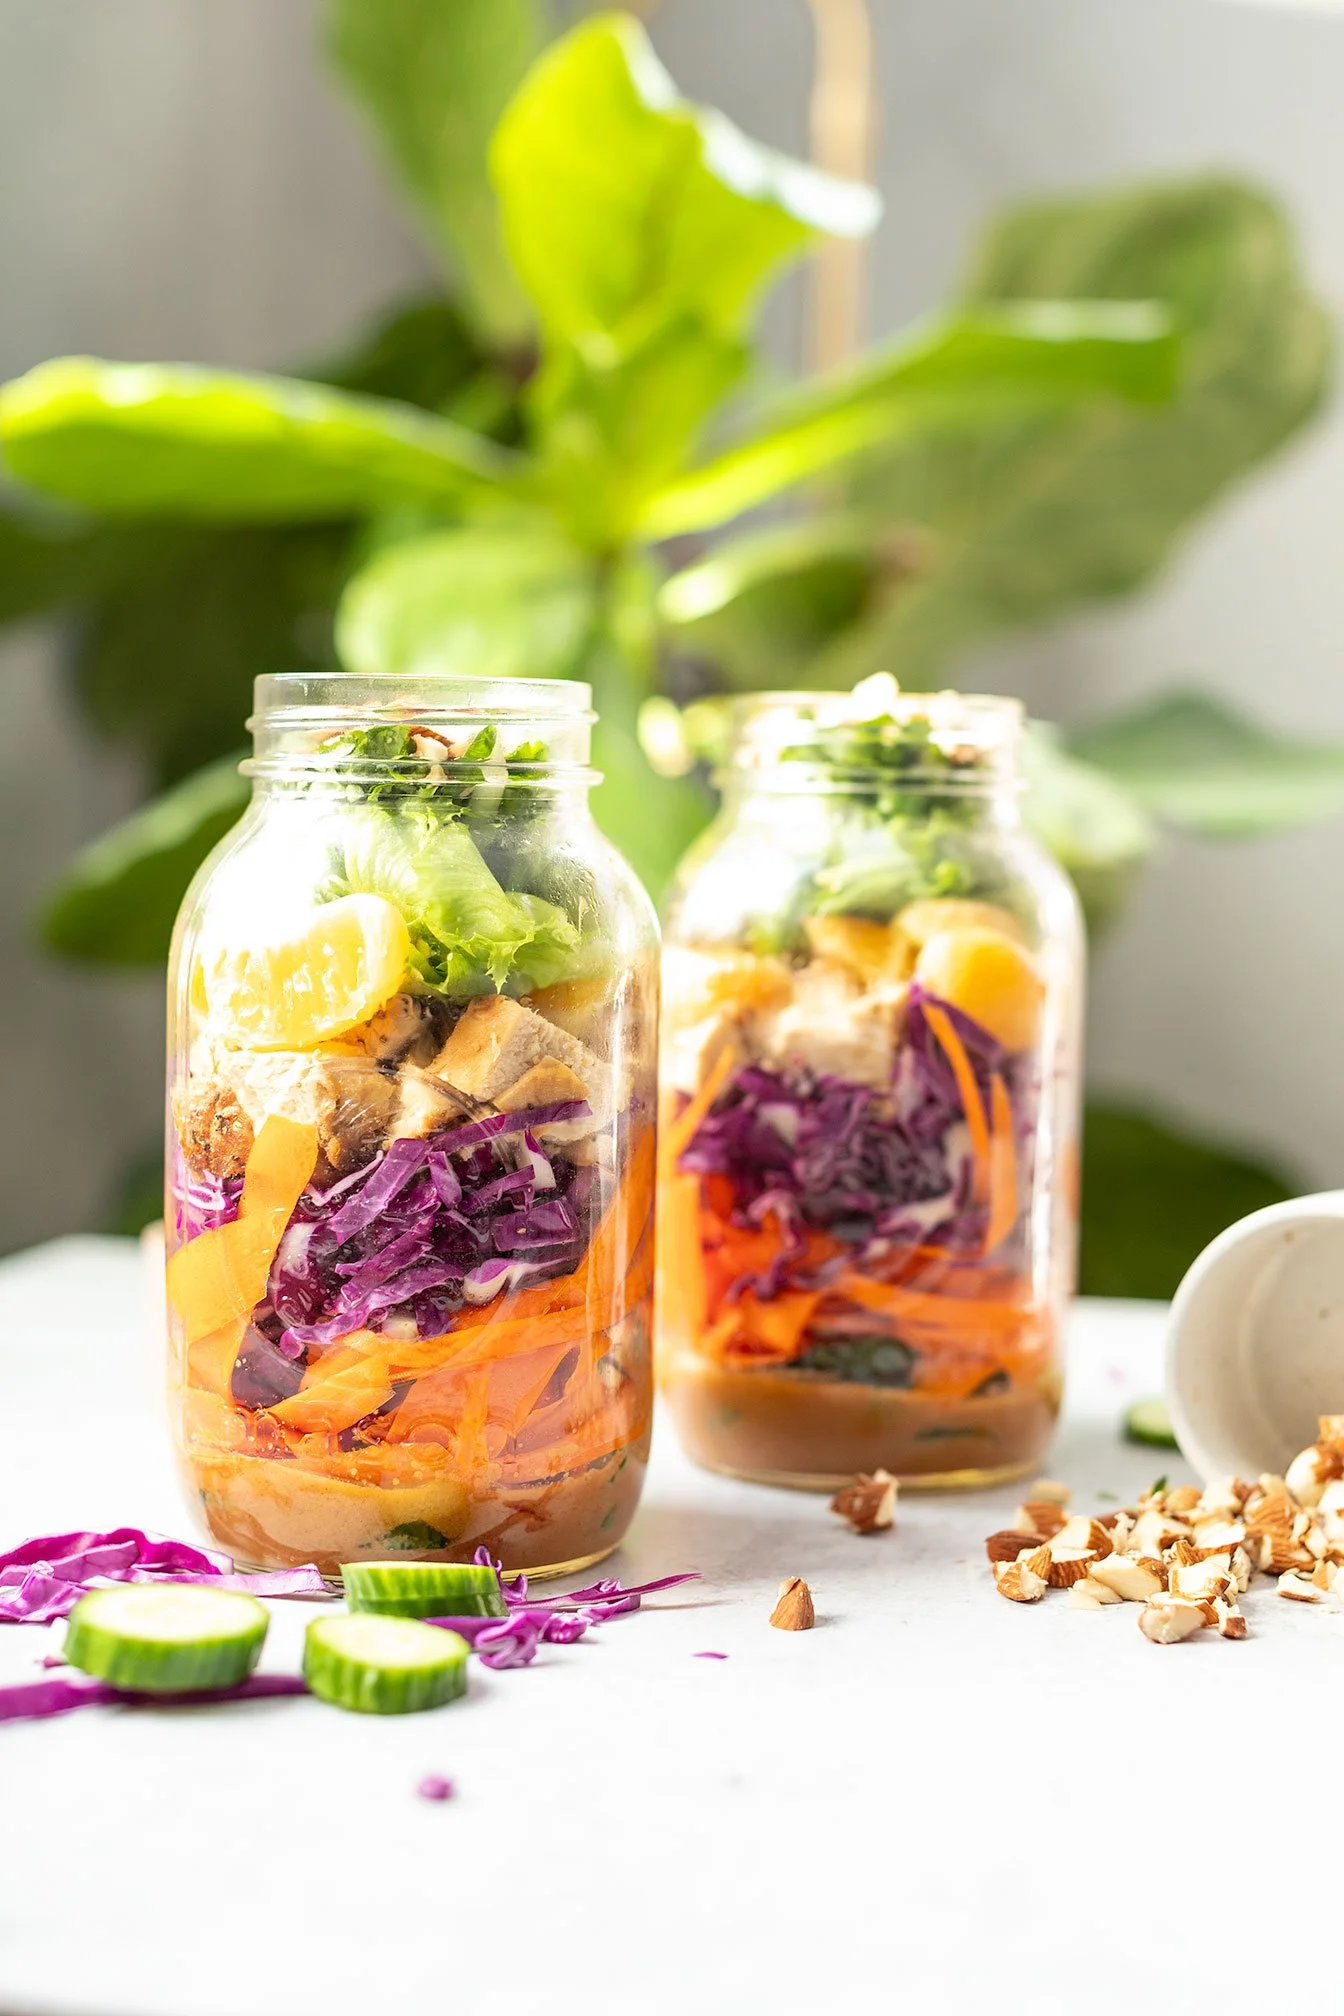
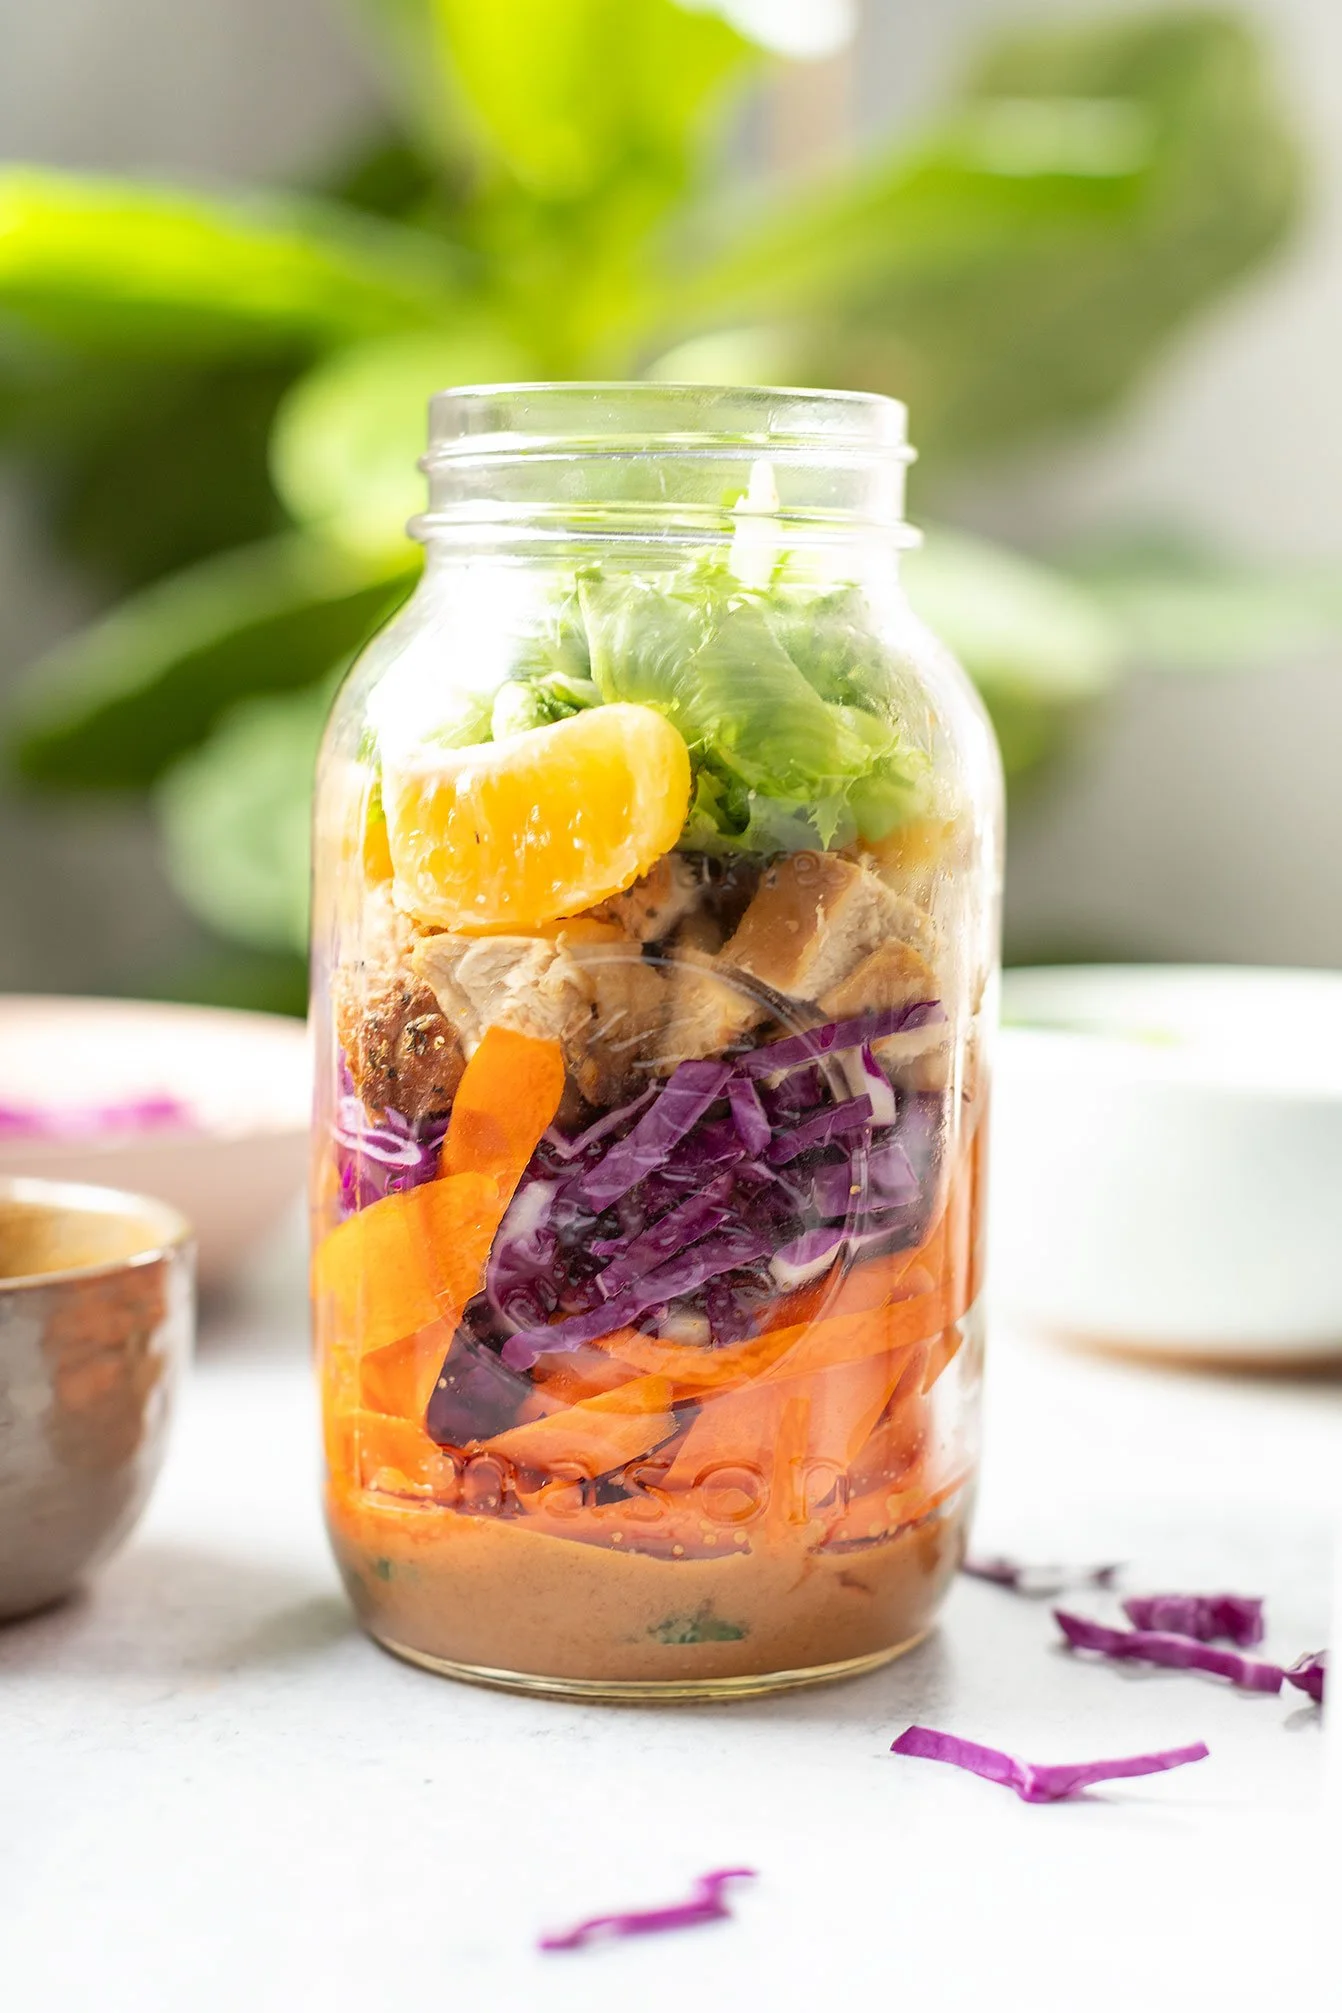
These healthy, delicious, and portable asian mason jar salads are made with chicken, mixed greens, cucumbers, cabbage, oranges, shredded carrots or the raw carrot salad (hormone balancing), green onions, cilantro, crushed peanuts with a peanut sauce dressing!
These healthy, delicious, and portable asian mason jar salads are made with chicken, mixed greens, cucumbers, cabbage, oranges, shredded carrots or the raw carrot salad (hormone balancing), green onions, cilantro, crushed peanuts with a peanut sauce dressing!

Mason Jar salads
I never realized I hadn't shared a single mason jar salad recipe on the blog! Back when I was in the corporate world, I used to enjoy these salads regularly, and I had forgotten how simple, versatile, and delicious they can be!
Given my fondness for Asian cuisine, I thought it fitting to make my first mason jar salad an Asian-inspired one.
For those who are part of the Nourished Roots Membership Program, you might recognize this recipe from the January 2024 Meal Prep Guide! If you're not yet a member, sign up today to access more exclusive recipes like this one that may not be featured on the public website!

Tips for assembling Asian mason jar salads:
The key to these jars is layering them correctly so that you can prep your salads in advance without them becoming soggy.
Start by adding your liquids at the bottom and layering your ingredients accordingly. For instance, place the dressing at the bottom and layer your fruits and vegetables from the sturdiest to the most delicate.
Refer to the images below for a visual guide on how to layer each ingredient!


Can I include other ingredients?
Absolutely! These salad jars can be enhanced with different protein sources like marinated pork, turkey, or chickpeas. You can also incorporate grains such as brown rice or quinoa. If you decide to add a grain, place it closer to the dressing layer at the bottom of the jar as they are heartier toppings.

If you try this recipe, let us know! Leave a comment, rate it, and don’t forget to tag a photo to #fromtherootsblog on Instagram. We love seeing what you come up with!
These healthy, delicious, and portable asian mason jar salads are made with chicken, mixed greens, cucumbers, cabbage, oranges, shredded carrots or the raw carrot salad (hormone balancing), green onions, cilantro, crushed peanuts with a peanut sauce dressing!
Servings: 4 | Prep Time: 15 min | Cook Time: 15 min
Ingredients
Mason jar salads
1 lb chicken breast (see below) (1/4 lb per jar)
8 cups mixed greens (2 cups/jar)
1/2 cup diced cucumbers (2 Tbsp/jar)
1 cup shredded red cabbage (1/4 cup/jar)
4 cuties, peeled
1/2 cup shredded carrots or raw carrot salad (2 Tbsp/jar)
Garnish: green onions, cilantro, crushed nuts like peanuts
Chicken Marinade
1 lb chicken breast
1/3 cup coconut aminos or teriyaki sauce
1 tsp garlic powder and S+P
Peanut Sauce
1/4 cup peanut butter
1/4 cup coconut aminos or tamari/soy sauce
1-2 tsp sriracha
2 Tbsp rice vinegar
1/4 tsp ground ginger
1/4 tsp garlic powder
Juice 1/2 orange
1-2 Tbsp warm water
S+P
Directions
Marinate chicken first by seasoning chicken generously with S+P, garlic powder and adding sauce in a Ziploc bag with chicken. Massage chicken in juices, sealed and place in fridge to marinate for 30 min or overnight.
Prepare the rest of the mason jar toppings.
Make the dressing: In a bowl, prepare the dressing by adding in everything. Mix well until combined. May use 1-2 Tbsp warm water to adjust thickness of sauce.
Bake chicken or on stove top as desired.
Assemble: Start with a layer of peanut sauce (~2 Tbsp per jar). Follow with layers of cucumbers, carrots, red cabbage, diced chicken, orange slices, greens and garnish with green onions, cilantro, crushed peanuts.
Store: Seal the mason jars with lids and refrigerate until ready to eat. When ready, add everything to a bowl and mix. store in fridge no more than 4 days.
Notes
*Feel free to add more or less of each ingredient to each salad jar.

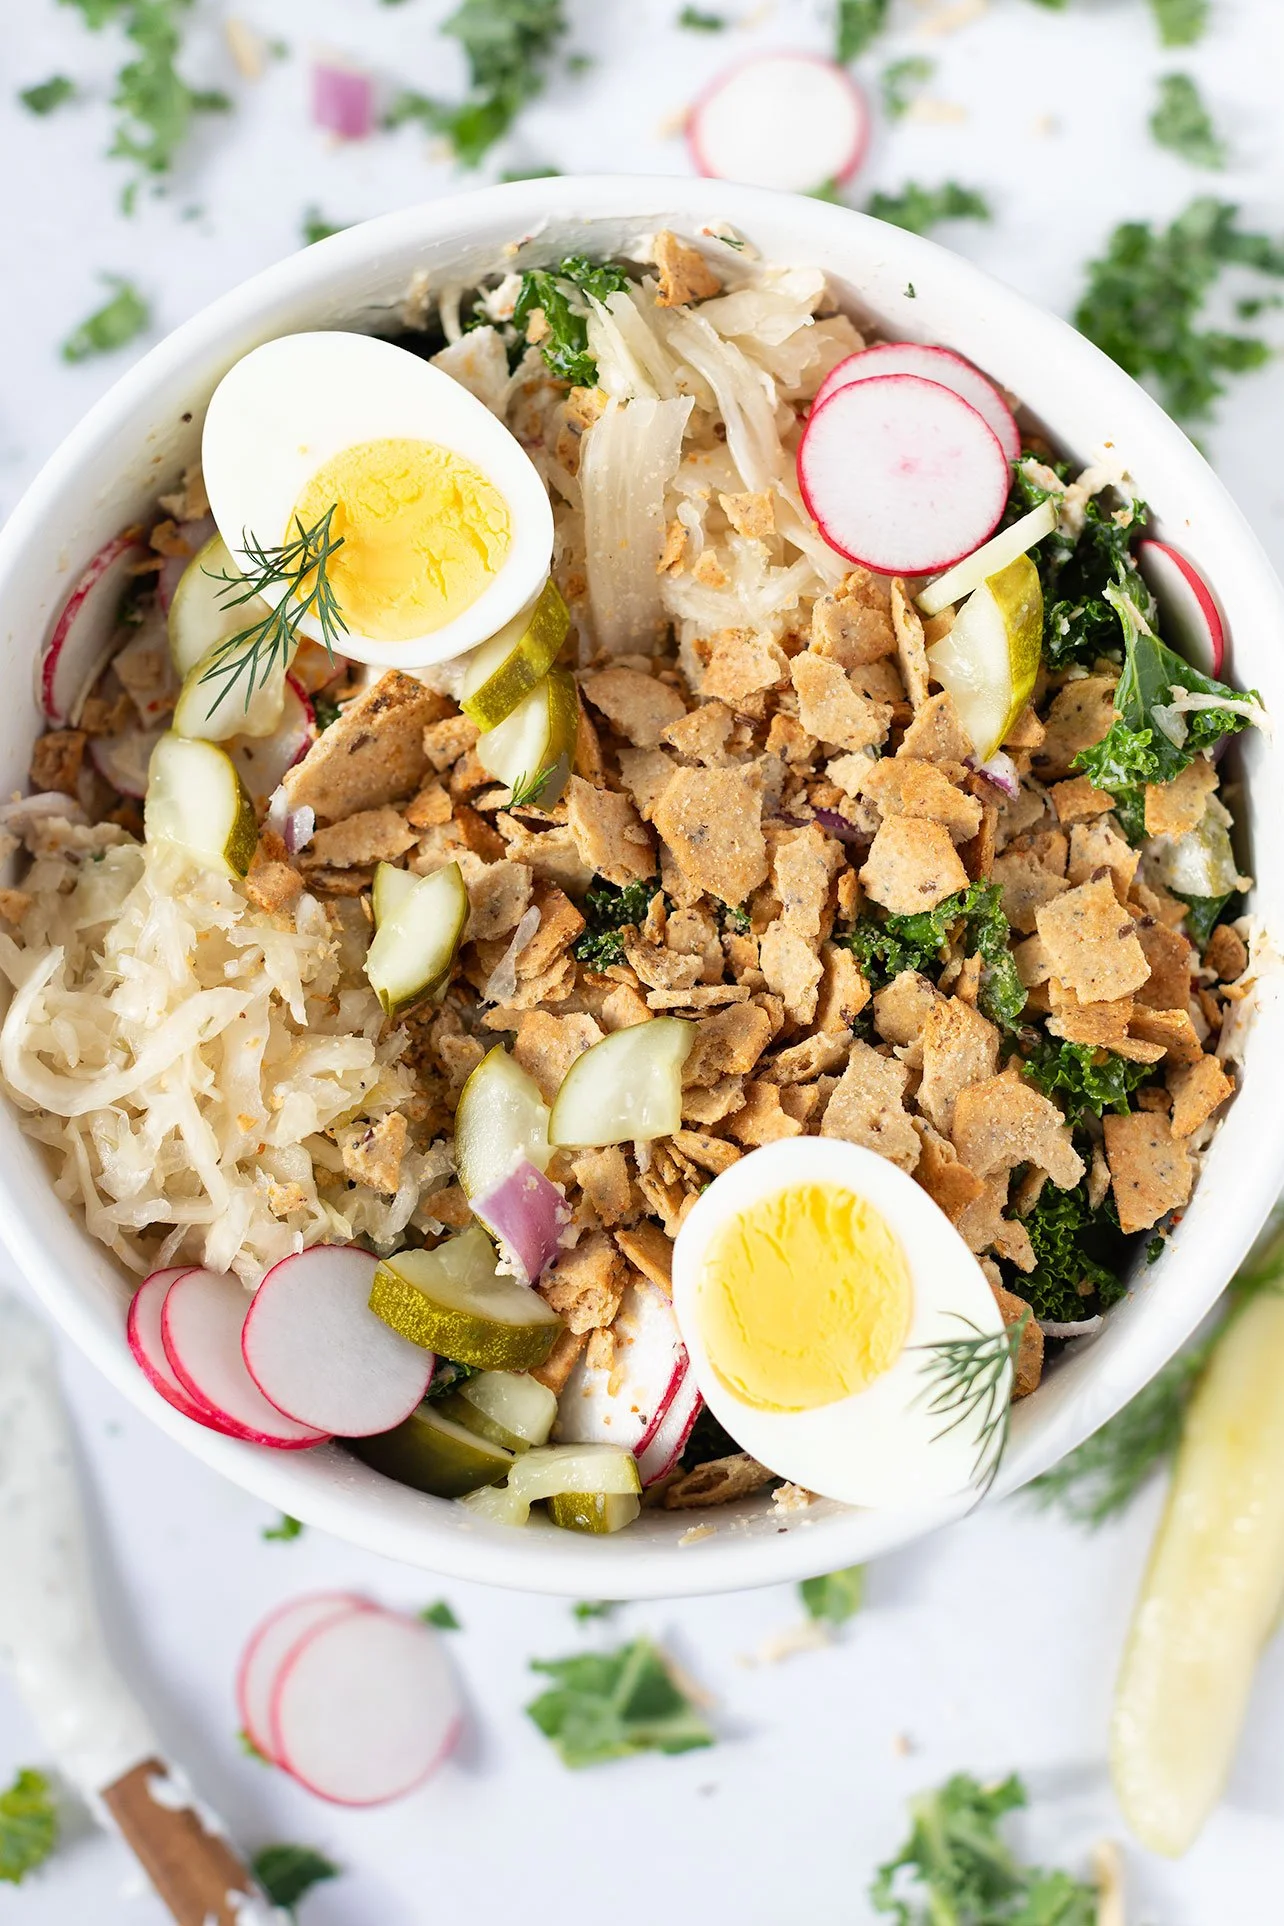
Dill Pickle Salad
This simple and nutritious chicken salad recipe incorporates diced dill pickles and pickle juice for a burst of flavor. Perfect for preparing in advance or for meal prepping lunches, it's a tasty way to utilize leftover cooked chicken.
This simple and nutritious chicken salad recipe incorporates diced dill pickles and pickle juice for a burst of flavor. Perfect for preparing in advance or for meal prepping lunches, it's a tasty way to utilize leftover cooked chicken.

If you have a fondness for pickles, you're in for a treat! Inspired by the Trader Joe's Dill-icious Chopped Salad Kit, I created a healthier version.
The salad showcases the tangy and salty essence of dill pickles, both in the garnish and the salad dressing. For an extra twist, consider adding dill-based sauerkraut such as Wildbrine or opt for a wholesome pickle chip brand like Siete Foods.
Interested in more effortless meal prep lunch ideas?
Dill pickle salad is a speedy dish, taking only 25 minutes from start to finish.
Rich in gut-friendly probiotics, high in protein, and low in carbs.
A convenient method to use up leftover batch-cooked chicken or rotisserie chicken.
The pickle flavor will leave you craving more!

GUT-FRIENDLY MEAL ADVANTAGES
To enhance your beneficial bacteria levels, this meal is part of a seven-day meal plan that emphasizes foods promoting healthy gut bacteria growth and maintenance.
You can access this meal plan through the Nourished Roots Membership Plan! Here's the direct link for access!
Check out the fun meal prep hacks in the video below!
If you try this recipe, let us know! Leave a comment, rate it, and don’t forget to tag a photo to #fromtherootsblog on Instagram. We love seeing what you come up with!
This simple and nutritious chicken salad recipe incorporates diced dill pickles and pickle juice for a burst of flavor. Perfect for preparing in advance or for meal prepping lunches, it's a tasty way to utilize leftover cooked chicken.
SERVINGS: 4 PREP TIME: 15 MIN COOK TIME: 25 MIN
Ingredients
SALAD BASE
3 cups shredded chicken (can use rotisserie)
4 cups massaged kale
1 cup dill pickles, chopped
1/2 cup radishes, sliced
2-4 hard boiled eggs
1-2 cups crushed crackers
1 cup sauerkraut (optional)
SALAD DRESSING
1 cup plain greek yogurt
2-4 Tbsp pickle brine
1 Tbsp dill weed (can take from dill container)
1 tsp garlic powder
1/2 tsp maple syrup
S+P (to season)
Directions:
To make dressing: In a small bowl, mix all ingredients until combined. Taste test to see if you need to add more seasoning, acid, or more pickle chunks!
To assemble the salad, combine all vegetable ingredients from SALAD BASE to a large mixing bowl and toss to combine well. Add in dressing and breadcrumbs and toss and garnish with quartered or halved eggs, serve and enjoy!
*To make hardboiled eggs: Place eggs in a small pot. Cover eggs with water and cover pot with lid. Bring water to boil. Once boiling, turn off and set a timer for 12-14 min. When done, drain and place eggs in an ice cold water bath to stop the cooking process. Peel the shells off once cool to touch.
Notes: I use this brand crackers so that this recipe is gluten and grain free!

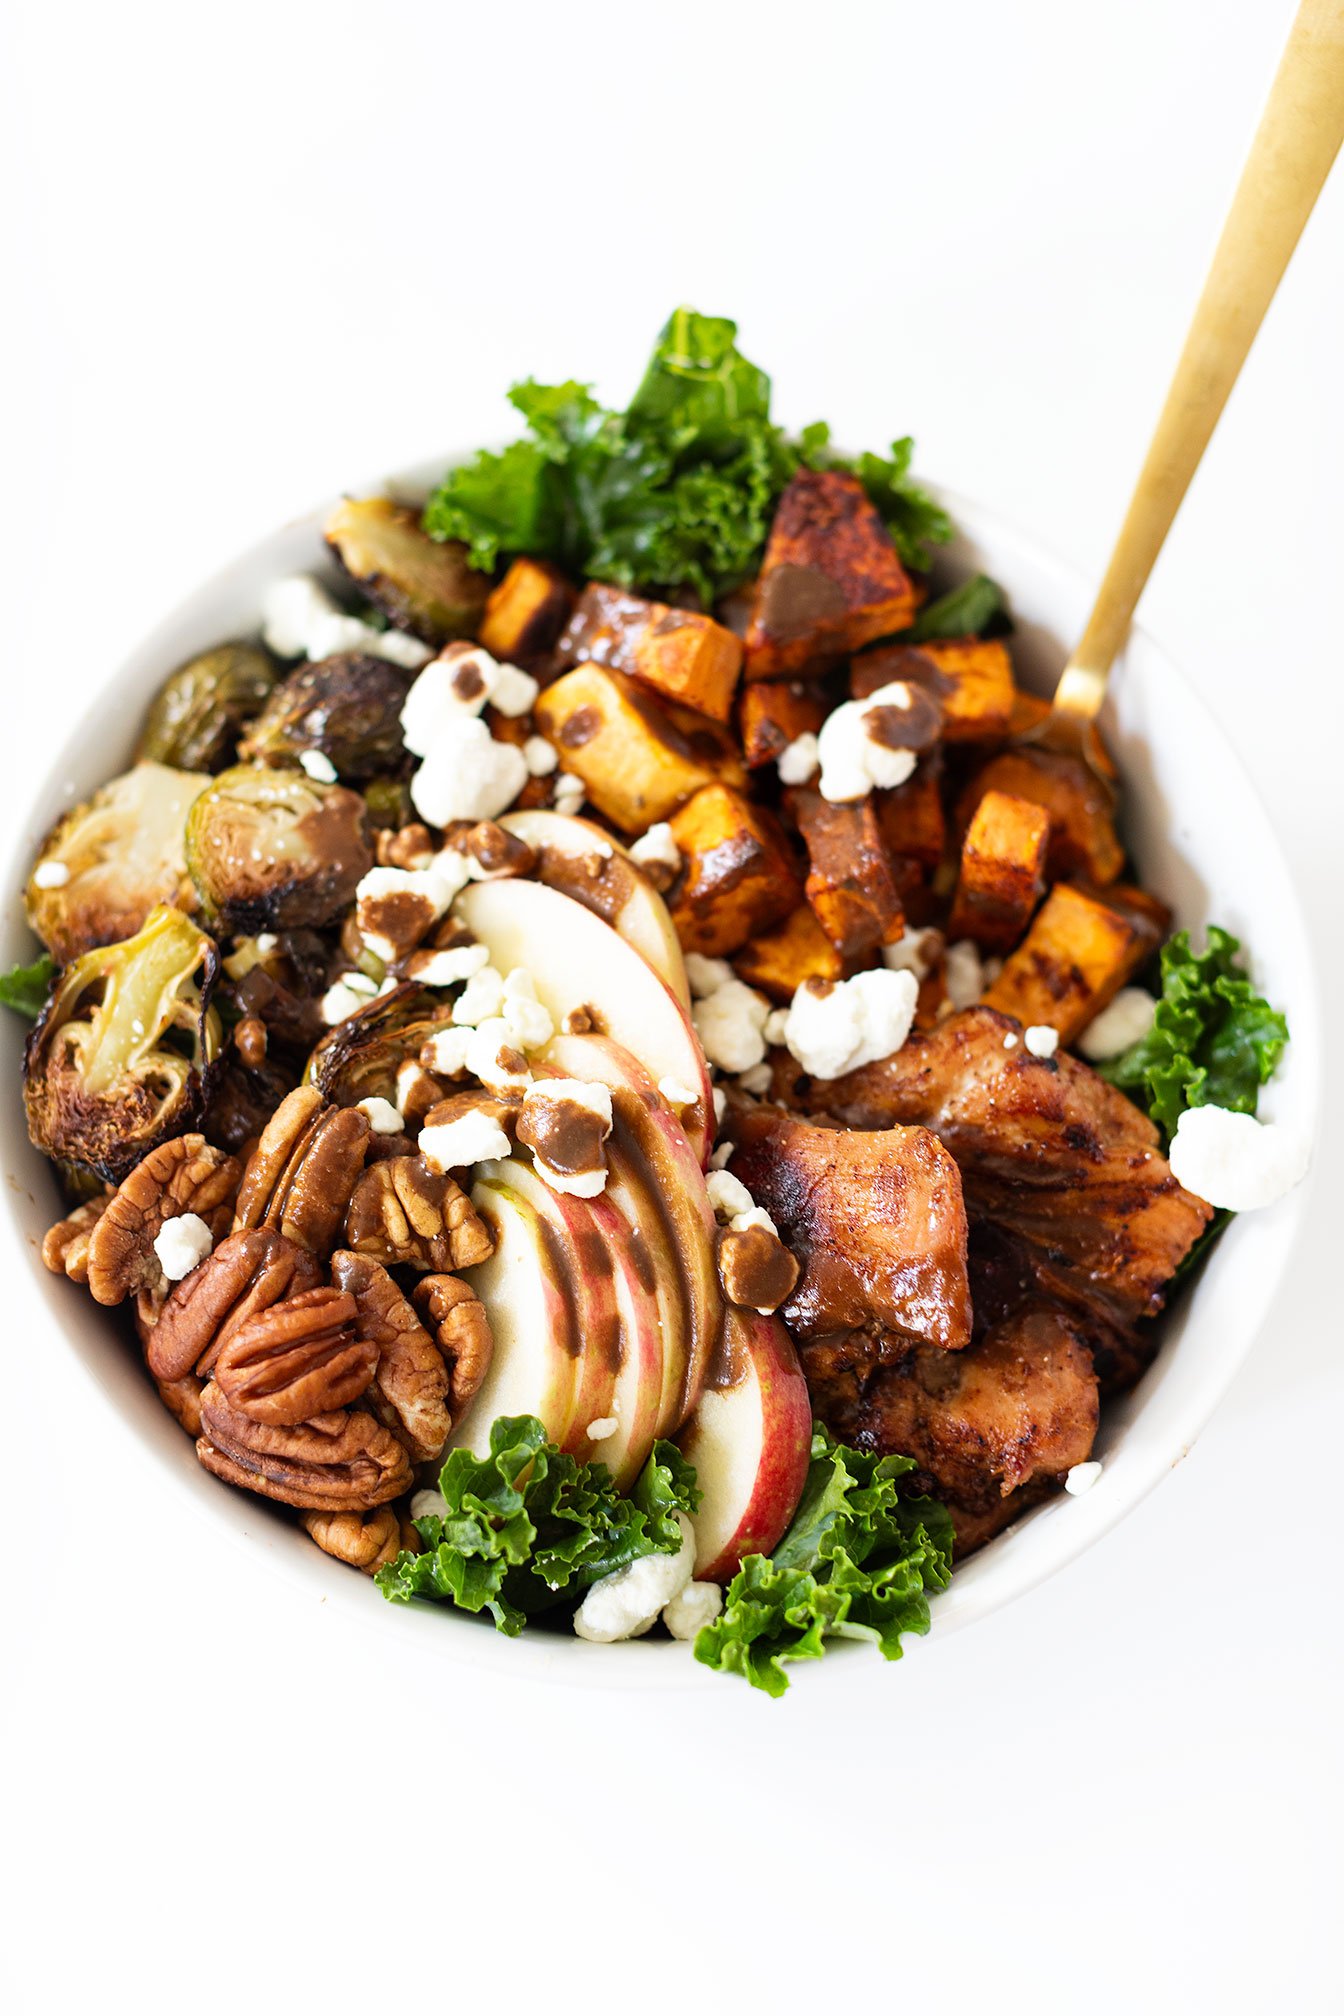
Chicken Harvest Bowl
Chicken Harvest Bowls with juicy marinated chicken thighs, roasted brussels sprouts and sweet potato, massaged kale, goat cheese, pecans, apple and a creamy balsamic dressing.
This harvest bowl is packed with delicious fall flavor influences that is perfect for a healthy lunch meal prep option or dinner. Gluten-free, grain-free, macro balanced and dairy-free friendly.
Chicken Harvest Bowl with juicy marinated chicken thighs, roasted Brussels sprouts and sweet potato, massaged kale, goat cheese, pecans, apple and a creamy balsamic dressing.


This harvest bowl is packed with delicious fall flavor influences that is perfect for a healthy lunch meal prep option or dinner. Gluten-free, grain-free, macro balanced and dairy-free friendly.
If you know anything about me, you know that nourish bowls are my favorite! From the Nourished Cookbook to the Nourishment Program - I absolutely love the art of batch cooking.

If you can allocate one or two days out of your week to prepare batch cook items, you will have the freedom to create different meals so that you won’t have to eat the same meal twice if you don’t want to! How fun and easy is that?!
With that said, here is a fall inspired nourish bowl that you can create for lunch meal prep or for dinner!
Chicken harvest bowl components based on the Six Senses Nourish Meal Template from The Nourishment Program:
Starchy + sugary carbs: sweet potatoes, honey, apple
Non starchy carbs: massaged kale, brussels sprouts
Protein: Chicken thighs + pecans + goat cheese
Fat: oil, chicken thighs, goat cheese, nut butter
Flavor: seasonings galore! Coconut aminos (or teriyaki sauce)
Probiotics: balsamic vinegar
If you try this recipe, let us know! Leave a comment, rate it, and don’t forget to tag a photo to #fromtherootsblog on Instagram. We love seeing what you come up with!
Chicken Harvest Bowl with juicy marinated chicken thighs, roasted Brussels sprouts and sweet potato, massaged kale, goat cheese, pecans, apple and a creamy balsamic dressing.
SERVINGS: 4 | PREP TIME: 15 MIN | COOK TIME: 45 MIN
Ingredients
Chicken marinade
1 lb chicken thighs
1/3 cup coconut aminos or teriyaki sauce
1 tsp garlic powder
S&P
Sweet potatoes
2-4 sweet potatoes, cubed
1 tsp each smoked paprika & garlic powder
dash of cinnamon
1 Tbsp oil
Brussels sprouts
1 lb brussels sprouts
1 tsp garlic powder
1 Tbsp oil
Balsamic dressing
1/4 cup balsamic vinegar
2 Tbsp nut butter
1-2 Tbsp water
1 Tbsp honey
S&P
Bowl components
1/2 cup pecans
1/2 cup goat cheese
1 large apple
massaged kale or regular leafy greens
Directions
Marinate your chicken first by seasoning chicken thighs generously with S&P. Mix marinade ingredients in a Ziploc bag and transfer chicken to the bag. Seal bag, massage chicken in juices while sealed and place in the fridge to marinate for 30 min or up to 8 hrs.
Preheat the oven to 400 degrees and line a large baking sheet with parchment paper.
Add diced sweet potatoes in seasoning mixture and halved Brussels sprouts in seasoning mixture on baking sheet. Toss in oil and roast in the oven for 35-45 min until tender.
You can either roast chicken thighs in the oven at the same time and on a different baking sheet or grill / cook in a skillet.
To make dressing: add the balsamic vinegar, nut butter, salt, honey and 1 Tbsp water to a small mason jar. Shake vigorously and add more water if you want a thinner consistency.
Prep the remaining ingredients: dice the apple, crumble goat cheese, roughly chop pecans and follow massaged kale recipe if not using leafy greens.
Assembly! Evenly divide the greens, chicken, roasted veggies, apples, goat cheese and nuts. Serve with creamy balsamic dressing and enjoy!

Healthy Crispy Chicken Salad
The biggest game changer for this recipe is the crispy chicken! I honestly should make a post on its own because once you master the cooking and preparing method, you will never look at chicken the same!
To make a mouthwatering, juicy chicken:
Slice the chicken breast halfway through in a crisscross pattern. You can use chopsticks on both sides as a guide to not cut completely through the chicken.
This allows the chicken to absorb the marinade, sauce, and seasonings when cooking as well as making the chicken get cooked evenly and quickly.
Healthy crispy chicken salad with ranch dressing is an easy and healthy take on the classic fried chicken salads. It’s gluten-free, dairy-free, air fried or baked - not deep fried, and full of protein, veggies and healthy fats!

The biggest game changer for this recipe is the crispy chicken! I honestly should make a post on its own because once you master the cooking and preparing method, you will never look at chicken the same!


To make a mouthwatering, juicy chicken:
Slice the chicken breast halfway through in a crisscross pattern. You can use chopsticks on both sides as a guide to not cut completely through the chicken.
This allows the chicken to absorb the marinade, sauce, and seasonings when cooking as well as making the chicken get cooked evenly and quickly.


It’s that easy! And what is more easy, is preparing this salad! If you grew up in the south like I did, you know the chicken frying method by memory. But for this recipe, you are tweaking it using gluten free alternatives with a healthy fat focus and using the air fryer or baking method - whichever you prefer.


I also want to mention that if you are following the Nourishment Program, you will see that this crispy chicken salad is considered a Six Senses Nourish Meal!
Six Senses Nourish Components:
Non-starchy carbs | lettuce, corn, carrots, tomatoes
Starchy carbs | chicken breading
Protein | chicken breast, pork rind
Fats | chicken, pork rind, avocado, dressing
Probiotics | pickled red onions
Flavor | herbs, seasonings on chicken and in dressing
If you would like more information on how to build more six senses nourish meals and why it’s an easy and seamless way of getting nutrient dense, whole foods into your diet, then check out the Nourishment Program for more information!

If you try this recipe, let us know! Leave a comment, rate it, and don’t forget to tag a photo to #fromtherootsblog on Instagram. We love seeing what you come up with!
Healthy crispy chicken salad with ranch dressing is an easy and healthy take on the classic fried chicken salads. It’s gluten-free, dairy-free, air fried or baked - not deep fried, and full of protein, veggies and healthy fats!
Servings: 4 | Prep Time: 15 min | Cook Time: 6 min
Ingredients
For the chicken
1 lb chicken breasts or tenderloins
2 large eggs
¼ cup plant based or milk
1 cup pork rind bread crumbs
½ cup GF baking flour
1 Tbsp of your go-to spicy or chicken seasoning
1 tsp salt
Avocado oil spray
For the ranch dressing
½ cup mayo (primal kitchen, chosen brand)
1 tsp fresh or dried dill
1 tsp fresh or dried parsley
1 tsp fresh lemon juice
½ tsp garlic powder
¼ tsp mustard powder
S+P
For the salad
6 cups romaine lettuce, chopped
½ cup pickled red onions
1-2 avocado, sliced or chopped
1 cup shredded carrots
1 cup corn
1 cup cherry tomatoes, halved
For the pickled onions:
½ red onion (thinly sliced)
½ cup apple cider vinegar (with the mother)
1 tsp fine sea salt
½ Tbsp pure maple syrup
Filtered water
Directions
Start with making the crispy chicken! Pat the chicken dry with a paper towel and make diagonal slices. You can use chopsticks on both sides of the chicken to make sure you are not cutting straight through to the bottom. (look at IG reel or description above). Sprinkle salt and your go-to seasoning on both sides of the chicken - making sure you are massaging the seasonings in the diagonal cuts. In a small bowl, whisk the eggs and milk until combined. In a separate bowl or plate, whisk the panko, flour, and seasonings. If using an air fryer, make sure you have it preheated. Now, you are ready to dip a chicken breast or tenderloin in the egg wash, and then in the dry mixture - making sure you are getting in the crannies of the chicken! Shake off any excess flour mixture and place in the air fryer rack. Repeat. Once your rack is full, but not cramped - spray avocado oil spray and cook for 400 degrees 4-6 min (flipping halfway). Lightly sprinkle with sea salt and set aside.
To make the dressing, add all the ingredients to a small dish and whisk until smooth. Place in the fridge until ready to serve.
To make the pickled onions, combine all ingredients into a mason jar and refrigerate for up to 2 weeks. If you want them to pickle faster, heat vinegar, salt, maple syrup and 1 cup filtered water over medium high heat until fully dissolved. Pour liquid mixture over the sliced onions in a sealed container (mason jar). Seal and shake the jar a few times and let sit for at least 20 min for onions to pickle.
While your chicken is cooking, prep the rest of the salad. Add the lettuce to a large bowl and top with sliced avocados, carrots, pickled onions, cherry tomatoes, corn and additional toppings. Place the chicken breast or tenderloins on top of the salad and serve with prepared dressing. *What’s great about preparing the chicken in this way - you don’t have to pre-cut! You just fork off a bite size chicken piece and that’s it!