Sort by Category
- August 2025
- June 2025
- August 2024
- July 2024
- June 2024
- May 2024
- February 2024
- January 2024
- December 2023
- November 2023
- October 2023
- September 2023
- August 2023
- July 2023
- March 2023
- February 2023
- January 2023
- December 2022
- November 2022
- October 2022
- September 2022
- August 2022
- June 2022
- May 2022
- April 2022
- March 2022
- February 2022
- January 2022
- December 2021
- November 2021
- October 2021
- September 2021
- August 2021
- July 2021
- June 2021
- May 2021
- April 2021
- March 2021
- February 2021
- January 2021
- December 2020
- November 2020
- October 2020
- September 2020
- August 2020
- July 2020
- June 2020
- May 2020
- April 2020
- March 2020
- February 2020
- January 2020
- December 2019
- November 2019
- October 2019
- September 2019
- August 2019
- July 2019
- June 2019
- May 2019
- April 2019
- March 2019
- February 2019
- January 2019
- December 2018
- November 2018
- October 2018
- September 2018
- August 2018
- July 2018
- June 2018
- May 2018
- April 2018
- March 2018
- February 2018

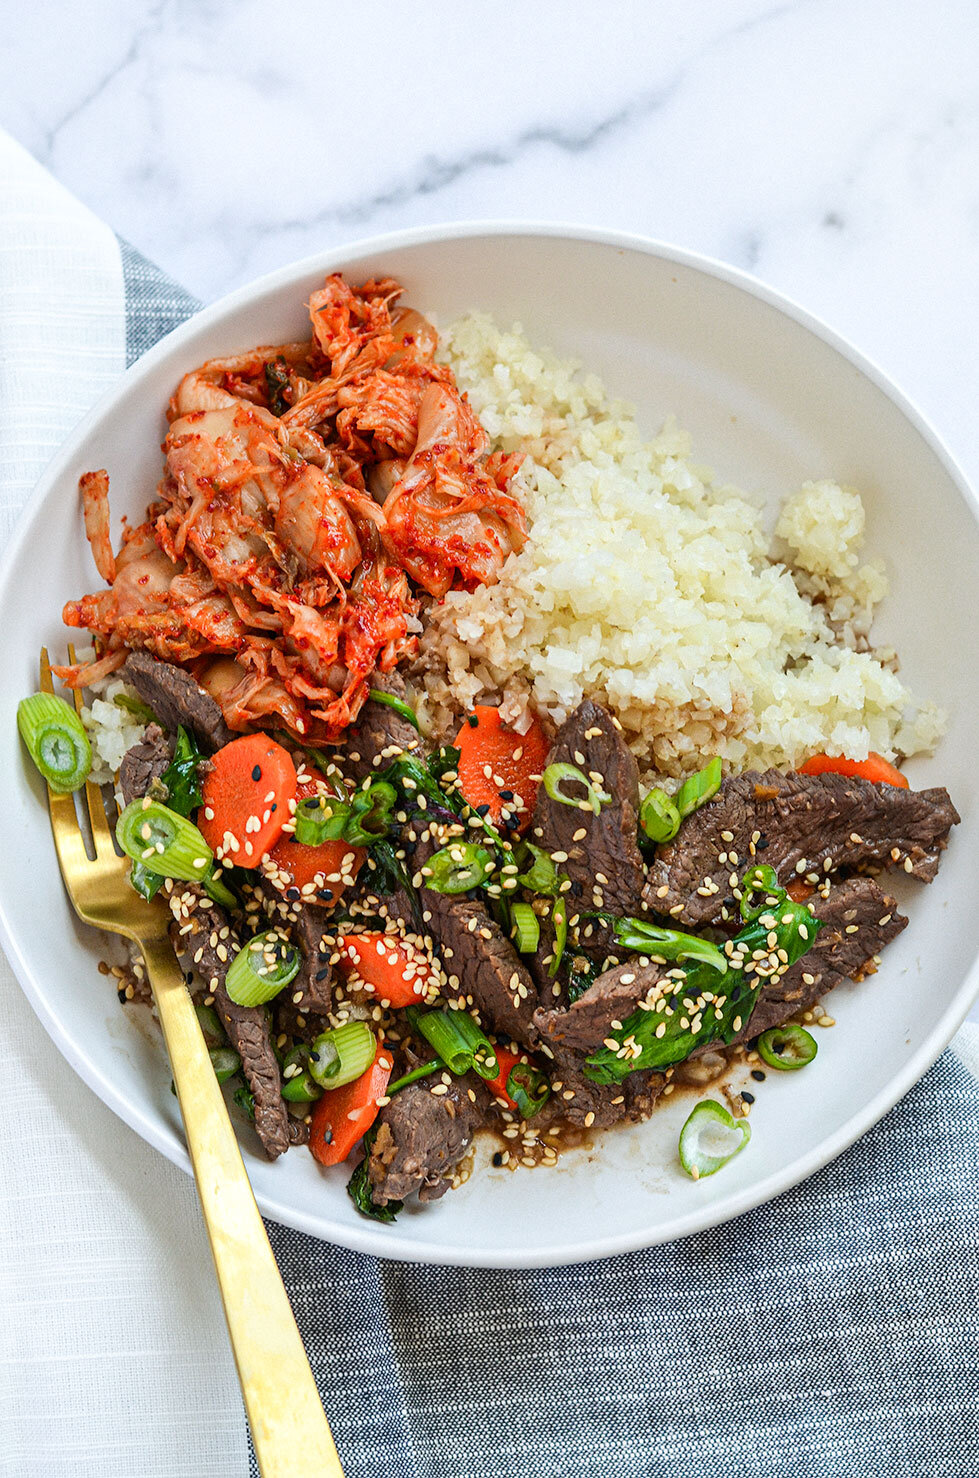
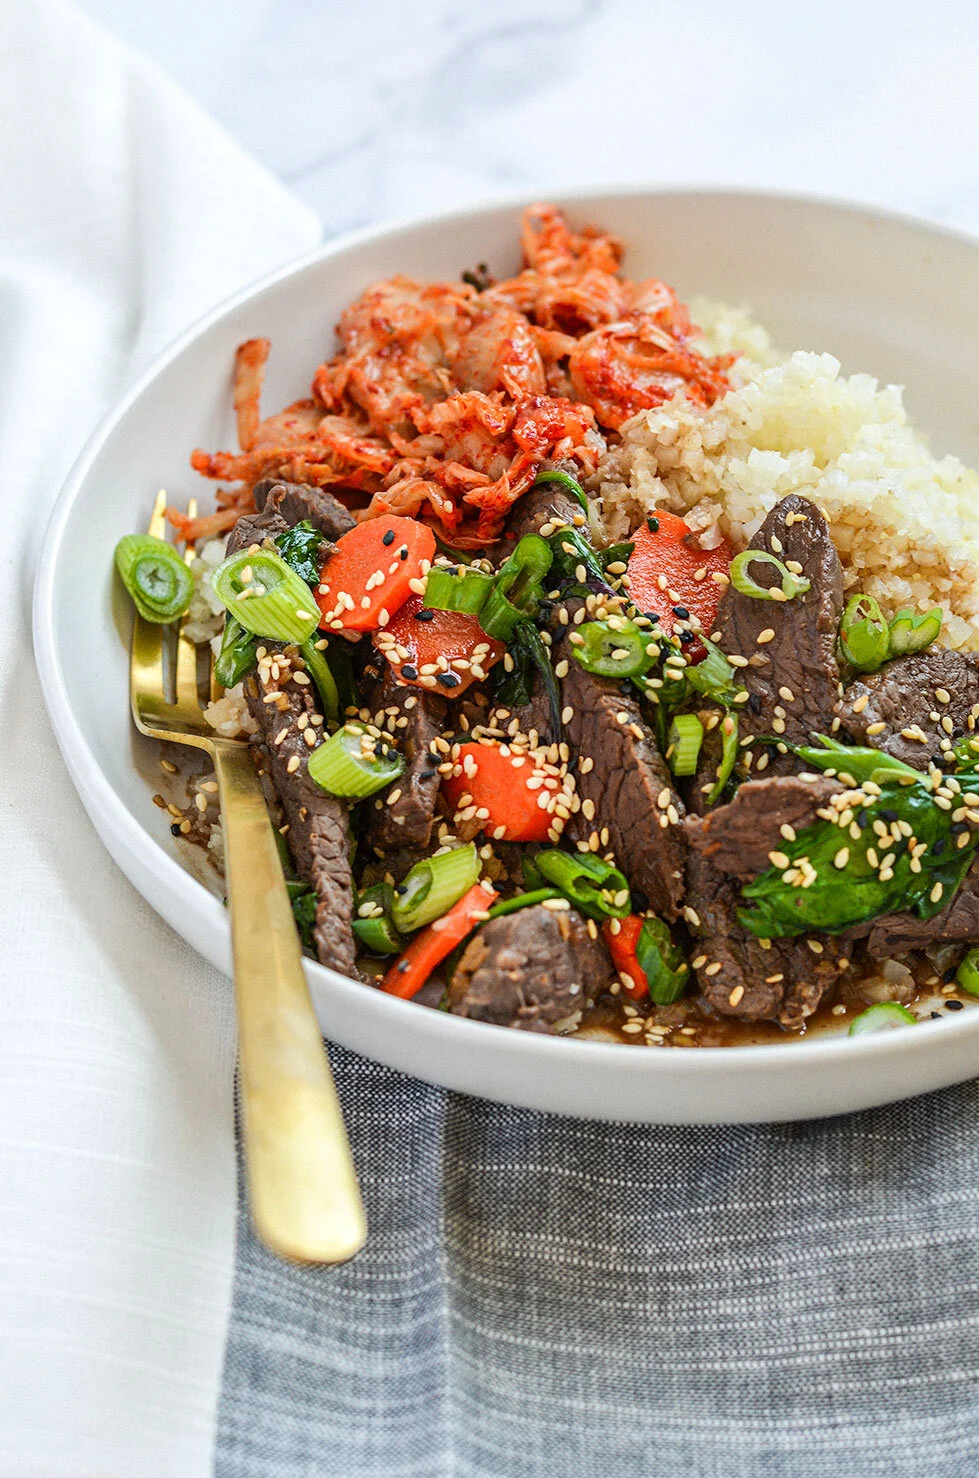
Beef Bulgogi Bowls
If you are wanting something quick and easy to make on your #sundaymealprep days, then look no further! For this recipe, you are simply creating a marinade with ingredients that most would have in their pantry and allow your protein to marinate as you assemble the add-ins for your bowl!
If you notice in the add-in ingredients, there is hardly any prep to this meal! For example, I like to use pre-washed organic spinach, this brand kimchi, and frozen cauliflower rice! That’s pretty much it!
Beef Bulgogi Bowls - A simple and nutritious low carb/high protein lunch meal prep!

Originally, I created this recipe for Emily Schromm’s April edition of Empress but since most of my followers want more meal prep recipes, you are getting this recipe, too!

If you are wanting something quick and easy to make on your #sundaymealprep days, then look no further! For this recipe, you are simply creating a marinade with ingredients that most would have in their pantry and allow your protein to marinate as you assemble the add-ins for your bowl!
If you notice in the add-in ingredients, there is hardly any prep to this meal! For example, I like to use pre-washed organic spinach, this brand kimchi, and frozen cauliflower rice! That’s pretty much it!
Now, let’s get to the recipe!
If you try this recipe, let us know! Leave a comment, rate it, and don’t forget to tag a photo to #fromtherootsblog on Instagram. We love seeing what you come up with!
Beef Bulgogi Bowls - A simple and nutritious low carb/high protein lunch meal prep!
Ingredients
Marinade
1.5 lb flank steak (can sub skirt or sirloin steak)
½ pear
¼ cup coconut aminos
3 cloves garlic
1 Tbsp fresh ginger knob
1 Tbsp toasted sesame seed oil
1 tsp liquid smoke
Add-ins
2 heaping cups spinach
1 cup carrots (chopped)
For assembling the bowls
3 cups cauliflower rice
1 cup kimchi
4 fried free-range eggs
Green onions
Sesame seeds
Directions
In a blender or processor, add the pear, coconut aminos, garlic, ginger, oil, and liquid smoke. Add blended ingredients to a large bowl. *If you do not have a blender, finely chop pear, garlic, and ginger and whisk all marinade ingredients in a large bowl.
Add the sliced beef to the bowl with the marinade and toss to combine. Cover and refrigerate the beef for a minimum of two hours and up to overnight.
When you are ready to cook the steak, heat 1 Tbsp oil in a skillet over medium heat. Add the beef strips and chopped carrots into the skillet. Pour in any remaining marinade also. Cook the beef and carrots, stirring occasionally until all of the marinade juices thicken and begin to caramelize. The beef will be coated with the sauce and will absorb all of the sauce flavors.
Cook for about 10-15 minutes or once the sauce has cooked down enough so it is just coating the meat pieces and the carrots are soft. For the last five minutes, add the spinach.
Assemble the bowls: Divide the rice among four serving bowls and top it with the beef bulgogi. Top each bowl with a fried egg (optional), a portion of kimchi, and garnish with green onions and sesame seeds.
Notes
If you are strictly paleo, you can sub out the sesame seed oil for avocado oil.
This recipe is great for meal prep - if you are wanting to add an egg to your meal, simply fry an egg in the morning or boil an egg beforehand for an easier way to pack your lunch!

Chicken Lettuce Wraps
I tried so hard not to create a copycat PF Chang’s lettuce wrap recipe, but in the end, I have done exactly that. I know, sounds cliche and basic, but I can’t hide the truth.
This recipe has a total of just three easy steps and takes less than 30 minutes to make.
Step 1: Brown the ground chicken
Step 2: Prepare a marinade to drizzle over browned chicken and veggies.
Step 3: Make the most delicious almond butter sauce known to man.
If you are concerned with your sodium intake, I have a great alternative -- I use liquid aminos. If you are not familiar with liquid aminos, it’s a vegetable protein from soybeans.
Chicken lettuce wraps - made with an almond butter sauce that is full of flavor and lower in sodium! Gluten-free, dairy-free, and paleo friendly!

I tried so hard not to create a copycat PF Chang’s lettuce wrap recipe, but in the end, I have done exactly that. I know, sounds cliche and basic, but I can’t hide the truth.
This recipe has a total of just three easy steps and takes less than 30 minutes to make.
Step 1: Brown the ground chicken
Step 2: Prepare a marinade to drizzle over browned chicken and veggies.
Step 3: Make the most delicious almond butter sauce known to man.
If you are concerned with your sodium intake, I have a great alternative -- I use liquid aminos. If you are not familiar with liquid aminos, it’s a vegetable protein from soybeans.

If soy is an issue for you then e coconut aminos is a great substitution. Coconut aminos is a soy-free alternative to soy sauce. There are only two ingredients to this condiment: coconut tree sap and salt. It’s popular in the paleo community and significantly lower in sodium than tamari or soy sauce.

Both options are lower in sodium, just remember that coconut aminos will have a coconut undertone.

Let’s get to the recipe! Btw, this recipe is very macro friendly so if you need me to provide the macros, please let me know.
If you try this recipe, let us know! Leave a comment, rate it, and don’t forget to tag a photo to #fromtherootsblog on Instagram. We love seeing what you come up with!
Chicken lettuce wraps - made with an almond butter sauce that is full of flavor and lower in sodium! Gluten-free, dairy-free, and paleo friendly!
Ingredients
1 lb ground chicken
1 can 8 oz water chestnuts (drained)
8 oz mushrooms (sliced)
1 red bell pepper (diced)
1 white onion (diced)
Marinade
¼ cup liquid aminos (or GF/low sodium tamari or soy sauce)
1 Tbsp rice vinegar
1 Tbsp almond butter
Juice of ½ orange
3 cloves garlic (minced)
1 small knob fresh ginger (grated)
1 tsp hot chili oil
Almond butter sauce
1 Tbsp almond butter
Juice of ½ orange
1 Tbsp liquid aminos (or GF/low sodium tamari or soy sauce)
1 tsp sriracha
Other
Head of butter lettuce (or romaine)
½ cup cashews
Spring onions
Sesame seeds
Directions
In a large skillet, brown ground chicken on medium high heat for 5-10 minutes.
Set browned chicken to the side and add diced onions to the skillet. Saute onions for 2-3 minutes and then add red peppers, followed by mushrooms and chestnuts until cooked through.
While your vegetables are cooking, prepare the marinade by adding all the ingredients to a small bowl and whisk together until mixture is fully incorporated.
Lower heat to medium and transfer chicken back to the skillet. Pour marinade over the cooked chicken and veggies and cook until marinade has simmered down, coating the chicken and veggie mixture completely.
While the chicken mixture is cooking, wash and clean butter lettuce, and prepare almond butter sauce by adding all ingredients to a small bowl and whisking together until fully incorporated. Depending on how oily the almond butter is, you may need to add water to the mixture until you reach desired sauce consistency.
When you are ready to eat, spoon a small amount of the chicken mixture onto a single butter lettuce and top with the almond butter sauce, sesame seeds, cashews, and spring onions.


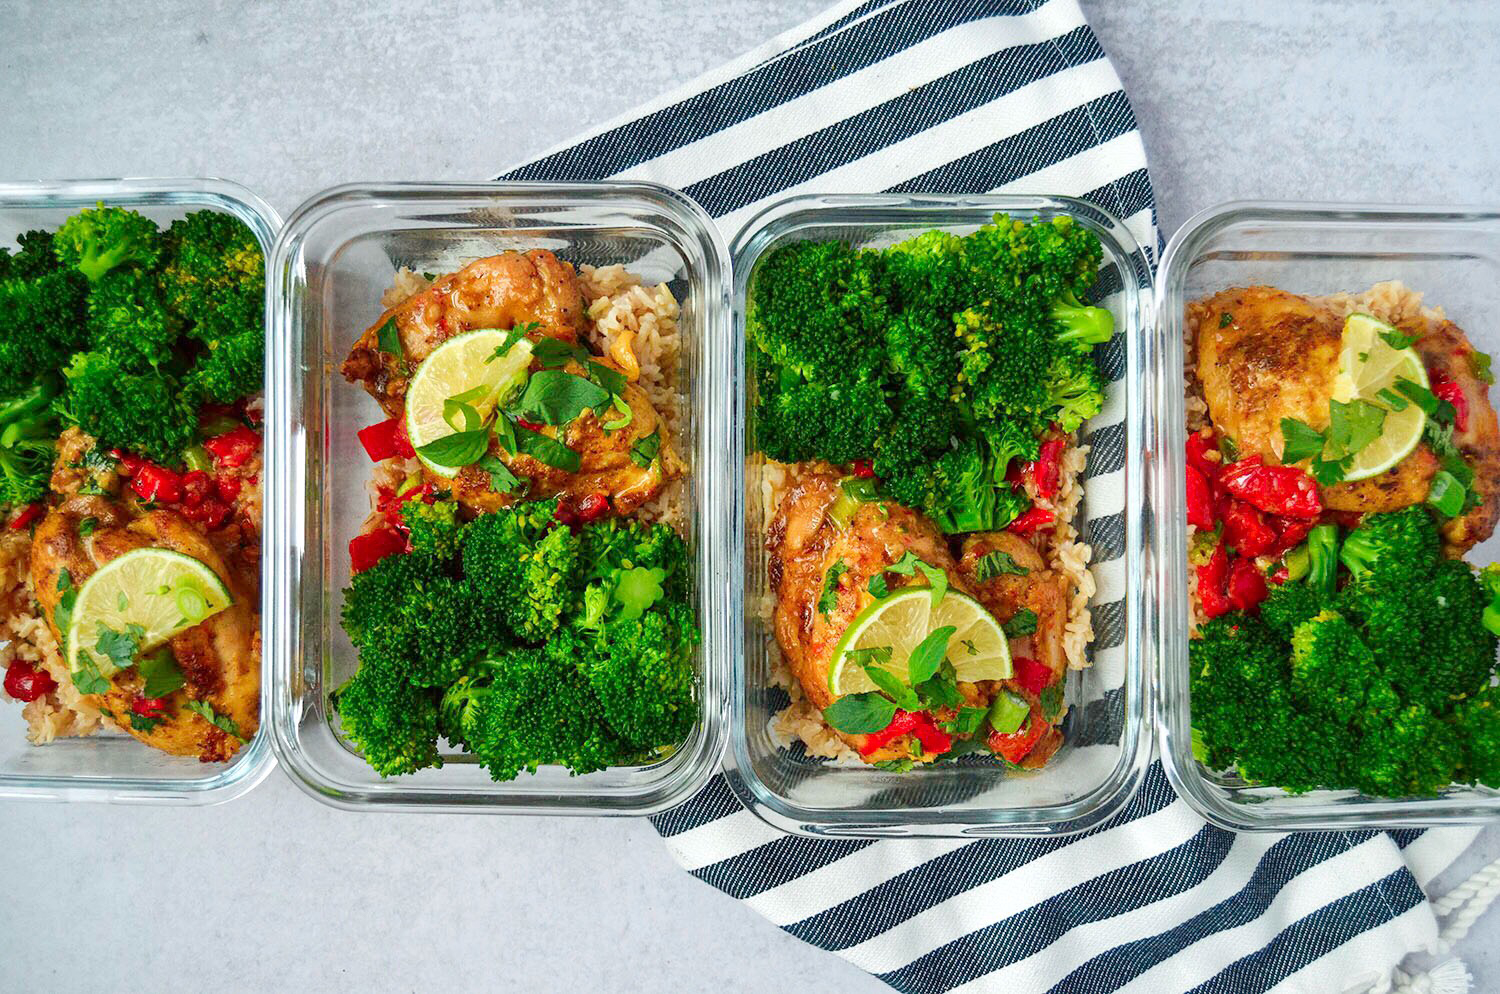
Creamy Coconut Lime Chicken Thighs
Do you ever get tired of cooking chicken the same way over and over again? As someone who is married to a man that works in the poultry industry BOTH of my hands are up! I would think even someone who develops new recipes every day can fall guilty to this routine.
To get me out of this rut, I often turn to Thai cuisine. One of my favorite thai dishes is Tom Kha Gai soup. If you’ve had this traditional thai soup then you know the flavors of coconut and lime are at the forefront. I’ve taken those components of Tom Kha Gai soup and incorporated it with chicken. So, there you have it -- a delicious Thai-inspired chicken recipe that pairs well with cauliflower rice or sprouted brown basmati rice and broccoli for lunch or dinner!
Creamy coconut lime chicken thighs - 30 minute, one pan meal that is perfect for meal preps or for a quick dinner! Dairy-free, gluten-free, and paleo-friendly.

Do you ever get tired of cooking chicken the same way over and over again? I would think even someone who develops new recipes every day can fall guilty to this routine.
To get me out of this rut, I often turn to Thai cuisine. One of my favorite thai dishes is Tom Kha Gai soup. If you’ve had this traditional thai soup then you know the flavors of coconut and lime are at the forefront. I’ve taken those components of Tom Kha Gai soup and incorporated it with chicken. So, there you have it -- a delicious Thai-inspired chicken recipe that pairs well with cauliflower rice or sprouted brown basmati rice and broccoli for lunch or dinner!

You may have noticed that the sauce color isn’t the prettiest but you shouldn’t be discouraged because we are focused on flavor over appearance. I’ve followed recipes similar to this one but they skip the best part which is thoroughly developing flavors in the cast iron. Don’t wipe away those brown bits after browning your chicken! That is the best part, I’m telling you!
My friends describe this recipe perfectly - it’s reminiscent of a good southern meal but with flavors of something exotic. I think that’s a perfect description because I wanted to create a recipe that is wholesome and hearty but with more depth. You can bring these spicy, floral, and fragrant flavors to your table easily using curry powder, ginger, and cilantro.

If you try this recipe, let us know! Leave a comment, rate it, and don’t forget to tag a photo to #fromtherootsblog on Instagram. We love seeing what you come up with!
INGREDIENTS
1 lb skinless boneless chicken thighs
Salt, pepper, yellow curry powder to season
SAUCE
1 can unsweetened coconut milk
1 red pepper (diced)
4 cloves garlic (minced)
½ tsp salt
1 small knob fresh ginger (minced)
1 lime (juice)
1 Tbsp arrowroot flour + mixed in with 1 Tbsp water
GARNISH
Fresh cilantro, green onions, lime wedges
DIRECTIONS
Heat 1 Tbsp oil in a cast iron skillet over medium high heat.
While your pan is getting hot, generously season chicken thighs on both sides with salt, pepper, and yellow curry powder.
Add the chicken thighs to the skillet and sear for 5-7 minutes. Remove the chicken from the skillet and set aside on a plate. The chicken doesn’t need to be fully cooked at this point - we will be returning it back to the skillet shortly.
Turn the heat down to medium and add more oil to the pan. Add garlic to the pan and saute for 2-3 minutes. Add chopped peppers. Make sure to scrape the brown bits into the garlic and pepper mixture.
Once peppers start to sweat, add coconut milk, salt, fresh ginger, and lime. Bring to a boil then add the arrowroot flour + water mixture. Once your mixture has thickened, place chicken thighs back into the pan.
Cook for 10-15 minutes on medium heat or until your chicken thighs have reached an internal temperature of 165 degrees Fahrenheit.
Garnish with cilantro, green onions, and lime. Serve over brown or cauliflower rice.
NOTES
If meal prepping for 4 servings, cook 4 servings of brown or cauliflower rice and one broccoli head.
Some coconut milk brands can provide different consistencies. I prefer using Thai Kitchen.
Feel free to spice up the recipe with chili oil or fresh chilies!
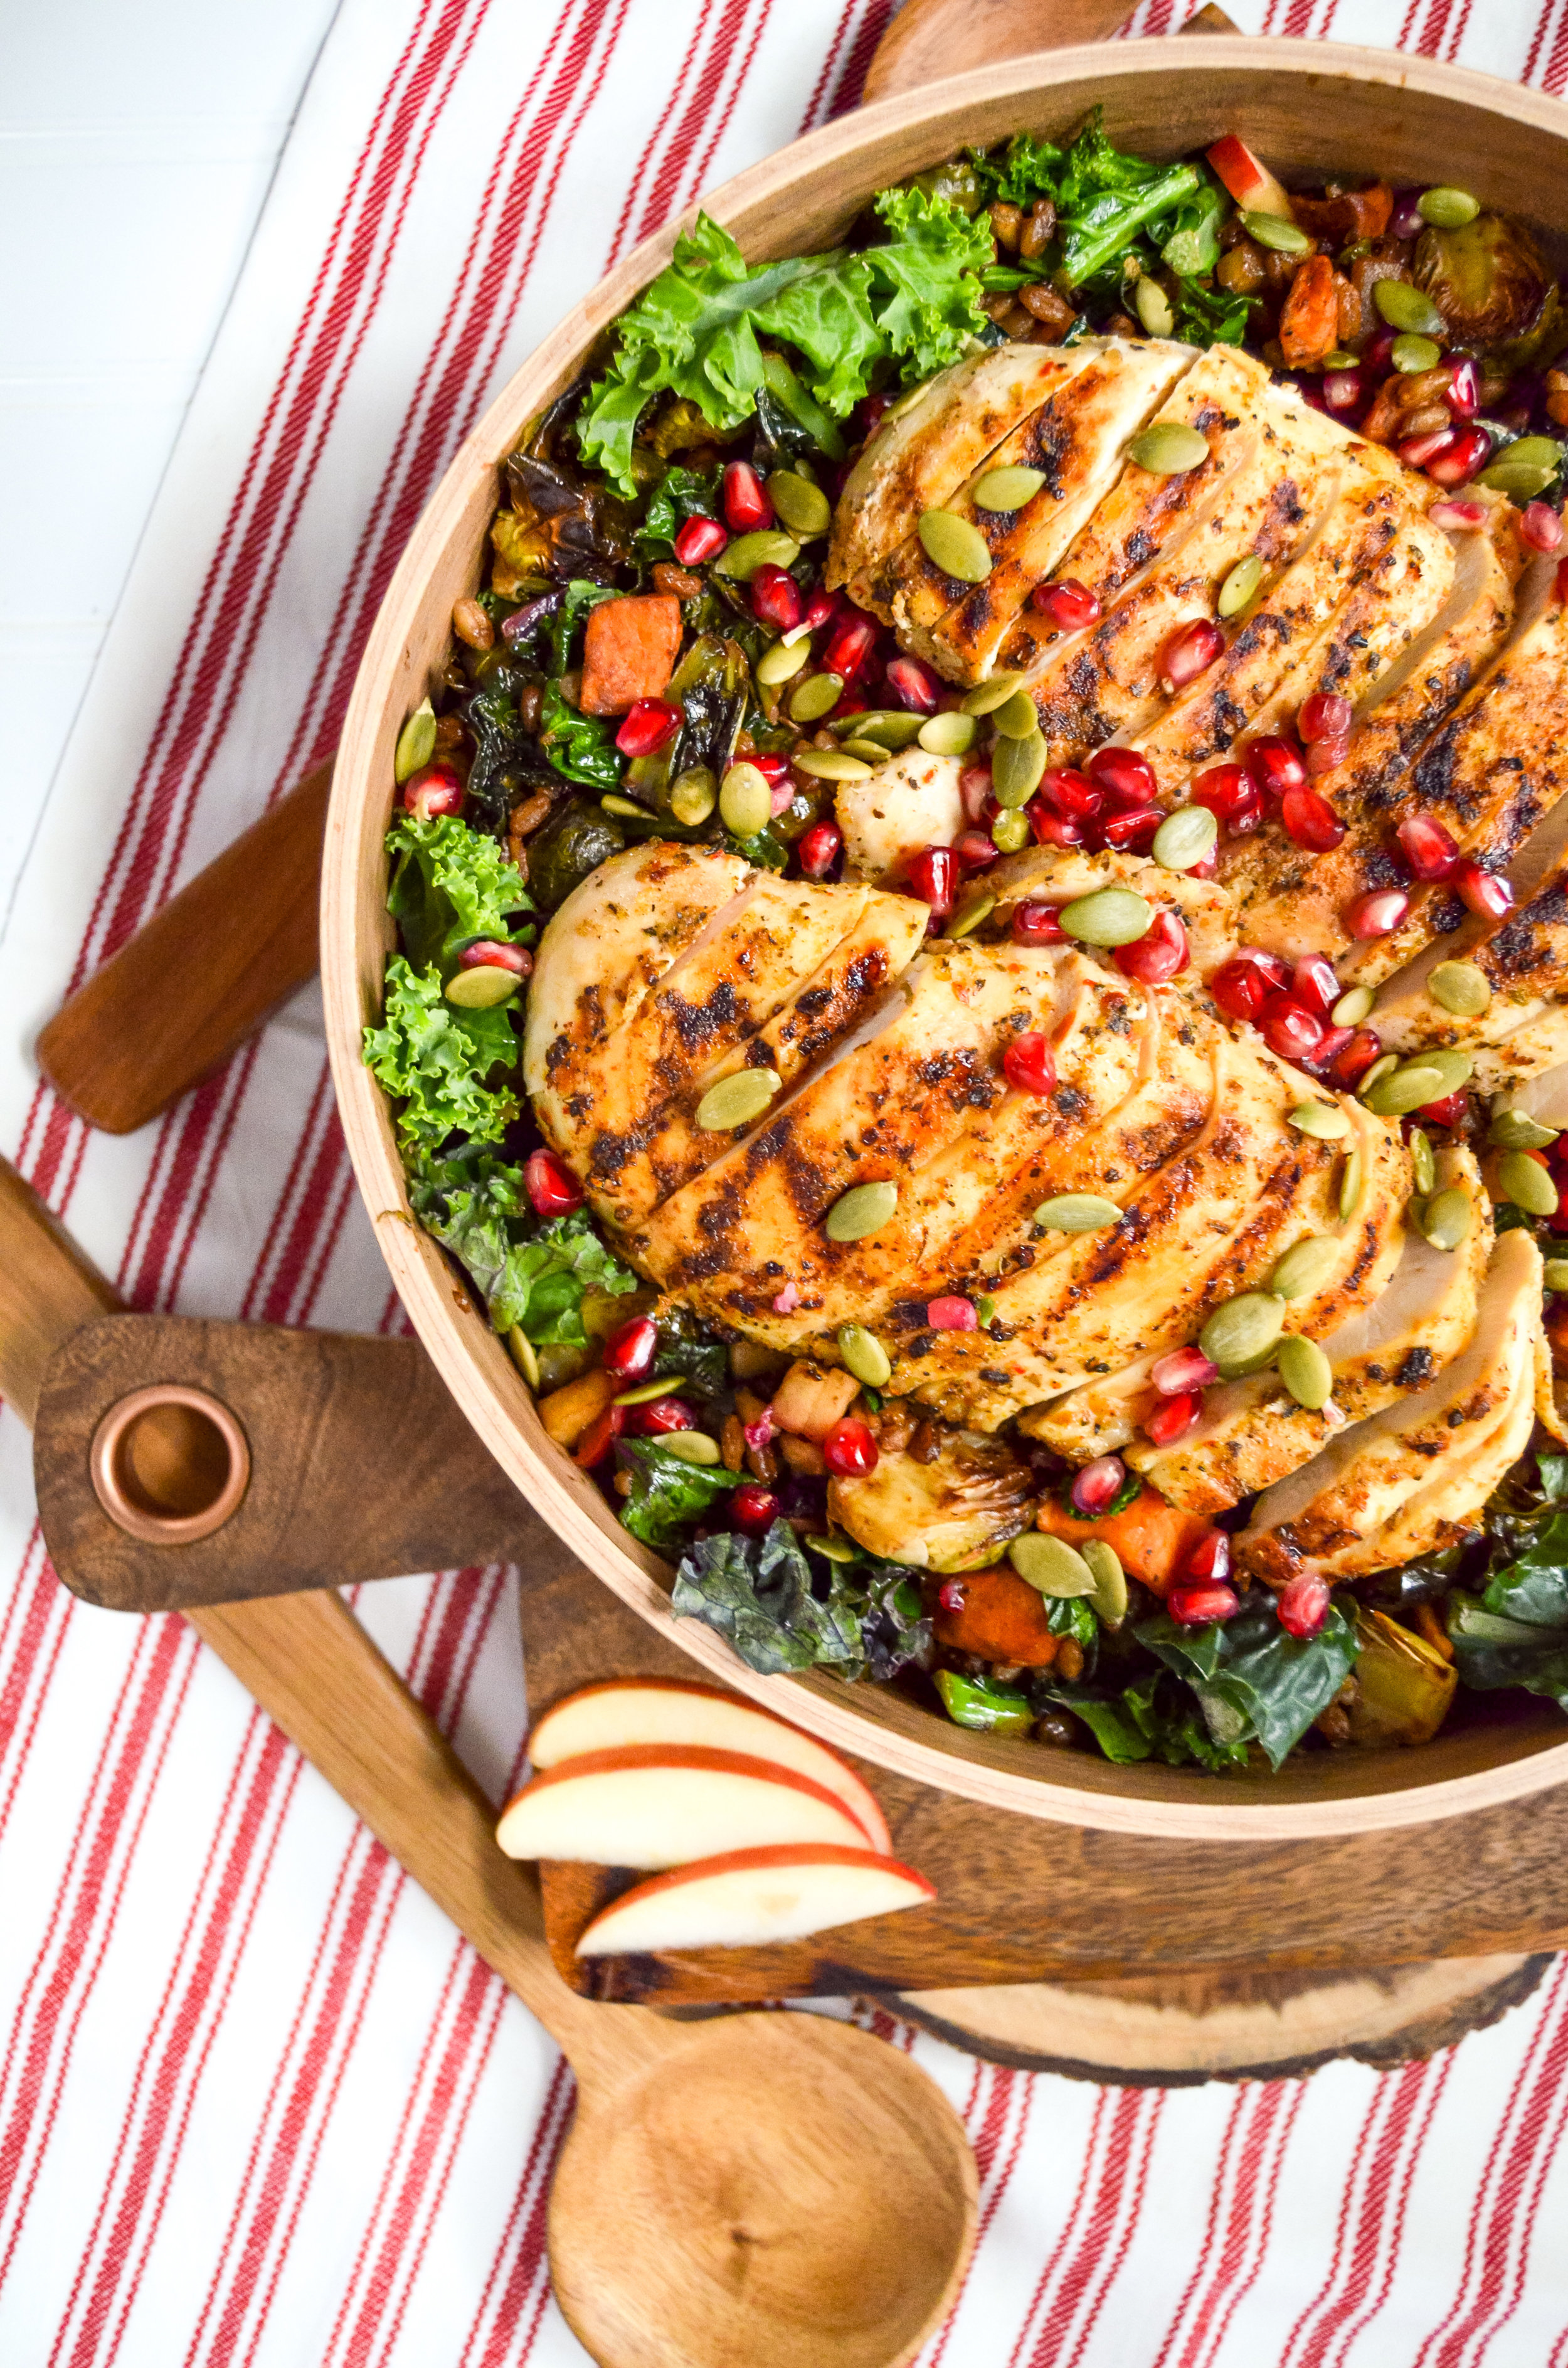
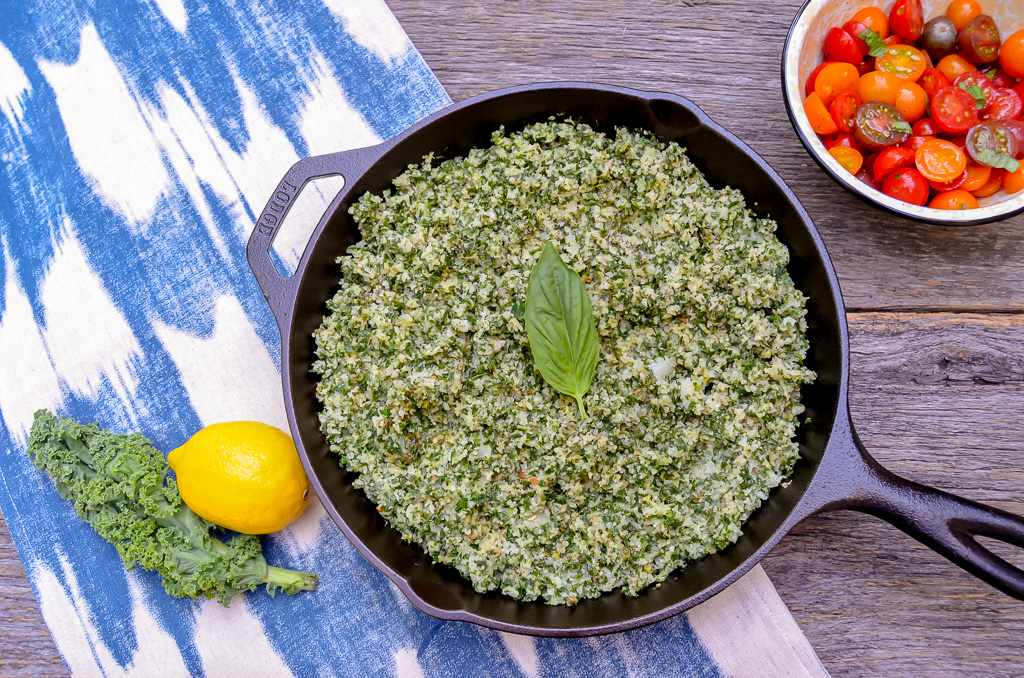
Fall Harvest Grain Bowl
I was inspired to make a harvest bowl after eating at a sweetgreen for the first time. My husband ordered their famous harvest bowl and absolutely fell in love with it. Now, this doesn’t happen too often where he will love something healthy, so I knew right then that I had to create a recipe similar so that he can continue to enjoy healthy foods like a harvest bowl.
Fall Harvest Grain Bowl is that perfect main dish filled with the most favorite seasonal produce!

I was inspired to make a harvest bowl after eating at a sweetgreen for the first time. My husband ordered their famous harvest bowl and absolutely fell in love with it. Now, this doesn’t happen too often where he will love something healthy, so I knew right then that I had to create a recipe similar so that he can continue to enjoy healthy foods like a harvest bowl.

Not only can we both enjoy a healthy meal, but I also get to make our harvest bowls with best seasonal produce! As you make this fall harvest grain bowl, here is a list of fall seasonal produce to look forward to in your local grocery store or market:
Apples
Beets
Broccoli
Brussel Sprouts
Cabbage
Carrots
Cauliflower
Fennel
Figs
Garlic
Greens
Mushrooms
Pears
Parsnips
Pomegranates
Radishes
Sweet potatoes
Winter squash

The grain that puts this dish together is farro. If you haven’t had farro then you are missing out! Farro has a brown rice / nutty taste with a nice, chewy texture. This ancient whole grain is also very healthy as it contains a hefty dose of vitamins A, E, and minerals like iron and magnesium. What’s great about farro is that the texture pairs perfectly with soups and main course salads like this fall harvest grain bowl!

A new tip I learned recently from Nutrition Stripped is to massage kale. Not only will your kale last longer in the fridge, but your body will digest the kale more easily by physically breaking it down. You can read more in her post here for the nutrition/science break down. For this recipe, we will be massaging the kale with lemon, olive oil, and salt.

Have fun with this recipe and swap out ingredients based on what your favorite fall produce are as well as preference. For example, if sweet potatoes are not your thing then use butternut squash instead!
If you try this recipe, let us know! Leave a comment, rate it, and don’t forget to tag a photo to #fromtherootsblog on Instagram. We love seeing what you come up with!
Fall Harvest Grain Bowl is that perfect main dish filled with the most favorite seasonal produce!
INGREDIENTS
1 cup cooked farro
1 sweet potato (cubed)
16 oz brussel sprouts (halved)
1 tsp garlic powder
1 large bunch kale
1 red apple (diced)
1 lb grilled chicken (or rotisserie chicken)
2 Tbsp Balsamic glaze
1 Tbsp EVOO
1 Tbsp pure maple syrup
1/2 lemon
toppings:
Pepitas and pomegranate seeds
DIRECTIONS
Preheat oven to 425 degrees. On a baking sheet, toss sweet potatoes and brussel sprouts with a little EVOO, S&P, and garlic powder. Cook for 15 minutes and then turn for an additional 10-15 minutes or until cooked through and crispy.
While your sweet potatoes and brussel sprouts are cooking, de-stem the kale leaves from the stem by slicing out the center. In a large bowl, add the de-stemmed kale leaves, 1 Tbsp EVOO, squeeze of 1/2 lemon and a couple dashes of salt. Using a massaging action, start to tear the leaves apart and massage. Continue to massage until the kale leaves turn a more vibrant green.
On medium-high heat, add diced apples to a large skillet with 1 tsp oil. Saute for about 2-5 minutes. Add the kale leaves along with the cooked sweet potatoes, brussel sprouts, and cooked farro.
Mix together maple syrup and balsamic glaze and drizzle over the skillet mixture.
Once the mixture is fully incorporated with the balsamic reduction, turn the skillet off and plate your harvest grain salad with grilled chicken (or other types of protein). Top with pomegranate seeds and pepitas and enjoy!

Classic Healthy Chicken Salad
Make your busy life manageable with this quick and healthy classic chicken salad that is sure to fill you up and save you time and money!When I worked at a spa in West Georgia, I would grab lunch at Chicken Salad Chick and get their amazing chicken salad that was quick and super refreshing. Sometimes, I would indulge and get the not-so-healthy chicken salad options. Nonetheless, everything was amazing and I miss it dearly! Now that I live in Kentucky where unfortunately Chicken Salad Chicken does not exist, I make my own chicken salad at home, saving time and money. With this recipe, all is good in the world!
My healthy take on the classic chicken salad is loaded with nutrient dense fruits and veggies as well as healthy fats that will keep you full all day long without weighing you down!

Make your busy life manageable with this quick and healthy classic chicken salad that is sure to fill you up and save you time and money!When I worked at a spa in West Georgia, I would grab lunch at Chicken Salad Chick and get their amazing chicken salad that was quick and super refreshing. Sometimes, I would indulge and get the not-so-healthy chicken salad options. Nonetheless, everything was amazing and I miss it dearly! Now that I live in Kentucky where unfortunately Chicken Salad Chicken does not exist, I make my own chicken salad at home, saving time and money. With this recipe, all is good in the world!


My healthy take on the classic chicken salad is loaded with nutrient dense fruits and veggies as well as healthy fats that will keep you full all day long without weighing you down!There are many ways to prepare chicken salad, but for this recipe, I have found that red onions, carrots, granny smith apples, sunflower seeds, and grapes are the perfect classic combination. As far as seasonings go, I keep it simple but use fresh herbs like dill and smoked paprika which I believe separates my classic chicken salad from the rest!
You can use whatever creamy component you prefer depending on your allergies/preferences. I have tested this recipe with avocados, vegan mayonnaise, and greek yogurt, so you are good on all fronts if you would like to change things up. Additionally, you can either shred the chicken or dice them. I prefer dicing as it saves a little bit of time and I appreciate the texture. Now, onto the recipe!
This recipe makes 4-6 servings and is a good choice if you want to meal prep it for the week. I like to use chicken salad for sandwiches, pairing it with tomato slices, mixed greens, alfalfa sprouts, and pickles on 100% whole grain bread. You can also add it to a salad or even have it as a snack with crackers!
If you try this recipe, let us know! Leave a comment, rate it, and don’t forget to tag a photo with #fromtherootsblog on Instagram. We love seeing what you come up with!
My healthy take on the classic chicken salad is loaded with nutrient dense fruits and veggies as well as healthy fats that will keep you full all day long without weighing you down!
INGREDIENTS
1 lb boneless skinless chicken breast
1 Tbsp coconut oil
1 Tbsp poultry and citrus seasoning
1/2 lemon with zest
1/2 small red onion (diced)
1/2 granny smith apple (diced)
1 cup fresh dill (chopped) (less or more depending on preference)
2 carrots (shredded)
1/4 cup raw sunflower seeds
1/2 cup grapes (halved)
1 tsp smoked paprika
1 tsp garlic powder
1/2 cup vegan mayonnaise (I use Primal Kitchen or Just Mayo) (or use greek yogurt or ripe avocado)
Garnish
Micro greens, pickles, alfalfa sprouts, mixed greens, slices of tomato
DIRECTIONS
Heat 1 Tbsp coconut oil in a skillet over medium-high heat. Prep chicken by seasoning with poultry and citrus seasoning and s&p.
Grill chicken on both sides for about 3-5 minutes or until brown and completely cooked through. Remove chicken from skillet; let chicken rest and cool.
Add the remainder of the ingredients to a large bowl.
Dice chicken after it has cooled (or shred with two forks if you prefer!)
Add chicken to large bowl with the rest of the ingredients and mix until fully combined.
Store in an airtight container and keep in the fridge for up to one week.
NOTES
If you are using avocados in place of mayonnaise, the fridge life will be shorter as avocados brown in the fridge.
You can cut down the time to make this salad even faster by using rotisserie chicken instead of grilling chicken as well as purchase pre-shredded carrots instead of shredding by hand.
I have recently noticed that Walmart does not carry the organic poultry and citrus seasoning anymore so I have used this brand instead.