Sort by Category
- May 2026
- March 2026
- December 2025
- November 2025
- October 2025
- September 2025
- August 2025
- June 2025
- August 2024
- July 2024
- June 2024
- May 2024
- February 2024
- January 2024
- December 2023
- November 2023
- October 2023
- September 2023
- August 2023
- July 2023
- March 2023
- February 2023
- January 2023
- December 2022
- November 2022
- October 2022
- September 2022
- August 2022
- June 2022
- May 2022
- April 2022
- March 2022
- February 2022
- January 2022
- December 2021
- November 2021
- October 2021
- September 2021
- August 2021
- July 2021
- June 2021
- May 2021
- April 2021
- March 2021
- February 2021
- January 2021
- December 2020
- November 2020
- October 2020
- September 2020
- August 2020
- July 2020
- June 2020
- May 2020
- April 2020
- March 2020
- February 2020
- January 2020
- December 2019
- November 2019
- October 2019
- September 2019
- August 2019
- July 2019
- June 2019
- May 2019
- April 2019
- March 2019
- February 2019
- January 2019
- December 2018
- November 2018
- October 2018
- September 2018
- August 2018
- July 2018
- June 2018
- May 2018
- April 2018
- March 2018
- February 2018

Mexican Eggs Benedict
If I am going out for breakfast or Sunday brunch, the first thing my eyes search for is the keyword: benedict. I’m obsessed with the concept of having a carb, piece of meat, poached egg, creamy hollandaise sauce, and fun toppings all on one fork and for every bite. Talk about an explosion of flavors!
So why wait for the next brunch invitation when you can make eggs benedict at home! And sure, you can totally make the American classic eggs benedict which consists of two halves of an English muffin, each topped with Canadian bacon, a poached egg, and hollandaise sauce OR… you can make it my way = the spicy, healthy, and fun way!
Mexican Eggs Benedict - A fun and healthy spin on the classic eggs Benedict - done 2-ways!

If I am going out for breakfast or Sunday brunch, the first thing my eyes search for is the keyword: Benedict. I’m obsessed with the concept of having a carb, piece of meat, poached egg, creamy hollandaise sauce, and fun toppings all on one fork and for every bite. Talk about an explosion of flavors!

So why wait for the next brunch invitation when you can make eggs Benedict at home! And sure, you can totally make the American classic eggs Benedict which consists of two halves of an English muffin, each topped with Canadian bacon, a poached egg, and hollandaise sauce OR… you can make it my way = the spicy, healthy, and fun way!
Mexican eggs Benedict done not one, but TWO ways!

Components consist of:
Carbohydrate base: Roasted or grilled sweet potato slices
Meat: Spicy chorizo
Poached egg: if it ain’t broke, don’t fix it!
Hollandaise sauce: creamy chipotle hollandaise sauce
Toppings: avocado, pickled onions, sliced peppers, lime wedge, cilantro
Fresh fruit salad on the side
Now that you have the components, you know how Mexican dishes tend to have variations of the same thing i.e. burrito, taco, enchilada - same ingredients just done a different way?


That is what we are doing here! So you can prepare the ingredients in the classic eggs Benedict fashion OR you can throw everything in a bowl and call it Mexican eggs Benedict nachos or Mexican eggs Benedict nourish bowl… up to you!

Before you start cooking, know that this recipe is gluten-free, dairy-free friendly, Whole 30, nut-free, paleo, and grain-free.

If you try this recipe, let us know! Leave a comment, rate it, and don’t forget to tag a photo to #fromtherootsblog on Instagram. We love seeing what you come up with!
Mexican Eggs Benedict - A fun and healthy spin on the classic eggs Benedict - done 2-ways!
Prep Time: 20 min Cook Time: 40 min Servings: 4
Ingredients
1 large sweet potato
1 Avocado
1 lb ground chorizo (removed from their casings if applicable)
4 large eggs
1 tsp white vinegar
Chipotle Hollandaise
2 egg yolks
Juice of half lime
1-2 Tbsp chopped chipotle pepper in adobo (or 1 Tbsp chipotle powder)
¼ cup melted butter (or ghee for paleo/Whole30)
¼ tsp salt
Toppings
Fresh fruit (strawberry + mango + juice of half lime)
1 bundle fresh cilantro, chopped
1 jalapeno, sliced
Pickled onions
Lime wedges
Directions
Peel the sweet potatoes and cut into ½ in thick slices for rounds or cut sweet potatoes into cubes slices for nacho style.
Brush or spray each slice or cubes with oil and grill or roast at 425 degrees for approx. 20 minutes per side or when the sweet potatoes are slightly tender.
To make the hollandaise, in a small processor or tall container add the egg yolks, salt, lime juice and chipotle. Insert an immersion blender into the tall container or blend on high in the food processor for 30 seconds. Very slowly drizzle the melted butter/ghee into the vessel while blending.
In a medium pan on medium-high heat, ground the chorizo meat until cooked and has a crumbly texture.
To make the poached eggs, fill a medium pot with approximately ¾ of water and add in the vinegar. Bring water to a boil and reduce the heat to low-medium. Using a spoon, quickly move the spoon in a circular motion in the water to create a whirlpool and then crack an egg into the center of the whirlpool. Let sit for 4 minutes to cook before removing the egg from the water using a slotted spoon. Repeat with the remaining eggs.
Eggs Benedict way: place two sweet potato rounds on a plate and top each slice with avocado slices, chorizo meat, poached egg and hollandaise sauce. Garnish with toppings and create a fresh fruit salad on the side before serving.
Nacho way: place sweet potato cubes on a plate or bowl and layer with avocado slices or cubes, chorizo meat, poached egg and hollandaise sauce. Garnish with the toppings along with the fresh fruit before serving.
Notes
This meal is considered a six senses nourish meal! For more information - check out the Nourishment Program!
SHOP OUR FAVORITE TOOLS + INGREDIENTS FOR THIS RECIPE!


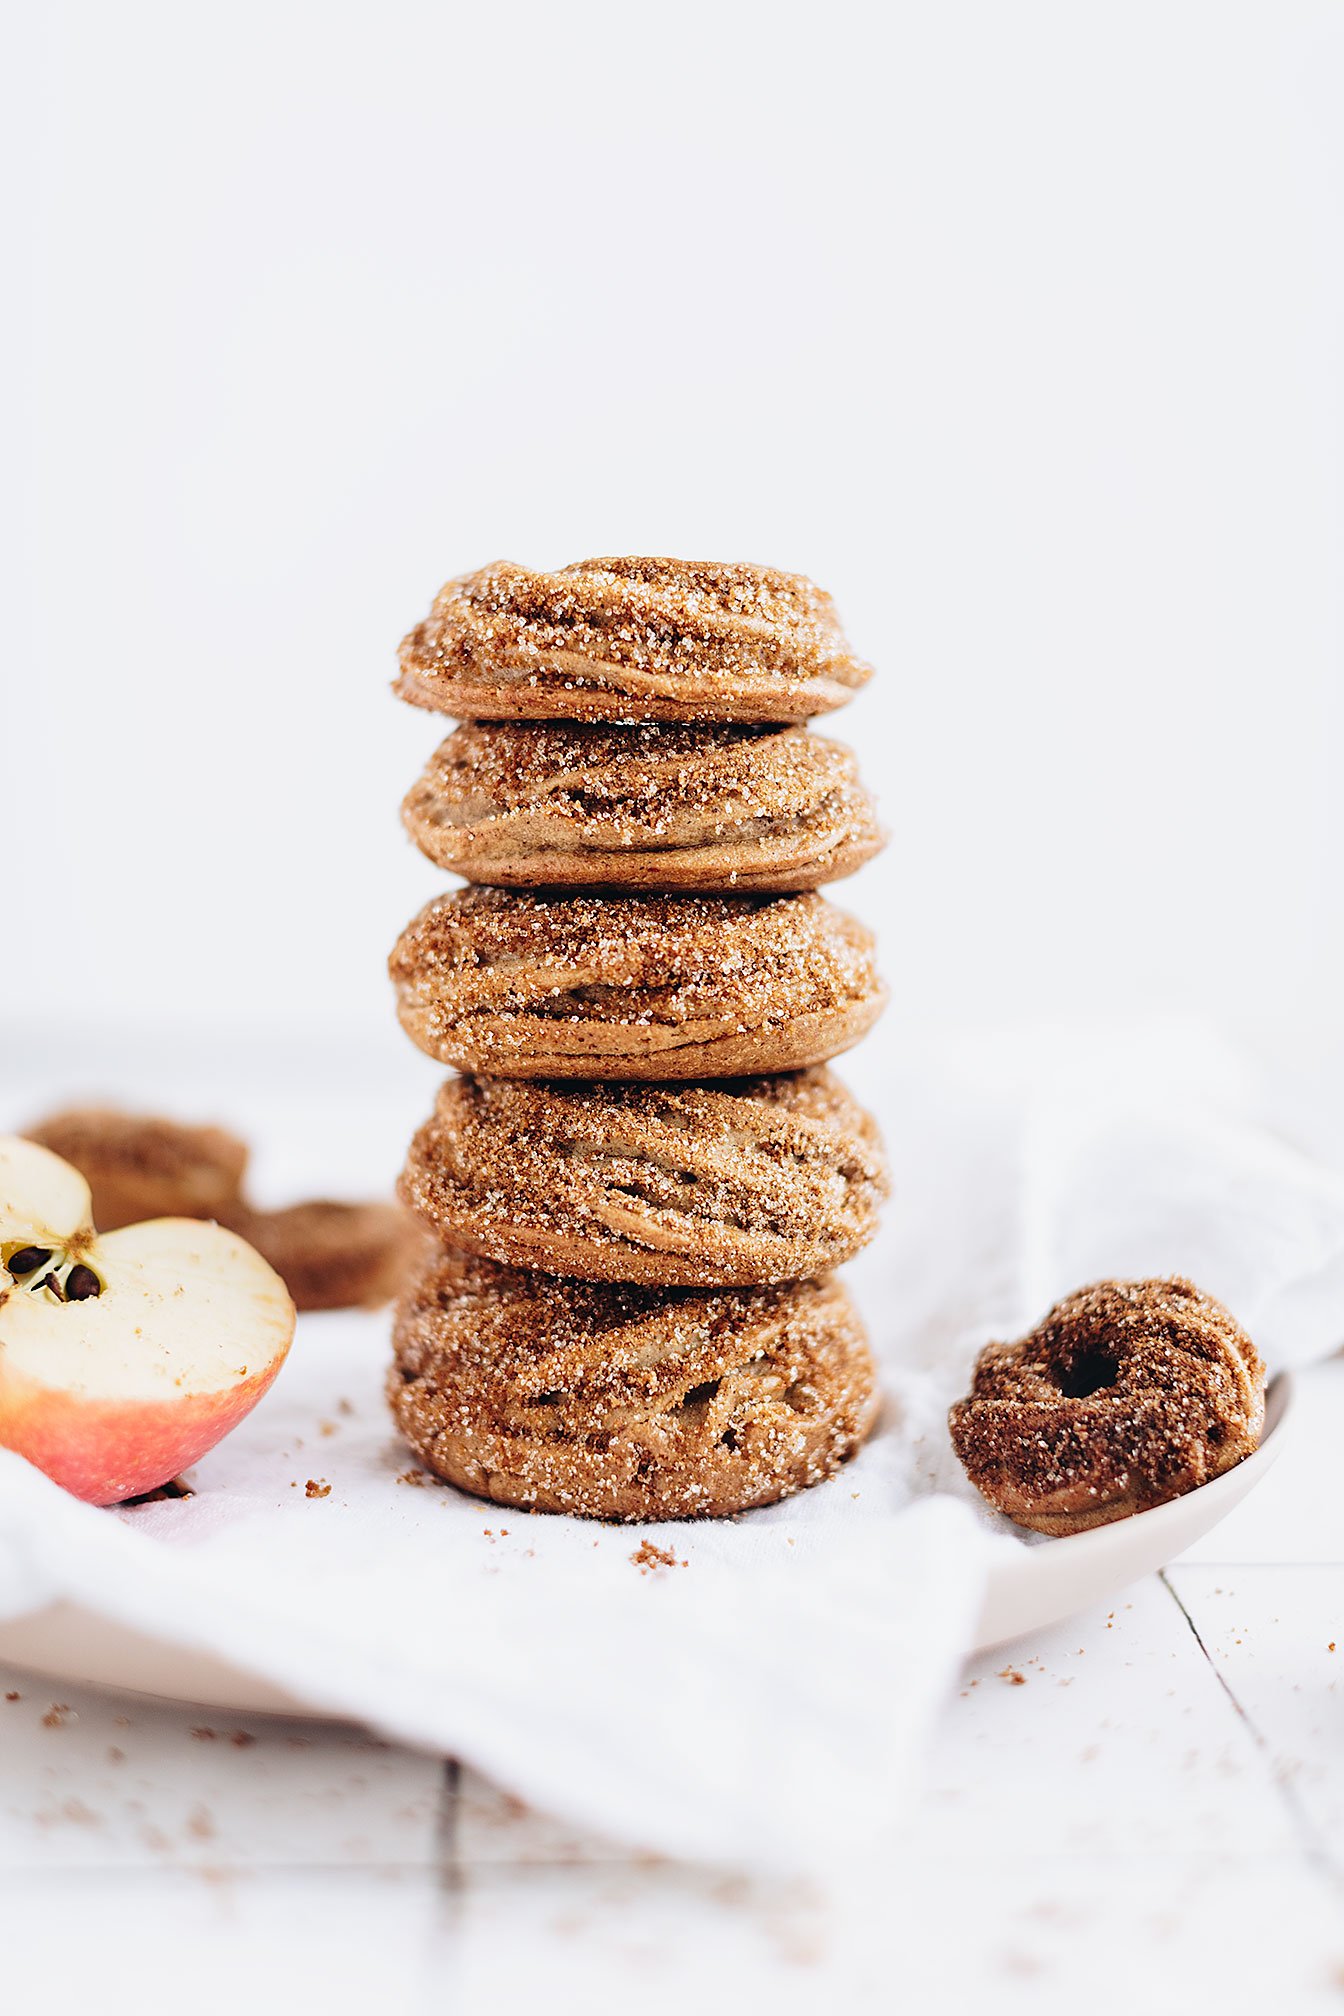
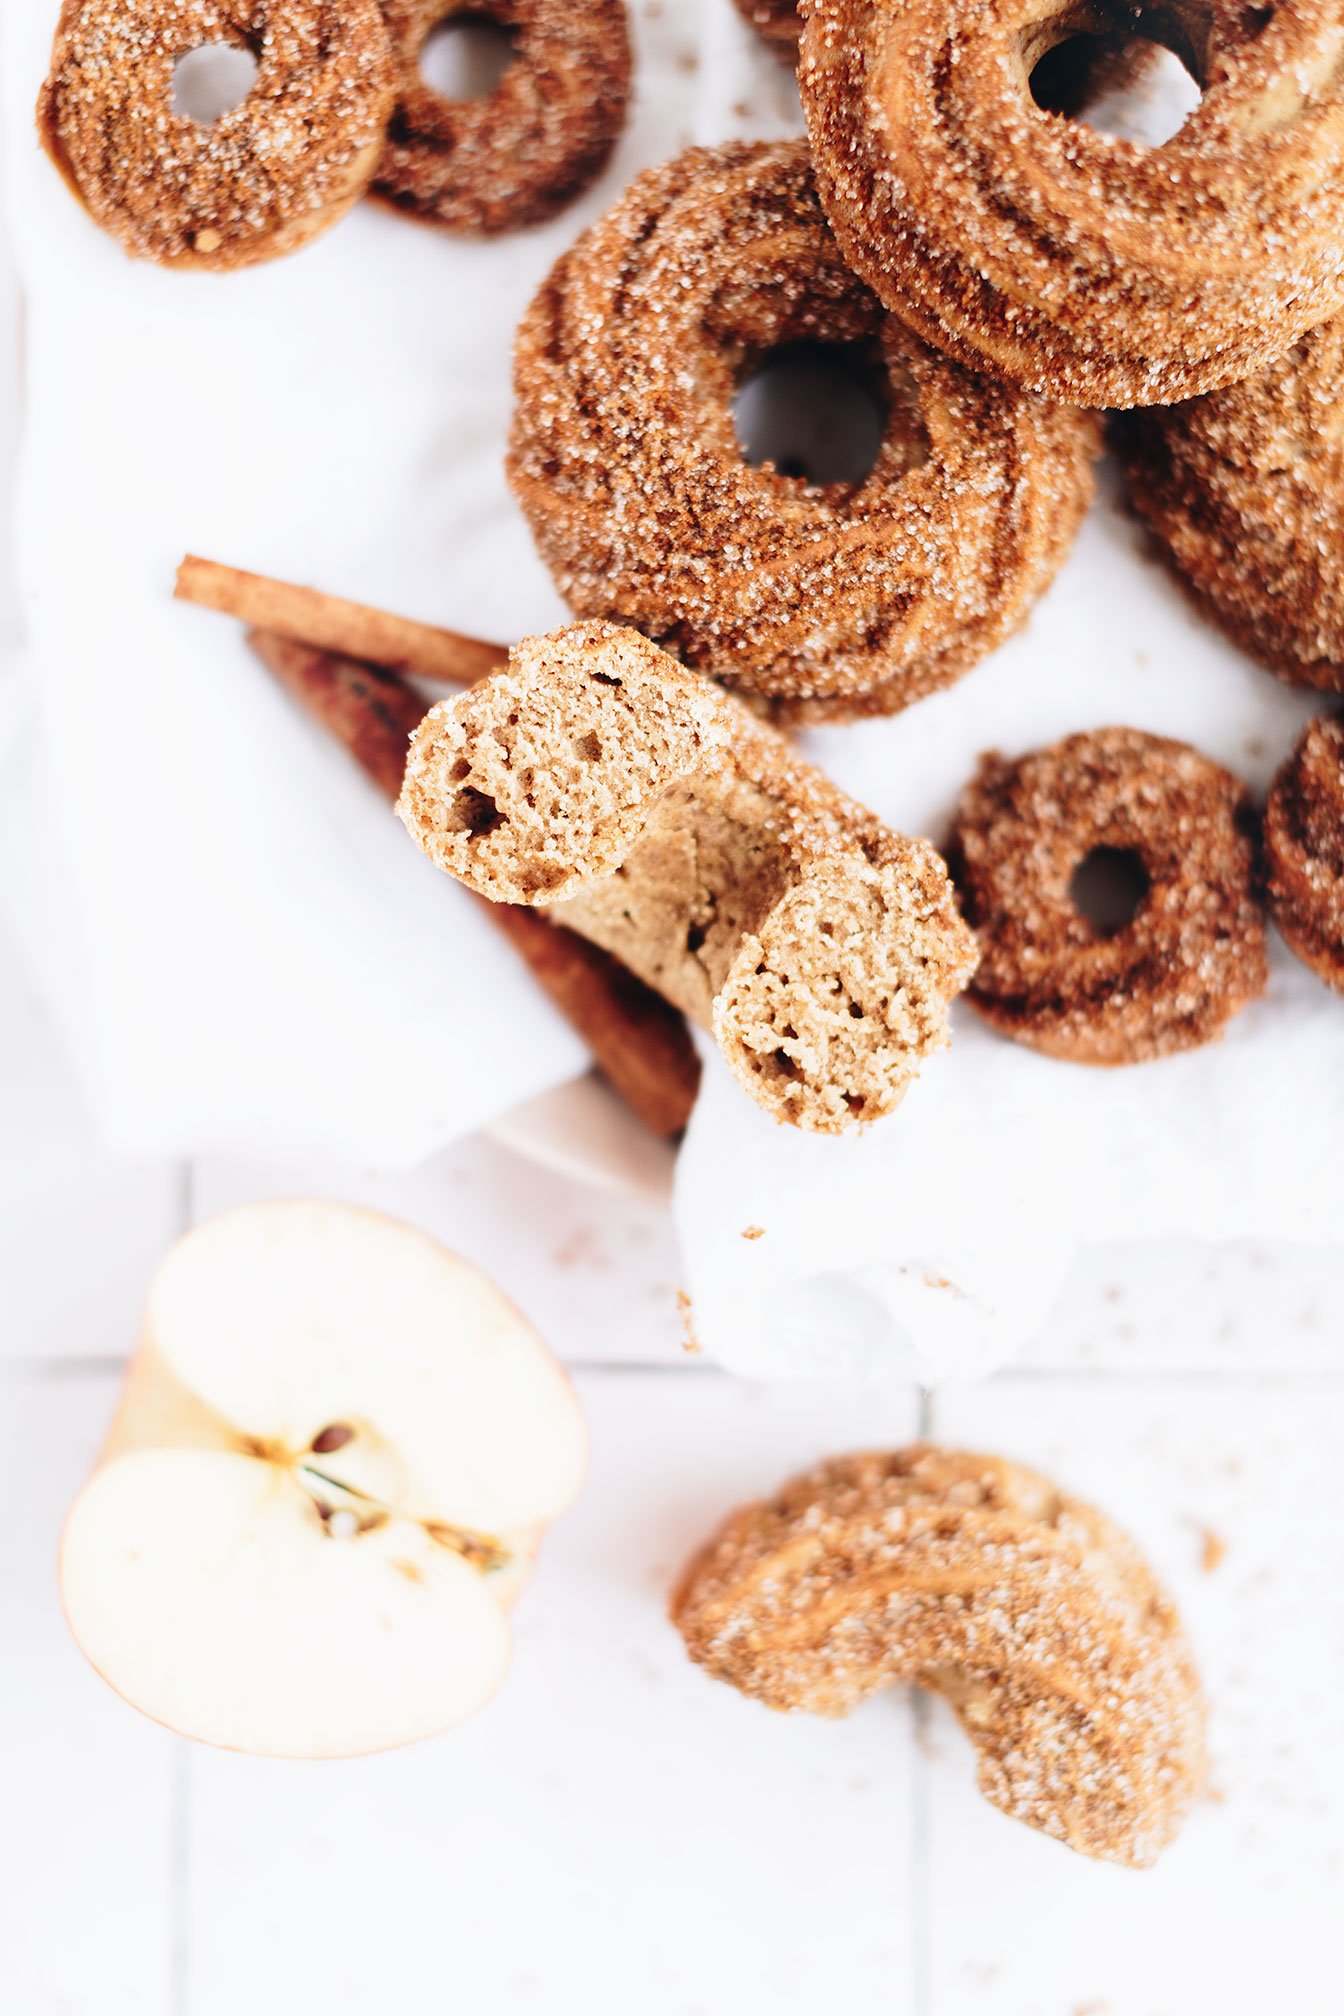
Apple Cider Churro Donuts
Last week, we had a local event in the area where business fronts downtown Hartwell would open their doors for women to shop, receive discounts in store all while enjoying delicious fall treats! In my office building, the chiropractor made warm apple cider, chocolate hummus, and goat cheese stuffed dates with chopped pistachios. So good!
Running on the apple cider train, I decided in my dreams that I should make some sort of apple cider donut! Haha, I swear, pressure to recipe development is where it’s at for me! As you can tell in the pictures, I have cute mini donuts sprinkled in and that is because my initial thought was to use them as a garnish for the apple cider!
Now, if you decide to use the apple cider churro donuts as a garnish for your apple cider or apple cider mimosas, then please take pictures and share - It would just be the cutest thing!
Apple Cider Churro Donuts - Apple cider meets churros - this healthier, baked not fried, donut is a delicious treat to bake during the fall season! Gluten-free, dairy-free, refined sugar free, nut-free, and paleo friendly.

Last week, we had a local event in the area where business fronts downtown Hartwell would open their doors for women to shop, receive discounts in store all while enjoying delicious fall treats! In my office building, the chiropractor made warm apple cider, chocolate hummus, and goat cheese stuffed dates with chopped pistachios. So good!


Running on the apple cider train, I decided in my dreams that I should make some sort of apple cider donut! Haha, I swear, pressure to recipe development is where it’s at for me! As you can tell in the pictures, I have cute mini donuts sprinkled in and that is because my initial thought was to use them as a garnish for the apple cider!

Now, if you decide to use the apple cider churro donuts as a garnish for your apple cider or apple cider mimosas, then please take pictures and share - It would just be the cutest thing!


Okay, I digress again. The reason why I added churro to the recipe name is not because these are made in the traditional sense as they are baked, not fried, but the cinnamon sugar topping! And bonus, if you decide to use a piping bag to fill in the donut pans then they create a natural churro design which is super fun and holds more cinnamon sugar topping. And who doesn’t want more of that!?

If you would like to see the kitchen equipment and ingredients I used to make this recipe, then scroll down below for the links!
So while it is still fall season and you have apple cider and all of your fall spices, then make a batch of these apple cider churro donuts!


I think I will make these for my niece and nephews for Thanksgiving breakfast this year :)
And hey, if you want to get super creative, here are some fun ways you can pair your donut with, if eating them on their own is not enough! Seasonal drinks like adrenal cream cider, coffee, hot cocoa, apple cider, turmeric latte, and chai tea, milk, ice cream (stop it!), dipped in nut butters, jams or the traditional churro style with chocolate sauce.

If you try this recipe, let us know! Leave a comment, pin it, and don’t forget to tag a photo to #fromtherootsblog on Instagram. We love seeing what you come up with!
Apple Cider Churro Donuts - Apple cider meets churros - this healthier, baked not fried, donut is a delicious treat to bake during the fall season! Gluten-free, dairy-free, refined sugar free, nut-free, and paleo friendly.
Prep Time: 15 min | Cook Time: 20 min | Servings: 12 large donuts
Ingredients
Donut Batter
2 cups gluten free 1-to-1 baking flour
¾ cup arrowroot flour
½ cup organic applesauce
⅓ cup coconut sugar
⅓ cup avocado or coconut oil
⅓ cup organic apple cider or apple juice
2 large eggs (room temperature)
1 Tbsp apple pie spice seasoning
2 tsp baking powder
1 tsp pure vanilla extract
½ tsp baking soda
¼ tsp sea salt
Avocado/coconut oil spray for donut pans
Churro Topping
3 Tbsp melted grass-fed butter, ghee, or coconut oil
3 Tbsp coconut sugar, maple sugar or date sugar
1 ½ tsp apple pie spice seasoning
Directions
Preheat the oven to 350 degrees and spray silicone donut pans for easy removal.
In a large mixing bowl, combine dry ingredients (ie both flours, sugar, apple pie spice, baking powder and soda, and salt). Set aside.
In a separate bowl, whisk together the eggs, oil, vanilla, applesauce, and apple cider/juice. Add the dry ingredients to the wet and stir well until fully combined. The batter should be scoopable, not pourable.
You can either spoon the batter or transfer batter into a piping bag and fill into the wells of the lightly greased donut pan to make 11-12 donuts - you might need to do this in 2 batches depending on the size of your donut pan.
Bake in the preheated oven for 18-20 minutes or until set and a toothpick, when inserted, comes out clean. Remove the pan from the oven and place it on a wire rack to cook for about 5 minutes. Once cooled, remove donuts from the pan and place on a wire rack to cool completely.
While the donuts are cooling, make the churro topping. Melt fat of choice in a small bowl. In a separate bowl, stir the sugar and apple pie spice seasoning. Brush the cooled donuts with the fat and either sprinkle with or dip donuts in the sugar mixture. Serve right away or store at room temperature for up to 3 days. Refrigerate or freeze to keep them longer.
Shop our favorite tools + ingredients for this recipe!


Fudgy Paleo Brownies
Growing up, brownies were my least favorite dessert. Maybe because the flavors were too rich or the texture was too dry, but nonetheless, I stopped eating them. Of course I would get the judgy looks and sneers but hey, they didn’t taste good to me! That is, until I had a fudgy vegan brownie at this bakery in Atlanta and I was floored! It was like the heavens opened up with arms wide open and sucked me in!
Foolproof staple brownie recipe that is also gluten-free, dairy-free, and nut-free!

Growing up, brownies were my least favorite dessert. Maybe because the flavors were too rich or the texture was too dry, but nonetheless, I stopped eating them. Of course I would get the judgy looks and sneers but hey, they didn’t taste good to me! That is, until I had a fudgy vegan brownie at this bakery in Atlanta and I was floored! It was like the heavens opened up with arms wide open and sucked me in!

Too much? Well, that’s how I feel about these brownies! Now, this recipe didn’t happen overnight (perfection doesn’t happen overnight). As a food blogger, sometimes recipes can be made simple and it just clicks. Other times, not so much.
This recipe did not instantly click. It started out as a Mexican hot chocolate cookie that had the batter of a brownie but baked similar to a cake and ultimately dried out after a day or two. But the flavor was there and that’s where I went. Long story short, here we are and I am so glad!
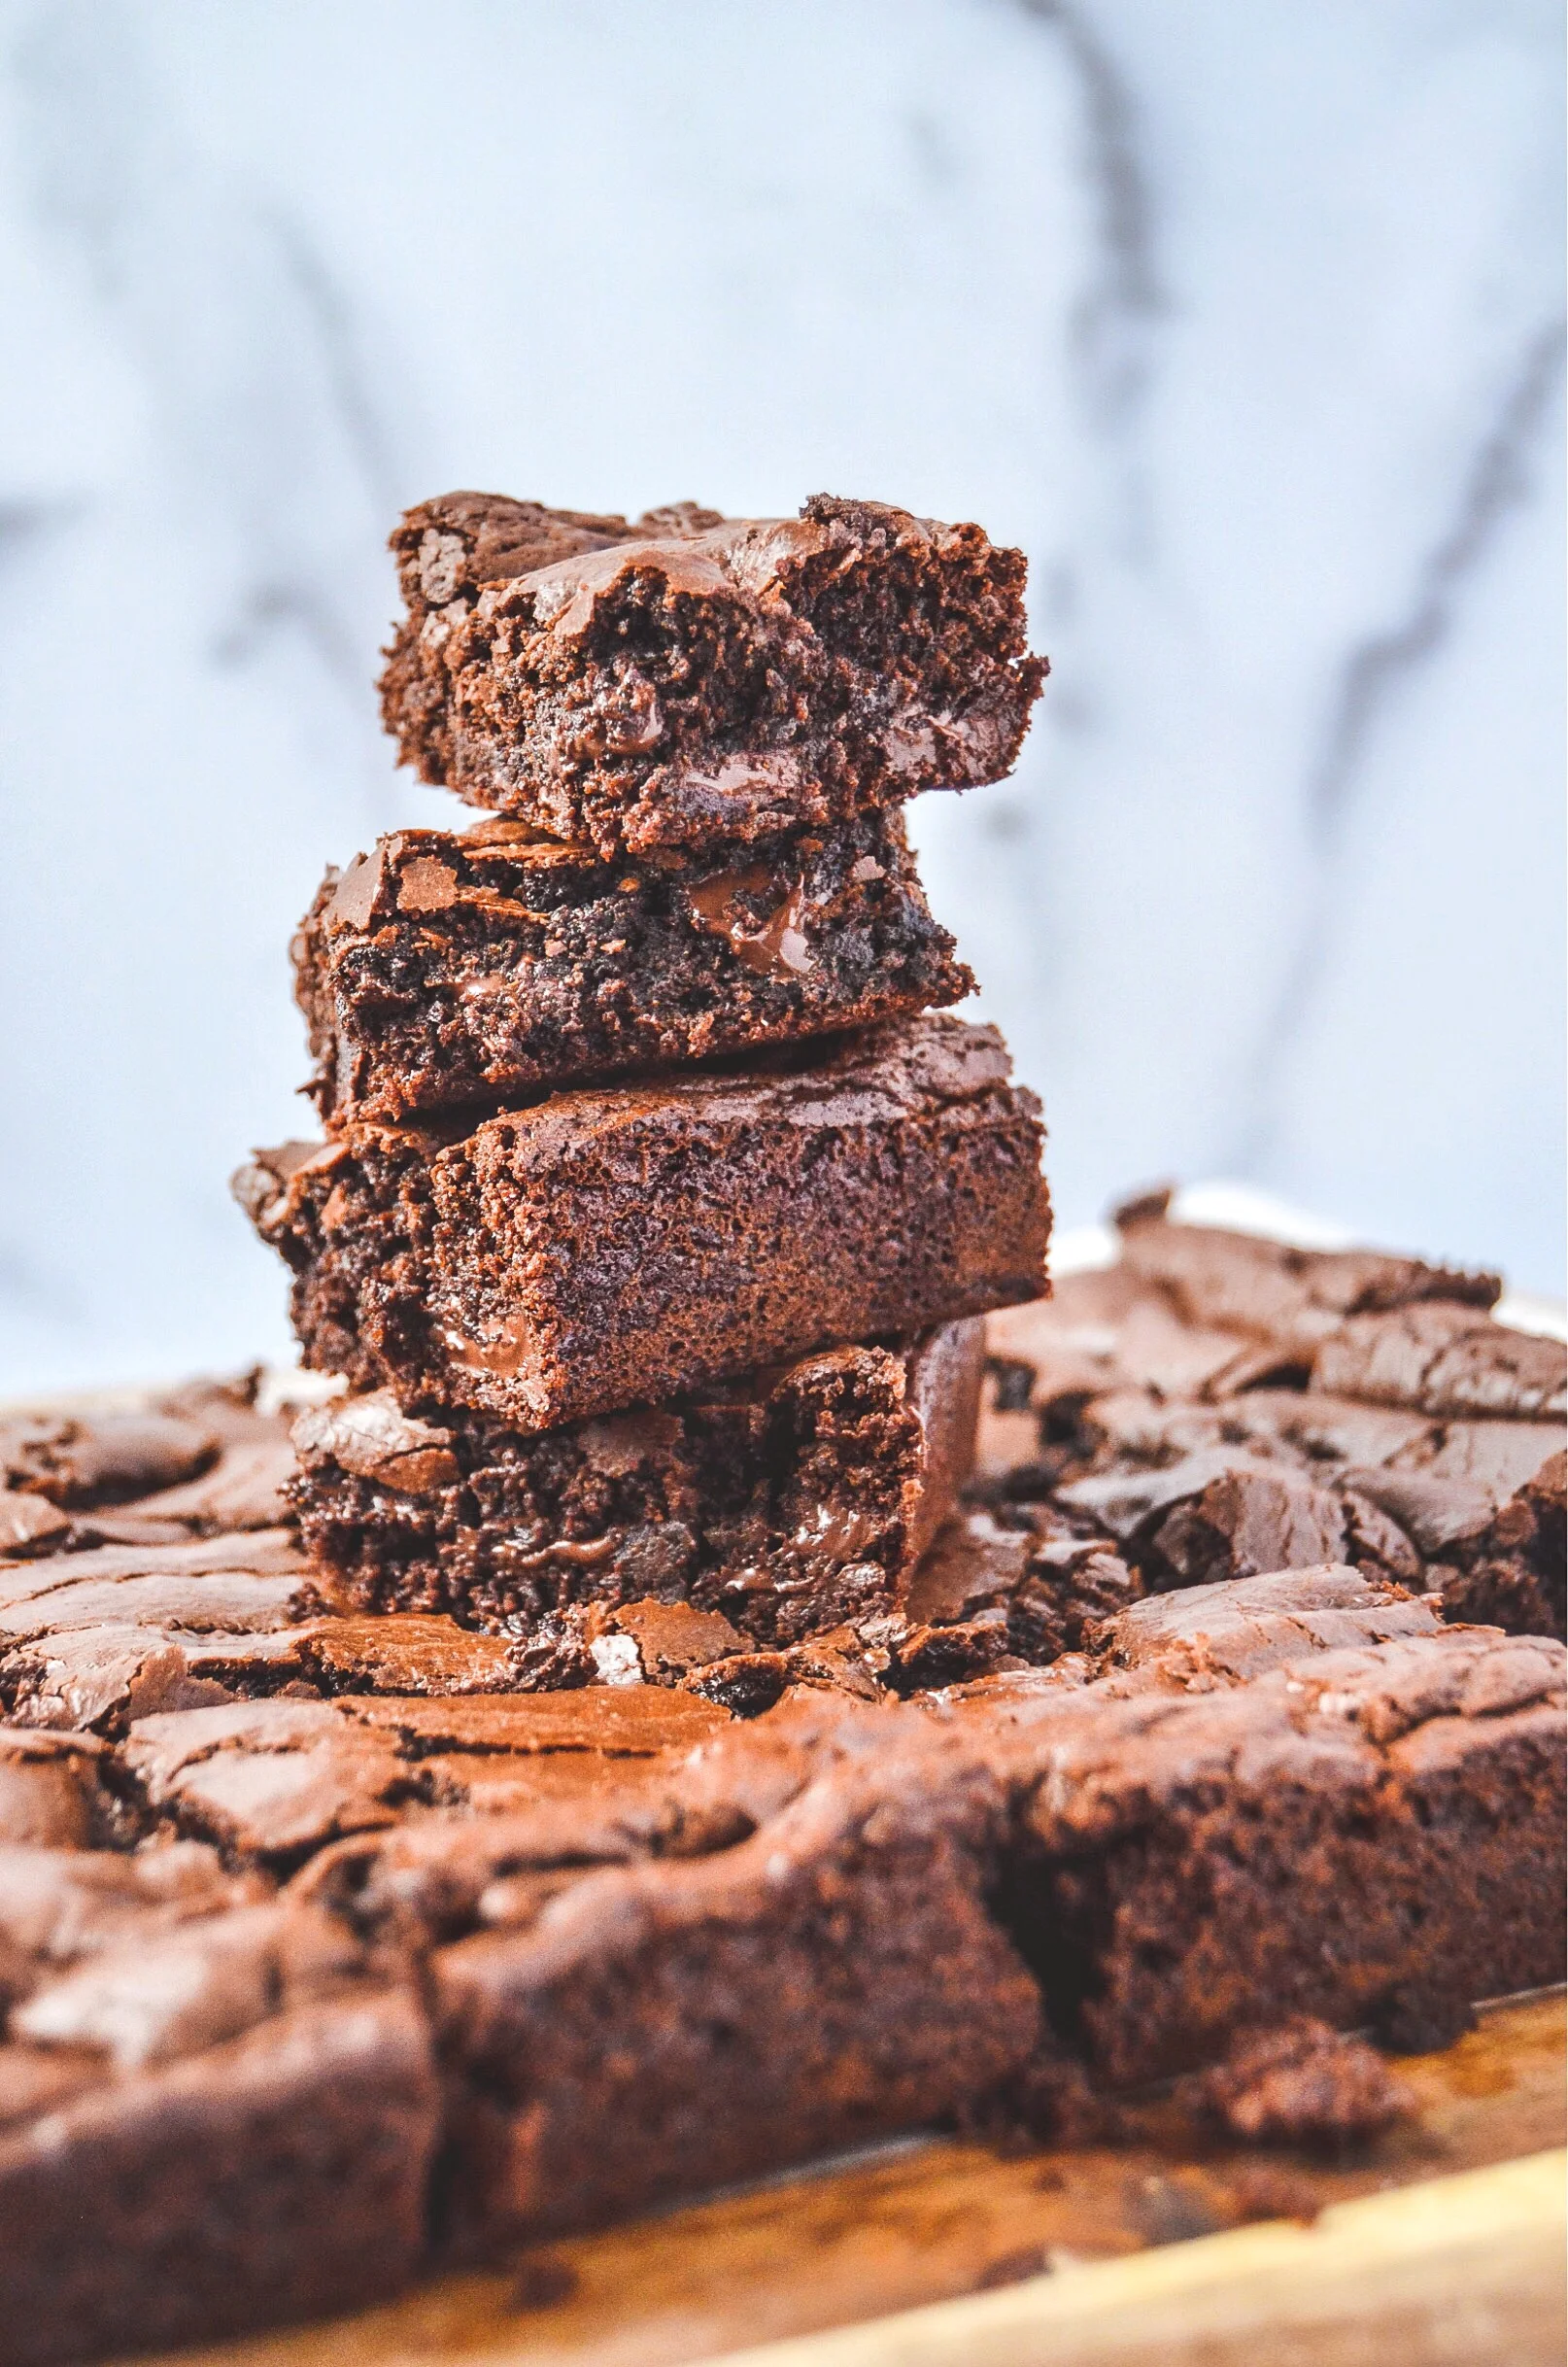
Adding a healthy twist to an old fashioned brownie can be cumbersome at times. Luckily, this brownie is free of everything “bad” yet it tastes just like your typical sugar-filled brownie. This way, we can still ride that amazing “sugar high” but not feel so bad.

How do we get there? Well, we adapt and understand the ingredients that we are using. For example, coconut flour is used to replace all-purpose white flour. Coconut flour absorbs liquid so we only use ¼ cup. Baking powder is a great leavening agent but since this is a paleo recipe, we use coconut sugar, eggs, and vanilla extract instead. This combination gets whipped until a “ribbon stage” is reached.

If you try this recipe, let us know! Leave a comment, rate it, and don’t forget to tag a photo to #fromtherootsblog on Instagram. We love seeing what you come up with!
Ingredients
2/3 cup coconut sugar
2 eggs
1 tsp vanilla extract
8 oz dark chocolate chunks
1/4 cup coconut oil
1/4 cup coconut flour
1/4 cup cocoa powder
1/2 tsp salt
1/2 tsp baking soda
1/2 cup dark chocolate chunk
instructions
Preheat oven to 350 degrees and line a 9x9 baking pan with parchment paper. Spray with a non-stick spray and set aside.
In a small saucepan or small bowl, melt 8 oz dark chocolate and oil in 30-second increments if using the microwave or low heat on stove top until smooth and glossy. Remove from heat and set aside to cool slightly.
Using a hand mixer or KitchenAid mixer, combine coconut sugar, eggs, and vanilla extract and whisk together until the mixture reaches the “ribbon stage” (when you lift the whisk, the mixture should stream down evenly in “ribbons”).
In a medium bowl, whisk dry ingredients (coconut flour, cocoa powder, salt, and baking soda)
With the mixer/hand mixer on low, add the melted chocolate and dry ingredients until fully combined. Fold in ½ cup dark chocolate chunks.
Pour batter into prepared pan and smooth the surface.
Bake for 17-20 minutes until edges are set and the inside is slightly underdone.
Let the brownies rest in the pan for 15-20 minutes. This is the hardest part but so worth it!
Store in fridge for up to a week or freezer for up to a month. I personally like making these to freeze so that I can have brownie bites for my ice cream!

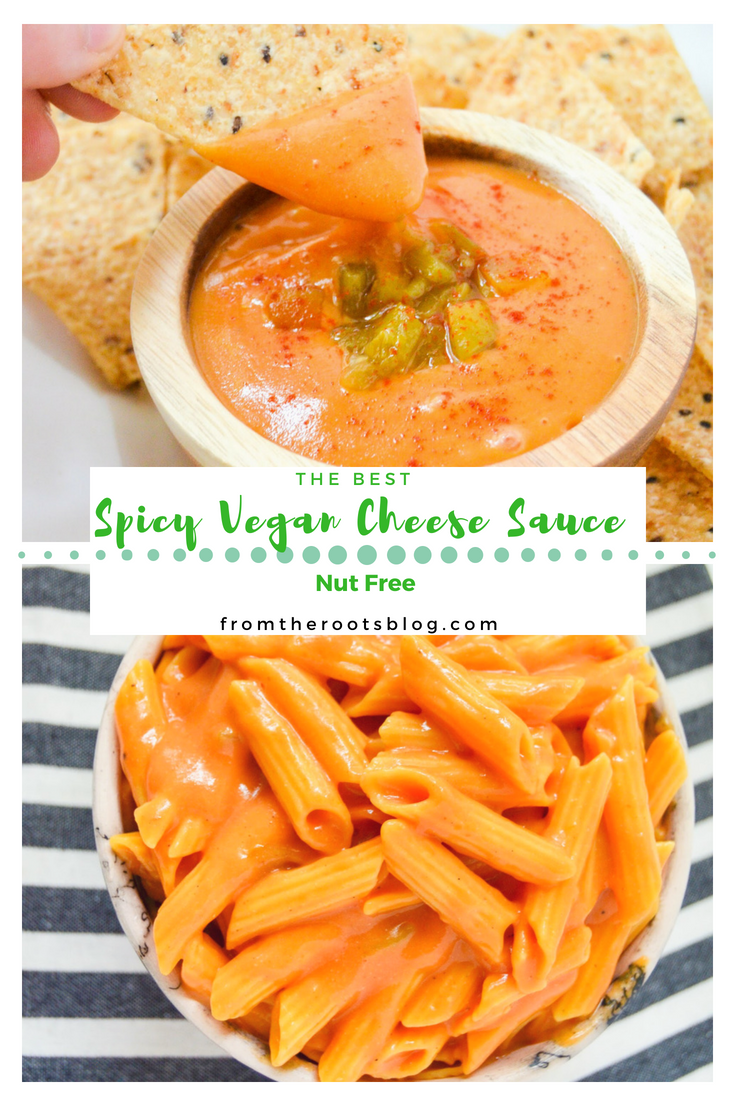
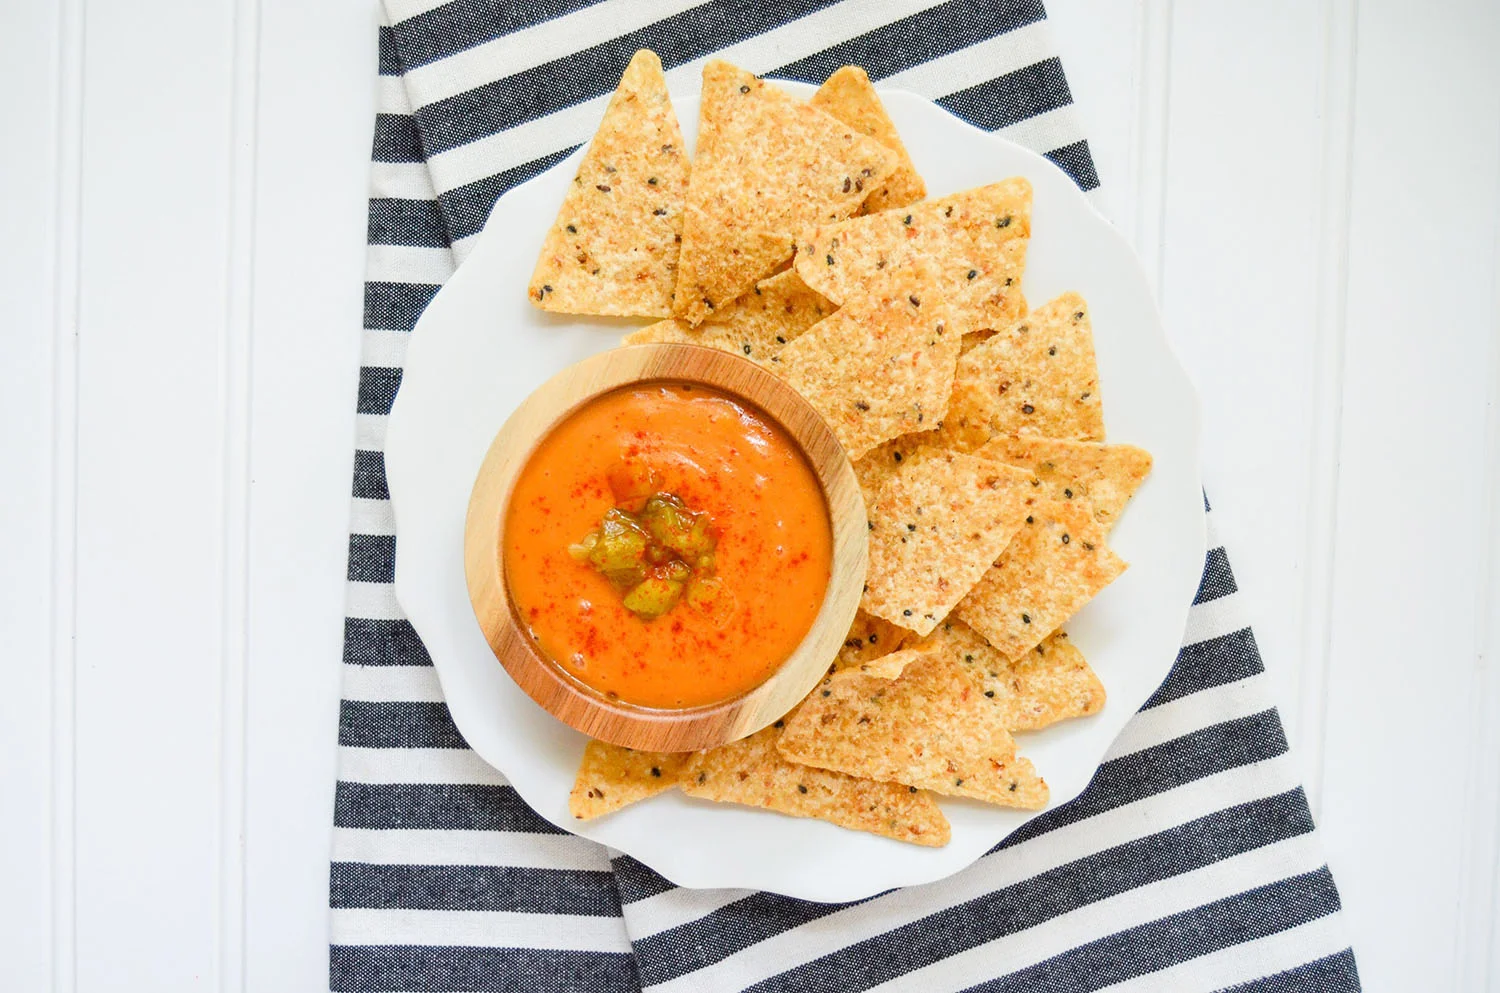
The Best Spicy Vegan Cheese Sauce
Ever since I found out that I was intolerant to dairy, my world crumbled before my eyes (pun intended)! So, you are trying to tell me that I cannot have mac and cheese, cheese on my pizza or queso from Mexican restaurants!? Are you trying to kill me!?
Since then, I have been scouring the web for the best dairy-free alternatives! To be honest, it’s hard finding alternatives that are not overly processed or inexpensive. But even though grocery stores are getting better at providing alternatives, it’s nice to know I can make something quick at home with staple ingredients that are always on hand. And I can do it on the cheap!
A delicious and super addicting spicy vegan cheese sauce that’s perfect for mac and cheese, dips, baked potatoes and more!
Ever since I found out that I was intolerant to dairy, my world crumbled before my eyes (pun intended)! So, you are trying to tell me that I cannot have mac and cheese, cheese on my pizza or queso from Mexican restaurants!? Are you trying to kill me!?
Since then, I have been scouring the web for the best dairy-free alternatives! To be honest, it’s hard finding alternatives that are not overly processed or inexpensive. But even though grocery stores are getting better at providing alternatives, it’s nice to know I can make something quick at home with staple ingredients that are always on hand. And I can do it on the cheap!

This is where I bring you to my most favorite recipe of them all, spicy vegan cheese sauce! When I was making a batch to take photos, I literally ate half the macaroni and cheese and the entire dip with chips within two hours; it is that addicting!
What makes this my favorite is that it’s crazy how easy and fast it is to make it! You see all these vegan cheese recipes with a million ingredients and the direction list are fifteen steps long and you're sitting there like, “Who has time for that?”

That’s why this recipe is easy. Simply boil the potato and carrots until mushy, transfer them to a blender along with the rest of the ingredients and blend until smooth. Boom, that’s it! Double boom because the sauce is already hot so no need to transfer it to a skillet or oven to heat up.

Even if you are not vegan or dairy free, this recipe is great to serve to your kids or that picky eater that struggles with incorporating veggies into their diet. Even better, you can get away with hiding them in popular dishes like mac and cheese, baked potato and chips and dip!

You could also use this recipe on a few From the Roots classics like kale and pesto cauliflower rice, Verde carne asada tostadas, turkey meatballs, and sweet potato hash breakfast skillet.
If you try this recipe, let us know! Leave a comment, rate it, and don’t forget to tag a photo to #fromtherootsblog on Instagram. We love seeing what you come up with!
A delicious and super addicting spicy vegan cheese sauce that’s perfect for mac and cheese, dips, baked potatoes and more!
INGREDIENTS
1 large russet potato (skin off)
2 large carrots
1 can (10 oz) low-sodium rotel (spicy)
1/4 cup nutritional yeast
1 Tbsp juice of fresh lemon
1/4 tsp salt
1/4 tsp pepper
DIRECTIONS
Cut potatoes and carrots into cubes and add to boiling water. Boil until vegetables are mushy.
Drain vegetables from water and transfer to a high powered blender. Add the rest of the ingredients to the blender and blend until smooth and creamy.
May add additional salt if bland or more nutritional yeast for desired “cheesy flavor.”
Serve immediately or refrigerate for up to a week.
NOTES
If you are making this into a dip, garnish with smoked paprika, diced green chilies or jalapenos!
For a more spicy taste, simply add hot sauce or green chilies for that desired taste.
Warning: if you use a regular can of Rotel, this sauce will taste "tomato-y" and not like a cheese dip flavor.