Sort by Category
- May 2026
- March 2026
- December 2025
- November 2025
- October 2025
- September 2025
- August 2025
- June 2025
- August 2024
- July 2024
- June 2024
- May 2024
- February 2024
- January 2024
- December 2023
- November 2023
- October 2023
- September 2023
- August 2023
- July 2023
- March 2023
- February 2023
- January 2023
- December 2022
- November 2022
- October 2022
- September 2022
- August 2022
- June 2022
- May 2022
- April 2022
- March 2022
- February 2022
- January 2022
- December 2021
- November 2021
- October 2021
- September 2021
- August 2021
- July 2021
- June 2021
- May 2021
- April 2021
- March 2021
- February 2021
- January 2021
- December 2020
- November 2020
- October 2020
- September 2020
- August 2020
- July 2020
- June 2020
- May 2020
- April 2020
- March 2020
- February 2020
- January 2020
- December 2019
- November 2019
- October 2019
- September 2019
- August 2019
- July 2019
- June 2019
- May 2019
- April 2019
- March 2019
- February 2019
- January 2019
- December 2018
- November 2018
- October 2018
- September 2018
- August 2018
- July 2018
- June 2018
- May 2018
- April 2018
- March 2018
- February 2018

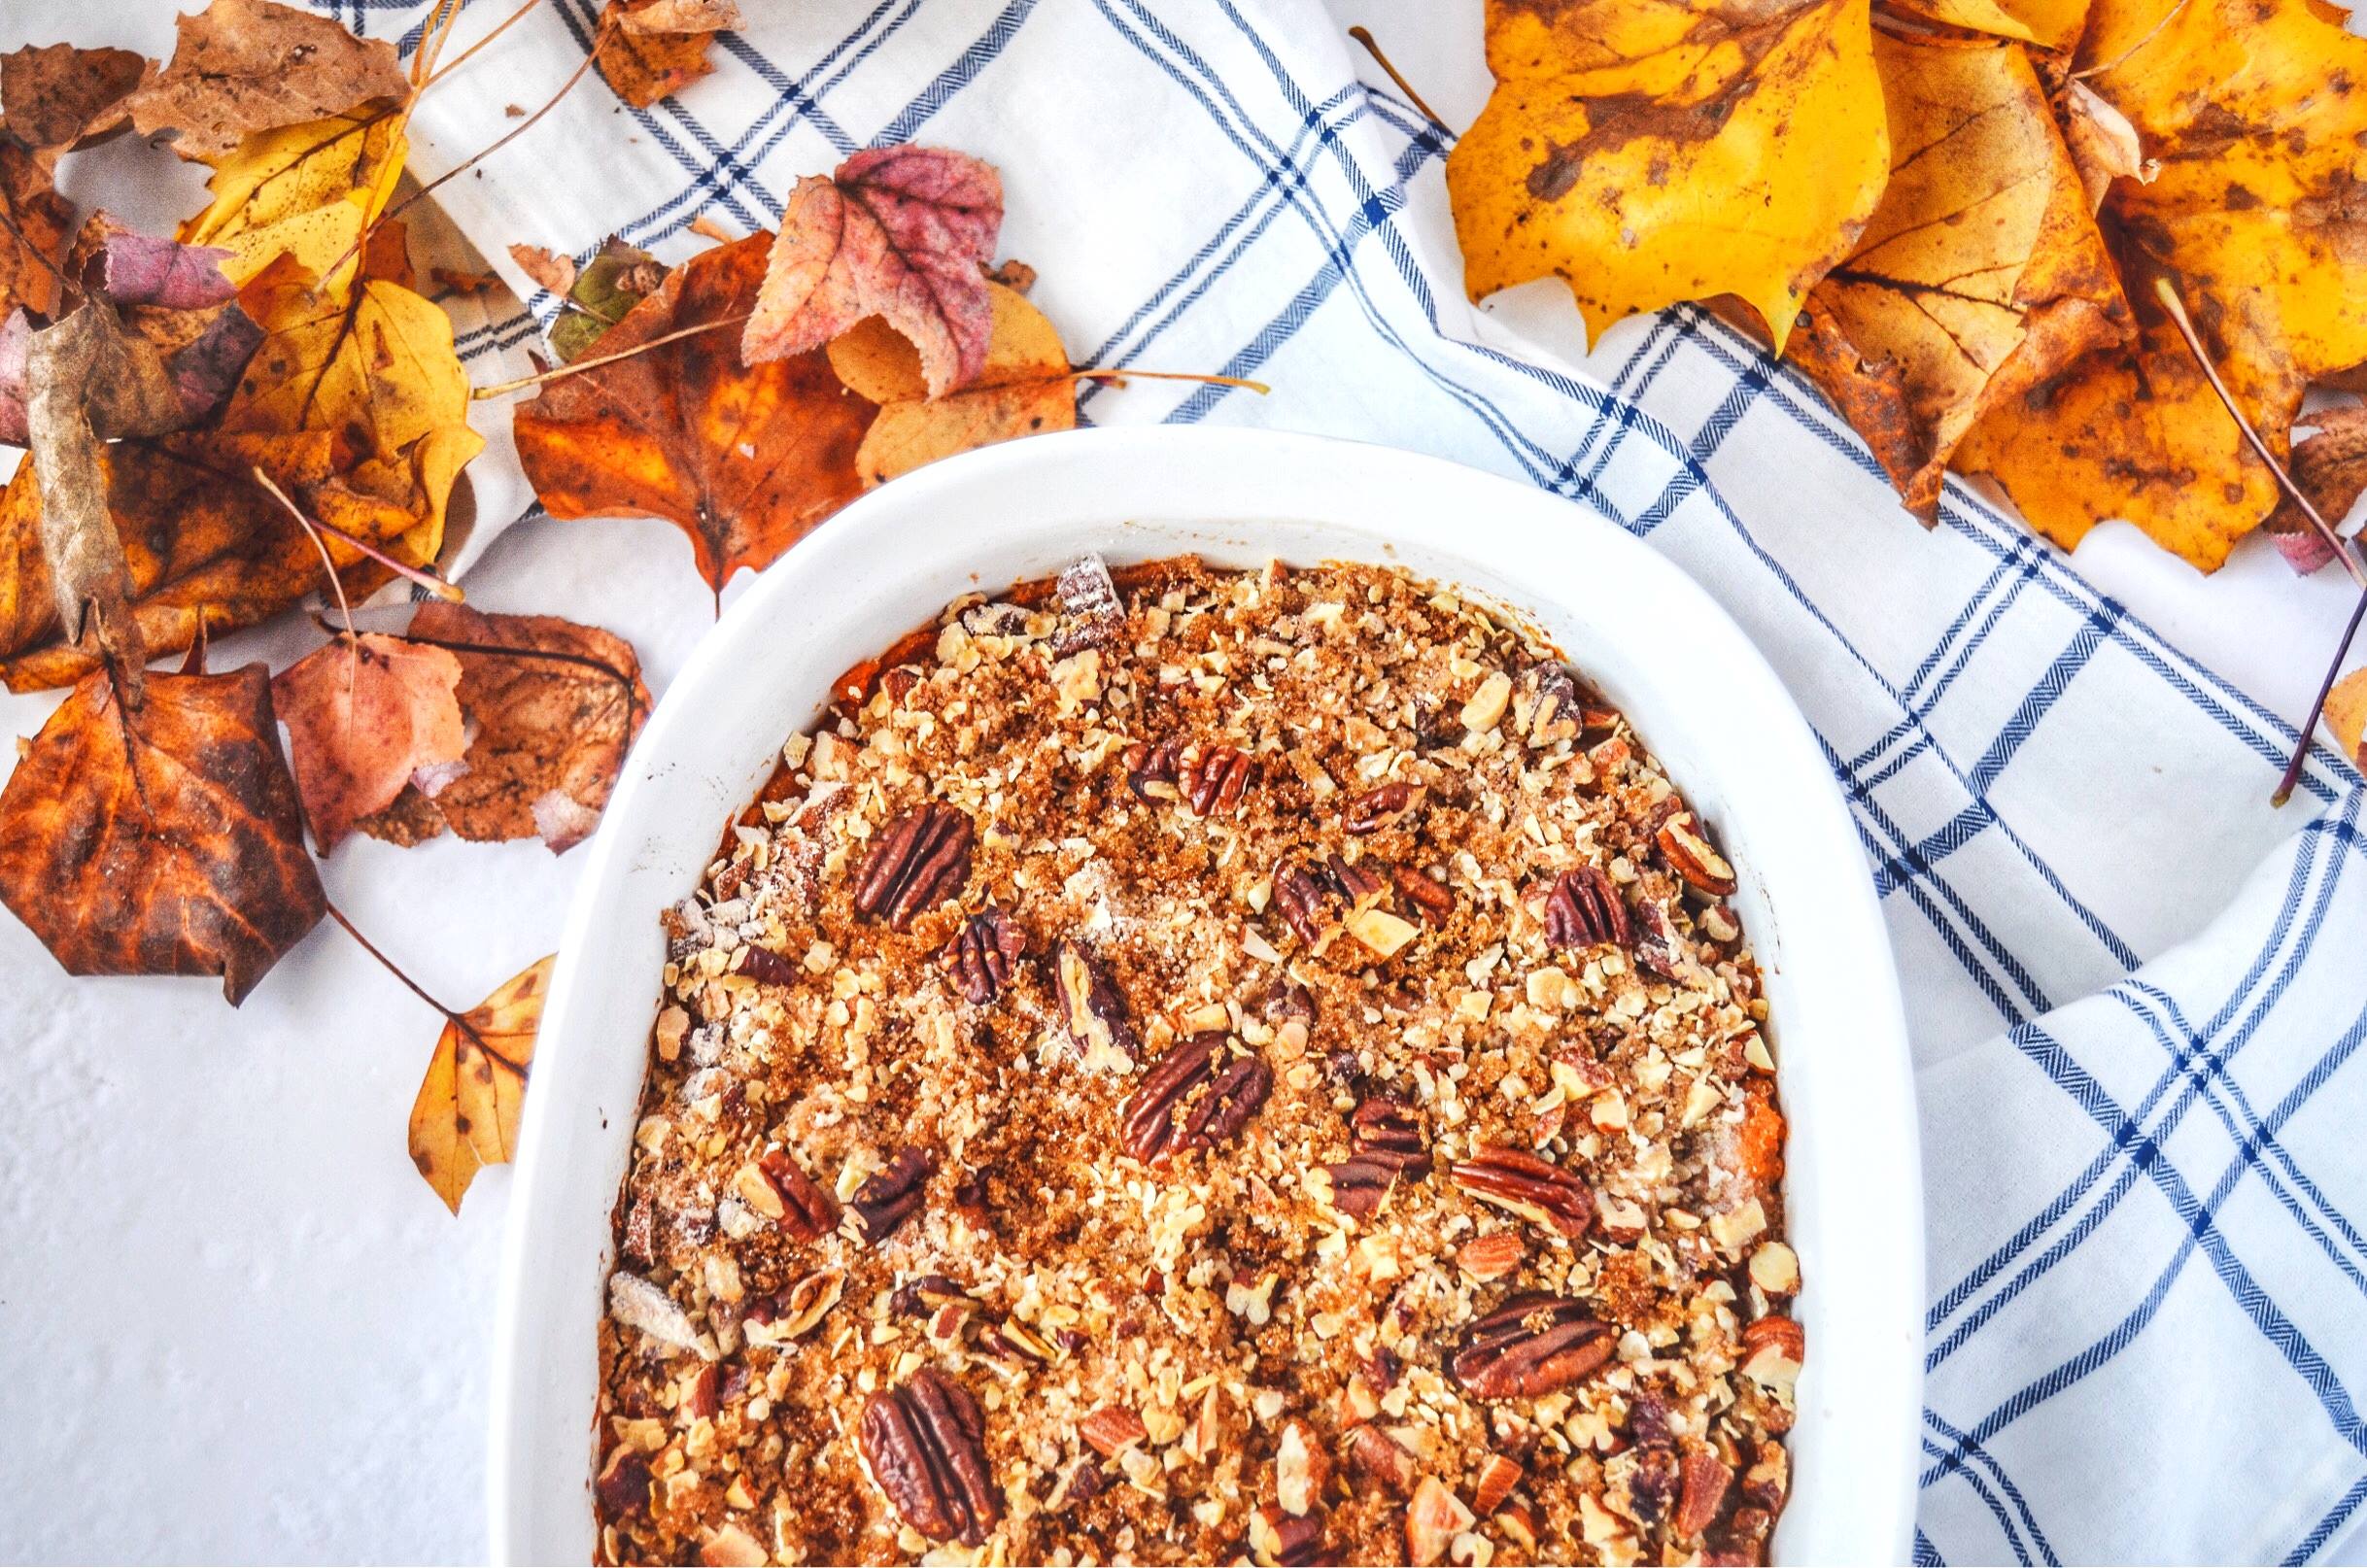
Healthy Sweet Potato Casserole
Let’s be honest, the only time I think about eating sweet potato casserole is during Thanksgiving; amiright?! Like a complete cooked turkey, it seems like sweet potato casserole only falls within a Thanksgiving side dish category.
Maybe after you make this, you can see that this side dish can be made year-round! I’m thankful for that because when recipe testing a month before Thanksgiving, I was glad this could be eaten with most any dishes. For example, we had this casserole with my pecan crusted spiced salmon and broccolini and it was amazing!
Perfect for the holidays or as a side dish! Bonus - vegan, gluten-free and naturally lower in sugar.

Let’s be honest, the only time I think about eating sweet potato casserole is during Thanksgiving; amiright?! Like a complete cooked turkey, it seems like sweet potato casserole only falls within a Thanksgiving side dish category.

Maybe after you make this, you can see that this side dish can be made year-round! I’m thankful for that because when recipe testing a month before Thanksgiving, I was glad this could be eaten with most any dishes. For example, we had this casserole with my pecan crusted spiced salmon and broccolini and it was amazing!

When it comes to sweet potato casserole, I have noticed the toppings can fall within two categories: marshmallows or with a crunchy texture. I fall in the crunchy texture category 100%! Personally, I am not the biggest fan of marshmallows (I know, I know -- crazy, right?). If you enjoy marshmallows, you can still go that route.

What I love about this recipe and what sets this casserole apart from the rest is the secret ingredient: oranges. After watching Samin Nosrat’s Salt Fat Acid Heat on Netflix, she made a good point that many Thanksgiving dishes lack acid which is why cranberry sauce is often served. With that in mind, I knew I needed to change that! I’m so glad I did because the orange zest and juices completely elevate the spices and sweetness in the sweet potatoes perfectly!

The rest of the ingredients are pretty standard for a traditional sweet potato casserole sans butter and heaping cups of sugar. To make them naturally sweeter without adding so much sugar, I simply baked the sweet potatoes instead of boiling them to maintain their natural sweetness.
With Thanksgiving in mind, I would bake the sweet potatoes a day before the big day so that when you are at the point of cooking all your casseroles/side dishes, you will just need to prepare the mixture and topping and pop them in the oven 23-30 minutes. It’s that easy.
If you try this recipe, let us know! Leave a comment, rate it, and don’t forget to tag a photo to #fromtherootsblog on Instagram. We love seeing what you come up with!
Healthy Sweet Potato Casserole with a crunchy nut topping - Perfect for the holidays or as a side dish! Bonus - vegan, gluten-free and naturally lower in sugar.
ingredients
3 large sweet potatoes
1 cup plant based milk
1/4 cup orange juice (1/2 orange)
Zest of 1/2 orange
1 tsp cinnamon
1 tsp vanilla extract
1/4 tsp nutmeg
1/4 tsp allspice
2-4 Tbsp pure maple syrup
1/2 tsp salt
Crunchy Nut Topping
1/2 cup chopped pecans
1/4 cup chopped almonds
1/3 cup GF old fashioned oats (regular is fine)
1/3 cup GF all purpose flour (regular is fine)
1/2 cup light organic brown sugar (coconut sugar is fine)
4 Tbsp cubed coconut oil
instructions
Preheat oven to 400 degrees.
Use a fork to poke holes in sweet potatoes and place potatoes on a foil-lined baking sheet.
Roast for about 45 min to an hour or until fork tender. Allow potatoes to cool for 5-10 minutes before discarding the skin.
Lower oven temperature to 350 degrees while potatoes are cooling. Spray an 8x8 inch pan or a 1 ½ quart to 2-quart oven safe baking dish with nonstick cooking oil. Set aside for later.
Place sweet potato flesh in a large bowl and add milk, seasonings, orange juice and zest, and maple syrup. Use an electric mixer or potato masher to beat mixture until smooth and creamy.
Pour mixture into a prepared baking pan and smooth top.
To make the crunchy nut topping: Whisk together nuts, oats, flour, sugar and oil.
Sprinkle topping all over the sweet potato mixture.
Bake for 25-30 minutes or until the top is golden brown. Remove from oven and let cool for 5-10 minutes.
Notes
You can make this casserole ahead of time! Cover and place in the fridge. When ready, bake as directed.
If you do not have coconut oil, you can use vegan or regular butter.
Don’t make the mistake I did and use quick oats! First bake is crunchy but reheating will make the topping mushy so use old fashioned oats!
I love using Spice Islands seasonings for this recipe, particularly their ground saigon cinnamon!

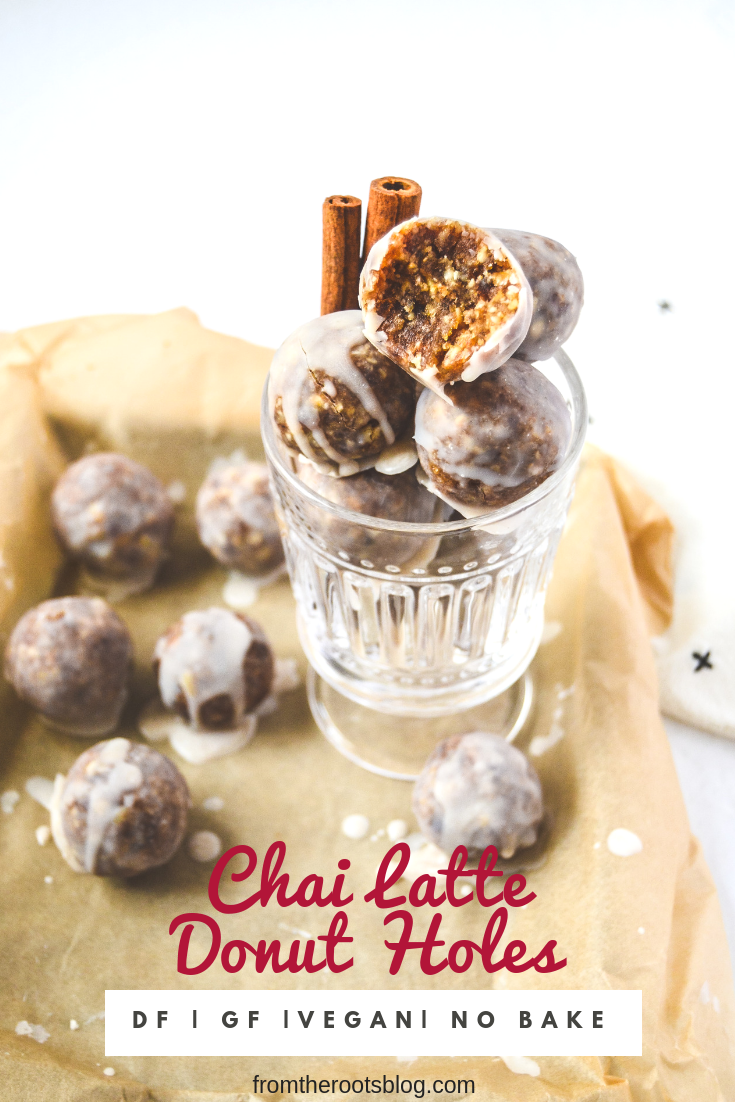
Chai Latte Donut Holes
Starting out as a new blogger, it can be easy to follow seasonal trends. For example, my Instagram feed was filled with pumpkin spice this and pumpkin spice that for a month! Now, in all genuineness, I truly love pumpkin and all things pumpkin spice, but I know not everyone feels the same way!
So I went back to what life was like before pumpkin spice, chai spice! When I was in school, I would have collections of chai teas from coconut chai teas to dark chocolate cayenne chai tea; I was obsessed! Now that I have perfected the chai spice mix, I think this nostalgia will never leave!
Made with nutrient dense filling and a coconut butter glaze, you will soon fall in love with a healthier take on donut holes...bonus - no bake!
Starting out as a new blogger, it can be easy to follow seasonal trends. For example, my Instagram feed was filled with pumpkin spice this and pumpkin spice that for a month! Now, in all genuineness, I truly love pumpkin and all things pumpkin spice, but I know not everyone feels the same way!
So I went back to what life was like before pumpkin spice, chai spice! When I was in school, I would have collections of chai teas from coconut chai teas to dark chocolate cayenne chai tea; I was obsessed! Now that I have perfected the chai spice mix, I think this nostalgia will never leave!

I’m chasing rabbits here, the focus lies on these chai latte donut holes that are out of this world! Probably my favorite “energy balls” to date! The reason why they are called donut holes is because of the mouthwatering glaze! The glaze is made with coconut butter and coconut oil that hardens at room temperature. It provides the perfect shine while cracking just as you take a bite!

The “donut holes” are made with nutrient dense ingredients that are nothing like a real donut. Unlike a fried donut hole, you will feel satisfied eating one or two. Bonus, these donut holes are naturally sweetened with medjool dates!
The DIY chai spice mix really takes you down chai latte heaven in these bad boys. With a cup of coffee or tea, these chai latte donut holes are the perfect match!

If you try this recipe, let us know! Leave a comment, rate it, and don’t forget to tag a photo to #fromtherootsblog on Instagram. We love seeing what you come up with!
ingredients
Donut Holes
1/2 cup walnuts
1/2 cup cashews
1/2 cup almond flour
1 cup pitted dates (about 12)
1 tsp chai spice mix
2 tsp vanilla extract
2 Tbsp water
Glaze
1 Tbsp coconut butter
2 Tbsp coconut oil
1 Tbsp maple syrup
pinch of cinnamon
instructions
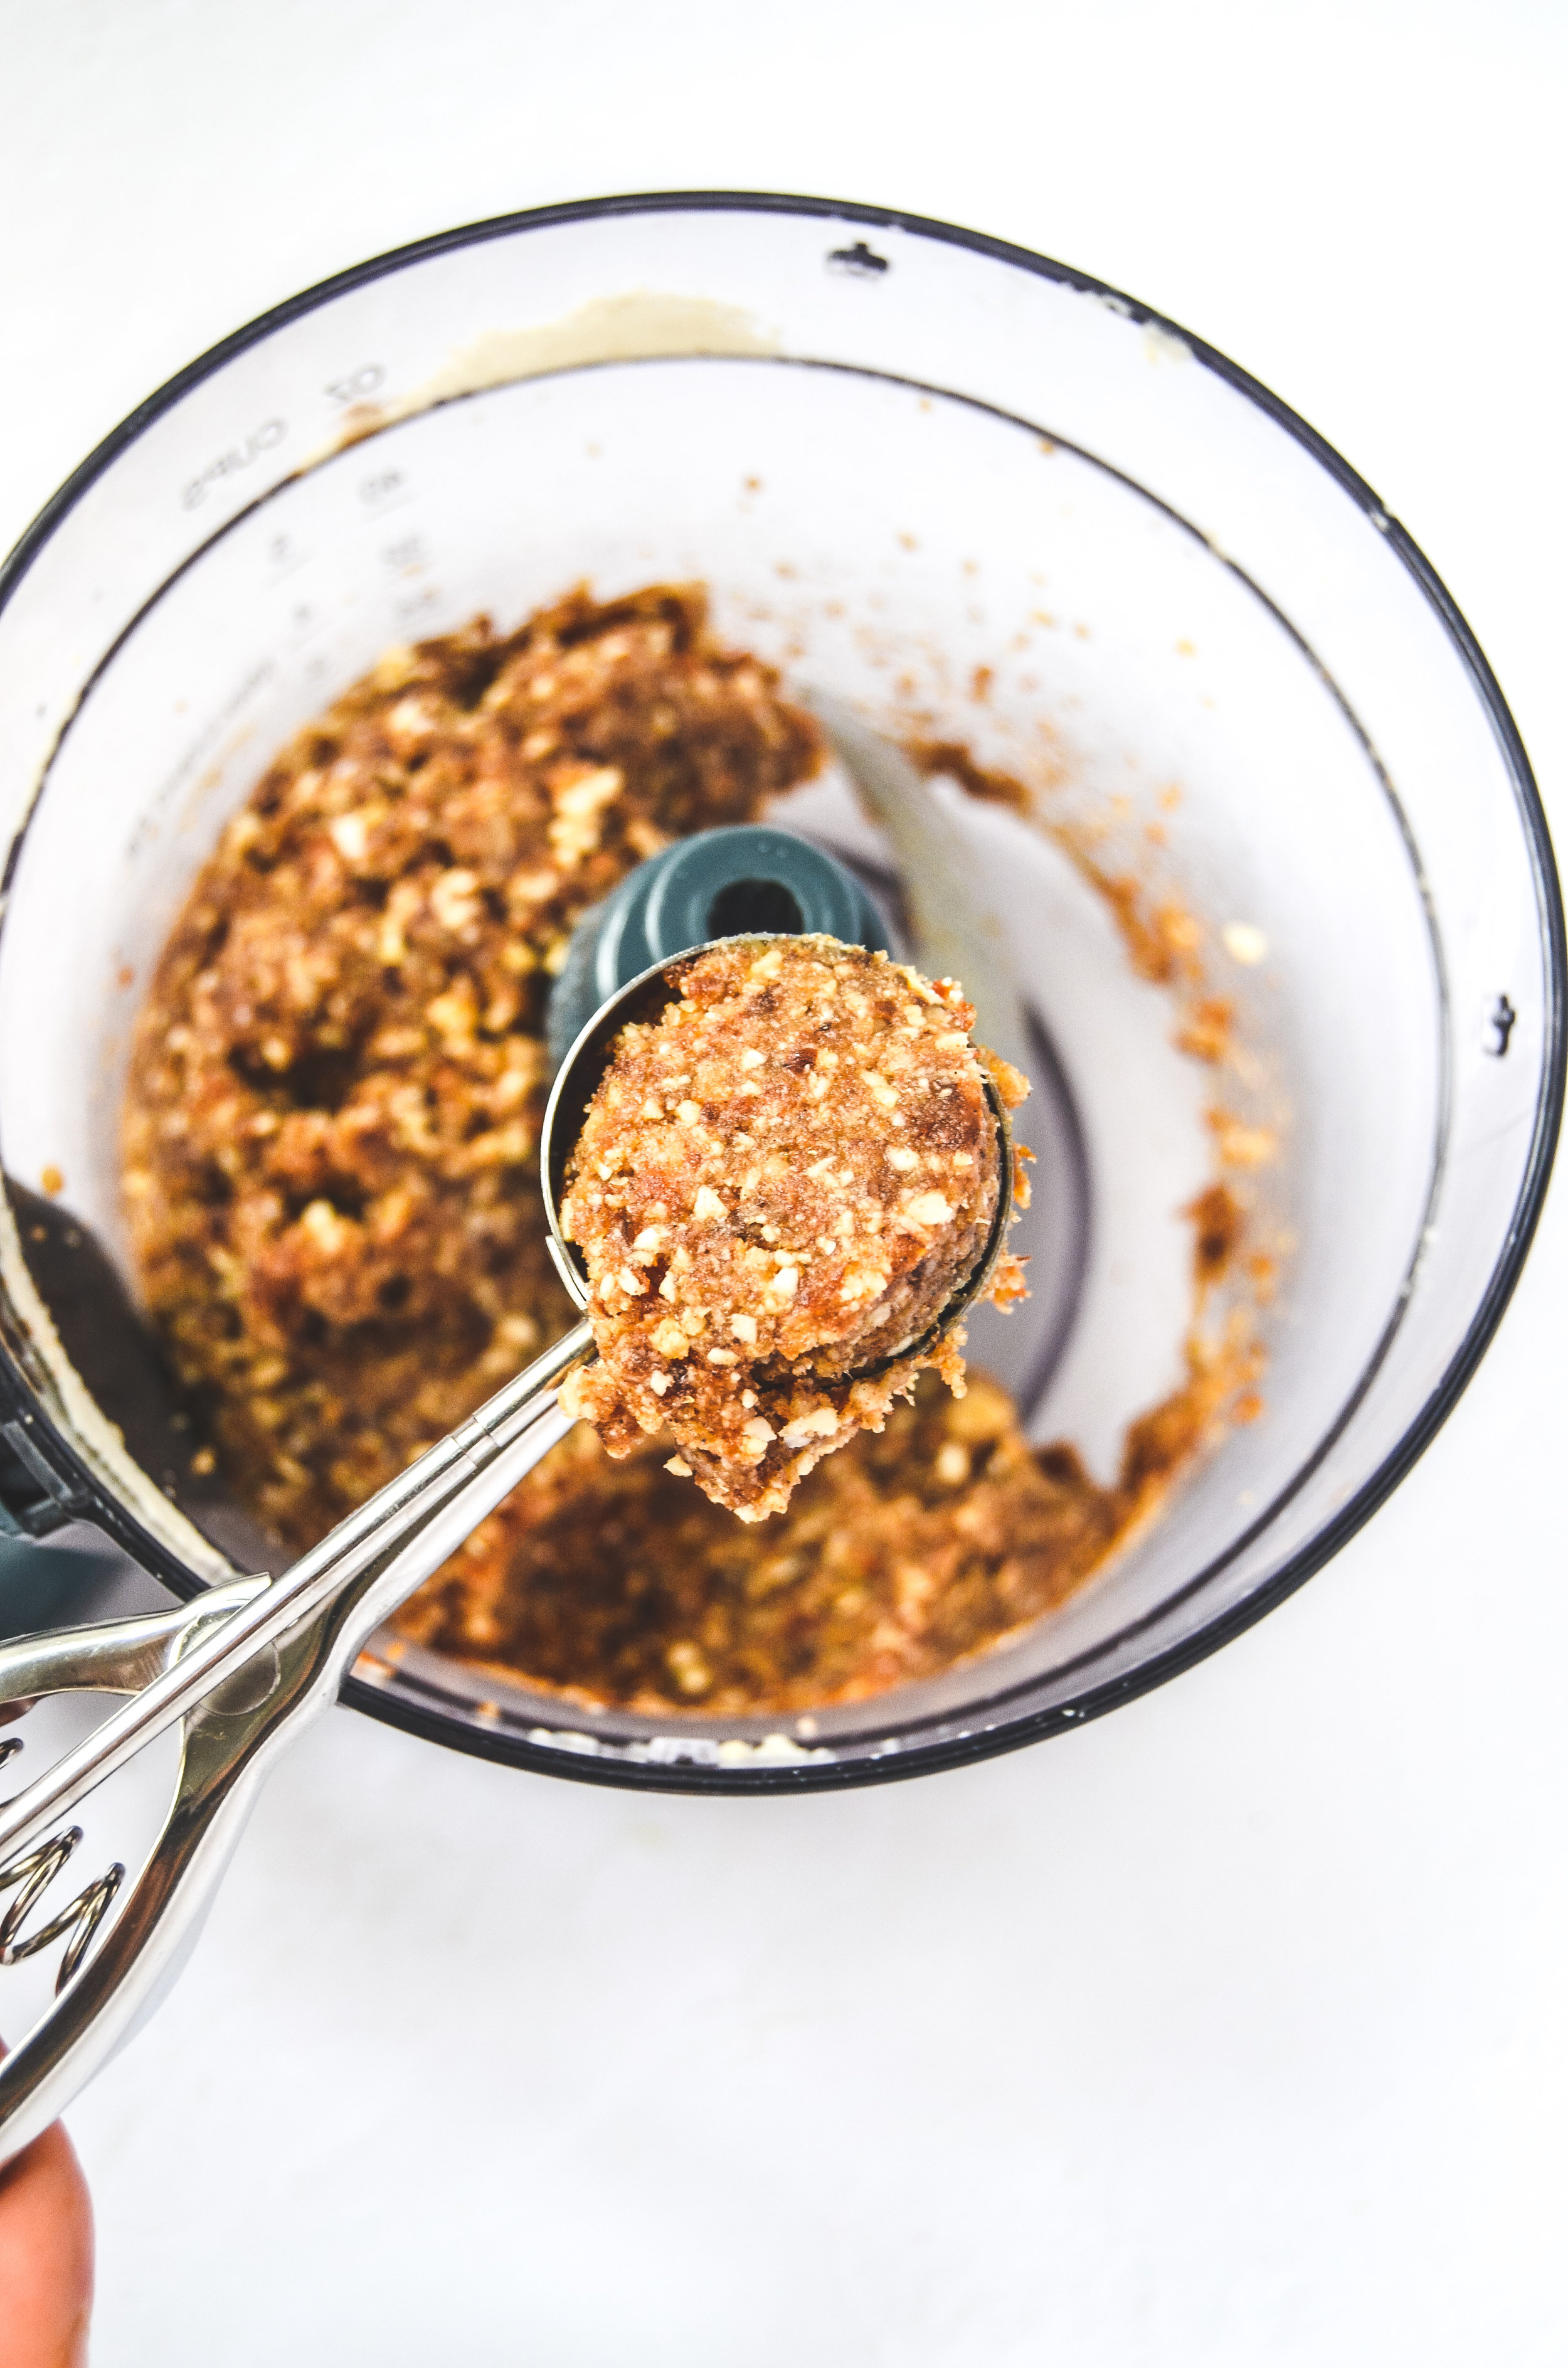
In a food processor, add all donut hole ingredients and pulse until desired consistency (picture for reference). You should blend until a tacky dough forms. You may need to add more water if the mixture is too dry.
With a tablespoon or cookie scooper, scoop about 1 Tbsp per ball to create 14 round balls.
Place balls onto a parchment lined baking sheet and put in the freezer for up to 10 minutes.
While the balls are in the freezer, make the glaze by adding all ingredients to a small bowl and warm in the microwave in 30-second increments until mixture is melted. (separation is natural - just stir well before glazing).
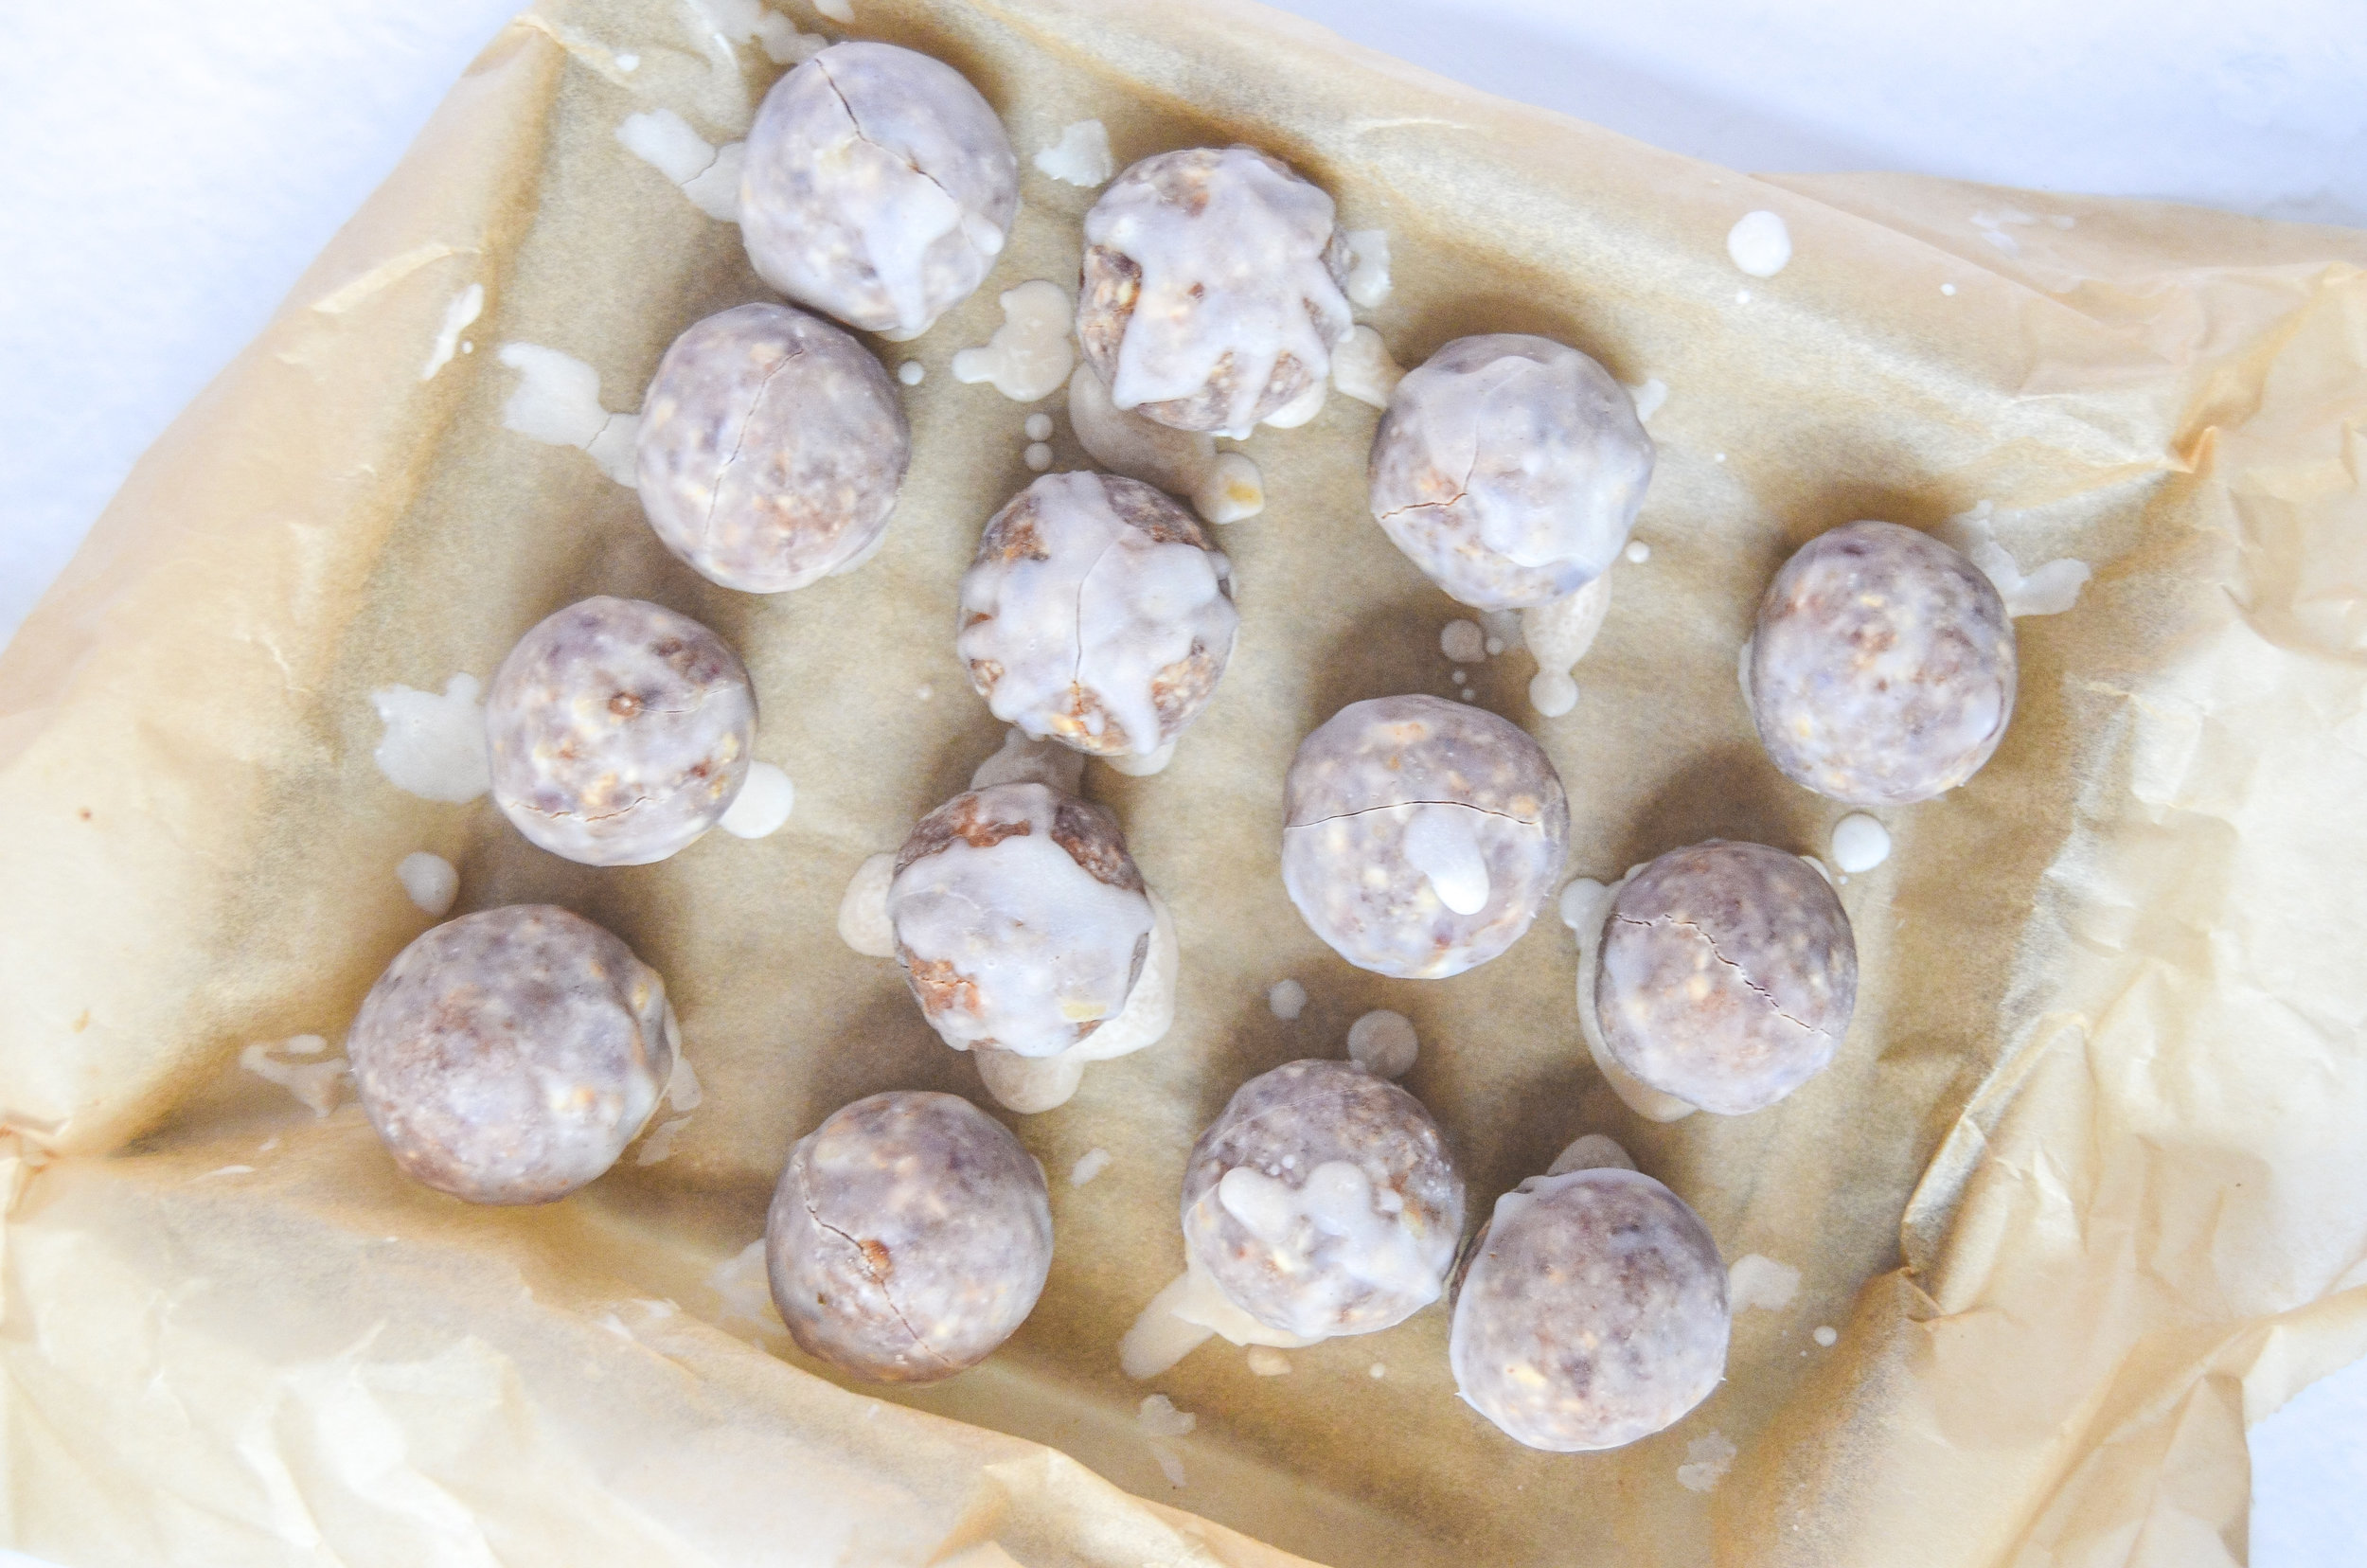
Take the balls out of the freezer and roll each ball into the glaze mixture using a spoon. Place back onto the parchment paper and put back into the freezer for 30 minutes.
Repeat the previous step again and put back in the freezer for 30 minutes or until glaze is set. You can repeat this step up to three times (or until mixture is used up) but I have found the glaze is perfect in two rounds.
Store donut holes in a storage container for up to two weeks or freezer for up to 1 month.
Notes
Even though the glaze is the best part, the chai latte donut holes will still taste just as good if you omit the glaze; they will just be chai latte balls!
If you would like a single serving amount of chai mix and pushed for time, simply add 1 tsp cinnamon, scant ¼ tsp cardamom, ¼ tsp ginger and a pinch of cloves. Just start slow with each seasoning and taste as you go since these spices are naturally strong.
With that said, if using chai is new to you or you're worried about the donut holes being too spicy, start by adding a ½ tsp of chai spice mix and gradually increase to the desired flavor.

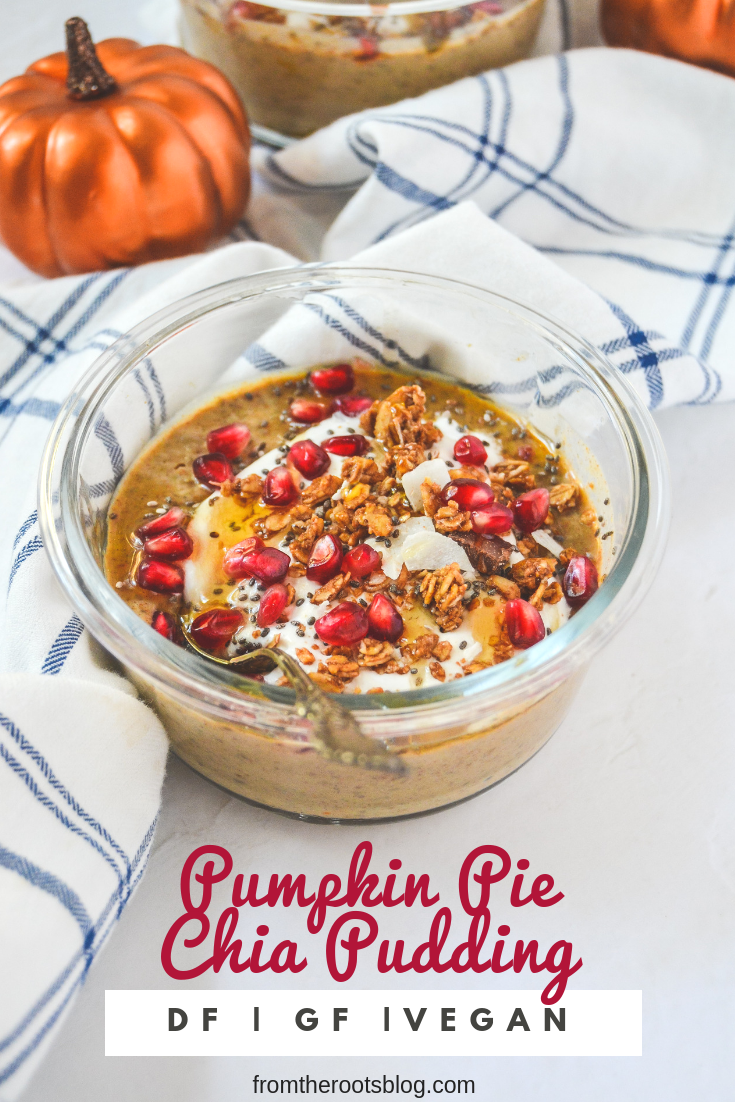
Pumpkin Pie Chia Pudding
Whether you are tired of hearing about pumpkin spice or can’t get enough, this recipe is perfect for both parties! The only reason why I know this is a fact is that my husband says so! Haha.
Usually, after photos have been taken, Michael will stick one ear out of the room to wait for those magic words: “Honey, would you like to eat this?” This time, he ate the entire jar before I could tell him what the special ingredient is in my chia pudding! For the record, he despises pumpkin pie spice everything!
Pumpkin Pie Chia Pudding - Simple, six-ingredient chia pudding that’s thick, creamy and nutritious!
Whether you are tired of hearing about pumpkin spice or can’t get enough, this recipe is perfect for both parties! The only reason why I know this is a fact is that my husband says so! Haha.
Usually, after photos have been taken, Michael will stick one ear out of the room to wait for those magic words: “Honey, would you like to eat this?” This time, he ate the entire jar before I could tell him what the special ingredient is in my chia pudding! For the record, he despises pumpkin pie spice everything!

See, I say this to tell you that pumpkin spice is here to stay! Not because of the spice, but because of the pumpkin that usually follows it! Pumpkin is an awesome fruit that is highly nutritious! Two of my favorite health benefits of pumpkin is that pumpkin is a powerful source of fiber and contains beta-carotene.

Have you ever wondered how orange vegetables and fruits have vibrant colors? It’s because of this powerful antioxidant called beta-carotene! Our body converts beta-carotene into vitamin A which is an essential vitamin for our bodies. We need vitamin A for healthy skin, a strong immune system, and good eye health. That is why I love pumpkin so much!
Enjoy this pumpkin pie chia pudding for breakfast, as a snack or even as a dessert. I’m sure chia pudding would be good warm but I have only tested this chilled. You can also use the leftover pumpkin puree in pumpkin pie protein smoothie or the elevated pumpkin spice latte recipe found on my Instagram.
If you try this recipe, let us know! Leave a comment, rate it, and don’t forget to tag a photo to #fromtherootsblog on Instagram. We love seeing what you come up with!
Pumpkin Pie Chia Pudding - Simple, six-ingredient chia pudding that’s thick, creamy and nutritious!
INGREDIENTS
1 Tbsp heaping pumpkin puree
2 Tbsp chia seeds
1/2 cup almond milk (or milk of choice)
1/2 tsp pumpkin pie spice seasoning
1/2 scoop vanilla protein powder (optional)
1 Tbsp honey
DIRECTIONS
In a small mason jar or container, combine all ingredients until fully combined.
Cover and refrigerate for at least 2-3 hours or overnight.
Eat chilled and top with your favorite toppings like pepitas, coconut flakes, bee pollen, pecans, honey, nut butter, or pomegranate seeds.

Dark Chocolate Chip Protein Bites
In light of the team series and various competitions my CrossFit gym has been doing this past month, I thought it would be fitting to make protein bites. Although I am not competing, I do want to make sure that I have the energy and stamina to complete my workouts successfully. That is why I incorporate this recipe into my weekly meal prep so that I always have a quick go-to snack right before my workout every time.
If you are looking for a classic protein ball, then look no further! These dark chocolate chip protein bites are perfect for treating a sweet tooth, perfect as a pre-workout snack, or to cure that 3pm crash!

In light of the team series and various competitions my CrossFit gym has been doing this past month, I thought it would be fitting to make protein bites. Although I am not competing, I do want to make sure that I have the energy and stamina to complete my workouts successfully. That is why I incorporate this recipe into my weekly meal prep so that I always have a quick go-to snack right before my workout every time.

It can be so easy to purchase protein bars instead because of the convenience but most protein bars are loaded with artificial sweeteners, preservatives and can be high in calories. If it’s convenience you are looking for, these protein bites are super easy to make! Added bonus: if you do swap these out for your regular protein bars but miss the flavor, these taste just like Larabars!

These dark chocolate chip protein bites are made with plant-based ingredients that are nutrient dense and worth every little calorie. They are naturally sweetened with Medjool dates which contain potassium, magnesium, vitamin B6, and calcium to name a few.

Medjool dates are great workout fuel since they are packed with slow-burning carbs (about 66 calories and 15 grams of sugar). These carbs are in a low glycemic form which means that glucose is released into the bloodstream slower which allows for steady energy during a workout.

If you try this recipe, let us know! Leave a comment, rate it, and don’t forget to tag a photo to #fromtherootsblog on Instagram. We love seeing what you come up with!
If you are looking for a classic protein ball, then look no further! These dark chocolate chip protein bites are perfect for treating a sweet tooth, perfect as a pre-workout snack, or to cure that 3pm crash!
INGREDIENTS
2 cups GF oats
1/3 cup dark chocolate chips (vegan)
1 cup (packed) or 12 medjool dates
1 scoop vanilla protein powder
1/4 cup almond butter
2 Tbsp chia seeds
1/4 cup cold water
Couple dashes of ground cinnamon
DIRECTIONS
Soak medjool dates in warm water for 10 minutes.
To a food processor or high powered blender, add soaked dates, oats, protein powder, almond butter, chia seeds, cinnamon. While pulsing on low, slowly add the water until the mixture is evenly combined but not overly processed. (may need to use more water for desired consistency)
Transfer mixture to a bowl and add the chocolate chips. Fold in the chocolate chips until combined.
Using a cookie scoop or 1 Tbsp measuring spoon, roll into 1-inch balls.
To set, place balls onto parchment paper lined baking tray and place into the fridge or freezer for 10 minutes or eat right away! Will keep for about a week in an airtight container or you can freeze them for longer term storage.
NOTES
Makes 22-24 protein bites
*Protein is derived from plant based vanilla protein powder

Lavender Scones and Lavender Latte
I’m not quite sure why I don’t make scones enough. They’re super easy to make, with simple ingredients, and they taste amazing! Let me show you how!
I have tried many lavender baked goods in my time and what I have found is that it is too easy to use too much lavender! It seems as though the flavor is overpowering, “soapy” tasting, or just nonexistent. The best way to use lavender is to use it sparingly so it adds the perfect hint of flavor and aroma. In this recipe, I simply infuse the milk with the dried buds, resulting in just the right amount of the lavender flavor.
Lavender scones and lavender latte, need I say more! Lavender scones are flaky and buttery without the guilt. Lavender latte made with lavender-infused coconut milk that is sure to wake you in the best way!

I’m not quite sure why I don’t make scones enough. They’re super easy to make, with simple ingredients, and they taste amazing! Let me show you how!
I have tried many lavender baked goods in my time and what I have found is that it is too easy to use too much lavender! It seems as though the flavor is overpowering, “soapy” tasting, or just nonexistent. The best way to use lavender is to use it sparingly so it adds the perfect hint of flavor and aroma. In this recipe, I simply infuse the milk with the dried buds, resulting in just the right amount of the lavender flavor.

On the subject, it is best to cook with dried culinary lavender rather than fresh. I love using lavender for many uses so I purchase this bulk dried lavender brand from Amazon.
The next thing you need to know is that scones are not like most pastries. The dough doesn’t require a lot of kneading and doesn’t need to rise. Actually, the less you mess with the dough the better!

These lavender scones are healthier than the typical scone as some of the classic main ingredients are swapped for healthier options. For example, a scone cannot be a flaky, buttery scone without cold cubed butter. I have tried this recipe with cold vegan butter but what I have found to be healthier and actually better tasting is using cold coconut oil. I also use 100% stone ground whole wheat pastry organic flour which I have found is the best base for this scone. Bob’s Red Mill brand is what I use for this recipe.


Before putting the scones in the oven, you’ll need to use your leftover infused lavender milk mixture and brush the mixture over the top of each scone. Sprinkle coarse sugar on top and dried lavender to pretty them up! The lavender milk and sugar will help create a crunchy outer layer which pairs great with the flakey, butteriness of the scones.
If you have leftover lavender milk mixture, why not make a lavender latte to pair with your scone!? It's super easy -- just add some to your choice of coffee!

You really don’t need a glaze for these scones as they stand on their own but if you must, I love drizzling honey over them. If you have been following me on Instagram, you’ll see that I love putting lavender honey over my scones to take it to the next level. Savannah Bee Company is what I use!


If you try this recipe, let us know! Leave a comment, rate it, and don’t forget to tag a photo to #fromtherootsblog on Instagram. We love seeing what you come up with!
Lavender scones and latte, need I say more! Lavender scones are flaky and buttery without the guilt. Lavender latte made with lavender-infused coconut milk that is sure to wake you in the best way! |Dairy Free|
INGREDIENTS
Lavender Scones
1 1/2 cup whole wheat pastry organic flour
1 Tbsp baking powder
1/2 tsp salt
2 Tbsp organic cane sugar
6 Tbsp cold coconut oil ((small cubed))
1 can unsweetened coconut milk
1 Tbsp vanilla extract
2 Tbsp dried lavender flowers
Lavender Latte
8 oz hot coffee
1-2 Tbsp lavender coconut milk*
1-2 Tbsp sweetener (honey, maple syrup, cane sugar)
DIRECTIONS
Lavender Scones
*In a small saucepan, combine coconut milk, vanilla, and lavender flowers and heat until boiling. Just when the mixture boils and the lavender is fragrant, turn the burner off and let steep for about 10 minutes. Strain the mixture using a fine strainer and let cool to room temperature.
Preheat oven to 375 degrees and line a baking sheet with parchment paper.
In a large mixing bowl, whisk together flour, powder, salt, and sugar.
Add the small cubed coconut oil and cut into the pastry using your hands or two knives moving in opposite directions resulting in a crumbly dough mixture.
Make a well in the center of the mixture and add 1 cup of the room temperature lavender milk mixture. Gently mix using your hands until the dough is fully incorporated (do not over knead!)
Transfer the dough to a lightly floured surface and form into a circle just under 1-inch thick. Cut into 8 wedges and transfer them to the parchment lined baking sheet. Brush the tops of each scone with the lavender milk mixture and sprinkle with pink organic cane sugar.
Bake for about 20-25 minutes until the scones rise and turn golden brown. Remove from the oven and place on a cooling rack to cool.
Once scones have cooled, eat right away or drizzle honey over them and enjoy!
Lavender Latte
To a Vitamix blender or milk frother, add 8 oz hot coffee, 1-2 Tbsp lavender milk mixture, and 1-2 Tbsp honey or maple syrup.
Blend until fully incorporated, showing signs of milk froth.
Enjoy right away with a scone or two!
NOTES
I prefer making the lavender coconut milk mixture a day before and keeping it in the fridge until I am ready to make the scones. It’s best to have the milk on the cooler side as coconut oil melts very quickly.
Must use cold coconut oil because if the oil melts when kneading the dough then your scones will be very hard and dry.