Sort by Category
- December 2025
- November 2025
- October 2025
- September 2025
- August 2025
- June 2025
- August 2024
- July 2024
- June 2024
- May 2024
- February 2024
- January 2024
- December 2023
- November 2023
- October 2023
- September 2023
- August 2023
- July 2023
- March 2023
- February 2023
- January 2023
- December 2022
- November 2022
- October 2022
- September 2022
- August 2022
- June 2022
- May 2022
- April 2022
- March 2022
- February 2022
- January 2022
- December 2021
- November 2021
- October 2021
- September 2021
- August 2021
- July 2021
- June 2021
- May 2021
- April 2021
- March 2021
- February 2021
- January 2021
- December 2020
- November 2020
- October 2020
- September 2020
- August 2020
- July 2020
- June 2020
- May 2020
- April 2020
- March 2020
- February 2020
- January 2020
- December 2019
- November 2019
- October 2019
- September 2019
- August 2019
- July 2019
- June 2019
- May 2019
- April 2019
- March 2019
- February 2019
- January 2019
- December 2018
- November 2018
- October 2018
- September 2018
- August 2018
- July 2018
- June 2018
- May 2018
- April 2018
- March 2018
- February 2018
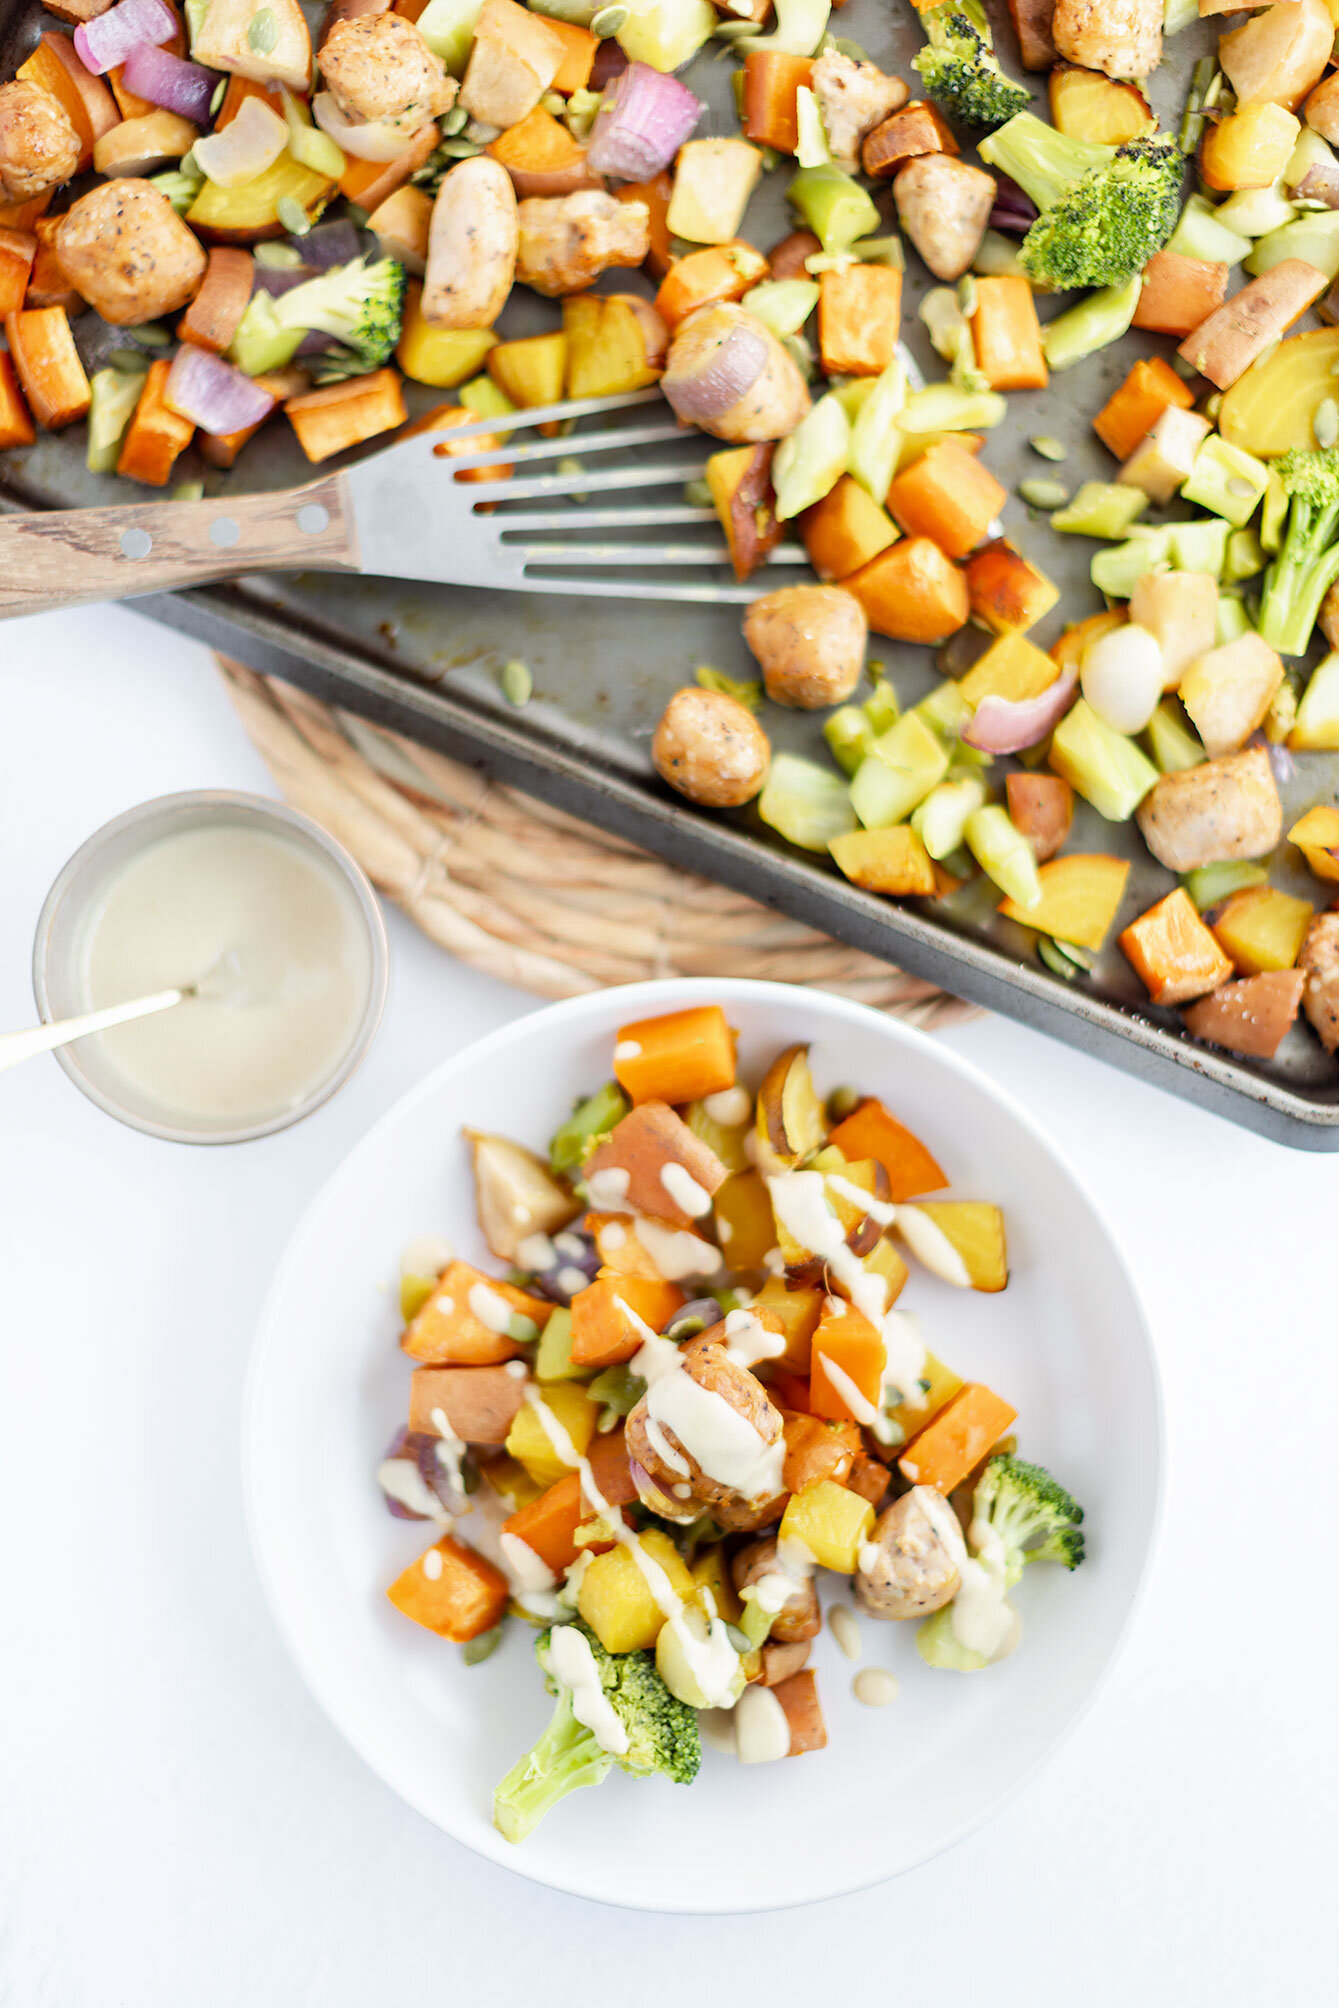
Chicken Sausage and Harvest Veggies Sheet Pan
Sheet Pans - Without a doubt, the easiest thing to prepare if you fall into the categories of: busy, tired, and bored. Simple as that. All you have to do is cut (or use pre-cut/frozen) your veggies, slice sausage links, and place in the oven until ready to eat. While your meal is cooking, prepare a simple 3 ingredient dressing and that is it!
To save even more time, you can prepare the veggies and dressing the day before so when you are ready to heat up the oven, simply spread the veggies and protein on the sheet pan and let it cook. Come on people, I am just spoon feeding how easy this meal is to you! Haha
Chicken Sausage + Harvest Veggies Sheet Pan - All the fall feels on one sheet pan. This healthy fall inspired sheet pan recipe includes a sweet maple tahini dressing. Meal-prep, make-ahead, and weeknight friendly.
Sheet Pans - Without a doubt, the easiest thing to prepare if you fall into the categories of: busy, tired, and bored. Simple as that. All you have to do is cut (or use pre-cut/frozen) your veggies, slice sausage links, and place in the oven until ready to eat. While your meal is cooking, prepare a simple 3 ingredient dressing and that is it!
To save even more time, you can prepare the veggies and dressing the day before so when you are ready to heat up the oven, simply spread the veggies and protein on the sheet pan and let it cook. Come on people, I am just spoon feeding how easy this meal is to you! Haha
By using seasonal veggies, you don’t necessarily have to worry about flavor as much as seasonal produce are at its peak!
Meaning, less seasonings = less fuss. For this recipe, I season with little salt (because of the sausage) and use a simple everyday seasoning blend when seasoning the veggies.
To help round this meal out by incorporating healthy fats, I created a sweet and simple maple tahini dressing that pairs perfectly with the dish!
So either add this to your lunch meal prep rotation, weeknight dinner option, or keep it in your back pocket when you need to make something last minute - I promise you, you won’t regret it!
If you try this recipe, let us know! Leave a comment, rate it, and don’t forget to tag a photo to #fromtherootsblog on Instagram. We love seeing what you come up with!
Chicken Sausage + Harvest Veggies Sheet Pan - All the fall feels on one sheet pan. This healthy fall inspired sheet pan recipe includes a sweet maple tahini dressing. Meal-prep, make-ahead, and weeknight friendly.
Ingredients
1 red apple, cored and cubed
12 oz (1 package) chicken sausage, sliced
2-3 medium to large beets, cubed
½ red onion, diced into chunks
2 large sweet potatoes or 1 small butternut squash, cubed
1 head broccoli (or frozen), chopped
¼ cup raw pepitas
Fav seasonings + S|P
Maple Tahini Dressing
2 Tbsp Tahini
1 tsp pure maple syrup
1 tsp dijon mustard
S+P
Directions
Preheat oven to 400 degrees and line a large baking sheet with parchment paper or generously coat with avocado/coconut oil spray
Add sweet potatoes to the sheet pan and toss to coat with oil spray.
Roast for 15 minutes. While sweet potatoes are roasting, prep other veggies/protein.
Remove sweet potatoes from the oven and add the rest of the sheet pan ingredients. Sprinkle seasonings over ingredients, toss to coat, and spread ingredients out in a single layer.
Return to the oven and continue to roast until the veggies are tender, about 25 minutes longer.
While roasting, prepare dressing by simply mixing all ingredients in a small bowl until combined. May need to add 1 Tbsp increments of water to thin dressing until desired consistency.
You can sprinkle pepitas over roasted veggies/protein and return to the oven for an additional 5-10 minutes or sprinkle pepitas after final cooking. Serve with dressing and enjoy!
10 Minute At Home Booty Workout
Even though your butt can look great in tight jeans or help to build confidence, there are so many more reasons than this! There are three major glute muscles that will be targeted in this short workout, gluteus maximas, gluteus medius and gluteus minimus. These muscles extends the hip (pulls the thigh behind you), does internal and external hip rotation, and abducts the hip (your lateral movement to the side). They are basically highly important! But for people who live a sedentary lifestyle or sit for the most part of the day, these muscles are often weak and under-worked.
By sitting, our glutes “turn off”which can lead to our hip flexors (the muscles that pull the thigh forward) get tight and can lead to injury. So with workouts like this that focuses on squatting with the addition to weights/without weights (strength/endurance), we can alleviate back pain, increase athletic performance, prevent knee pain, and improve posture! Now you know what your glutes do for you, here are four moves you can do for them!
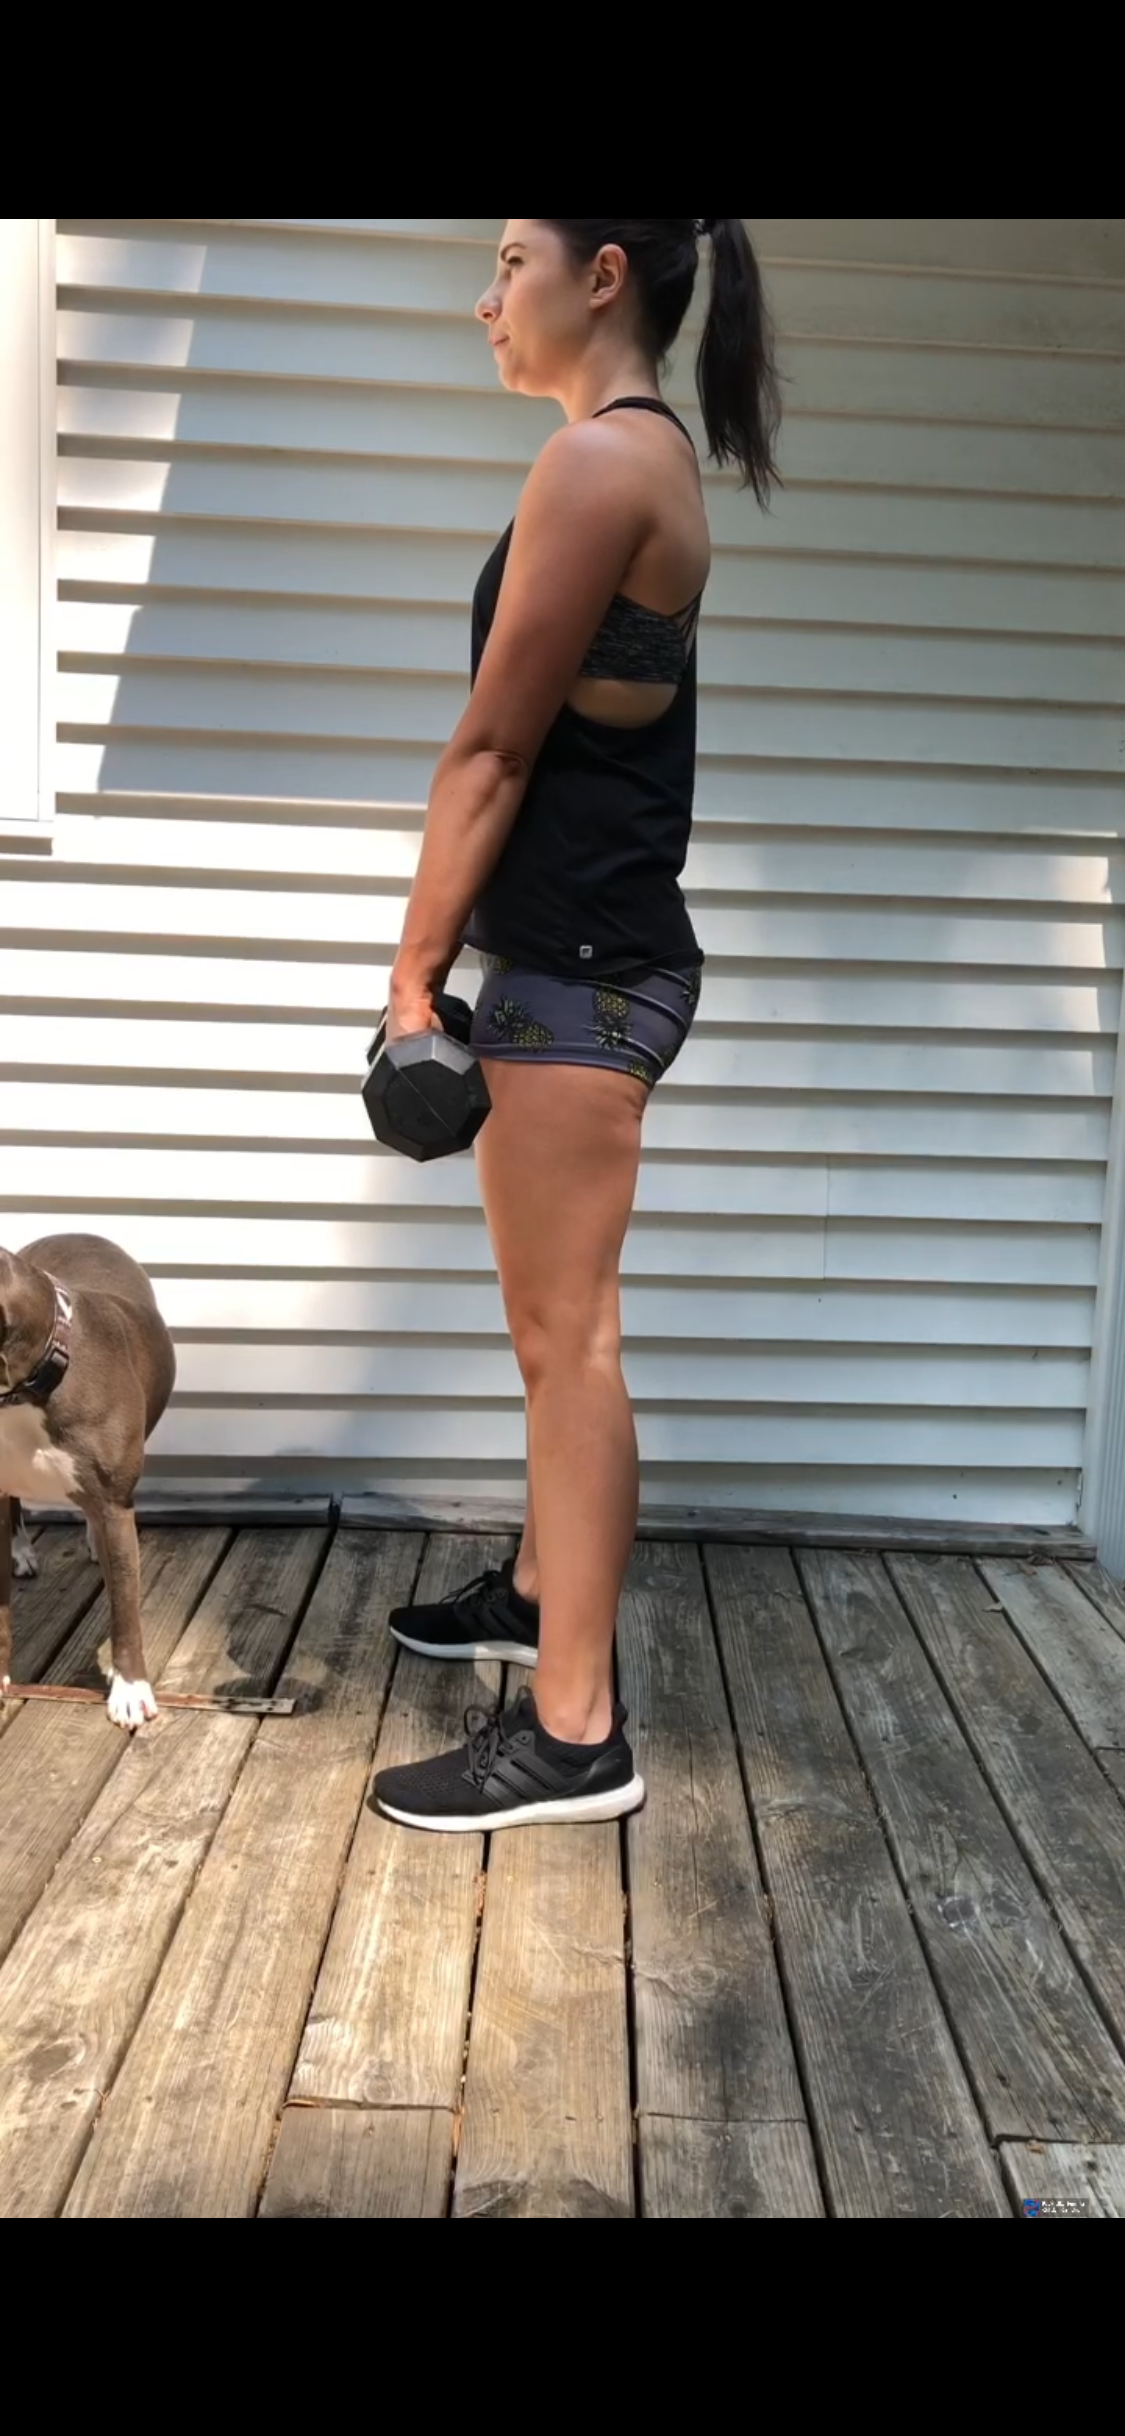
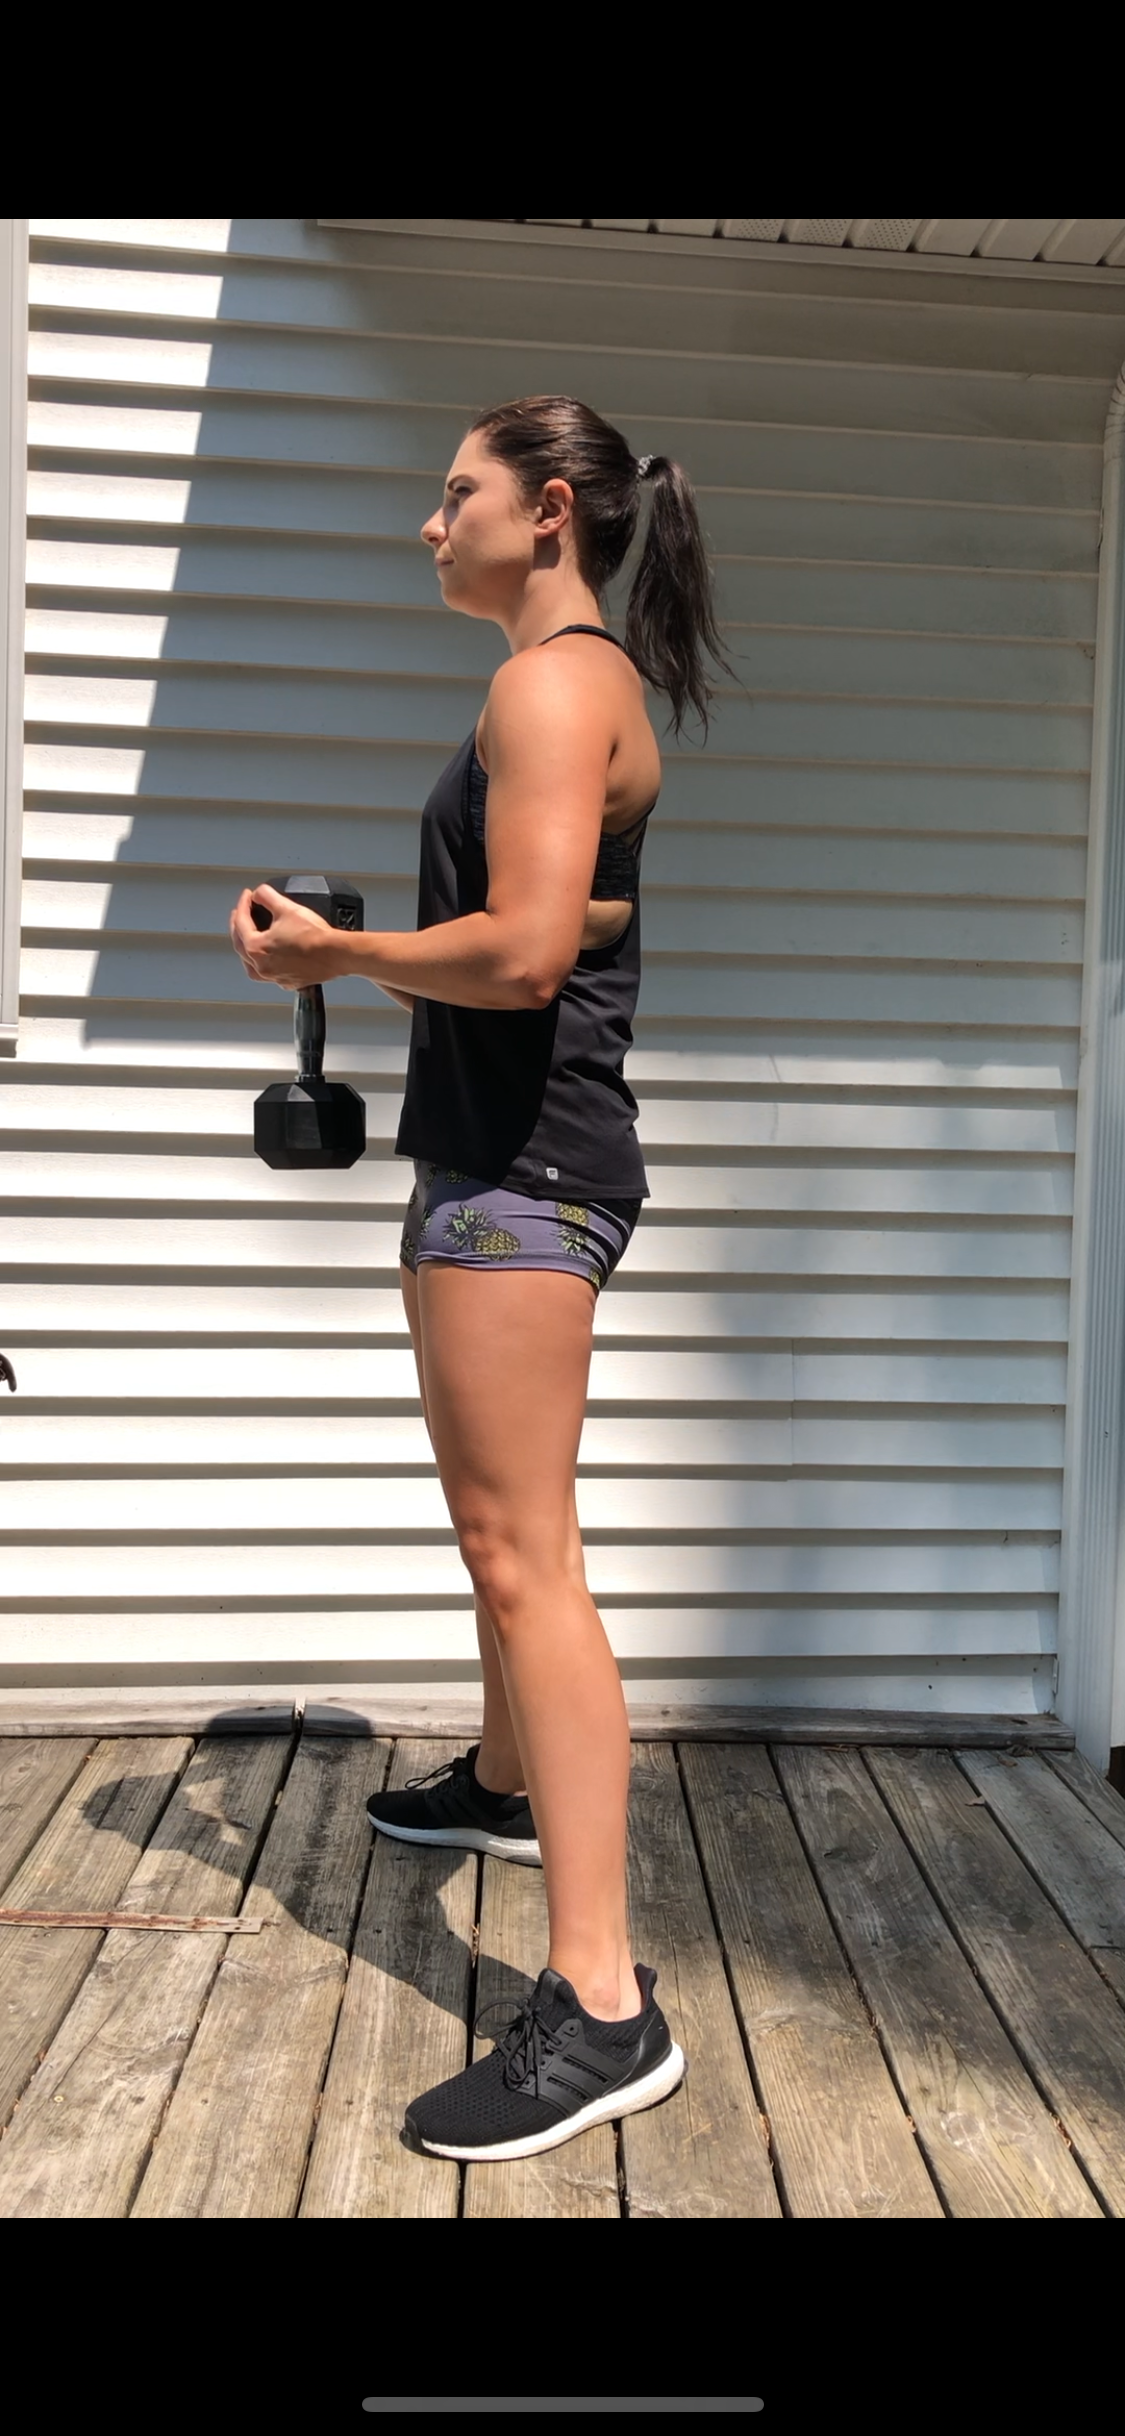
Romanian Deadlift With Weight
Stand with feet hip-width apart, soft knees, while holding dumbbells in front of hips with palms facing thighs. Keep spine in neutral position and squeezing shoulder blades, start sending the hips back. Lower dumbbells in front of shins, keeping them close to the body. Once they pass the knees, do not allow the hips to sink further. At the bottom of the movement, maintain a neutral spine and drive through heels to fully extend hips and knees, squeezing glutes at the top. *Avoid rounding the back at any point! (I used 25# dumbbells)
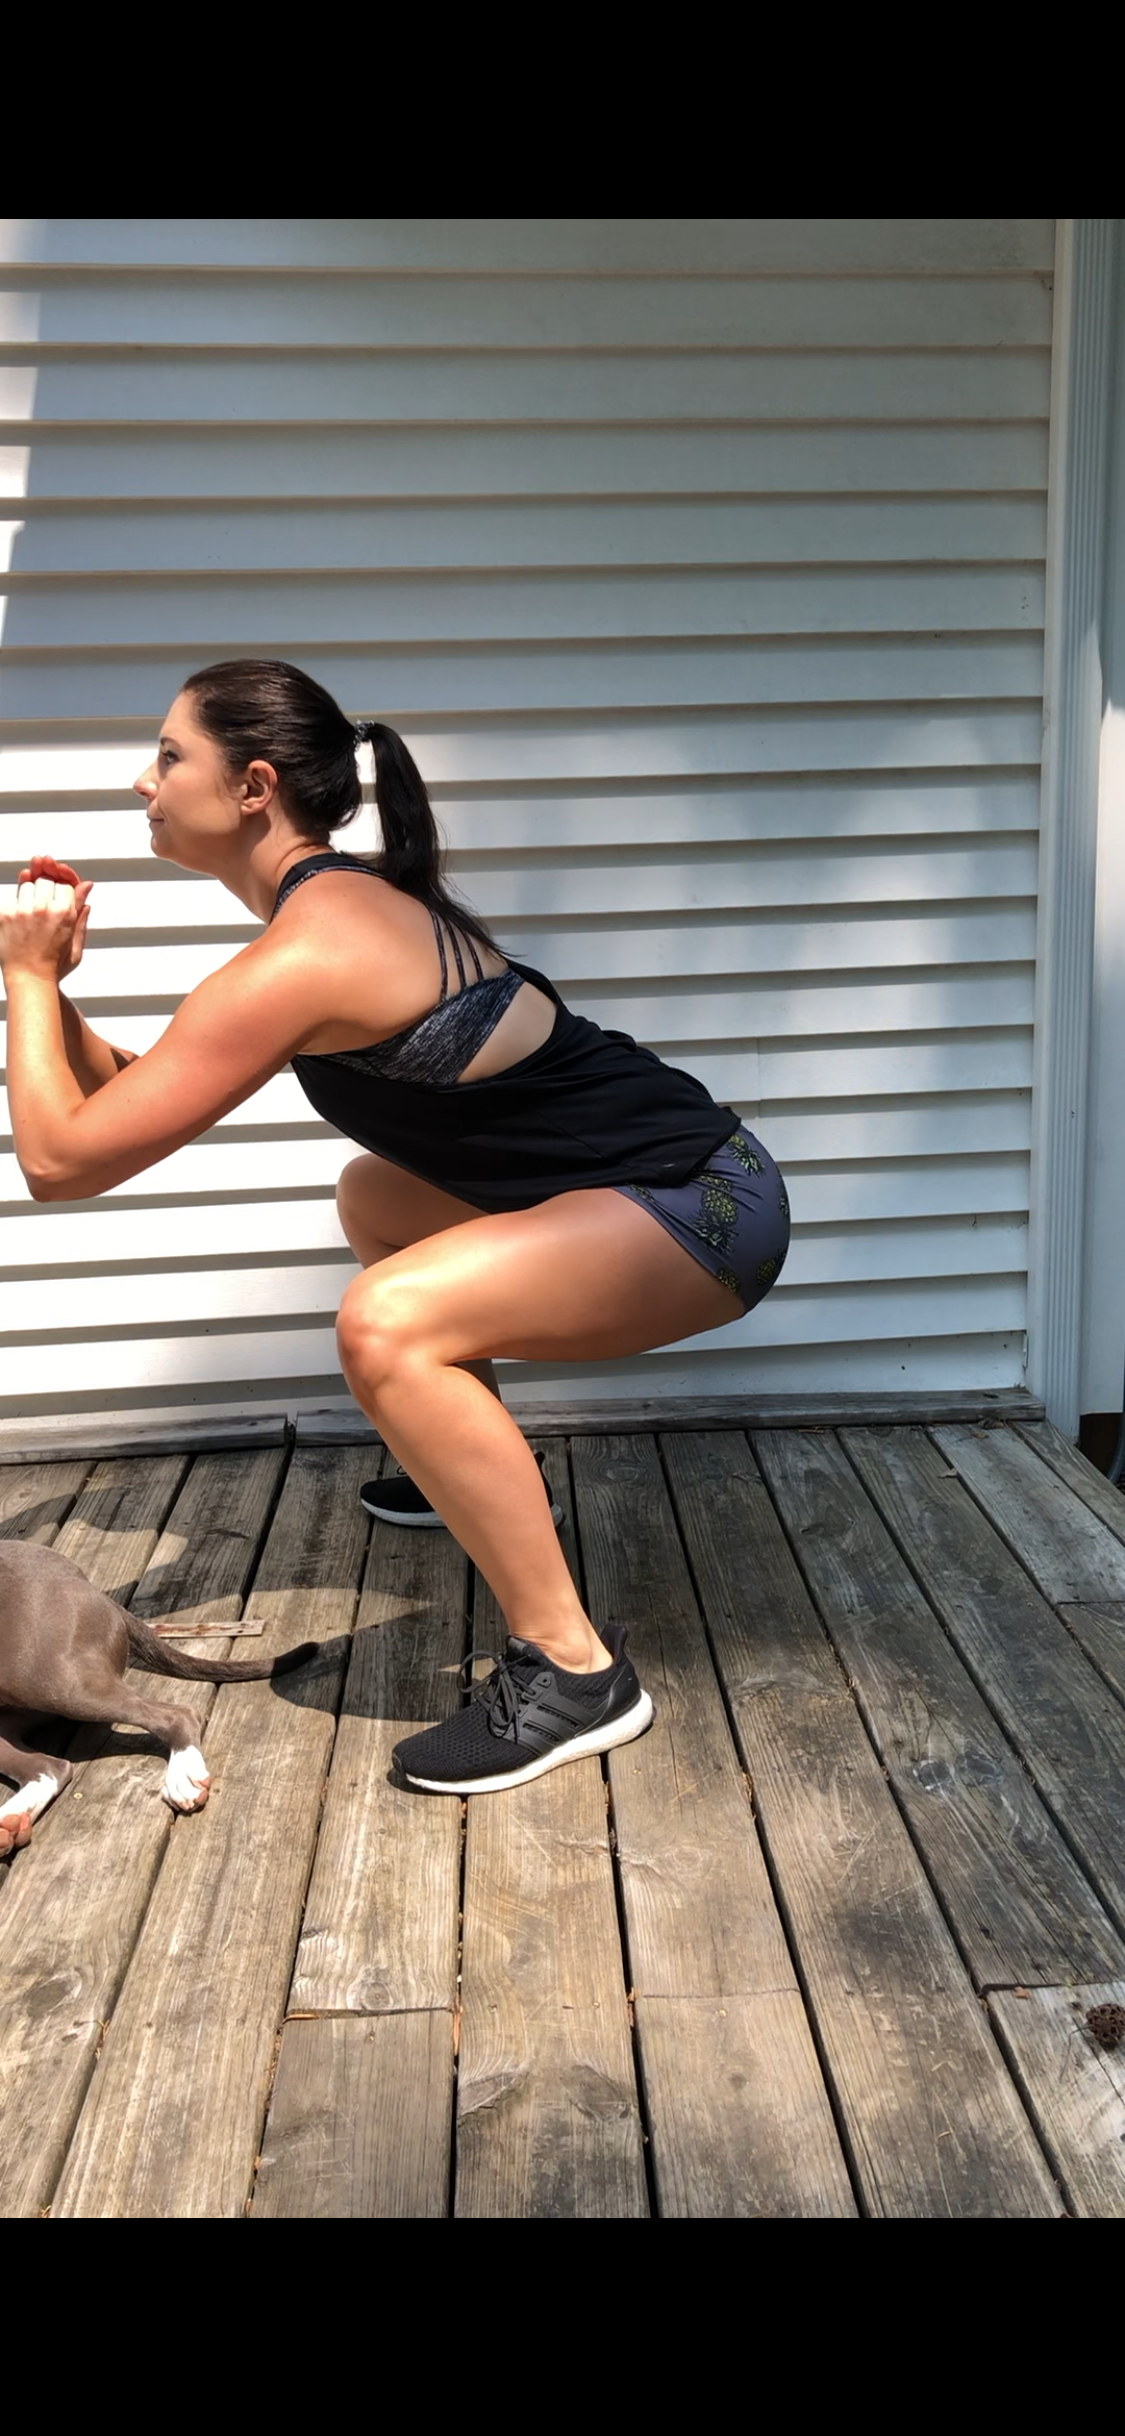
Squat Jumps
Stand with feet hip-width apart, toes turned slightly out. Squat down with your weight in your heels, proud chest, and a neutral spine. When you hit the bottom of your squat, squeeze your butt tight and drive hard through your legs and heels as you launch straight up, pelvis forward, pushing off your toes at the last moment of contact with the floor. Land softly, then use the momentum from landing to go right into your next squat.
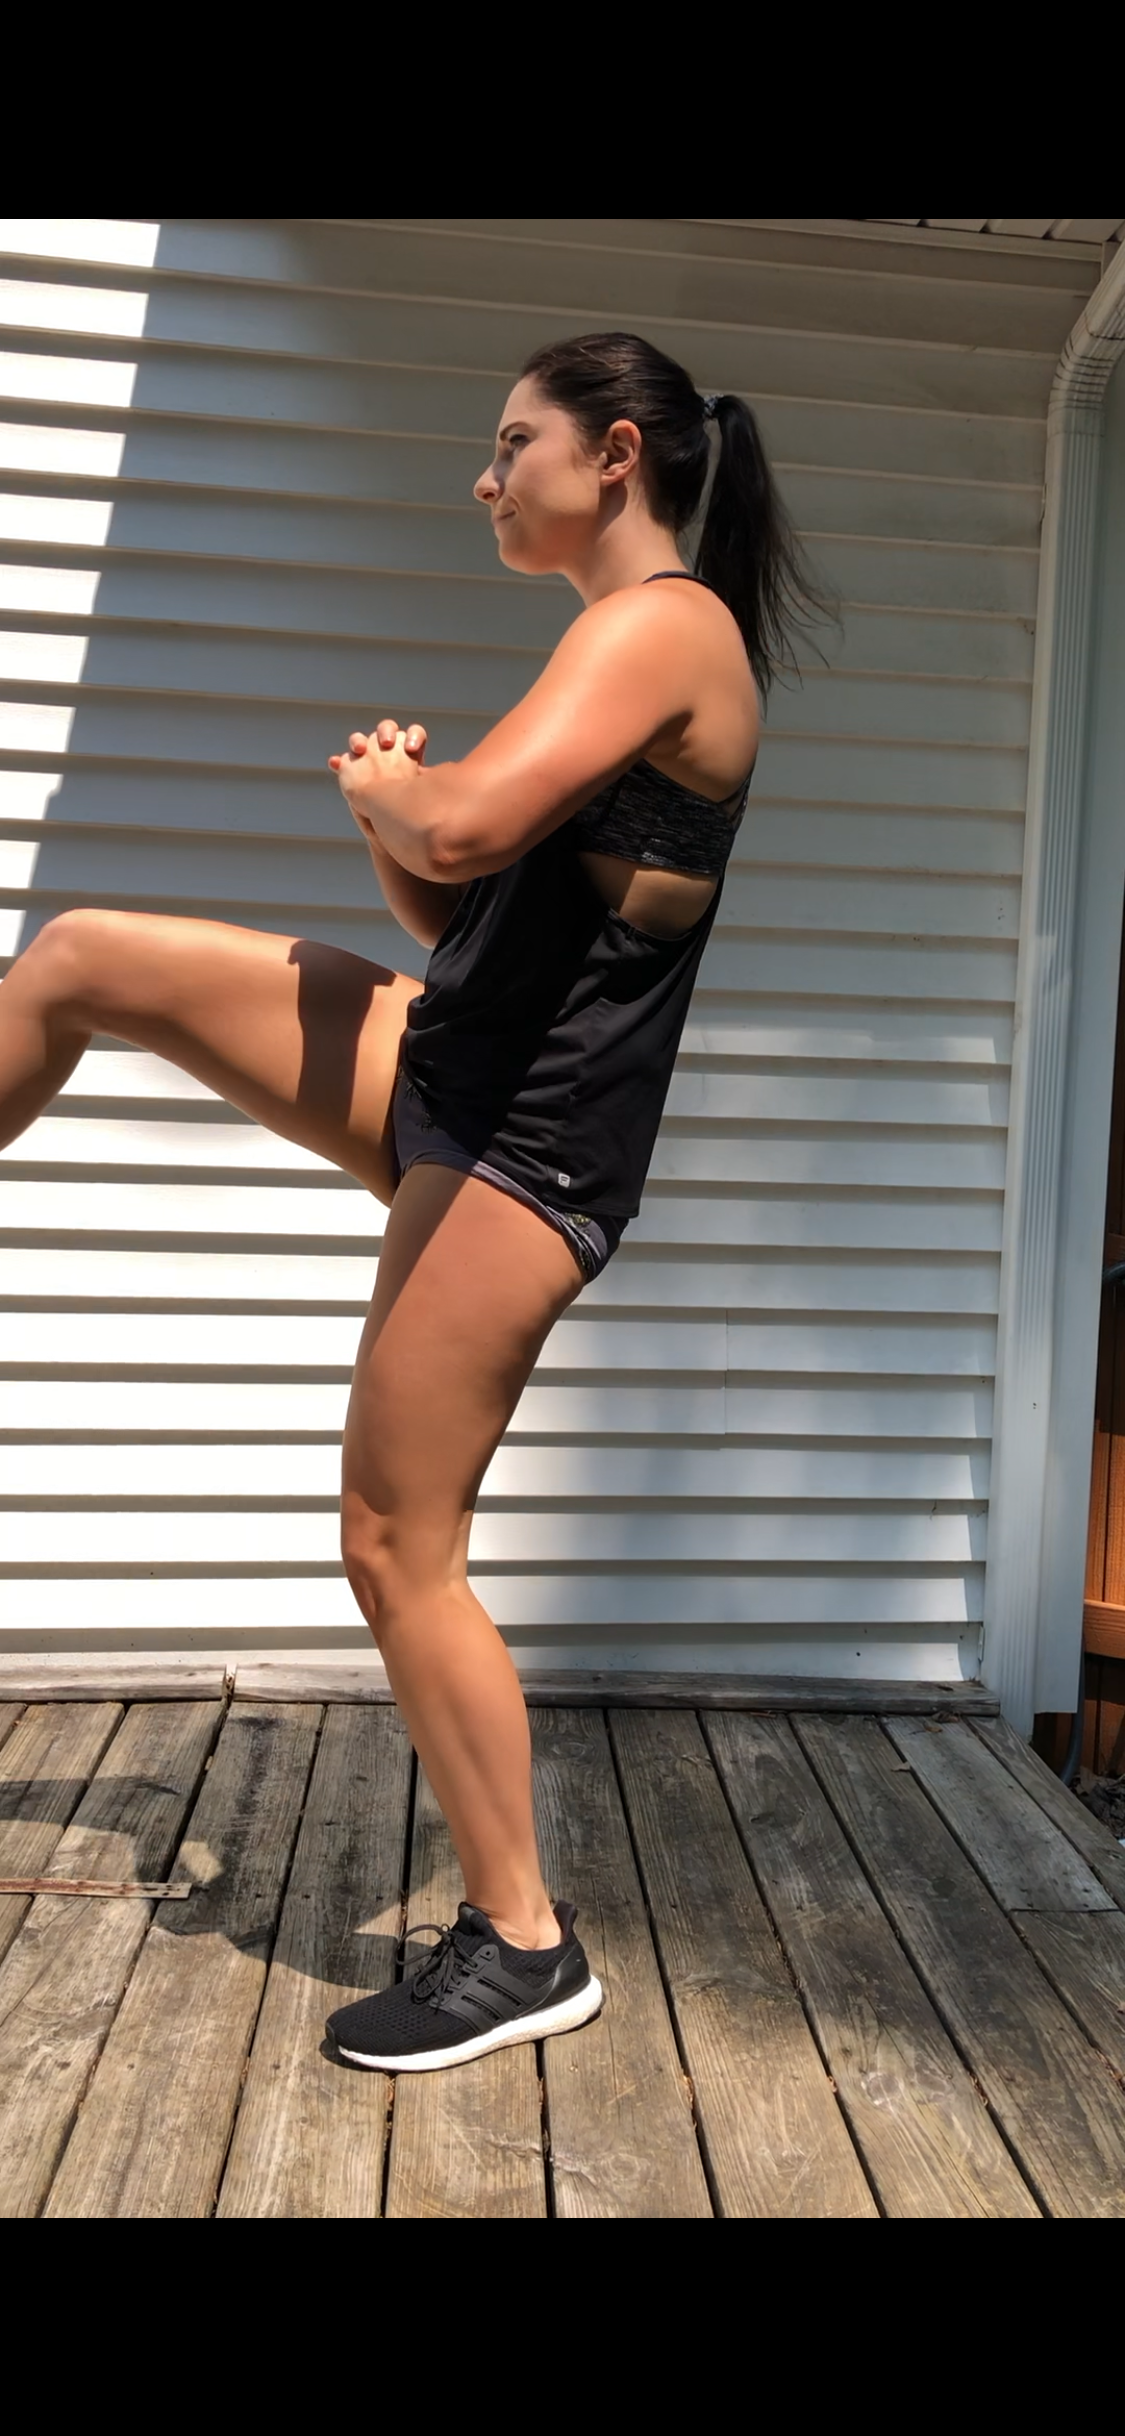
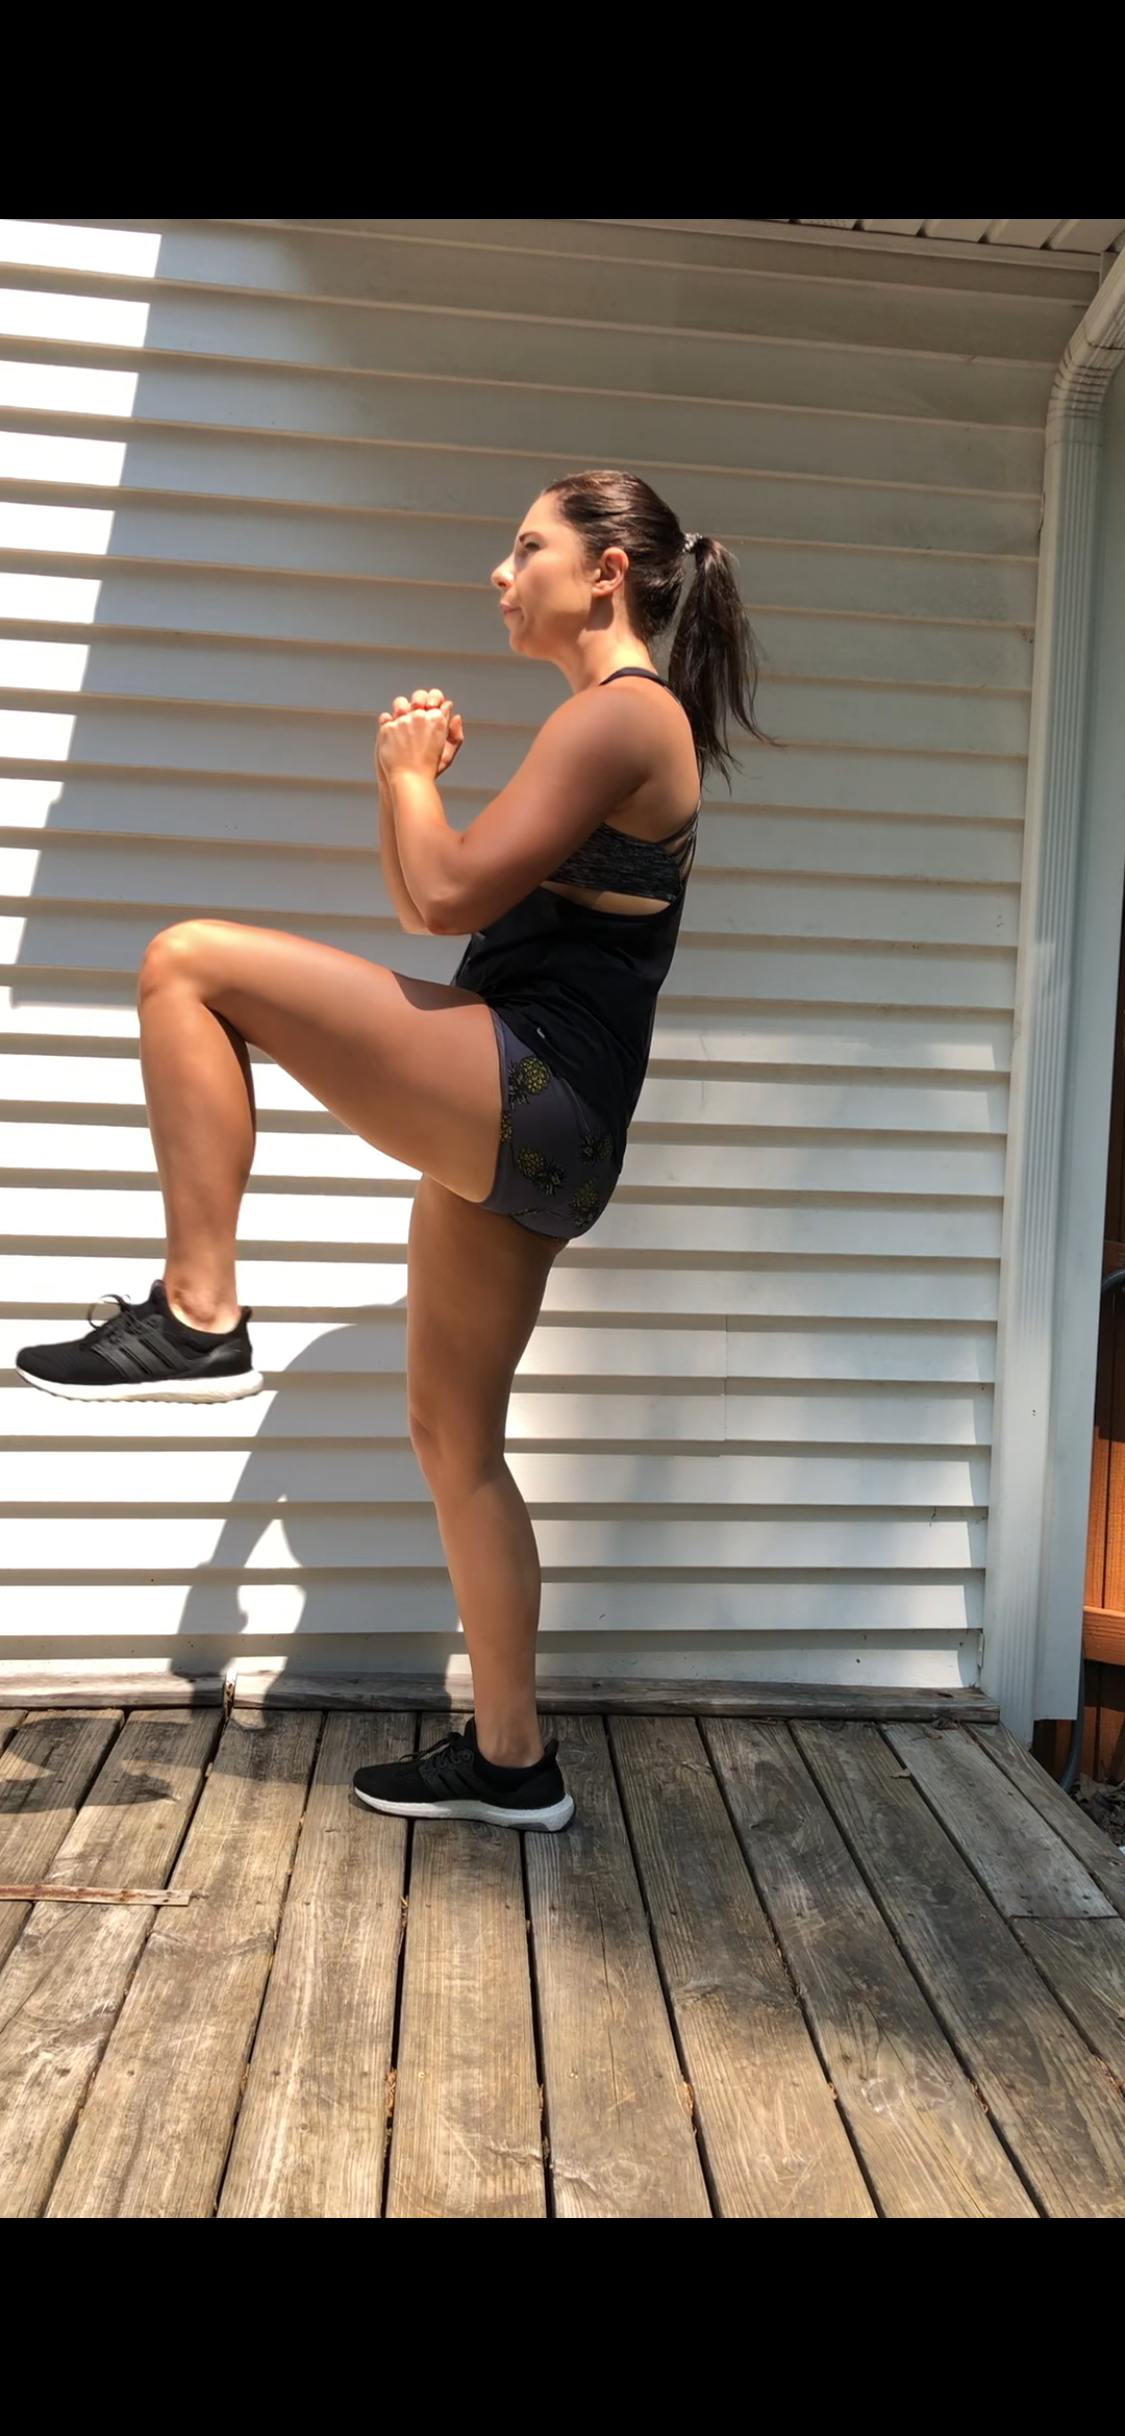
Alternating Squat Kicks
Stand with your feet shoulder-width apart, hands behind your head or held together, and elbows out to the sides. Bend your knees and sit back as far as you can. Push back to start, then kick your right leg in front of you, foot flexed. That’s one rep. Repeat, kicking with your left leg, and continue alternating.
Sumo Goblet Squats With Weight
Stand with feet shoulder-width apart, toes turned out slightly. Inhale to sit hips back and lower into a squat, clasping hands in front of chest or clasping weight. Keep core engaged and neutral spine. Pause at the bottom, when hips are in line with knees or when form starts to break. Shins should be vertical and knees should be tracking over but past toes. Exhale to press into heels and outer edge of foot to stand. Squeeze glutes at the top. (I used 25# dumbbells)
If you try this workout, let us know! Leave a comment, rate it, and don’t forget to tag a photo to #fromtherootsblog on Instagram. If you ever need to see the movements in action; especially how to pulse for each movement, I have the workout videos stored on my IG!
Quinoa Breakfast Bowls 2 Ways
I will be honest and say that I was somewhat apprehensive about implementing quinoa in my breakfast dishes. I’m just so used to adding quinoa to my buddha bowls or as a dinner side. I never thought you could use it for sweet dishes but once I caved, I’ve never gone back.
Quinoa is an excellent versatile option for breakfast. You can make it sweet, like I have discovered, or you can keep it savory.
This recipe is fun and so easy to incorporate for your breakfast meal prep. You can simply cook up four servings, taking ½ cup from that to do whatever your heart's desire.
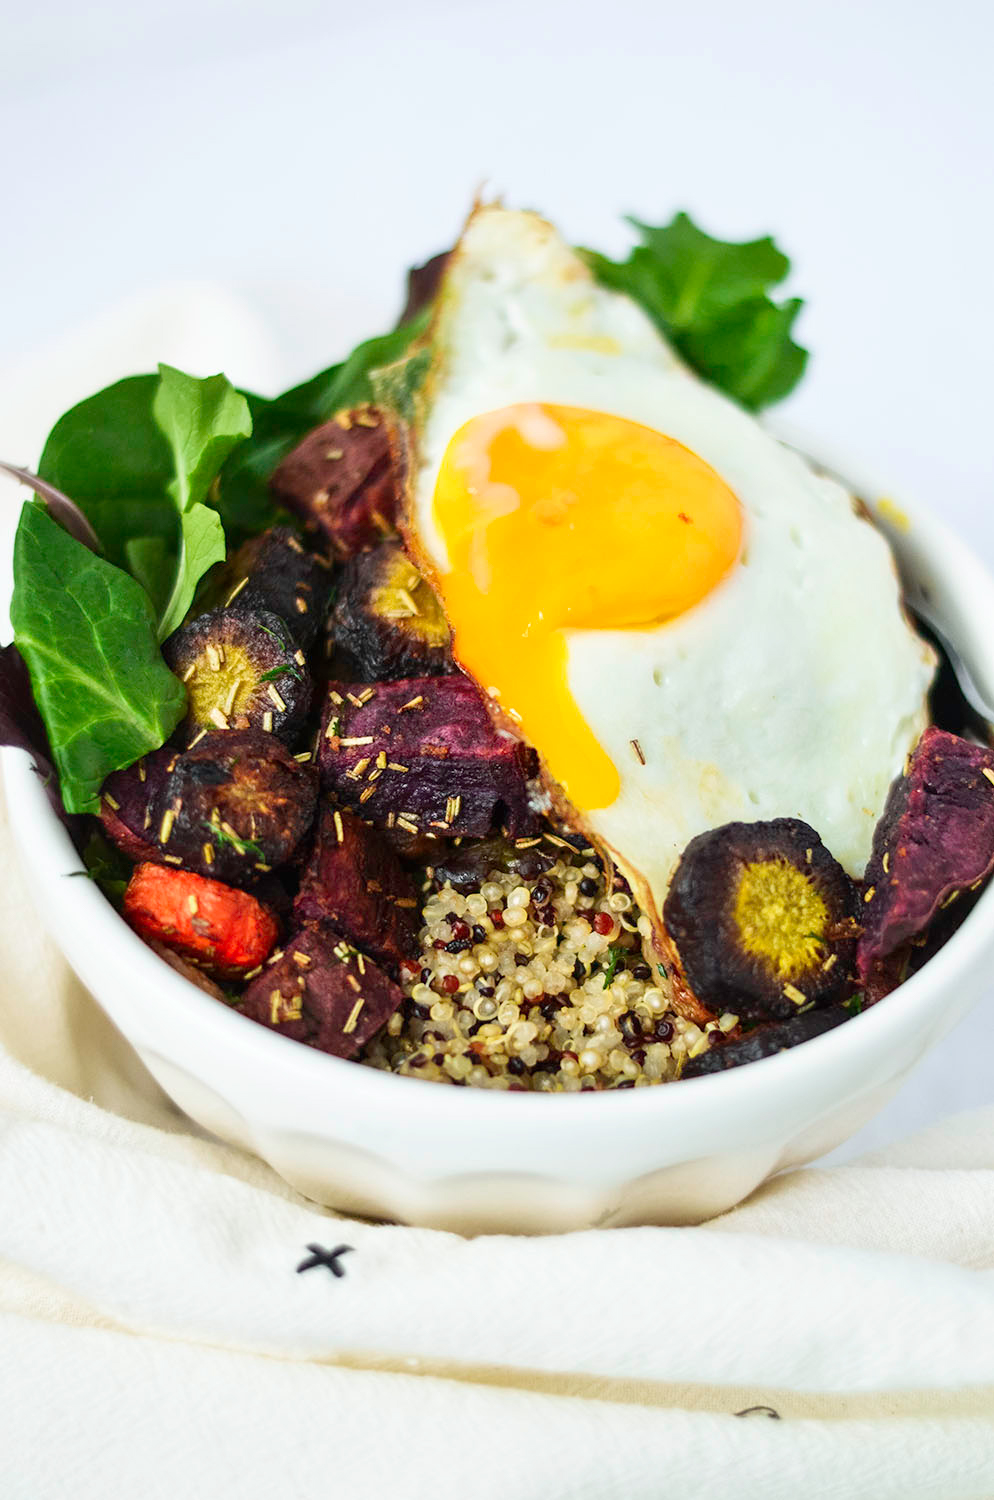
If you want to lean towards the savory side of the quinoa breakfast bowl then you can add roasted veggies, greens, a fried egg, half of an avocado, and possibly another protein source.
Quinoa Breakfast Bowls 2 Ways - A healthy and hearty way to start your morning; sweet or savory!
I will be honest and say that I was somewhat apprehensive about implementing quinoa in my breakfast dishes. I’m just so used to adding quinoa to my buddha bowls or as a dinner side. I never thought you could use it for sweet dishes but once I caved, I’ve never gone back.
Quinoa is an excellent versatile option for breakfast. You can make it sweet, like I have discovered, or you can keep it savory.
This recipe is fun and so easy to incorporate for your breakfast meal prep. You can simply cook up four servings, taking ½ cup from that to do whatever your heart's desire.
If you want to lean towards the savory side of the quinoa breakfast bowl then you can add roasted veggies, greens, a fried egg, half of an avocado, and possibly another protein source.
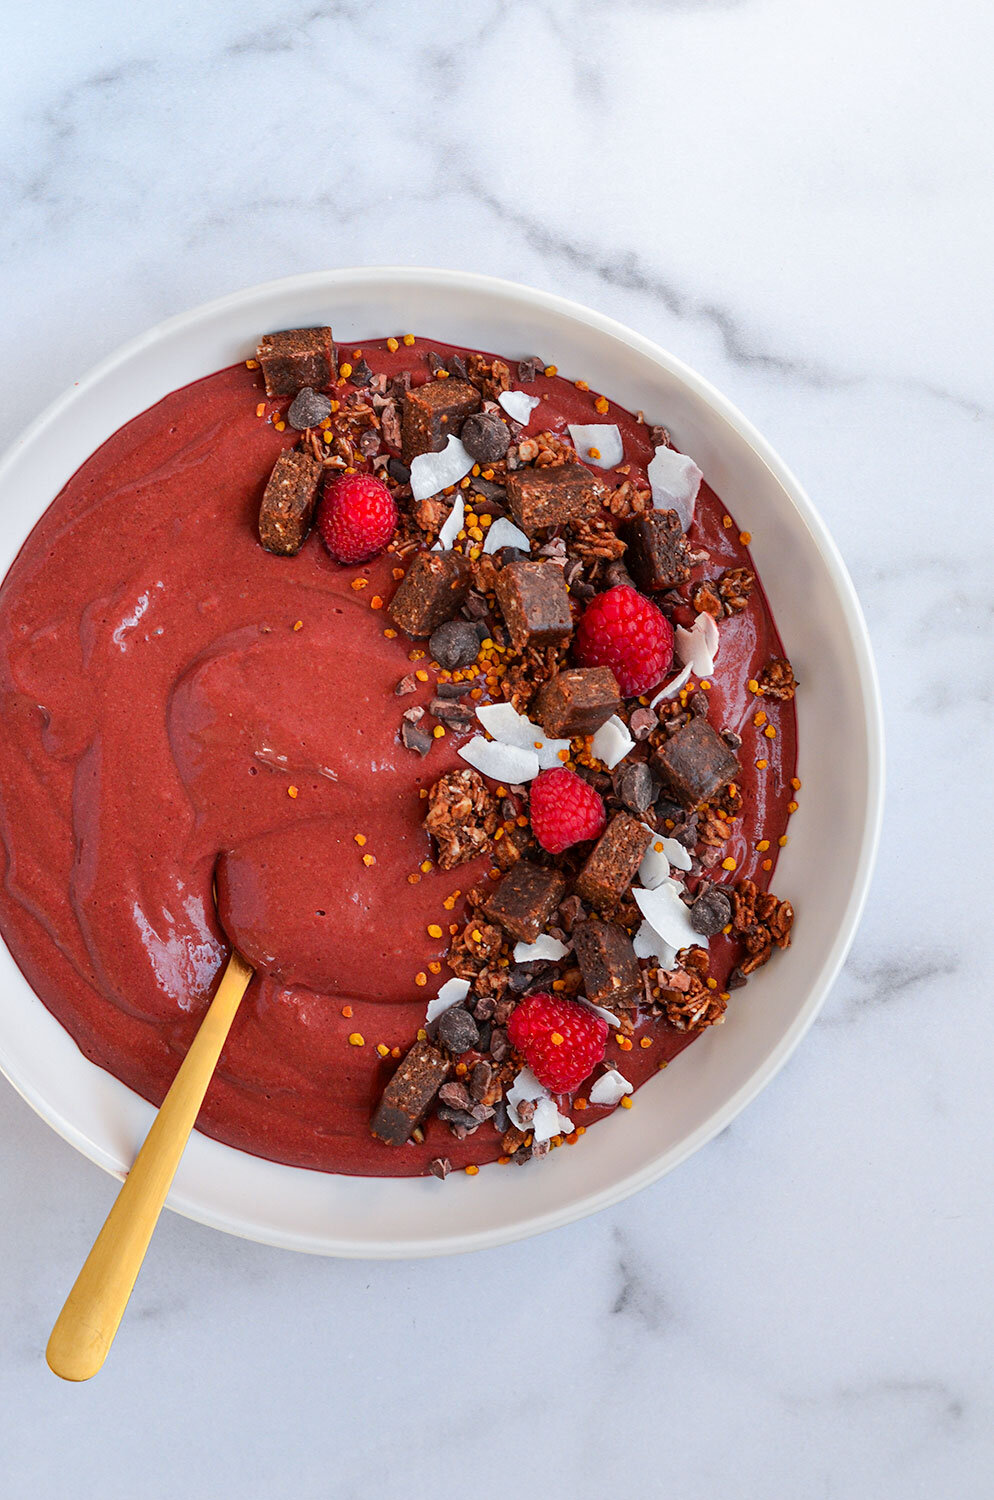
For something sweet, add cocoa powder, plant-based milk, honey, nut butter, superfood toppings, and assorted fruits.
Whatever way you prefer, quinoa is very easy to incorporate into your diet and pairs well with many foods. It’s gluten-free, high in protein, and one of the few plant foods that contains a sufficient amount of all nine essential amino acids.
If you try this recipe, let us know! Leave a comment, rate it, and don’t forget to tag a photo to #fromtherootsblog on Instagram. We love seeing what you come up with!
Quinoa Breakfast Bowls 2 Ways - A healthy and hearty way to start your morning; sweet or savory!
Sweet Way
½ cup cooked quinoa
1 cup plant-based milk
2 tsp cocoa powder
1 Tbsp honey or pure maple syrup
1 Tbsp nut butter
Toppings
Fruits, coconut flakes, chia seeds, hemp seeds, dairy-free yogurt, dark chocolate
Savory Way
½ cup cooked quinoa
Small handful of assorted greens
Fried egg
Roasted veggies
Half of an avocado
Toppings
Hemp seeds, hot sauce, nutritional yeast flakes, lemon, salt and pepper
How to cook quinoa
Rinse quinoa in a fine mesh sieve until water runs clear. Drain and transfer to a medium pot.
Add 2 cups water, pinch of salt and bring to a boil.
Cover, reduce heat to medium low and simmer until water is absorbed (about 15-20 minutes).
Set aside off heat for 5 minutes. Uncover and fluff with a fork. Makes 4 servings.
You could also follow the same process but in a rice cooker.
Sweet Potato Hash Breakfast Skillet
Breakfast skillets are my go-to when I’m looking for an easy, early morning meal (or for any time of the day -- I’m a fan of breakfast for dinner!). In this recipe, I use a sweet potato hash that creates a flexible foundation for a breakfast skillet that you can customize to your liking. Whether you need to plan an unexpected breakfast brunch, or just want an easy no-fuss meal, this recipe caters to you! Ingredients in this recipe can easily be changed out with your favorite veggies. Sometimes, I’ll resort to this recipe when I want to clear out my fridge and use leftover ingredients. So, let’s get to cooking!
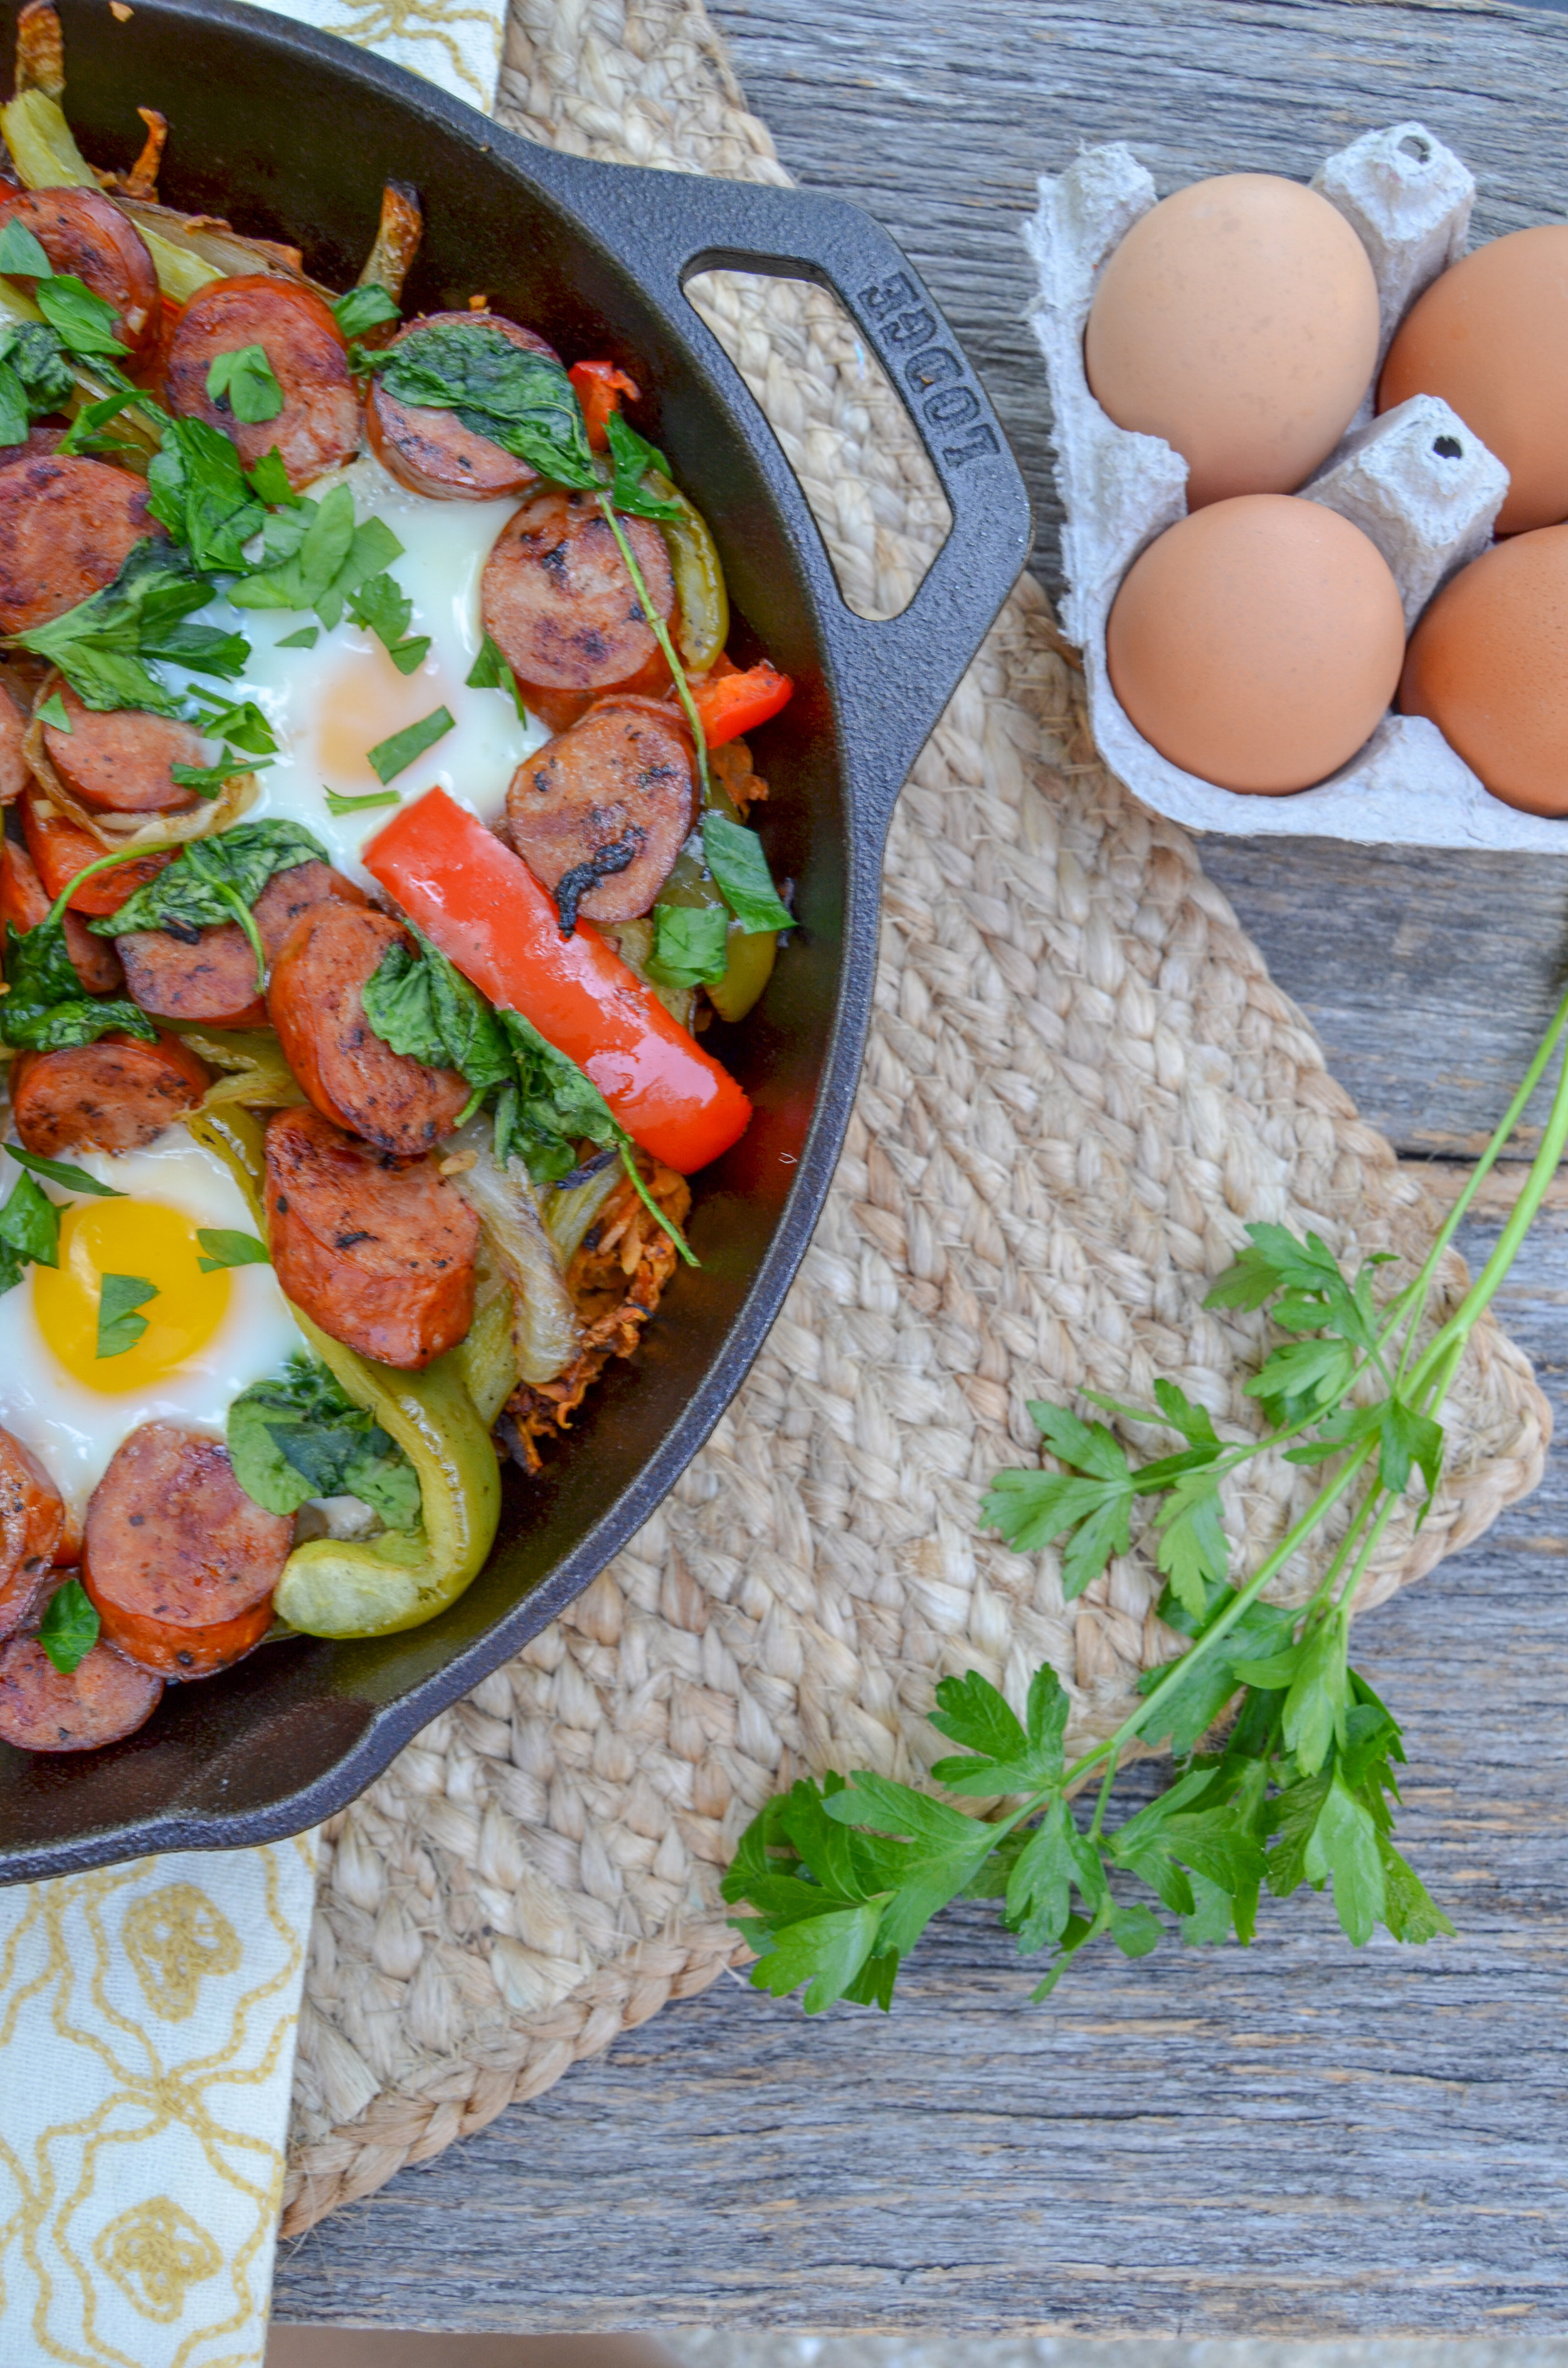
This breakfast skillet with andouille sausage and eggs is a filling, savory, healthy meal for any time of day!
Breakfast skillets are my go-to when I’m looking for an easy, early morning meal (or for any time of the day -- I’m a fan of breakfast for dinner!). In this recipe, I use a sweet potato hash that creates a flexible foundation for a breakfast skillet that you can customize to your liking. Whether you need to plan an unexpected breakfast brunch, or just want an easy no-fuss meal, this recipe caters to you! Ingredients in this recipe can easily be changed out with your favorite veggies. Sometimes, I’ll resort to this recipe when I want to clear out my fridge and use leftover ingredients. So, let’s get to cooking!
My sweet potato hash breakfast skillet recipe only takes 30 minutes to make and requires just one skillet with any produce, protein, and eggs you have left in the fridge. At the end of the week, I typically have about a small bunch of fresh spinach left in the bag, ½ of an onion in a sandwich bag lodged in the back of the fridge, as well as stocked grated sweet potato in the freezer.
I start out by cooking the onions and garlic in the skillet to provide a base flavor for the skillet to build upon before adding peppers and protein. In this case, I used green and red peppers and andouille sausage. Once the peppers and sausage have been cooked, I remove them from the skillet so that I can cook the sweet potatoes next. I season the sweet potatoes to perfection then add the cooked ingredients back on top. This is when I add a handful of spinach and mix everything together. Create cute little nest pockets for how many eggs you would like and then pop the skillet in the oven for the final bake.
Serve up one egg per person along with a healthy helping of the sweet potato mixture. Since this recipe is flexible, you can garnish it however you want. For example, sometimes I want a more “Southwestern” flavor with a kick. In that case, I would top the skillet with cilantro, avocado slices, cotija cheese, salsa, and hot sauce! Remember, this skillet recipe caters to your needs! ;)
You can also serve this up with a side of toast or on a bed of mixed greens to make sure you get all of the delicious egg yolk!
If you try this recipe, let us know! Leave a comment, rate it, and don’t forget to tag a photo with #fromtherootsblog on Instagram. We love seeing what you come up with!
This breakfast skillet with andouille sausage and eggs is a filling, savory, healthy meal for any time of day!
INGREDIENTS
4-6 fresh eggs
1 large sweet potato (peeled and chopped into small cubes or grated)
1 green pepper chopped
1 red pepper chopped
1/2 cup onion diced
2 cloves garlic minced
1 cup packed fresh baby spinach
8 oz andouille chicken sausage (Applegate)
1 Tbsp coconut oil, plus more for cooking
1/2 tsp smoked paprika
1/2 tsp cumin
1/4 tsp salt
1/4 tsp black pepper
1 small handful parsley (garnish)
DIRECTIONS
Preheat oven to 400 degrees.
Add 1 Tbsp coconut oil to a cast iron skillet over medium-high heat. Once hot, add onions and let cook for 2-3 min until softened.
Add peppers and garlic and cook for 3-5 min until softened.
Set veggies to the side and cook sausage or protein until 5-7 min or until brown and crispy. (If using raw meat, cook until brown and cooked through).
Set protein aside and drizzle more oil in the skillet if necessary. Add sweet potatoes and spices and toss until combined. Cook until the potatoes are soft and crispy on the outside, about 5-10 min.
Add cooked veggies and protein back in the skillet along with spinach and cook until spinach has wilted.
Create a well in the hash mixture for 4-6 eggs.
Crack an egg into each well and bake in the oven, just until eggs are set. Check for doneness after 5 min.
Garnish with parsley and top with your favorite toppings like avocado, hot sauce, salsa, or goat cheese.
Lemon and Coconut Energy Balls
I have to be honest - life can be hard and stressful for me at times.
I juggle school, work, this food blog, and my personal life all while searching for grad schools. In everything I do, I strive to be intentional in every moment and hour in my life.For example, if I take a class and pass by the skin of my teeth then what have I gained from the experience? With every new practice, patience and persistence are tested as we don’t always get it right the first time. In the midst of the busy times, I have to continuously remind myself that this is only temporary and that I should be proud of myself for getting this far.
Filled with fiber, plant-based protein, and healthy fats, these are the perfect choice when you need a little pick-me-up snack! They are great to make as a “911 snack” as it only takes 5 minutes to make and uses only 6 ingredients!
I have to be honest - life can be hard and stressful for me at times.
I juggle school, work, this food blog, and my personal life all while searching for grad schools. In everything I do, I strive to be intentional in every moment and hour in my life.For example, if I take a class and pass by the skin of my teeth then what have I gained from the experience? With every new practice, patience and persistence are tested as we don’t always get it right the first time. In the midst of the busy times, I have to continuously remind myself that this is only temporary and that I should be proud of myself for getting this far.
As easy as it sounds to be intentional, you need the energy and willpower to actually do it! That’s why I lean on to these amazing lemon and coconut energy balls. Lemon and coconut is an excellent pairing as they are both sweet and refreshing. This flavor-packed combination is great with the caramel undertones of pitted dates; the creamy texture provided by cashews and almonds is also a big plus!
Cashews, almonds, and dates are magnesium-rich foods that actually boost energy and prevent inflammation. Magnesium is key in creating energy by activating ATP; (adenosine triphosphate) which is an energy carrying molecule found in the cells of your body. Ultimately, when you have an adequate amount of magnesium in your system, your body is primed to function at its peak.
Not only are these lemon and coconut energy balls great for providing energy and preventing inflammation, they’re nutrient and calorically dense. Filled with fiber, plant-based protein, and healthy fats, these are the perfect choice when you need a little pick-me-up snack! They are great to make as a “911 snack” as it only takes 5 minutes to make and uses only 6 ingredients! I recommend making a couple of batches so that you can store half in the fridge for immediate use throughout the week and the other half in the freezer for a later time.
If you try this recipe, let us know! Leave a comment, rate it, and don’t forget to tag a photo with #fromtherootsblog on Instagram. We love seeing what you come up with!
Filled with fiber, plant-based protein, and healthy fats, these are the perfect choice when you need a little pick-me-up snack! They are great to make as a “911 snack” as it only takes 5 minutes to make and uses only 6 ingredients!
INGREDIENTS
1 cup raw cashews
1 cup raw almonds
1/2 cup coconut flakes
1 Tbsp melted coconut oil
8 pitted dates
half one lemon *plus more for preference
Zest of one whole lemon *plus more for garnish
Dash pink Himalayan salt
DIRECTIONS
Soak dates in warm filtered water for at least 10 minutes
After dates have properly soaked, remove dates and set date water aside.
Blend all ingredients in a high-speed processor until desired texture. If the consistency seems dry, add a little bit of the reserved date water.
Scoop out about 1 tablespoon of the mixture, and form into balls.
Roll into your favorite toppings! I like to use lemon zest and coconut flakes.
NOTES
These can be stored in an airtight container in the fridge for up to two weeks or in the freezer for up to a month. Make large batches to store snacks ahead of time.


