Sort by Category
- December 2025
- November 2025
- October 2025
- September 2025
- August 2025
- June 2025
- August 2024
- July 2024
- June 2024
- May 2024
- February 2024
- January 2024
- December 2023
- November 2023
- October 2023
- September 2023
- August 2023
- July 2023
- March 2023
- February 2023
- January 2023
- December 2022
- November 2022
- October 2022
- September 2022
- August 2022
- June 2022
- May 2022
- April 2022
- March 2022
- February 2022
- January 2022
- December 2021
- November 2021
- October 2021
- September 2021
- August 2021
- July 2021
- June 2021
- May 2021
- April 2021
- March 2021
- February 2021
- January 2021
- December 2020
- November 2020
- October 2020
- September 2020
- August 2020
- July 2020
- June 2020
- May 2020
- April 2020
- March 2020
- February 2020
- January 2020
- December 2019
- November 2019
- October 2019
- September 2019
- August 2019
- July 2019
- June 2019
- May 2019
- April 2019
- March 2019
- February 2019
- January 2019
- December 2018
- November 2018
- October 2018
- September 2018
- August 2018
- July 2018
- June 2018
- May 2018
- April 2018
- March 2018
- February 2018
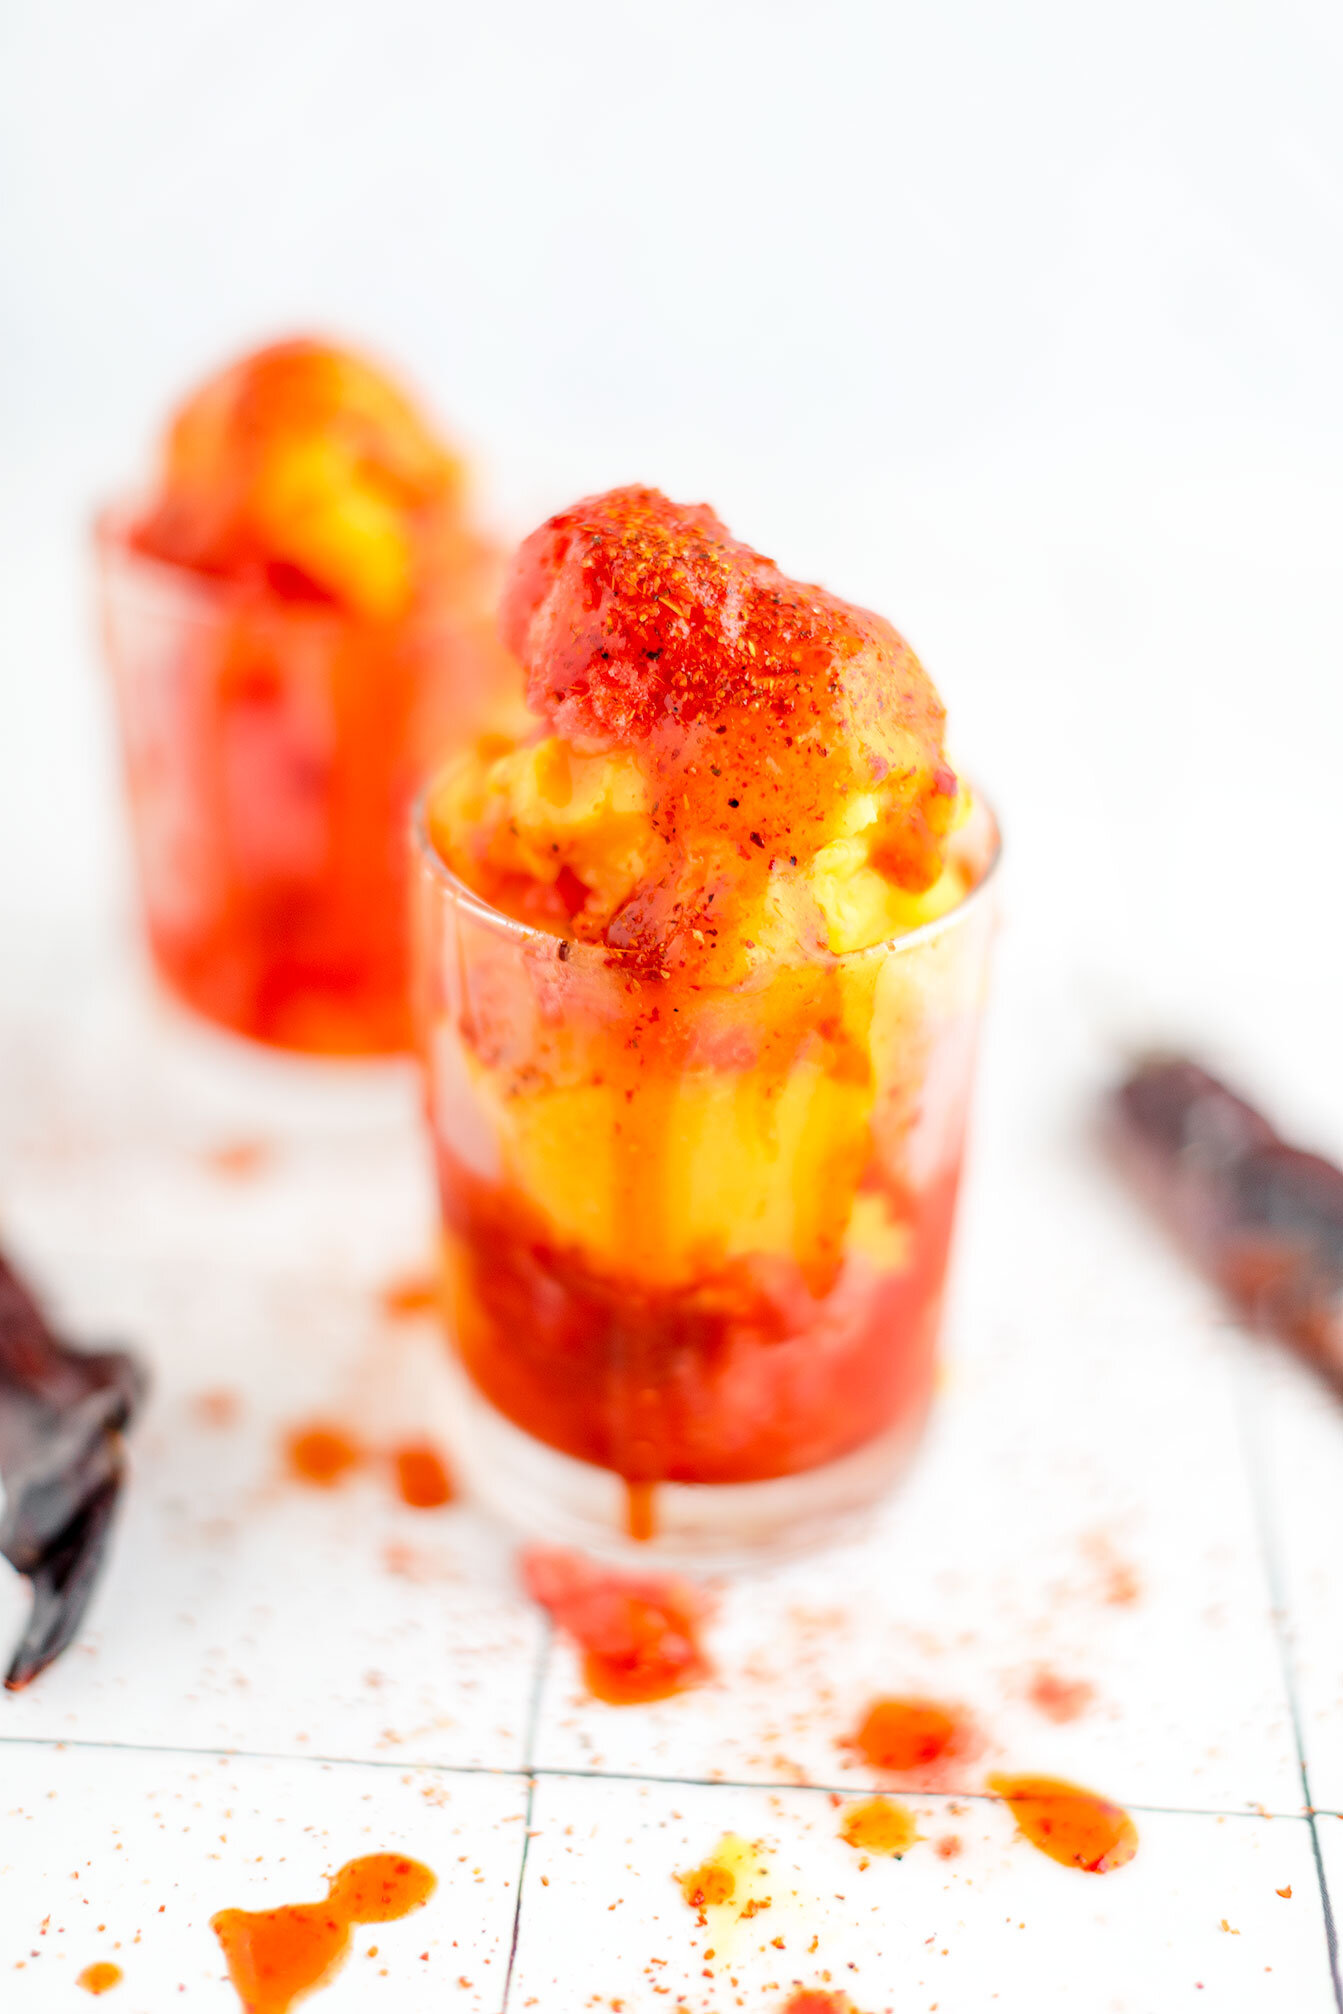
Mango Melon Sorbet with Chamoy Sauce
Mango melon sorbet with chamoy sauce - A popular Mexican condiment that is salty, sour, spicy, and sweet. Paired with the two most favorite summer fruits and sprinkled with chili lime seasoning - it’s the ultimate refreshing summer dessert! Naturally sweetened, dairy free, and bursting with flavor!
It is sad to say that my taste buds have not been in contact with chamoy sauce until two weeks ago! It’s actually embarrassing - just writing it out. I thought, maybe because I just wasn’t exposed to it being that I have lived in the South and Midwest my entire life but it’s not that because out of all the places in the world, I had my first chamoy experience in this small Mexican sorbet shop in Oklahoma!
That day forever changed my taste buds for the good! Literally, if you had chamoy sauce, your mouth is probably drooling at this point - because that is what it does to you!
Chamoy = Salt + Sour + Spicy + Sweet
Mango melon sorbet with chamoy sauce - A popular Mexican condiment that is salty, sour, spicy, and sweet. Paired with the two most favorite summer fruits and sprinkled with chili lime seasoning - it’s the ultimate refreshing summer dessert! Naturally sweetened, dairy free, and bursting with flavor!

It is sad to say that my taste buds have not been in contact with chamoy sauce until two weeks ago! It’s actually embarrassing, just writing it out. I thought, maybe because I just wasn’t exposed to it being that I have live in the South and Midwest my entire life but it’s not that because out of all the places in the world, I had my first chamoy experience in this small Mexican sorbet shop in Oklahoma!


That day forever changed my taste buds for the good! Literally, if you had chamoy sauce, your mouth is probably drooling at this point - because that is what it does to you!
Chamoy = Salt + Sour + Spicy + Sweet
Meaning, chamoy has a unique flavor profile that hits your tongue to where you instantly want more. Traditional ingredients include flor de jamaica (hibiscus flowers), lime juice, dried apricots, sugar, prunes, ancho chilies, and cayenne powder.
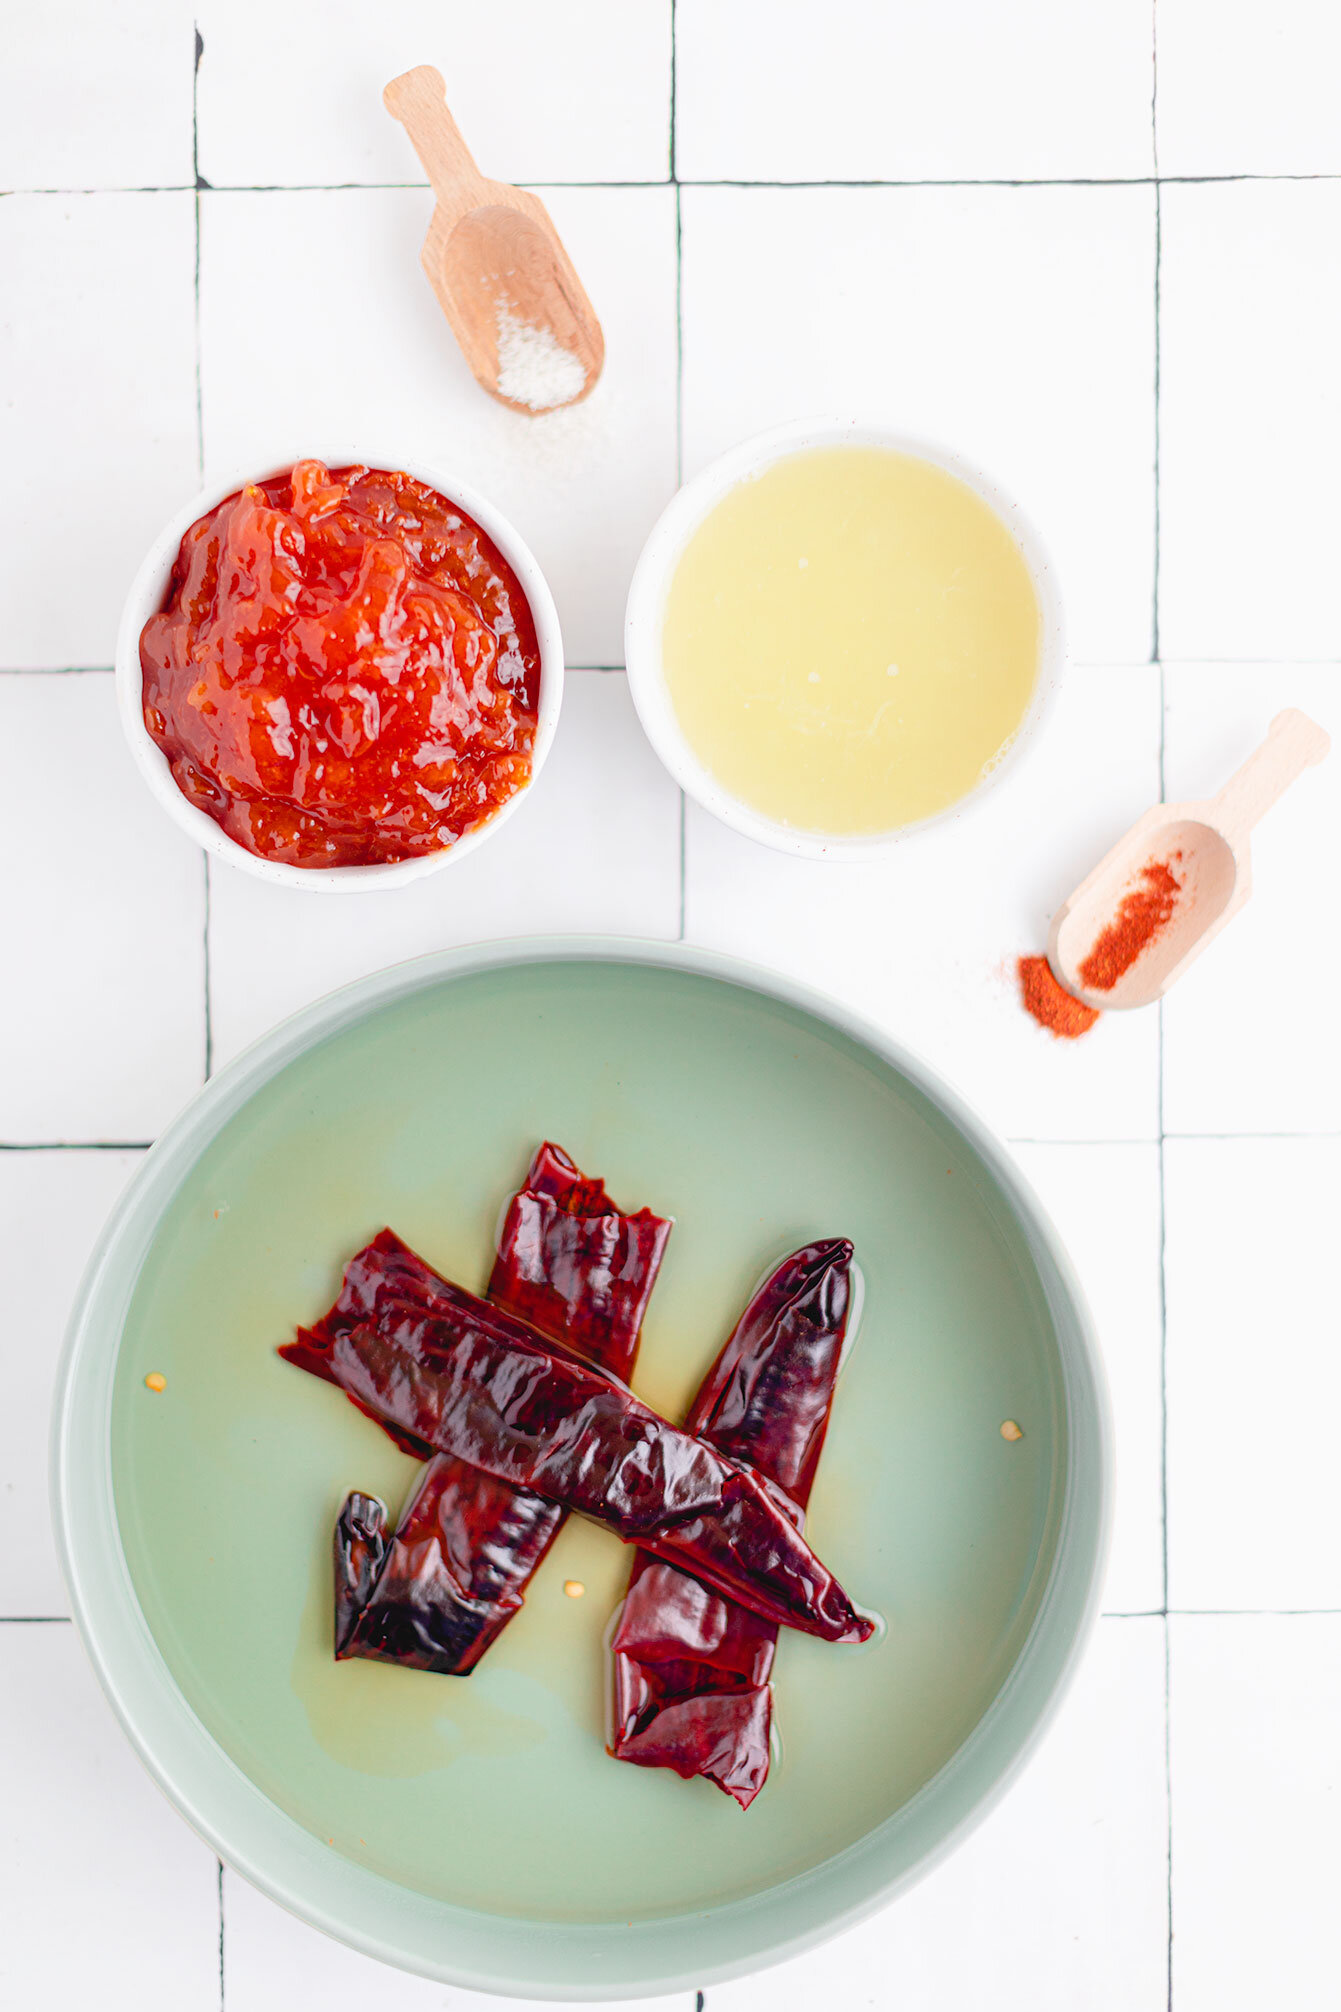
To make this super easy, while deriving sugar from fruit only, and using ingredients that most consumers can find at a grocery store, we are using just 5 ingredients: organic apricot jam, dried ancho chilies, lime juice, cayenne pepper, and salt.

So what do you put chamoy sauce on? Personally, I just add the chamoy sauce into a squeeze bottle and squeeze it straight into my mouth but that might be a little TMI…

You could put chamoy sauce on fresh mangos as a refreshing healthy snack, make mango chamoy fruit roll ups, or use it as a swirl to mango or fruit paletas, mangonadas, chili lime mango smoothies, or agua frescas.


But my new favorite way of using this drool worthy sauce is pouring it over sorbet. For this recipe, I used my two favorite summer flavors: mango and watermelon to create a sorbet swirl. Layering chamoy and tajin or TJ’s chili lime seasoning in between sorbet is the ultimate refreshing summer treat!
If you try this recipe, let us know! Leave a comment, rate it, and don’t forget to tag a photo to #fromtherootsblog on Instagram. We love seeing what you come up with!
Mango melon sorbet with chamoy sauce - A popular Mexican condiment that is salty, sour, spicy, and sweet. Paired with the two most favorite summer fruits and sprinkled with chili lime seasoning - it’s the ultimate refreshing summer dessert! Naturally sweetened, dairy free, and bursting with flavor!
Ingredients
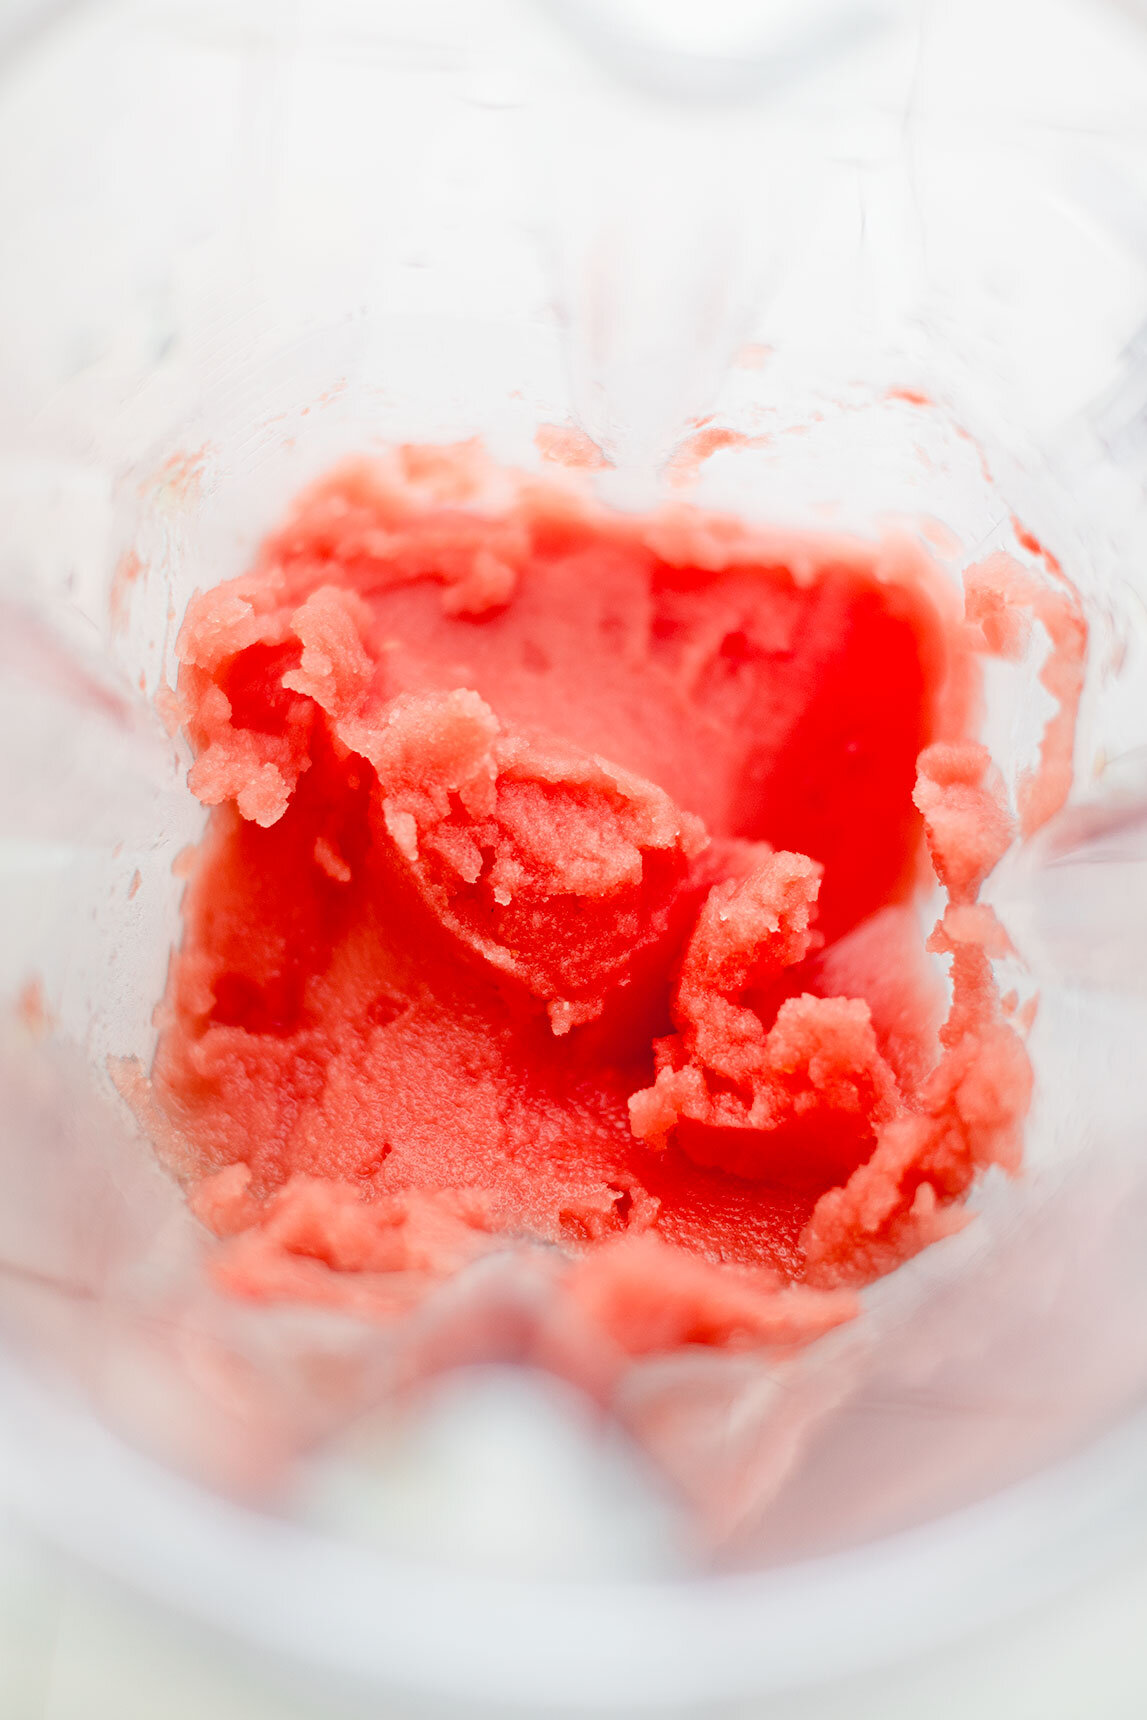
Watermelon sorbet
2 cups seedless watermelon cubes
Juice and zest of one lime
1 Tbsp honey (optional)
Mango sorbet
2 cups mango chunks (fresh or frozen)
Juice and zest of one lime
1 Tbsp honey (optional)
Chamoy Sauce
½ cup fresh lime juice (5-7 limes)
1-3 dried ancho chilies
1 - 10 oz jar organic apricot jam
1 tsp salt
¼ tsp cayenne pepper
Directions
To make the sorbet
cut up fresh watermelon until you have about 2 cups worth. Place watermelon chunks on a sheet tray lined with parchment paper and place in the freezer to freeze. (up to 4 hours or overnight)
If you are using fresh mangos, follow the same procedure (a)
Place frozen watermelon chunks into a blender or processor with juice and zest of lime and sweetener. You may need to add Tbsp increments of water to help the blending process. Once smooth in texture, transfer to a freezer safe pan like a bread pan and place in the freezer until firm, about 4 hours.
Follow the same procedure with mangos. You can either mix the frozen fruit chunks together or make them separate.
To serve, let the sorbets rest on the counter a few minutes before scooping.
To make the chamoy sauce
While the sorbets are freezing, prepare the chamoy sauce by preparing the ancho chilies.
Tear the stem off and deseed the ancho chilies. Submerse dried chilies in boiling water for a few minutes until the chilies are soft.
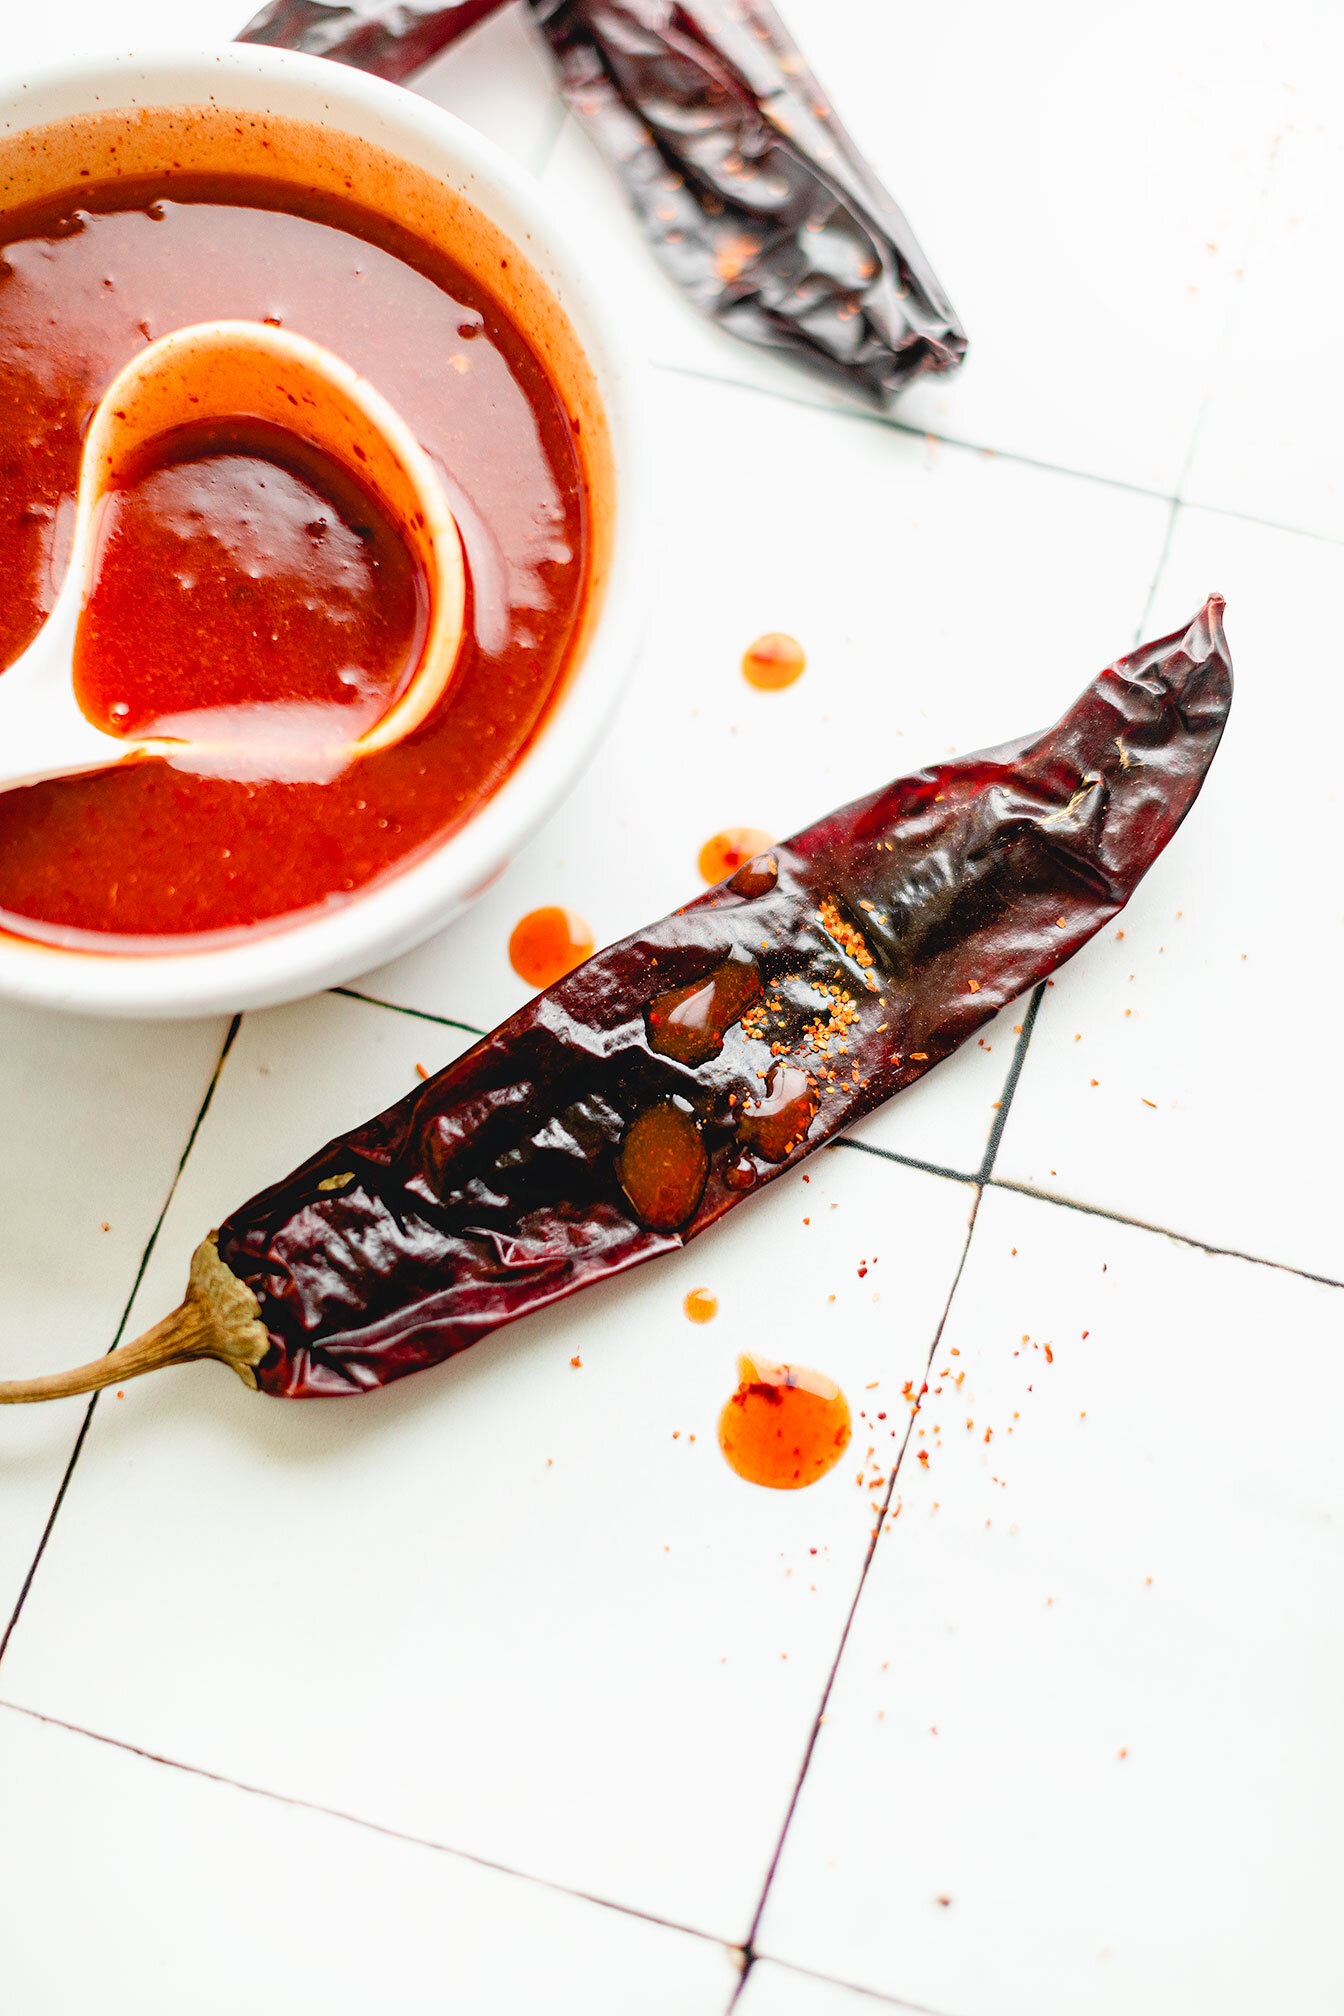
In a high speed blender, place the soft ancho chilies along with the entire jar of apricot jam, lime juice, salt, cayenne pepper, and a ladle or two of the water that the ancho chilies were in.
Blend on high speed until extremely smooth. Taste sauce and adjust flavors if need to (i.e. I typically add an additional ½ tsp cayenne pepper because I like it super spicy!) as well as sauce consistency. This should make about 2 cups worth. If you are unsure about the sauce consistency, look at the pictures above for reference.
Store in a sealed container in the refrigerator for up to 2 months.
To assemble!
Swirl chamoy sauce in a clear glass to coat the bottom and sides of the glass. One scoop each of mango and watermelon sorbet and layer with more chamoy sauce and tajin or TJ’s chili lime seasoning. Continue with another layer of one scoop each mango and watermelon sorbet and top with more chamoy sauce and seasoning. Enjoy!

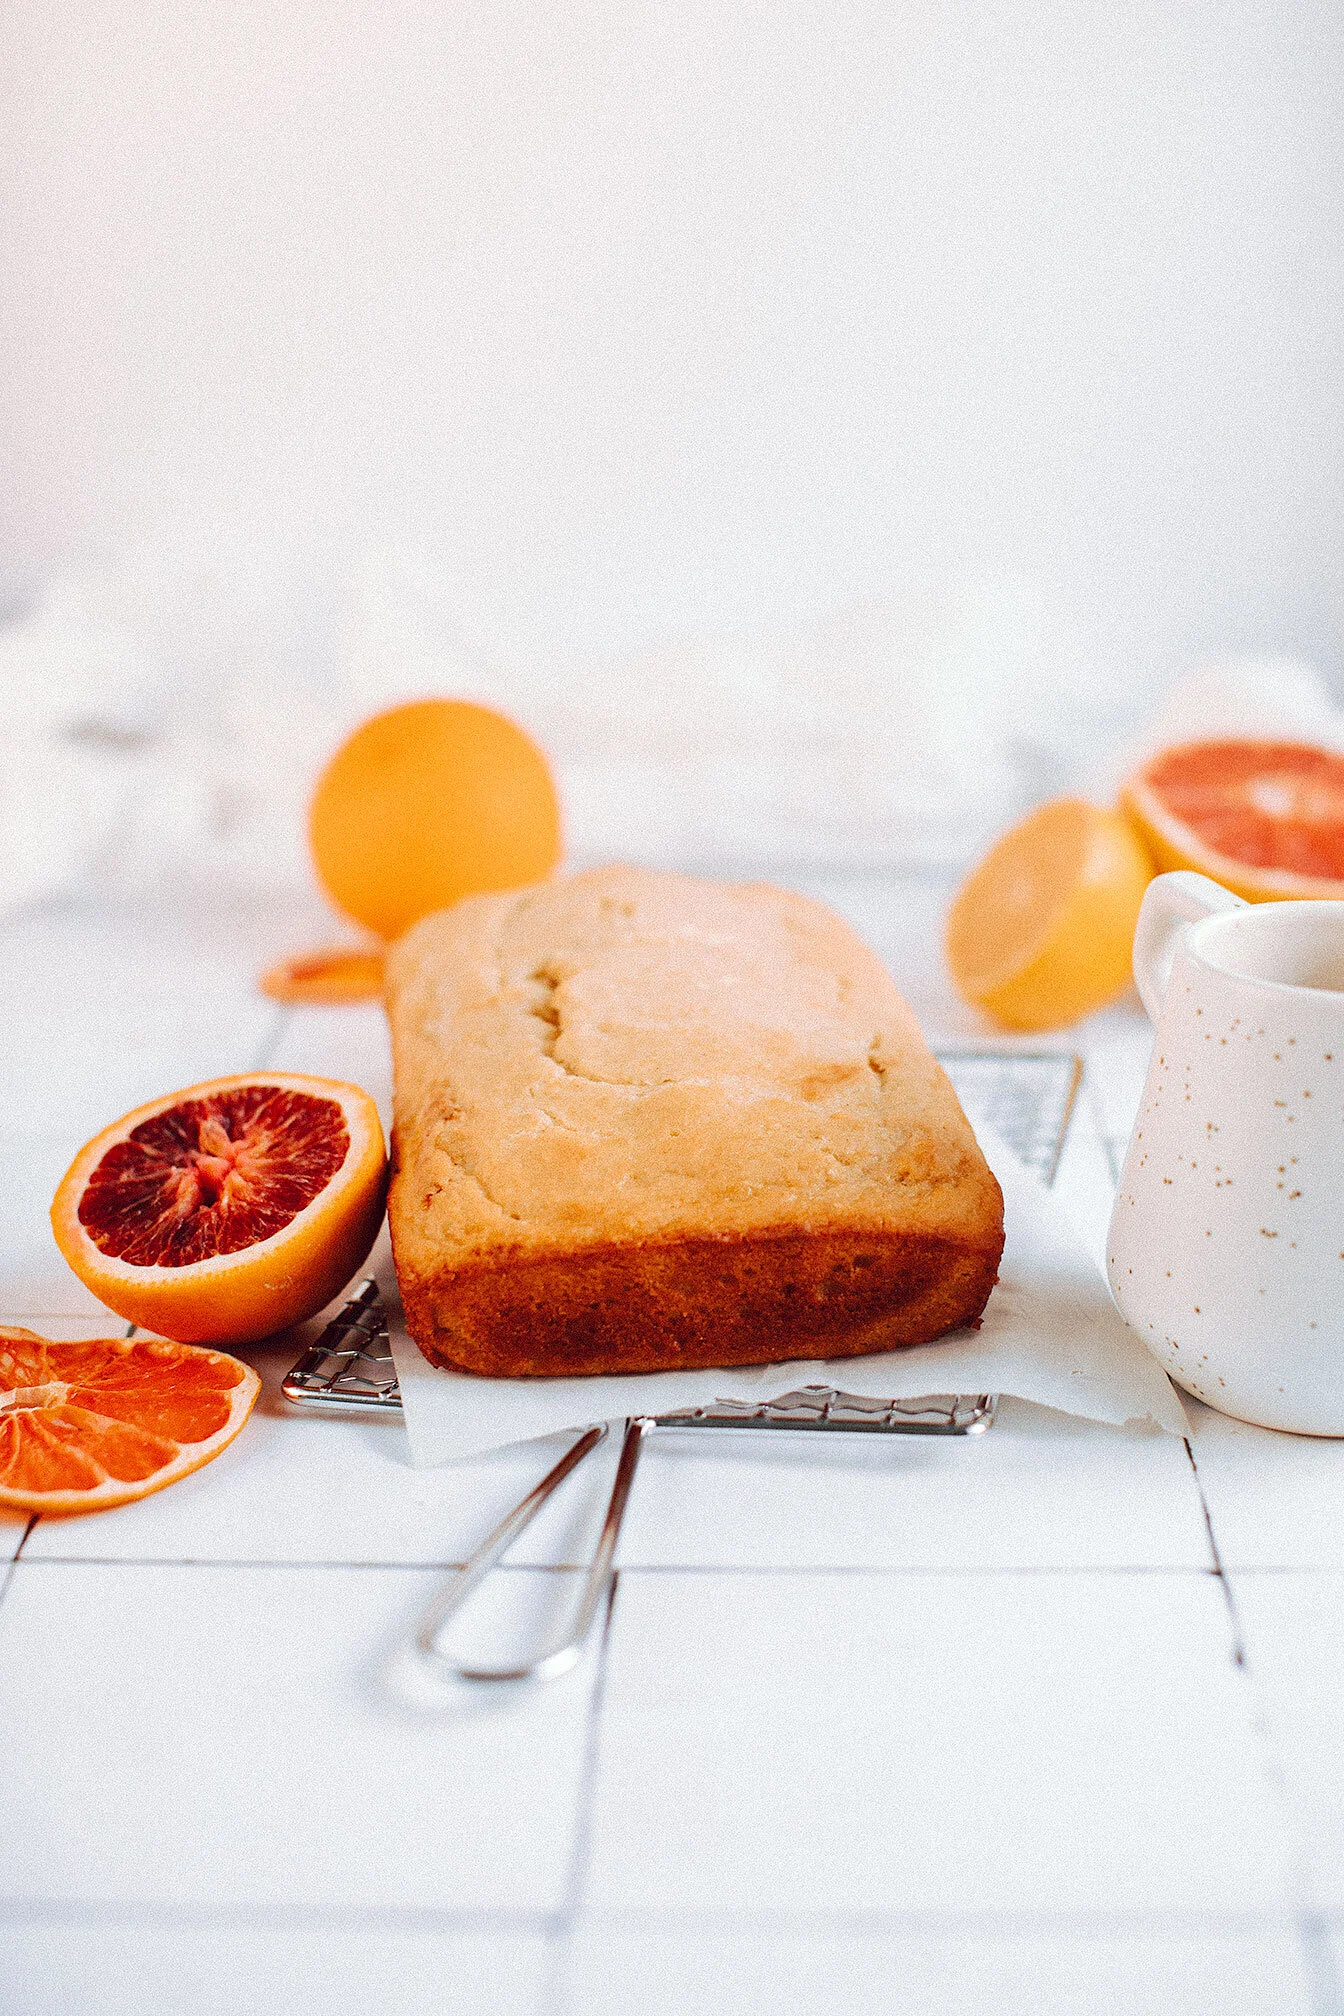
Lemon Pound Cake with a Blood Orange Glaze
Not going to lie, recipe tasting this pound cake recipe was hard. Mentally hard. I had to wake up early in the morning so that by the time the pound cake was cooled and glazed, I immediately dropped it off at the office before I could think to take a slice for myself. It’s just that good!
Since I made this recipe close to Mother’s Day, my coworkers alluded to the fact that it’s the perfect Mother’s Day dessert! And, they are right - because what mother doesn’t love moist pound cake and citrus!? If anything, my mother first introduced me to pound cake - lemon pound cake in fact!
Lemon Pound Cake with a Blood Orange Glaze - Bright and simple gluten-free pound cake that’s perfect for any occasion.

Not going to lie, recipe tasting this pound cake recipe was hard. Mentally hard. I had to wake up early in the morning so that by the time the pound cake was cooled and glazed, I immediately dropped it off at the office before I could think to take a slice for myself. It’s just that good!


Since I made this recipe close to Mother’s Day, my coworkers alluded to the fact that it’s the perfect Mother’s Day dessert! And, they are right - because what mother doesn’t love moist pound cake and citrus!? If anything, my mother first introduced me to pound cake - lemon pound cake in fact!


Although bittersweet, even though we are nearing the end of the blood orange season, you can use whatever citrus fruit juice you would like as the glaze. For example, I played with oranges, grapefruit, and limes - all complement the lemon flavor in the pound cake.

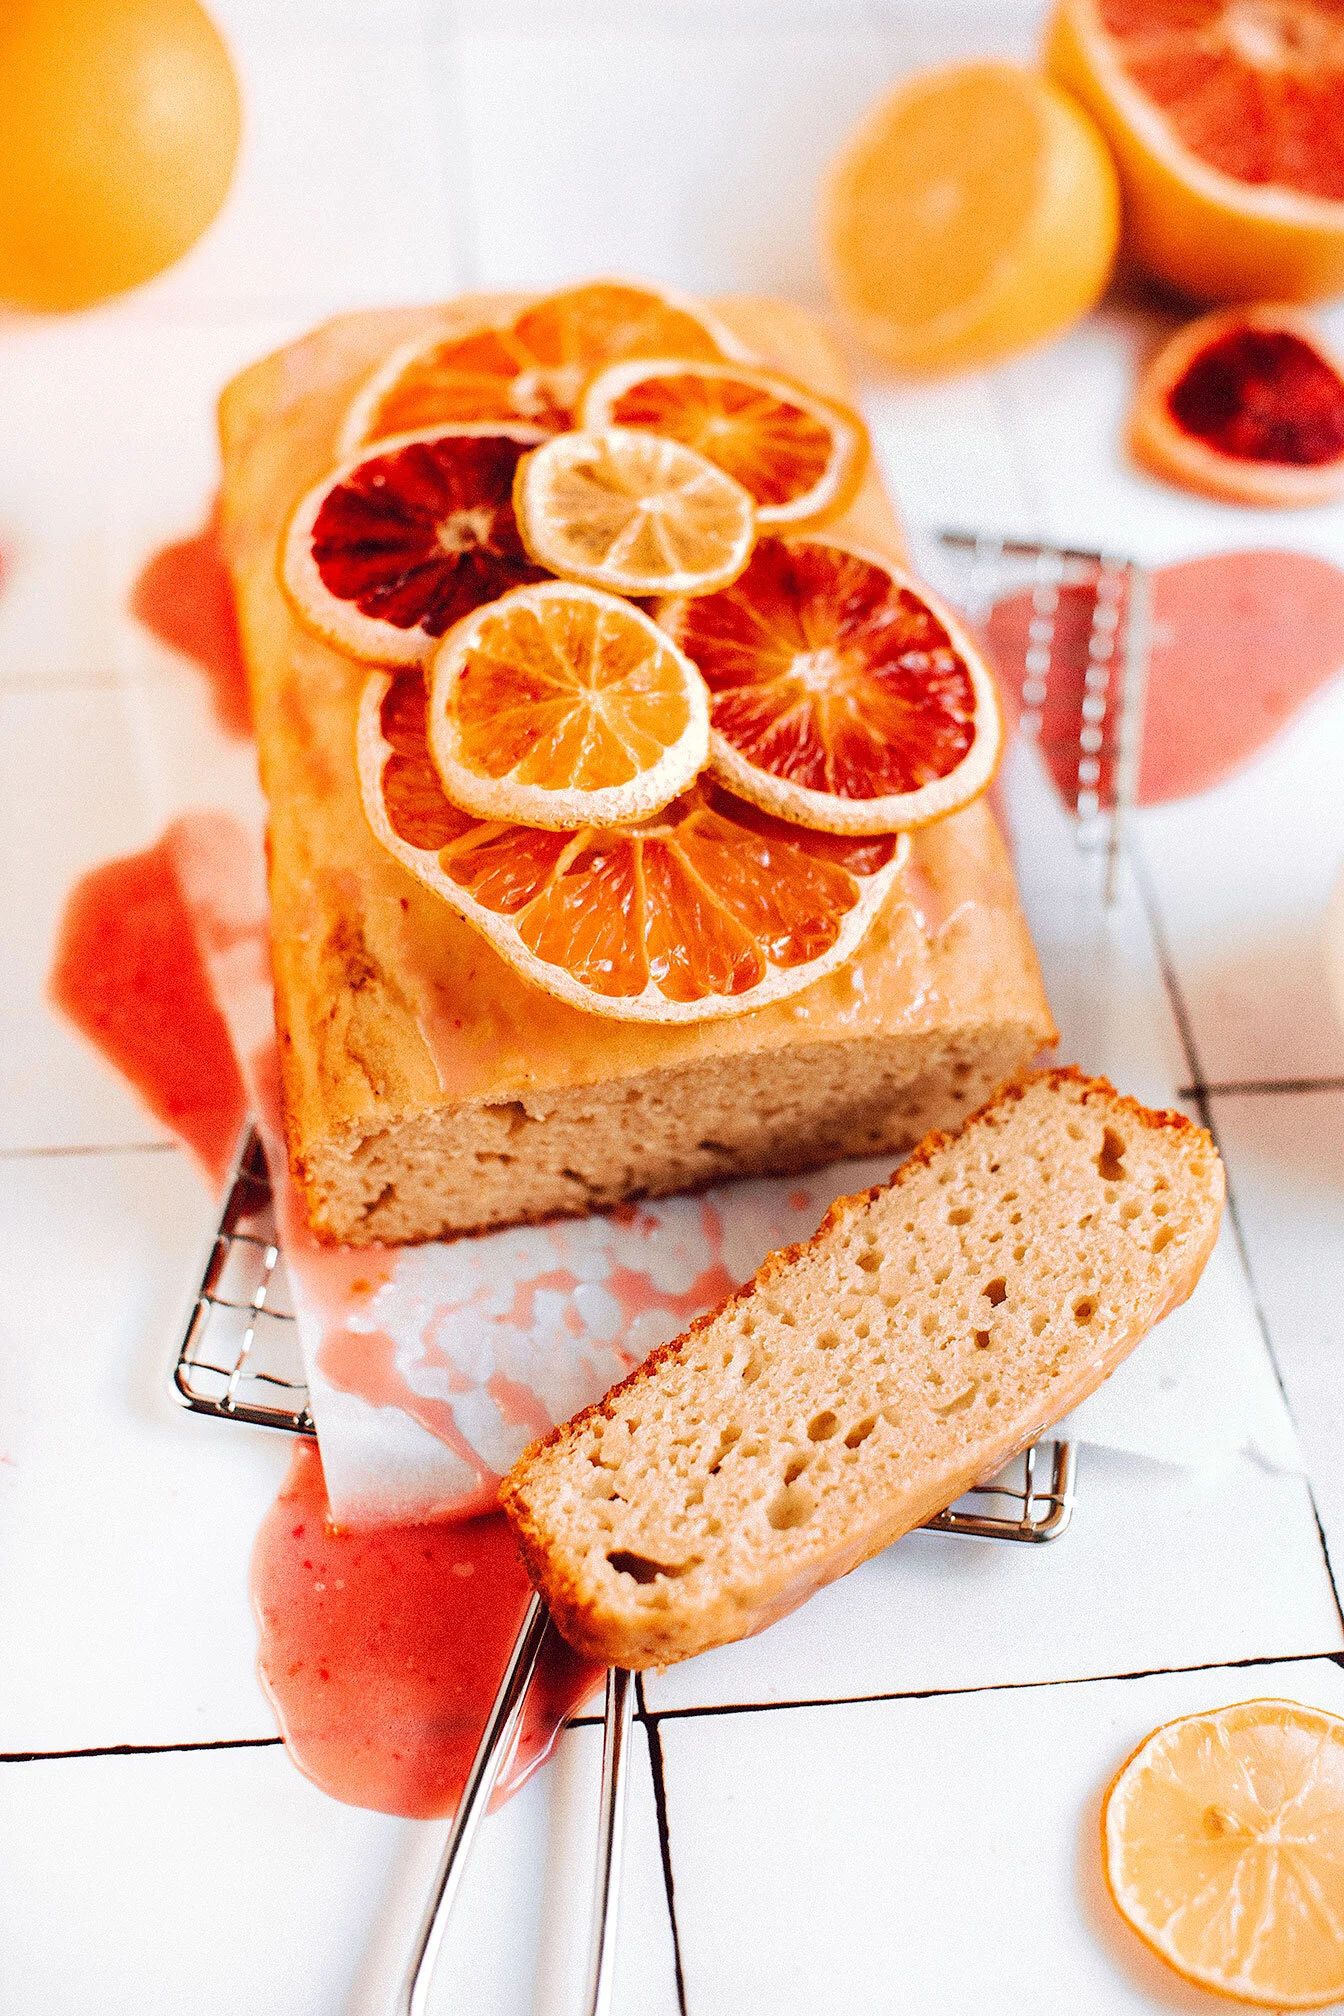
So why not impress your mother with this super easy pound cake recipe! Not only is the recipe super simple (no need for a kitchen aid mixer) but it’s aesthetically pleasing thanks to dehydrated citrus slices!
All you have to do is:
Preheat oven to 200 degrees
Slice citrus thinly using a serrated knife or mandolin
Spray bacon rack with a neutral oil spray (like avocado)
Place citrus slices on a rack and bake for 1 ½ hour to 2 hours
That’s it! So what are you waiting for, make this now!

If you try this recipe, let us know! Leave a comment, rate it, and don’t forget to tag a photo to #fromtherootsblog on Instagram. We love seeing what you come up with!
Lemon Pound Cake with a Blood Orange Glaze - Bright and simple gluten-free pound cake that’s perfect for any occasion.
Ingredients
1 ½ cup gluten-free baking 1-to-1 flour
½ cup organic cane sugar
4 Tbsp lemon juice + zest
1 tsp vanilla extract
½ cup plain yogurt (dairy or lactose-free)
2 eggs
¼ cup avocado oil
1 tsp baking powder
½ tsp baking soda
¼ tsp salt
Glaze
½ juice blood orange
½ tsp vanilla extract
¼ - ½ cup organic confectioners sugar
Directions
Preheat the oven to 350 degrees and line your loaf pan with parchment paper and spray the inside using a neutral oil like avocado oil spray.
In a medium bowl, whisk your dry ingredients until combined.
In a larger mixing bowl, whisk your wet ingredients until combined.
Slowly add your dry ingredients into your wet ingredients until combined. The mixture might look thick but that is okay!
Pour mixture into loaf pan, spread evenly into the pan, and bake for 30-35 minutes or until lightly brown and toothpick, when inserted, comes out clean.
While your loaf is cooking, prepare the glaze by mixing the juice, vanilla, and sugar until desired consistency. (may need to add more or less of confectioners sugar or juice)
When the pound cake is done baking, let sit in the pan for 5-10 minutes before transferring to a cooling rack. Once the pound cake has cooled down, pour the glaze over the pound cake and enjoy!
Notes
To make dehydrated citrus slices: Preheat oven to 200 degrees. Slice citrus thinly using a serrated knife or mandolin. Spray bacon rack with a neutral oil spray (like avocado). Place citrus slices on a rack and bake for 1 ½ hour to 2 hours. That’s it!

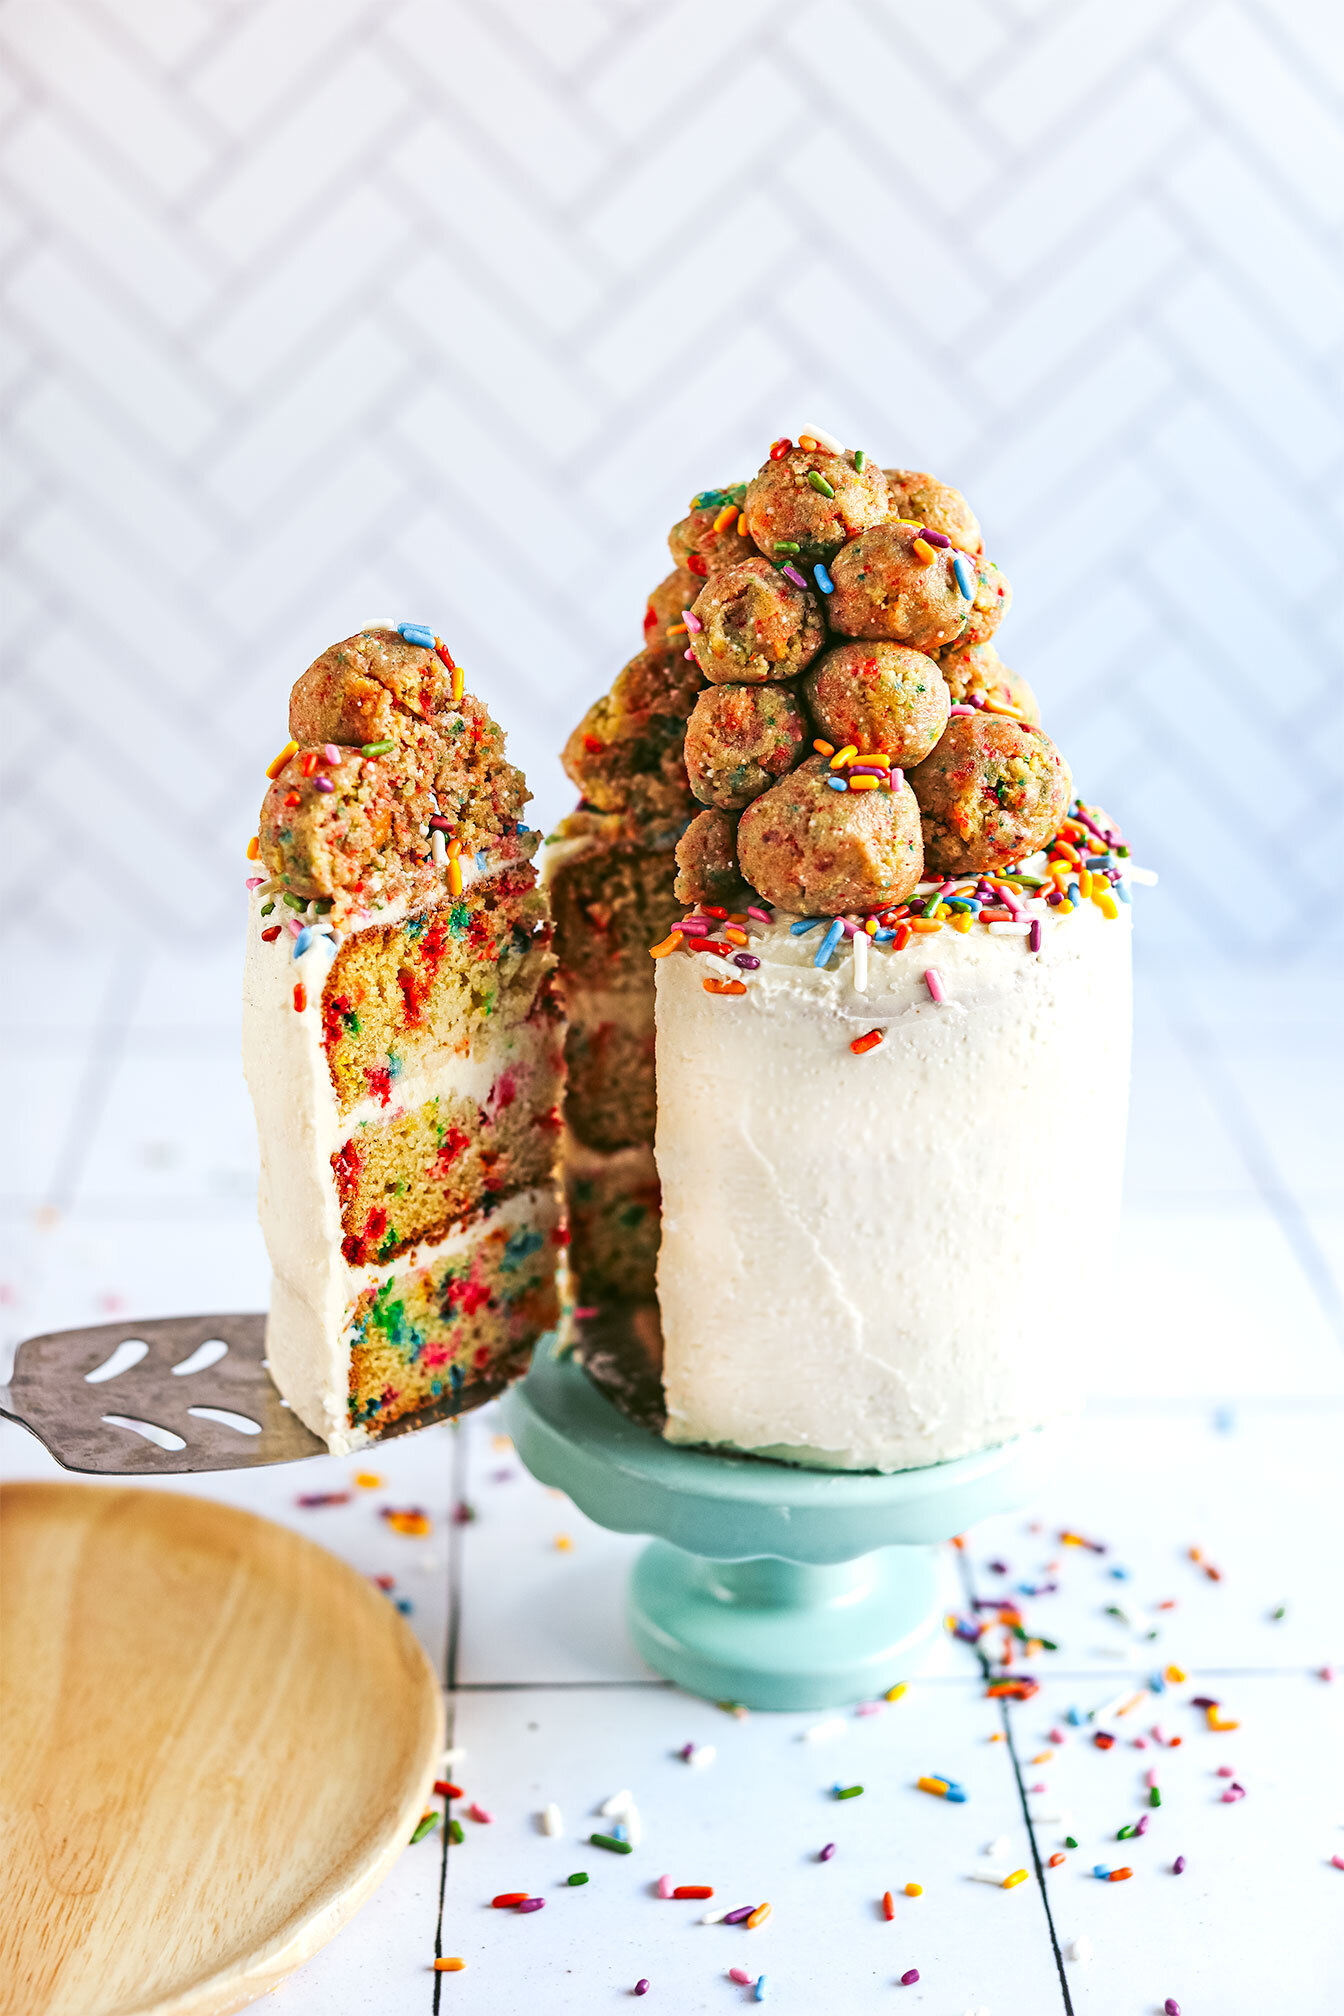
The Best Gluten Free Confetti Cake
The Best Gluten Free Funfetti Cake - Fluffy, tender gluten free cake that reuses layered tops as cake ball garnishes! Includes baking techniques to create that perfect “just came from the bakery funfetti cake.”
I turned the big dirty thirty a couple weeks back (pisces in the house!?) and it feels so good! Ever since I was a kid, I dreamt of this day. For some reason, in my childhood brain, 30 meant that I was going to be a woman. That I would have it all together. That I was going to be successful. And in most ways, it feels that way or at least leading to that prediction.
For so many years, I would let my stomach succumb to a laundry list of ingredients that made me feel like crap for the sake of pleasing coworkers who rarely knew me or family members that “forgot” that I had a gluten and dairy sensitivity. But not this year! This year, I am making my own damn cake! And the cake will have ingredients that I can fully digest and not feel like crap after! Haha
The Best Gluten Free Funfetti Cake - Fluffy, tender gluten free cake that reuses layered tops as cake ball garnishes! Includes baking techniques to create that perfect “just came from the bakery funfetti cake.”
I turned the big dirty thirty a couple weeks back (pisces in the house!?) and it feels so good! Ever since I was a kid, I dreamt of this day. For some reason, in my childhood brain, 30 meant that I was going to be a woman. That I would have it all together. That I was going to be successful. And in most ways, it feels that way or at least leading to that prediction.

For so many years, I would let my stomach succumb to a laundry list of birthday cake ingredients that made me feel like crap for the sake of pleasing coworkers who barely knew me or family members that “forgot” that I had a gluten and dairy sensitivity. But not this year! This year, I am making my own damn cake! And the cake will have ingredients that I can fully digest and not feel like crap after! Haha


So if you feel the same way, you are making a cake for someone with these sensitivities, or just want a really good funfetti cake then look no further!

I’ve been watching a lot of baking shows during COVID: Great British Baking Show Nailed It, you name it! So this cake was inspired by all those late nights drooling over all the glutenous and sugary-laden desserts! Haha!
With that said, even though these recipes are traditional, I learned the techniques that can be applied to gluten and dairy-free baking! With cooking in general, it’s all about learning and finding ways where cooking can work for you! So the techniques used for this cake will, in the end, produce a damn good gluten-free cake.


Directions in the recipe below, provide the techniques used but if you need more information regarding how to: reverse creaming, flat tops for even layering, milk soaking layers, build supported cake layers, frost your cake or leaving it naked, tools needed for a layered cake, and so much more -- check out Erin McDowell’s video on How to Make Layered Cakes and Claire Saffitz Makes Confetti Cake.


If you try this recipe, let us know! Leave a comment, rate it, and don’t forget to tag a photo to #fromtherootsblog on Instagram. We love seeing what you come up with!
The Best Gluten Free Funfetti Cake - Fluffy, tender gluten free cake that reuses layered tops as cake ball garnishes! Includes baking techniques to create that perfect “just came from the bakery funfetti cake.”
Ingredients
1 ½ cups gluten free 1-to-1 baking flour
½ cup organic granulated cane sugar
1 tsp baking powder
½ tsp baking soda
¼ tsp salt
½ cup goat milk + ¼ cup or plant-based milk
1 tsp lemon juice + zest of one lemon
1 egg + 3 Tbsp egg whites (whisked + room temperature)
½ stick grass-fed butter (room temperature)
½ tsp almond extract
⅓ cup (1.75 oz) sprinkles
Frosting
Coconut whipped frosting (homemade or store-bought) or frosting of choice
Toppings
Sprinkles and cake balls (from leftover cake tops + frosting)
Directions
Preheat the oven to 350 degrees F and spray 3 - 4-inch springform pans with cooking spray and line the bottoms with parchment paper. Set aside.
Make your “buttermilk” by adding lemon juice and zest to your goat milk. Let sit for at least 10-15 min. Set aside. *The zest just adds brightness to the cake, not necessarily creating the buttermilk mixture.
Place the flour, sugar, baking powder, baking soda, and salt into the bowl of your stand mixer with the paddle attachment.
Turn the mixer on the slowest speed. Slowly add chunks of your softened butter until everything is mixed and looks like coarse sand.
Add your buttermilk mixture and bump up the speed to 4. Mix for one minute and scrape the bowl. Slowly add the whisked egg mixture, and almond extract and continue mixing for one minute. Stop halfway to scrape the bowl one more time. Mix until combined. Your batter should be thick but creamy and pourable.
Take off the paddle attachment and fold the sprinkles into the batter.
Divide the batter into your greased pans and fill ¾ of the way full. I like to evenly distribute batter by weighing each pan or use a cookie/ice cream scooper to make sure each pan has the right amount of batter.
Bake for 25-30 minutes or until golden brown and a toothpick when inserted, comes out clean.
Remove the cakes from the oven and let them cool for 10 minutes, then gently remove the pan and allow them to cool completely on a wire rack.
Let layers cool completely before stacking and frosting. I like to place my layers in the fridge for about 20-30 min to firm up the cakes for easier stacking.
Before we start stacking, it’s time to start slicing! In order to have even layers for a tall and flat layered cake, we need to make sure each layer is even. Bonus: Slicing the tops off our cakes will make our cake balls for garnish!
Use a knife to score the entire outside edge of the cake - right where the cake stops cooking in the pan (you will see a distinct edge right as it starts to dome up). Go slowly, not too deep, and make sure you are getting down to eye-level.
Take a serrated knife and cut through the cake along the indentation made with the knife marker. The best way of doing this without breaking the layers putting each cake layer on a decorating turntable. That way, you're slowly moving the serrated knife as the cake is turning. Eventually, you will end up in the middle and the top layer should come right off without any buckling or crumbling.
Set the domed top part of each layer to the side in a medium bowl to make cake balls for later.
To assemble:
Spread a bit of frosting onto the middle of the cake board, serving plate, or decorating turntable. (I like to cut out a piece of 4” round cardboard as a base for my cake so that it’s easier to transfer to a serving plate without messing with the finished product) If you are using this method, place the cardboard piece on frosting so that it stays. Dab another bit of frosting on that and then center your first layer on it.
Use a pastry brush or small spoon and dab leftover goat milk onto each cake. Don’t overdo it as you don’t want a soggy cake. Sprinkle extra lemon zest - optional but so good!
Stack the layers on top of one another, using an offset spatula to spread about half-inch frosting between each layer. Repeat each layer with milk dab, zest, and frosting. The last layer, turn the layer upside down so that the cake bottom is on top. *Makes for a clean flat top!
Crumb coat by covering the whole cake in a very thin layer of frosting. You can also pipe in between layers where there are visible holes.
Chill the cake in the fridge until the frosting has firmed up; about 20 minutes.
Apply the final coating of frosting.
To make the cake balls: Crumble domed cake tops in a small bowl with leftover frosting. Combine until you can make a ball without it crumbling. Create different size cake balls and set them aside.
To garnish, sprinkle the cake top with sprinkles or however you would like to decorate and stack cake balls in the center. Let set in the fridge so that everything is firm. Slice and enjoy!
Notes:
Simple Mills vanilla frosting, Sprinkles, cake pans, cake decorating starter kit
Even though goat milk has lactose, I have found that my body tolerates it better than cow’s milk. If you don’t know if you can tolerate goat milk then do plant-based milk instead!

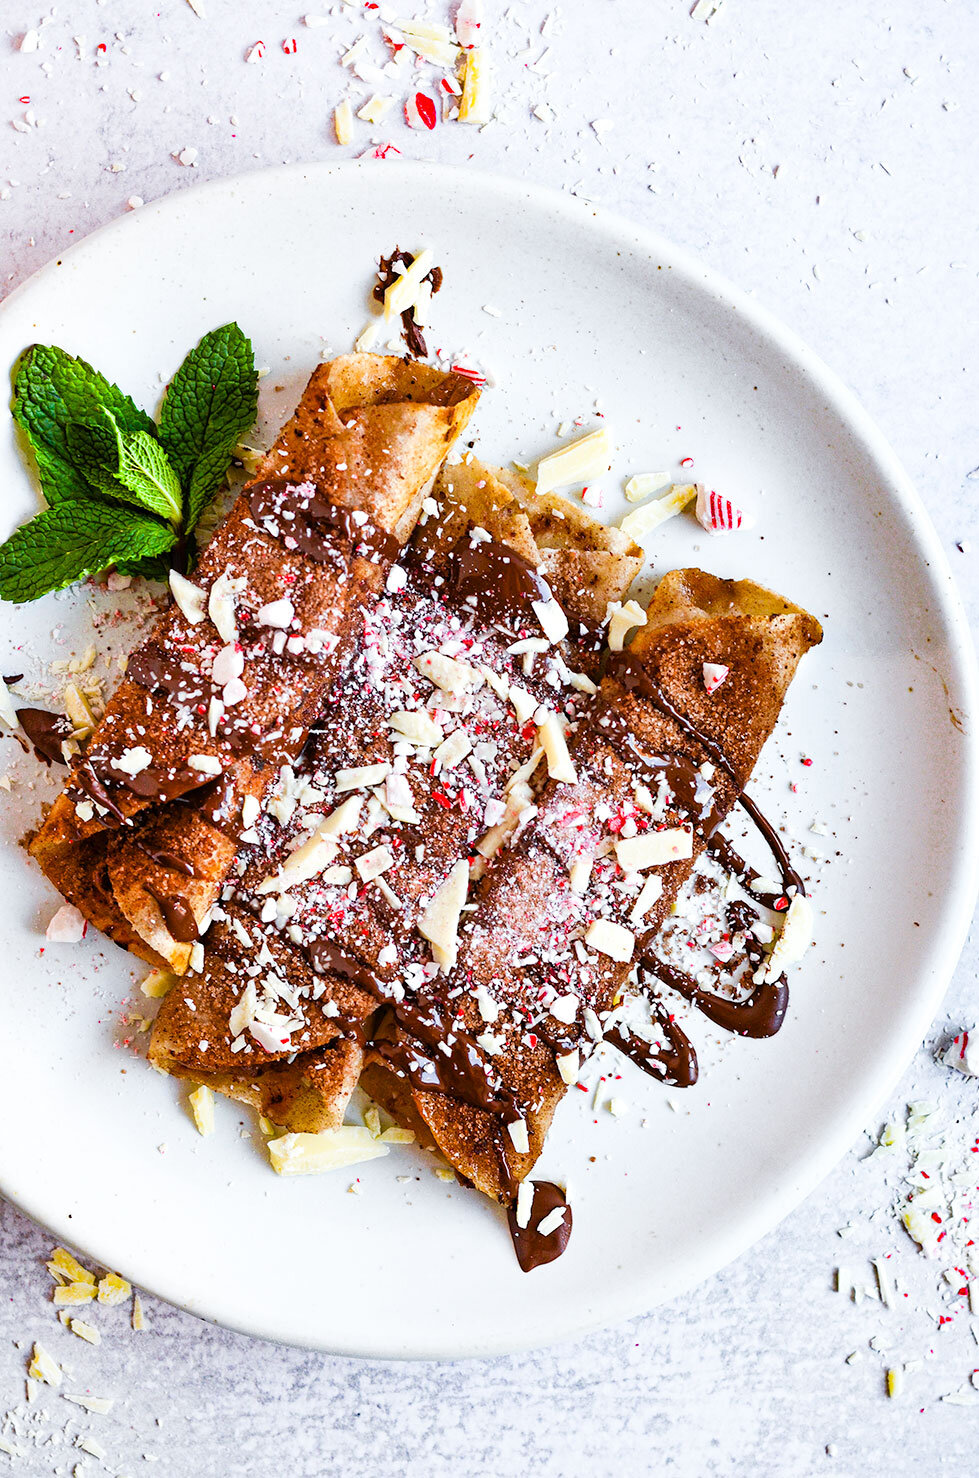
Peppermint Mocha Roll Ups
If you find seasonal drinks like Starbucks peppermint mocha or homemade hot cocoa with a peppermint stick intriguing during the holidays then look no further!
I have found a way where you can relive these amazing childhood Christmas moments without crashing from a sugar rush or hurting from tummy woes!
These roll ups are reminiscent of fried cheesecake sans refined sugar, traditional flour, rancid oils, and dairy - all with a seasonal twist! Made with only five natural ingredients, using avocado oil spray instead of deep-frying, and using healthier sugar-laden swaps, not only is this a healthy treat, but it shows you how easy it is to make healthy swaps when it comes to desserts!
Peppermint Mocha Roll Ups - A healthy and seasonal take on the classic fried cheesecake. Made with just FIVE ingredients that are rolled in the Christmas spirit! They are gluten-free, dairy-free, naturally low in sugar, and paleo-friendly (without candy cane!)
If you find seasonal drinks like Starbucks peppermint mocha or homemade hot cocoa with a peppermint stick intriguing during the holidays then look no further!


I have found a way where you can relive these amazing childhood memories without the sugar crash or tummy woes!
These roll ups are reminiscent of fried cheesecake sans refined sugar, traditional flour, rancid oils, and dairy - all with a seasonal twist! Made with only five natural ingredients, using avocado oil spray instead of deep frying, and using healthier sugar-laden swaps.


Now, these are peppermint mocha themed using peppermint extract, cacao powder, and instant coffee as the main ingredients but if you would like to switch out the flavor profile, feel free! For example, if you are caffeine sensitive, omit instant coffee.


If you would like to see how these are made, head over to my IG reels
Peppermint Mocha Roll Ups - A healthy and seasonal take on the classic fried cheesecake. Made with just FIVE ingredients that are rolled in the Christmas spirit! They are gluten-free, dairy-free, naturally low in sugar, and paleo-friendly (without candy cane!)
Ingredients
To make one roll up
1 cassava flour tortilla (or allergy/sensitivity tortilla of choice)
2 Tbsp Lactose-Free Plain Yogurt
1 tsp pure maple syrup
1 tsp cacao powder
¼ tsp instant coffee
A drop of organic peppermint extract
Avocado oil spray
Cacao Sugar Mixture
Cacao powder
Organic Cane Sugar (or maple/coconut sugar if Paleo)
Toppings
¼ cup dark chocolate chips
1 tsp coconut oil
Vegan white chocolate bar (omit if Paleo)
Organic Candy cane (omit if Paleo)
Fresh mint leaves
Directions
In a small bowl, mix together yogurt, syrup, cacao powder, coffee, and peppermint extract until fully incorporated.
Place the filling mixture in the center of a tortilla and spread crosswise to form a long line of filling. For each roll-up, roll the side closest to you up over filling.
In a skillet, heat avocado oil to medium-high heat. Place roll ups in hot oil and fry on one side for 30-60 seconds. Turn roll ups until all sides are golden brown. Remove from the skillet and immediately sprinkle with the cacao-sugar mixture.
Set on a plate. Continue doing these steps if making more than one roll up.
For toppings, heat dark chocolate chips with coconut oil in the microwave or on the stovetop until melted. Drizzle chocolate mixture over roll ups. If not paleo, add chopped white chocolate bark pieces and crushed candy cane. Garnish with fresh mint and serve immediately!
Notes
Here are the ingredients I used for this recipe: Siete foods cassava flour tortilla, Chosen foods avocado oil spray, Siggi’s lactose-free plain yogurt, Flavororganics organic peppermint extract, Navitas organic cacao powder, Enjoy Life dark chocolate chips, Pascha organic vegan white chocolate bar, YumEarth organic candy cane
Using these ingredients, the nutrition facts for 1 roll up (sans toppings) is 128 calories (3g fat; 19g carb; 5g protein; 6g sugars).

Half Baked Chickpea Blondies + Edible Cookie Dough Dip
When you are stuck at home due to COVID-19, you think of creative ways to pass the time. So for this month, I’m creating recipes based on what is in my pantry.
I assume that most people will have the same ingredients so let’s look inside our pantry to see if we have these ingredients on hand:
can of chickpeas, almond flour, a jar of peanut butter, random ⅓ bag of dark chocolate chips, maple syrup from last week's pancakes, and baking essentials like baking soda, baking powder, salt, cocoa powder, and vanilla extract.
Have all these ingredients? Alright, let’s start baking!
Edible cookie dough dip transformed into a blondie if you decide to cook the batter! Vegan, gluten-free, dairy-free, and flour-less.

When you are stuck at home due to COVID-19, you think of creative ways to pass the time. So for this month, I’m creating recipes based on what is in my pantry.

I assume that most people will have the same ingredients so let’s look inside our pantry to see if we have these ingredients on hand:
can of chickpeas, almond flour, jar of peanut butter, random ⅓ bag of dark chocolate chips, maple syrup from last week's pancakes, and baking essentials like baking soda, baking powder, salt, cocoa powder, and vanilla extract.
Have all these ingredients? Alright, let’s start baking!

Personally, I think that most baking recipes that call for chickpeas as a healthy ingredient swap are great and all, except that I get the “chickpea” taste in the dessert. So to create a neutral and creamy texture to this recipe, I followed the same technique that I used for my hummus recipes.
Simply place chickpeas in a medium saucepan with ½ tsp baking soda. Cover the chickpeas with several inches of water, then bring to a boil over high heat. Boil for about 20 minutes or until the chickpeas look bloated, soft, and their skins are falling off. In a fine mesh strainer, drain the chickpeas and run cool water over them.

Now, you have the option of creating one batch of this recipe for either a small batch of blondies or to create edible cookie dough dip!
If you are wanting to create half baked blondies, you will double the recipe and split the batter in half. In one batter, you are adding about ⅓ cup chocolate chips. The other batter, you are adding ⅓ cup chocolate chips and 3 Tbsp cocoa powder.

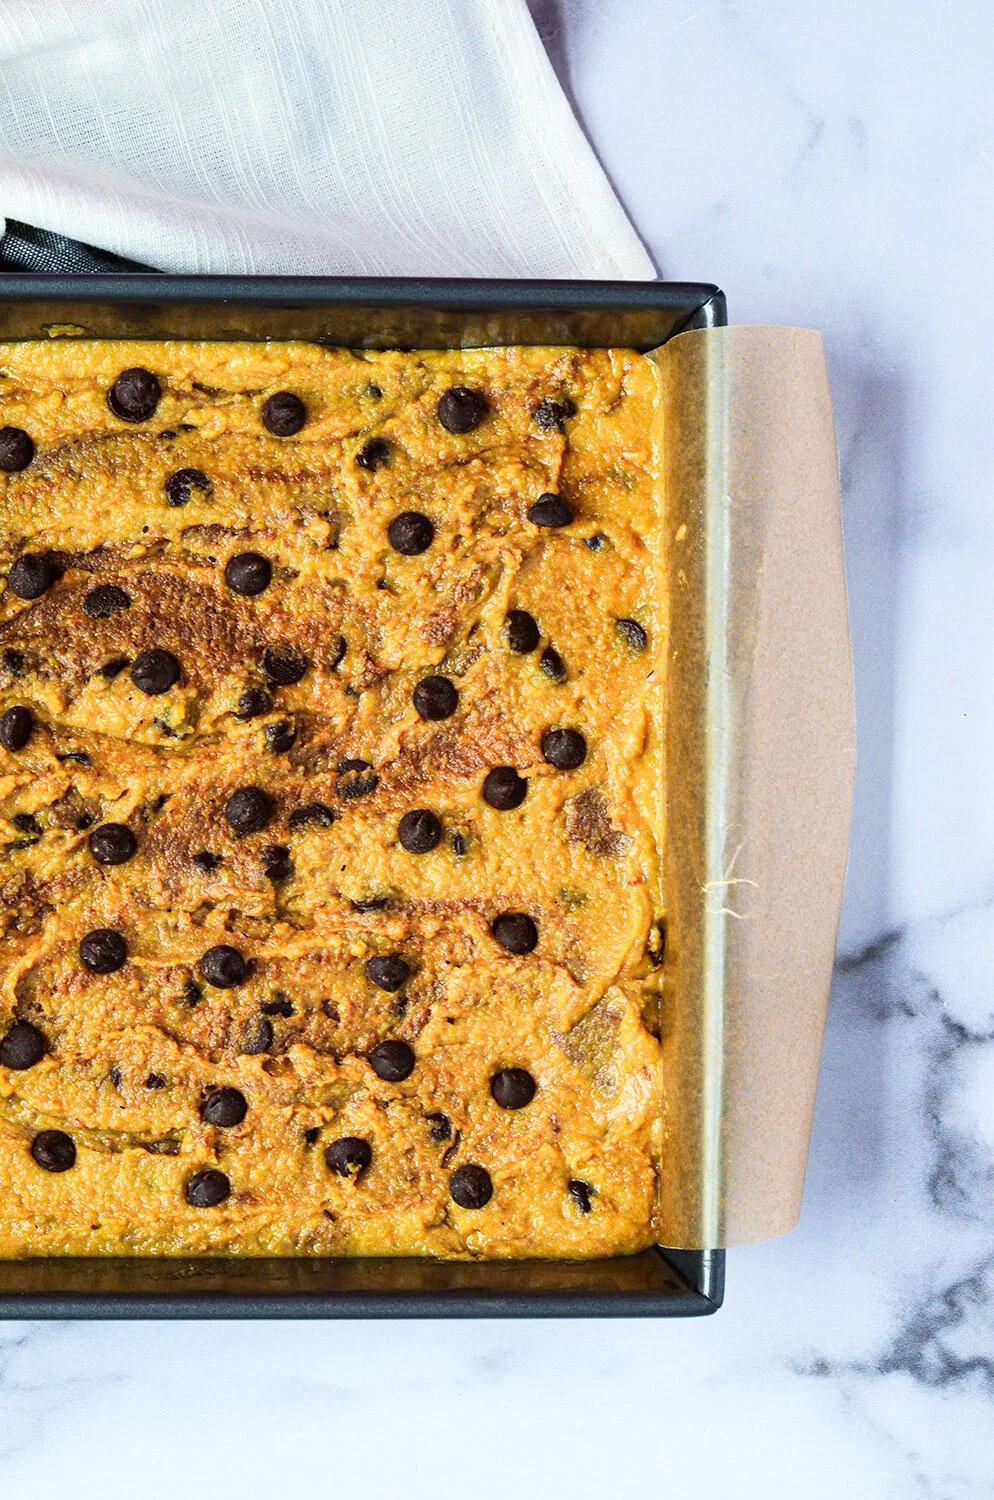
To create the “marbled” effect, spoon half of the regular batter into the prepared pan, and then top it with half of the chocolate batter. Repeat this with the remaining regular batter and chocolate batter. Swirl the batters together with a knife just a few times - do not overmix! A slight swirl will create that beautiful marbled look once it’s all baked.

Both options taste amazing and would be great for a party, healthy snack, or dessert.
If you try this recipe, let us know! Leave a comment, rate it, and don’t forget to tag a photo to #fromtherootsblog on Instagram. We love seeing what you come up with!
Half Baked Chickpea Blondies + Edible Cookie Dough Dip - Edible cookie dough dip transformed into a blondie if you decide to cook the batter! Vegan, gluten-free, dairy-free, and flour-less.
Ingredients
(Double this recipe if you are making half baked blondies)
1 can chickpeas (drained and rinsed) + ½ tsp baking soda
⅓ cup peanut butter
⅓ cup pure maple syrup
⅓ cup dark chocolate chips
¼ cup almond flour
1 tsp vanilla extract
¼ tsp baking soda
¼ tsp baking powder
¼ tsp salt
3 tbsp unsweetened cocoa powder - for the brownie batter
Directions
Edible cookie dough dip
Place chickpeas in a medium saucepan with ½ tsp baking soda. Cover the chickpeas with several inches of water, then bring to a boil over high heat. Boil for about 20 minutes or until the chickpeas look bloated, soft, and their skins are falling off. In a fine mesh strainer, drain the chickpeas and run cool water over them.
Add the chickpeas to a food processor along with the rest of the ingredients sans chocolate chips and cocoa powder.
Blend until the mixture is thick and creamy, scrape down the sides as necessary.
If you are wanting edible chocolate chip cookie dough dip, fold in ⅓ cup chocolate chips.
If you are wanting edible brownie batter dip, fold in ⅓ cup chocolate chips + 3 Tbsp cocoa powder.
Pour into a bowl and serve with various fruits, pretzels, and cinnamon sugar pita chips.
half baked blondies:
Double the recipe by adding two cans of chickpeas in a medium saucepan with 1 tsp baking soda. Cover the chickpeas with several inches of water, then bring to a boil over high heat. Boil for about 20 minutes or until the chickpeas look bloated, soft, and their skins are falling off. In a fine mesh strainer, drain the chickpeas and run cool water over them.
While the chickpeas are boiling, preheat the oven to 350 degrees and line and grease an 8x8 baking pan.
Add the chickpeas to a food processor along with the rest of the ingredients sans chocolate chips and cocoa powder.
Blend until the mixture is thick and creamy, scrape down the sides as necessary.
Split batter in half. In one batter, you are adding about ⅓ cup chocolate chips. The other batter, you are adding ⅓ cup chocolate chips and 3 Tbsp cocoa powder.
To create the “marbled” effect, spoon half of the regular batter into the prepared pan, and then top it with half of the chocolate batter. Repeat this with the remaining regular batter and chocolate batter. Swirl the batters together with a knife just a few times - do not overmix! A slight swirl will create that beautiful marbled look once it’s all baked.
Top with additional chocolate chips and bake in the oven for 25-30 minutes.
Let the pan cool for at least 10 minutes before cutting into squares. Enjoy! Optional: Sprinkle sea salt flakes before serving.