Sort by Category
- May 2026
- March 2026
- December 2025
- November 2025
- October 2025
- September 2025
- August 2025
- June 2025
- August 2024
- July 2024
- June 2024
- May 2024
- February 2024
- January 2024
- December 2023
- November 2023
- October 2023
- September 2023
- August 2023
- July 2023
- March 2023
- February 2023
- January 2023
- December 2022
- November 2022
- October 2022
- September 2022
- August 2022
- June 2022
- May 2022
- April 2022
- March 2022
- February 2022
- January 2022
- December 2021
- November 2021
- October 2021
- September 2021
- August 2021
- July 2021
- June 2021
- May 2021
- April 2021
- March 2021
- February 2021
- January 2021
- December 2020
- November 2020
- October 2020
- September 2020
- August 2020
- July 2020
- June 2020
- May 2020
- April 2020
- March 2020
- February 2020
- January 2020
- December 2019
- November 2019
- October 2019
- September 2019
- August 2019
- July 2019
- June 2019
- May 2019
- April 2019
- March 2019
- February 2019
- January 2019
- December 2018
- November 2018
- October 2018
- September 2018
- August 2018
- July 2018
- June 2018
- May 2018
- April 2018
- March 2018
- February 2018

Carrot Cake Smoothie
Carrot cake has got to be in my top 5 of favorite cakes. From the spices of cinnamon to the crunchy textures of nuts and carrots, there is nothing that will stand in the way of me and carrot cake.
That’s why I love recipe testing with carrot cake ingredients. One of the most popular recipes on the blog are these carrot cake pancakes. The post also includes a fun waffle variation if you are team #waffles.
But this smoothie version really takes the cake! (no pun intended)
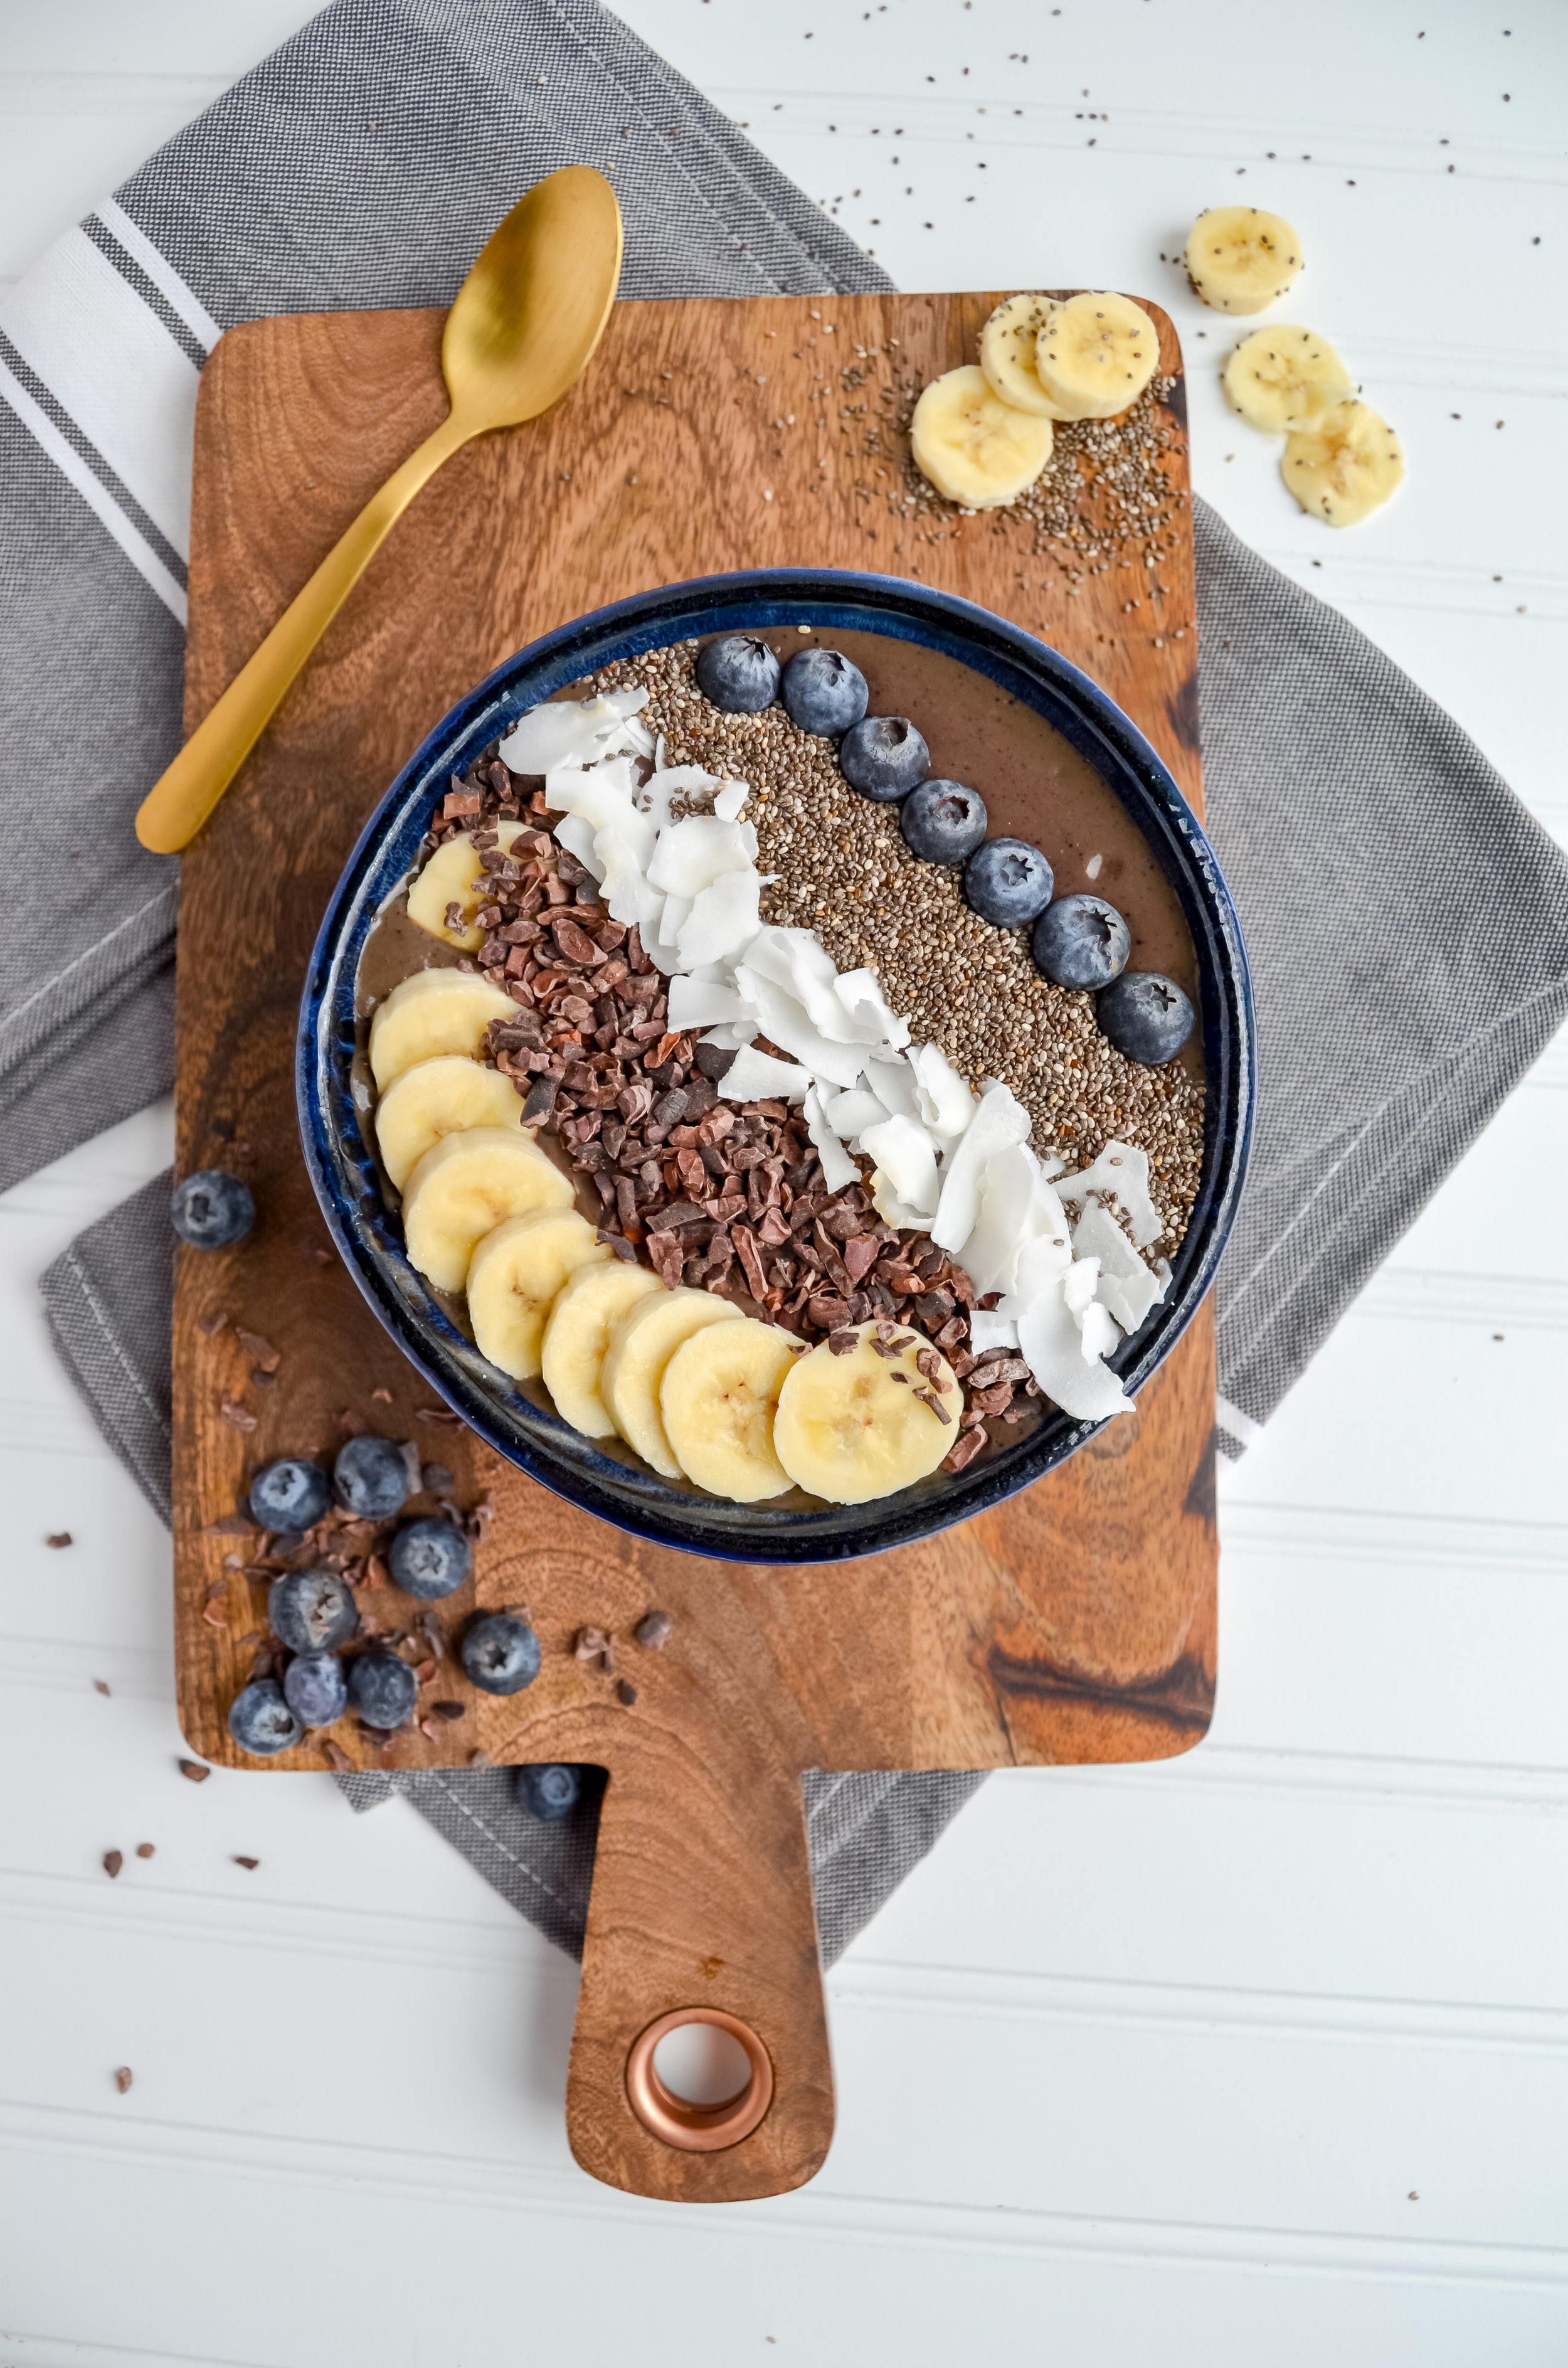
Carrot Cake Smoothie - Oatmeal smoothie based that provides one serving of veggies, plus fiber and protein. Perfect for breakfast, or as a pre/post-workout shake!

Carrot cake has got to be in my top 5 of favorite cakes. From the spices of cinnamon to the crunchy textures of nuts and carrots, there is nothing that will stand in the way of me and carrot cake.
That’s why I love recipe testing with carrot cake ingredients. One of the most popular recipes on the blog are these carrot cake pancakes. The post also includes a fun waffle variation if you are team #waffles.
But this smoothie version really takes the cake! (no pun intended)

On the fact that you just might have all the ingredients on hand! So if you are wanting something quick to make for breakfast or fuel before or after your workout, this recipe is for you!
The only thing I will mention is that if you do not have a high-powered blender, like a Vitamix, then you may need to do some prep work before blending. You will need to finely grate the raw carrots before adding to the blender, that is all!
If you try this recipe, let us know! Leave a comment, rate it, and don’t forget to tag a photo to #fromtherootsblog on Instagram. We love seeing what you come up with!
Carrot Cake Smoothie - Oatmeal smoothie based that provides one serving of veggies, plus fiber and protein. Perfect for breakfast, or as a pre/post-workout shake!
Ingredients
1 cup raw carrots
1 cup plant-based milk
¼ cup gluten-free rolled oats
½ frozen banana
1 Tbsp almond butter
1 Tbsp hemp seeds
½ tsp vanilla extract
½ tsp ground cinnamon
Boosters
1 scoop unflavored or vanilla-flavored collagen peptides or protein powder
Toppings
Chopped pecans, hemp seeds, cinnamon, carrot flakes, and coconut flakes
Directions
Add all ingredients to a high powered blender. Feel free to add any optional add-ins to your smoothie if you’d like. Blend until smooth. Serves 1.
Notes
You need a high powered blender for this recipe. If you do not have a high powered blender, finely grate carrots before adding to a normal blender.
To make it sweeter, add the other half of frozen banana or pure maple syrup, honey.
Add ½ cup ice cubes to keep the smoothie cold and thick.

Magic Bar Cookie Skillet
As I was packing food supplies for my winter retreat, I noticed that I didn’t have anything for dessert. Who doesn’t think about packing dessert!? But I didn’t want to bring a lot of ingredients to make something homemade so that’s when I came up with an idea to make “a cookie skillet in a jar”! All the dry ingredients are in a jar. Just bring one egg and coconut oil and you are all set!
Magic Bar Cookie Skillet - Great for camping trips, DIY holiday gifts, or when you are hankering for a cookie skillet! - Paleo, naturally low in sugar, dairy-free, and gluten-free.

As I was packing food supplies for my winter retreat, I noticed that I didn’t have anything for dessert. Who doesn’t think about packing dessert!? But I didn’t want to bring a lot of ingredients to make something homemade so that’s when I came up with an idea to make “a cookie skillet in a jar”! All the dry ingredients are in a jar. Just bring one egg and coconut oil and you are all set!


Dry ingredient layers (bottom to the top)
Almond flour
Paleo flour
Baking soda
Salt
Coconut sugar
Chocolate chips
Toasted coconut flakes
Chopped raw walnuts

You can also use the batter to make cookies! For these cookies, I swapped out the “magic bar” toppings for chocolate chips and salted caramel almond butter. Reserve ¼ serving of salted caramel to drizzle over the cookies, add a pinch of coarse sea salt, and bam! Perfection!

If you try this recipe, let us know! Leave a comment, rate it, and don’t forget to tag a photo to #fromtherootsblog on Instagram. We love seeing what you come up with!
Magic Bar Cookie Skillet - Great for camping trips, DIY holiday gifts, or when you are hankering for a cookie skillet! - Paleo, naturally low in sugar, dairy-free, and gluten-free.
Ingredients
1/2 cup blanched almond flour
1/2 cup paleo flour
1/4 cup coconut oil (solid)
1 egg
1/3 cup coconut sugar, dark chocolate chips, chopped raw walnuts, toasted coconut flakes
1 tsp vanilla extract or vanilla powder
1/4 tsp salt
1/4 tsp baking soda
Directions
Preheat oven to 350 degrees.
Combine sugar and solid coconut oil together.
Add the egg, salt, baking soda, and fours and blend using a mixer until well combined.
Fold chocolate chips, walnuts, and coconut flakes into the dough until well combined.
Grease a 6 inch cast iron skillet and press cookie dough firmly into skillet
Cook for 16-20 minutes
After the cookie skillet has cooled down, top with dairy-free whipped cream or ice cream and enjoy!
Notes
If you do not have paleo flour, double up on almond flour. Vice versa for paleo flour.
Here is the paleo flour brand I use.
Healthy Strawberry Brown Rice Krispie Treats
After finding out that I was sensitive to gluten, my love for rice krispie treats grew. I know that sounds bad and unhealthy, but hey, at the time, there weren’t too many gluten-free options when it came to desserts!
But within a year of only eating rice krispie treats, I felt like I was done for life. 5 years later, that’s all I crave! So, without further ado, I have made for you a healthier rice krispie treat -- but with a spin.
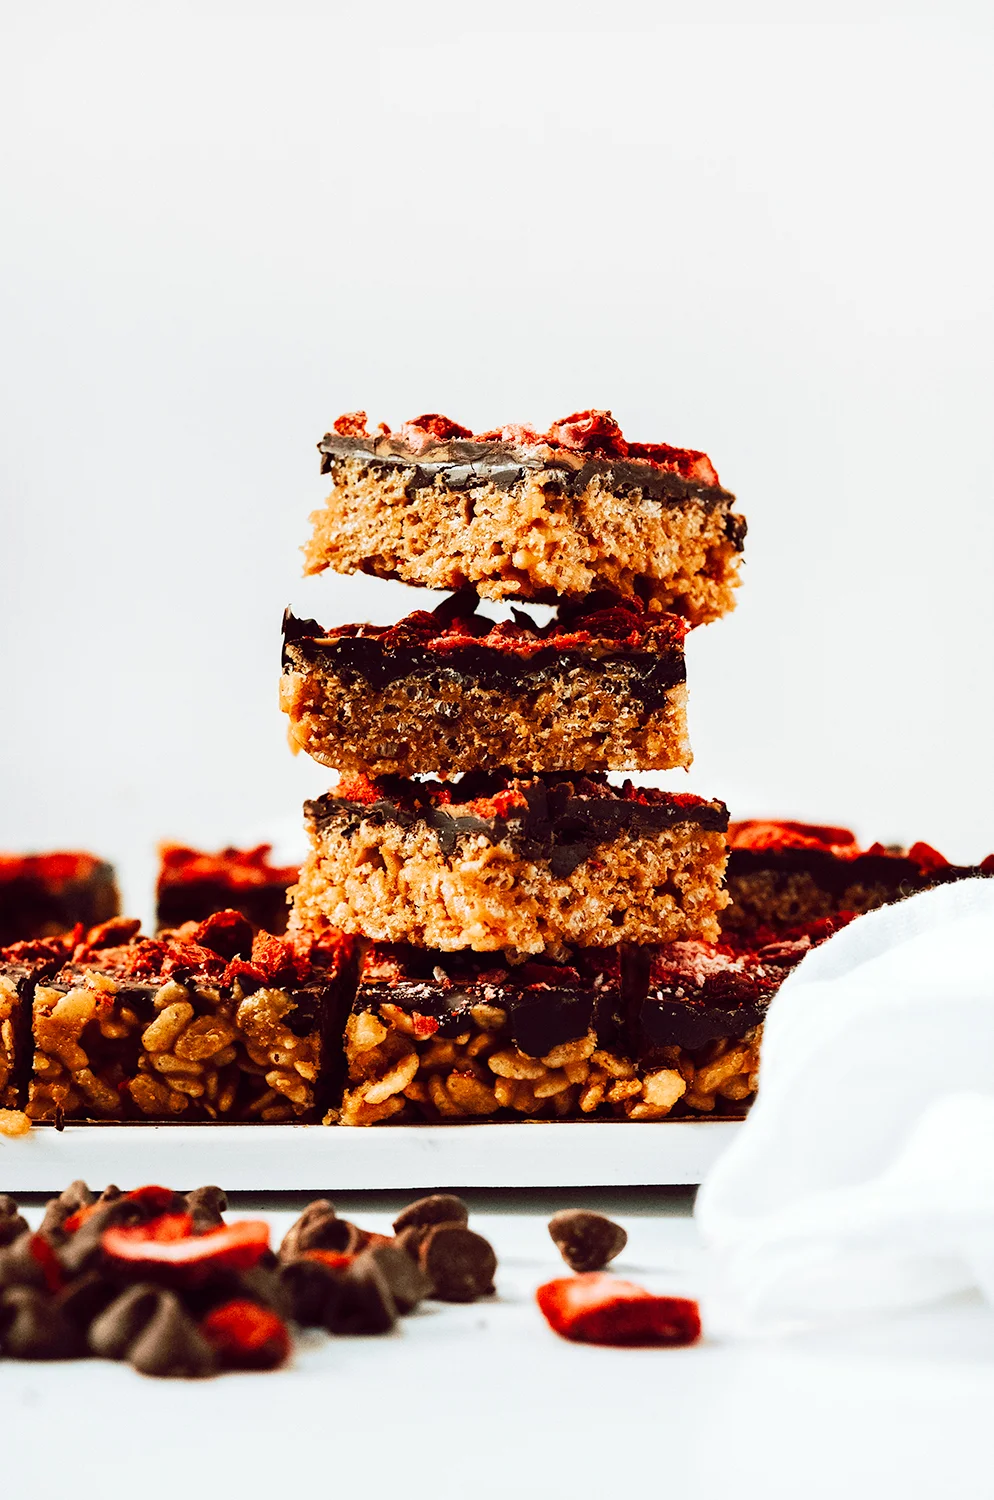
Healthy Strawberry Brown Rice Krispie Treats - Healthy play on the traditional rice krispie treat! Gluten-free, dairy-free, and naturally lower in sugar!

After finding out that I was sensitive to gluten, my love for rice krispie treats grew. I know that sounds bad and unhealthy, but hey, at the time, there weren’t too many gluten-free options when it came to desserts!
But within a year of only eating rice krispie treats, I felt like I was done for life. 5 years later, that’s all I crave! So, without further ado, I have made for you a healthier rice krispie treat -- but with a spin.

Instead of using marshmallows, I used a mixture of peanut butter, coconut oil, pure maple syrup and strawberry preserves. I just love the addition of strawberry preserves, making these rice krispie treats taste more like a PB&J or a no bake cookie!

You can also play with the toppings if you would like. My favorite way to add color and to play off the strawberry preserves is to add freeze dried strawberries, goji berries, and melted peanut butter into the dark chocolate. You could keep it classy with melted dark chocolate and sea salt flakes, or create a superfood rice krispie treat with goji berries, bee pollen, nuts and seeds, cacao nibs, and coconut flakes. The possibilities are endless!

These are great as a healthy snack and dessert as each serving size is less than 200 calories with about 10 grams of sugar per serving. The ingredients I used in predicting these numbers are listed in the notes section below.
If you try this recipe, let us know! Leave a comment, rate it, and don’t forget to tag a photo to #fromtherootsblog on Instagram. We love seeing what you come up with!
Healthy Strawberry Brown Rice Krispie Treats - Healthy play on the traditional rice krispie treat! Gluten-free, dairy-free, and naturally lower in sugar!
Makes 16 servings
Ingredients
3 cups brown rice cereal
1 cup dark chocolate
½ cup natural peanut butter
⅓ cup pure maple syrup
2 Tbsp coconut oil
Pinch of salt
1 Tbsp strawberry preserves
Toppings
Freeze dried strawberries
Goji berries
Directions
Line 8x8 pan with parchment paper. Set aside
Place a small saucepan on the stove-top over low heat. Combine peanut butter, maple syrup, coconut oil, strawberry preserves, and a pinch of salt. Mix until smooth and well combined, about 1-2 minutes. Add brown rice cereal to a medium bowl and pour peanut butter mixture over the brown rice. Mix until combined and cereal is completely coated.
Transfer rice krispie mixture to the parchment paper lined pan and press mixture down flat using a spatula to create an even surface.
In a small microwave safe bowl, add dark chocolate and 1 tbsp coconut oil (optional) and heat in 30-second increments (stirring in between) until chocolate is fully melted and smooth.
Pour chocolate mixture over krispie mixture and add toppings. You can follow the strawberry trend and add freeze dried strawberries, goji berries, and melted peanut butter or you can keep it classic with sea salt or naked. Up to you!
Place pan in the refrigerator for at least 30 minutes until bars are completely cooled and chocolate is set.
Place bars onto a cutting board and cut into 16 bars. Bars should be kept in the fridge covered for up to a week.
Notes
Ingredients I used: Erewhon organic brown rice gluten free cereal, pure maple syrup, dark chocolate, strawberry preserves.
If you would like to add more protein to these bars, add a scoop of collagen peptides to the peanut butter mixture when everything is in the saucepan heating.


Chai Spiced Sweet Potato Chocolate Chip Muffins
Growing up as a kid, we didn’t eat sweet potatoes often. The few times we did, it was usually in the form of sweet potato casseroles or sweet potato pie for Thanksgiving. Now that I’m older, I can’t get enough of them.
That’s why, regardless of the weather, I wanted to create a super cozy and comforting sweet potato muffin made with chocolate chips (because why not!?) and chai spice!
If you can’t tell from my Instagram, I use this chai spice seasoning on almost everything. Before diving into this muffin recipe, you should totally whip up this amazing chai spice seasoning if you haven’t done so already, then we can get to cooking!
Chai spiced sweet potato chocolate chip muffins - Nutrient-packed sweet potato muffins that are super moist and addictingly delicious! Gluten-free, dairy-free, and naturally low in sugar.

Growing up as a kid, we didn’t eat sweet potatoes often. The few times we did, it was usually in the form of sweet potato casseroles or sweet potato pie for Thanksgiving. Now that I’m older, I can’t get enough of them.
That’s why, regardless of the weather, I wanted to create a super cozy and comforting sweet potato muffin made with chocolate chips (because why not!?) and chai spice!

If you can’t tell from my Instagram, I use this chai spice seasoning on almost everything. Before diving into this muffin recipe, you should totally whip up this amazing chai spice seasoning if you haven’t done so already, then we can get to cooking!
Of course, if you don’t have the time to make a homemade seasoning blend, you can always use a regular chai spice blend found at a grocery store, use pumpkin spice seasoning, or simply cinnamon!

At first glance, it might seem like you need a lot of ingredients for these muffins, but if you look closer, you will see that you might have many of these ingredients already in your pantry! If you don’t have gluten-free fine oat flour then you definitely need to stock up!

If you are worried about buying an entire bag of oat flour just for a muffin recipe, then don’t fret because you can also use this oat flour for many other recipes such as my fluffy, gluten-free pancakes or raspberry almond thumbprint cookies.
If you try this recipe, let us know! Leave a comment, rate it, and don’t forget to tag a photo to #fromtherootsblog on Instagram. We love seeing what you come up with!
Chai spiced sweet potato chocolate chip muffins - Nutrient-packed sweet potato muffins that are super moist and addictingly delicious! Gluten-free, dairy-free, and naturally low in sugar.
Ingredients
Dry
2 cups gluten-free oat flour
1 cup superfine blanched almond flour
½ cup chocolate chips + plus more for topping
1 Tbsp chai spice seasoning
1 tsp baking soda
¾ tsp baking powder
½ tsp salt
Wet
1 cup sweet potato puree (from 1 sweet potato)
½ cup plant-based, unsweetened milk
¼ cup coconut oil
¼ cup pure maple syrup
2 eggs
1 tsp vanilla extract
Directions
To cook the sweet potato, peel the sweet potato and cut into small chunks. To a medium pot, add sweet potato chunks to water and boil potatoes until soft. Drain potatoes and blend in a processor, blender, or using a masher until sweet potatoes are pureed. Set aside to cool.
Preheat oven to 350 degrees and line a 12 cup muffin tin with liners and spray the inside of them with nonstick cooking spray.
In a medium bowl, whisk the dry ingredients together except the chocolate chips.
In a separate large bowl, whisk the wet ingredients until well combined, smooth and creamy. Add the dry ingredients to the wet ingredients and mix until well combined. Gently fold in ½ cup chocolate chips.
Divide batter evenly into muffin liners (about ¾ full), and top each with a few chocolate chips. Bake for 25-35 minutes or until toothpick comes out clean.
Let the muffins cool for 5 minutes and then remove and transfer muffins to a wire rack to finish cooling.
Notes
Remember - if you want this to be a true dairy-free version, use dark chocolate chips that have no milk.
If you would like to make this recipe lower in oil, you can use 2 tablespoons of oil. It will just not be as moist - more on the crumbly side but still delicious!
If you need help finding the best ingredient brands, these are what I use! Gluten-free whole grain oat flour, superfine almond flour, dairy free chocolate chips, vanilla extract
If you have leftover sweet potato puree, you can make this pumpkin pie protein smoothie - just replace pumpkin with sweet potato!


Fudgy Paleo Brownies
Growing up, brownies were my least favorite dessert. Maybe because the flavors were too rich or the texture was too dry, but nonetheless, I stopped eating them. Of course I would get the judgy looks and sneers but hey, they didn’t taste good to me! That is, until I had a fudgy vegan brownie at this bakery in Atlanta and I was floored! It was like the heavens opened up with arms wide open and sucked me in!
Foolproof staple brownie recipe that is also gluten-free, dairy-free, and nut-free!

Growing up, brownies were my least favorite dessert. Maybe because the flavors were too rich or the texture was too dry, but nonetheless, I stopped eating them. Of course I would get the judgy looks and sneers but hey, they didn’t taste good to me! That is, until I had a fudgy vegan brownie at this bakery in Atlanta and I was floored! It was like the heavens opened up with arms wide open and sucked me in!

Too much? Well, that’s how I feel about these brownies! Now, this recipe didn’t happen overnight (perfection doesn’t happen overnight). As a food blogger, sometimes recipes can be made simple and it just clicks. Other times, not so much.
This recipe did not instantly click. It started out as a Mexican hot chocolate cookie that had the batter of a brownie but baked similar to a cake and ultimately dried out after a day or two. But the flavor was there and that’s where I went. Long story short, here we are and I am so glad!
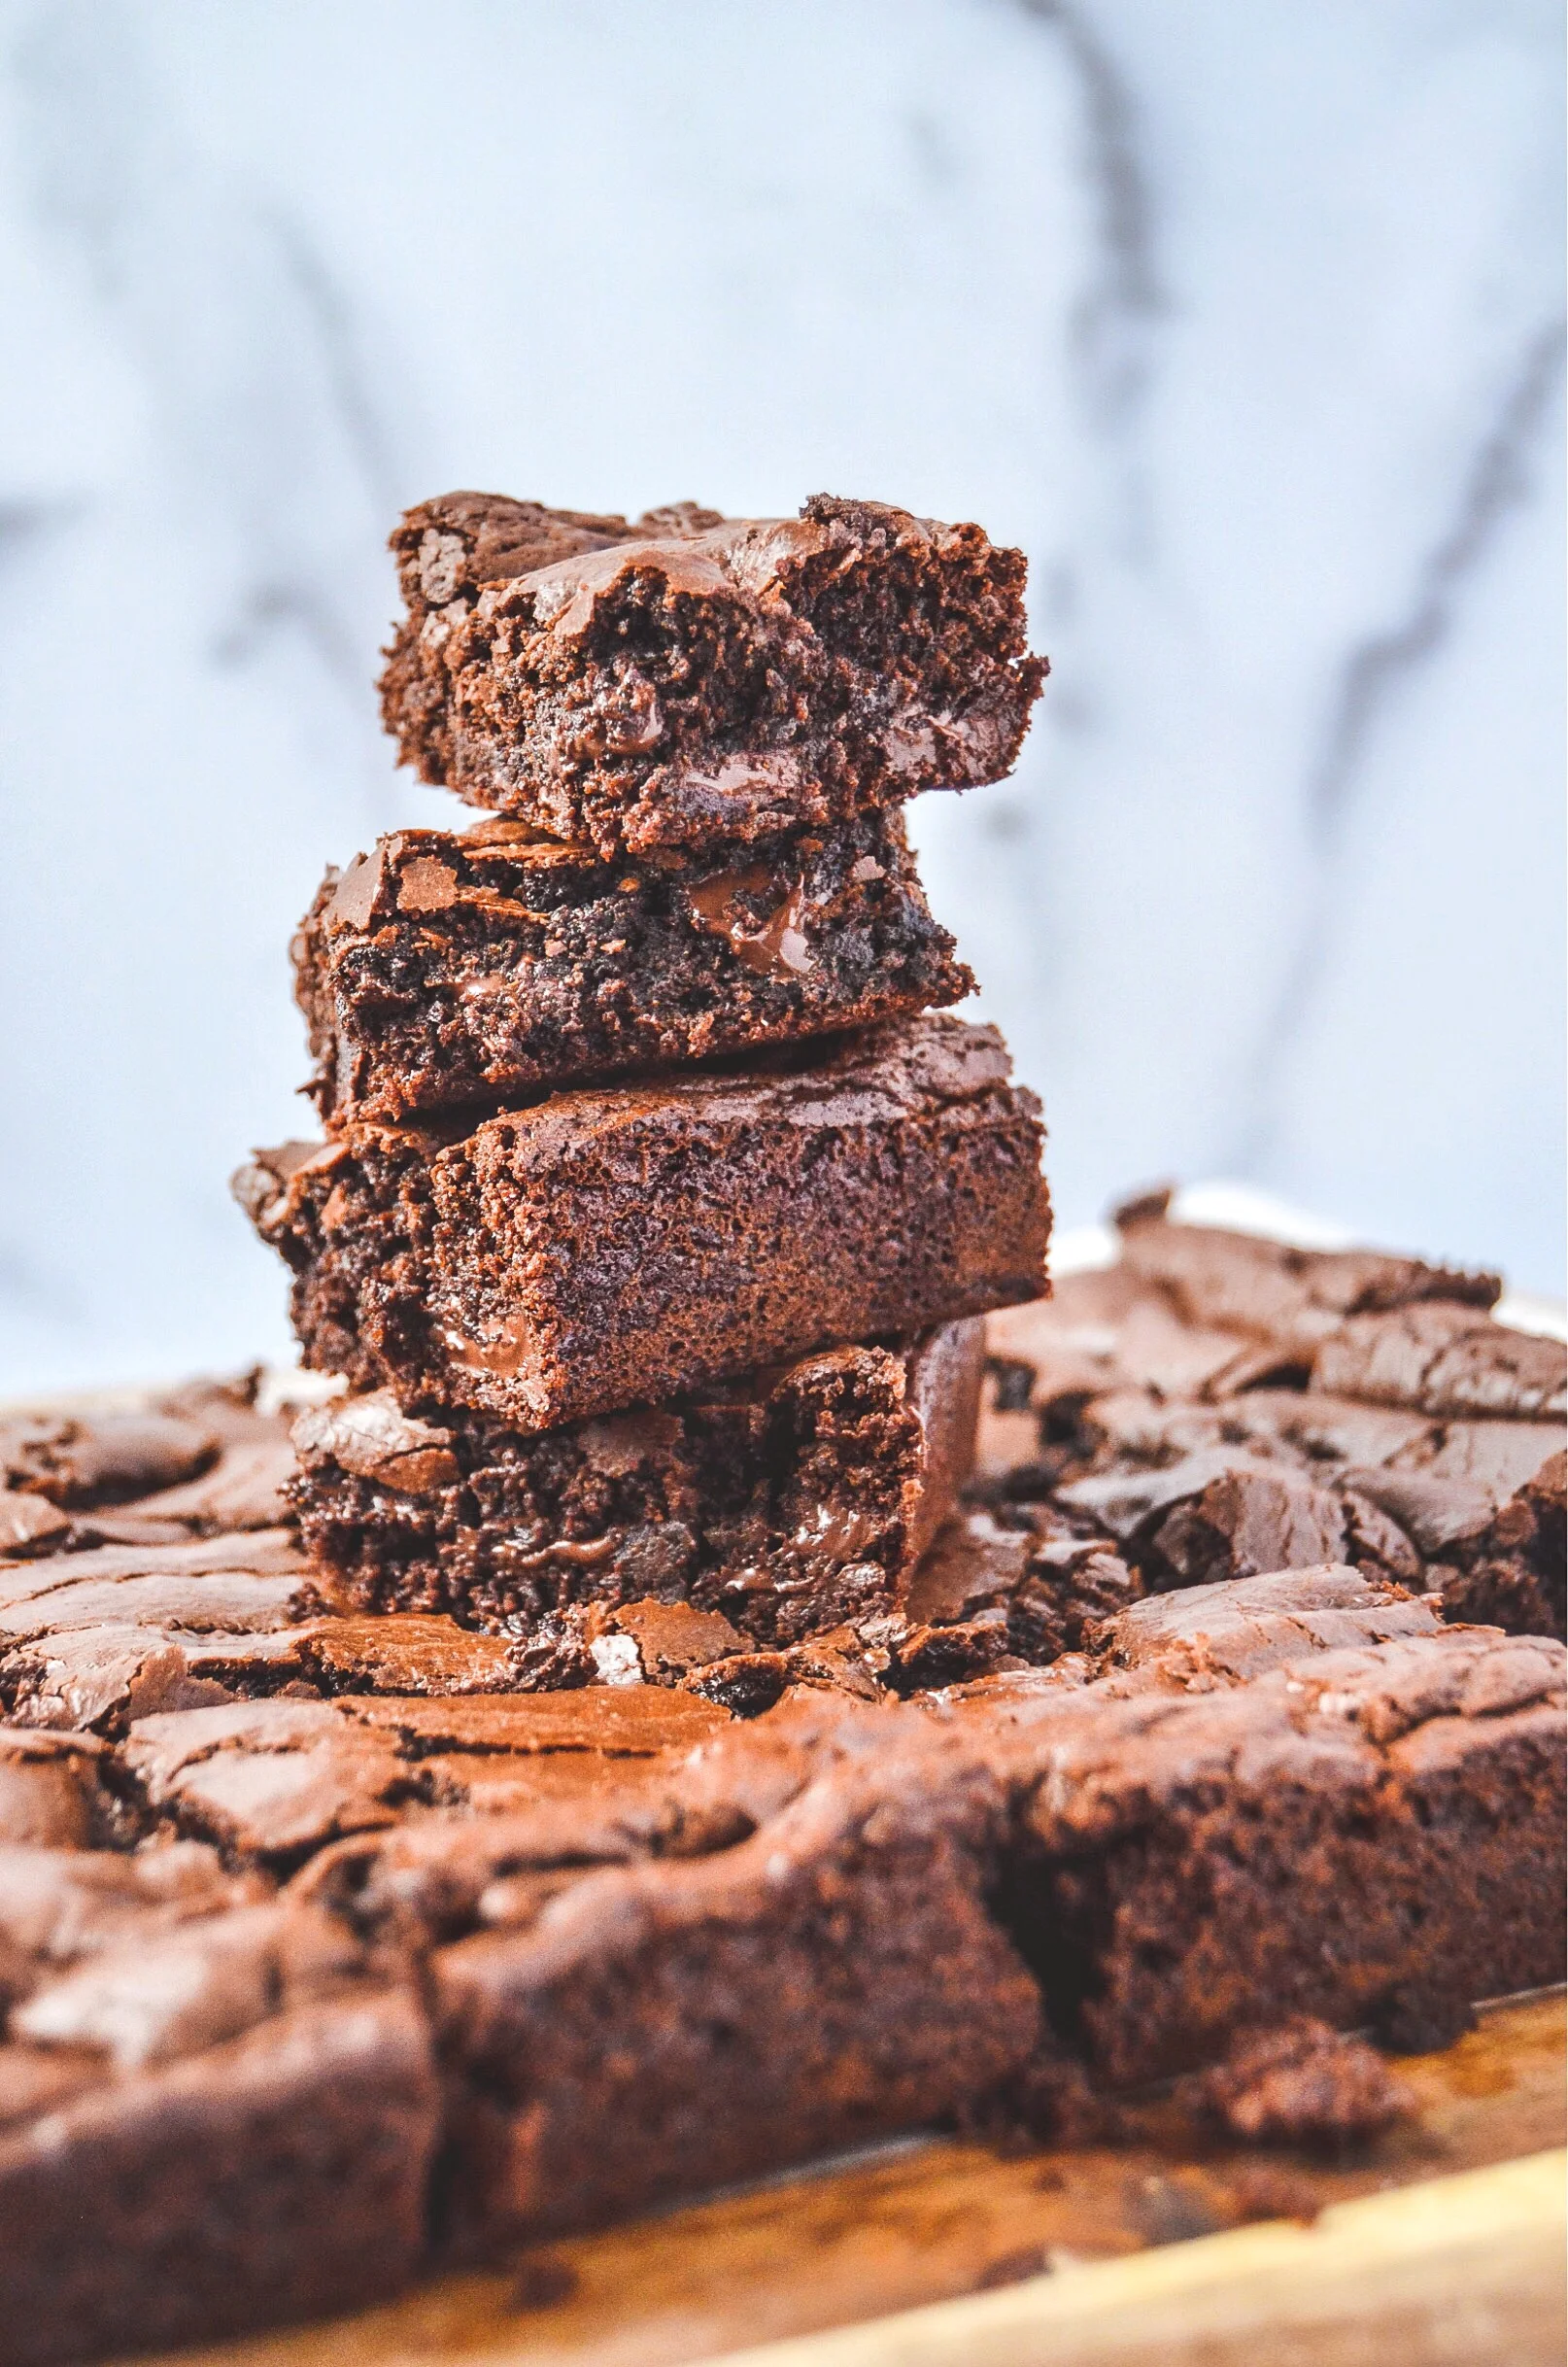
Adding a healthy twist to an old fashioned brownie can be cumbersome at times. Luckily, this brownie is free of everything “bad” yet it tastes just like your typical sugar-filled brownie. This way, we can still ride that amazing “sugar high” but not feel so bad.

How do we get there? Well, we adapt and understand the ingredients that we are using. For example, coconut flour is used to replace all-purpose white flour. Coconut flour absorbs liquid so we only use ¼ cup. Baking powder is a great leavening agent but since this is a paleo recipe, we use coconut sugar, eggs, and vanilla extract instead. This combination gets whipped until a “ribbon stage” is reached.

If you try this recipe, let us know! Leave a comment, rate it, and don’t forget to tag a photo to #fromtherootsblog on Instagram. We love seeing what you come up with!
Ingredients
2/3 cup coconut sugar
2 eggs
1 tsp vanilla extract
8 oz dark chocolate chunks
1/4 cup coconut oil
1/4 cup coconut flour
1/4 cup cocoa powder
1/2 tsp salt
1/2 tsp baking soda
1/2 cup dark chocolate chunk
instructions
Preheat oven to 350 degrees and line a 9x9 baking pan with parchment paper. Spray with a non-stick spray and set aside.
In a small saucepan or small bowl, melt 8 oz dark chocolate and oil in 30-second increments if using the microwave or low heat on stove top until smooth and glossy. Remove from heat and set aside to cool slightly.
Using a hand mixer or KitchenAid mixer, combine coconut sugar, eggs, and vanilla extract and whisk together until the mixture reaches the “ribbon stage” (when you lift the whisk, the mixture should stream down evenly in “ribbons”).
In a medium bowl, whisk dry ingredients (coconut flour, cocoa powder, salt, and baking soda)
With the mixer/hand mixer on low, add the melted chocolate and dry ingredients until fully combined. Fold in ½ cup dark chocolate chunks.
Pour batter into prepared pan and smooth the surface.
Bake for 17-20 minutes until edges are set and the inside is slightly underdone.
Let the brownies rest in the pan for 15-20 minutes. This is the hardest part but so worth it!
Store in fridge for up to a week or freezer for up to a month. I personally like making these to freeze so that I can have brownie bites for my ice cream!