Sort by Category
- December 2025
- November 2025
- October 2025
- September 2025
- August 2025
- June 2025
- August 2024
- July 2024
- June 2024
- May 2024
- February 2024
- January 2024
- December 2023
- November 2023
- October 2023
- September 2023
- August 2023
- July 2023
- March 2023
- February 2023
- January 2023
- December 2022
- November 2022
- October 2022
- September 2022
- August 2022
- June 2022
- May 2022
- April 2022
- March 2022
- February 2022
- January 2022
- December 2021
- November 2021
- October 2021
- September 2021
- August 2021
- July 2021
- June 2021
- May 2021
- April 2021
- March 2021
- February 2021
- January 2021
- December 2020
- November 2020
- October 2020
- September 2020
- August 2020
- July 2020
- June 2020
- May 2020
- April 2020
- March 2020
- February 2020
- January 2020
- December 2019
- November 2019
- October 2019
- September 2019
- August 2019
- July 2019
- June 2019
- May 2019
- April 2019
- March 2019
- February 2019
- January 2019
- December 2018
- November 2018
- October 2018
- September 2018
- August 2018
- July 2018
- June 2018
- May 2018
- April 2018
- March 2018
- February 2018
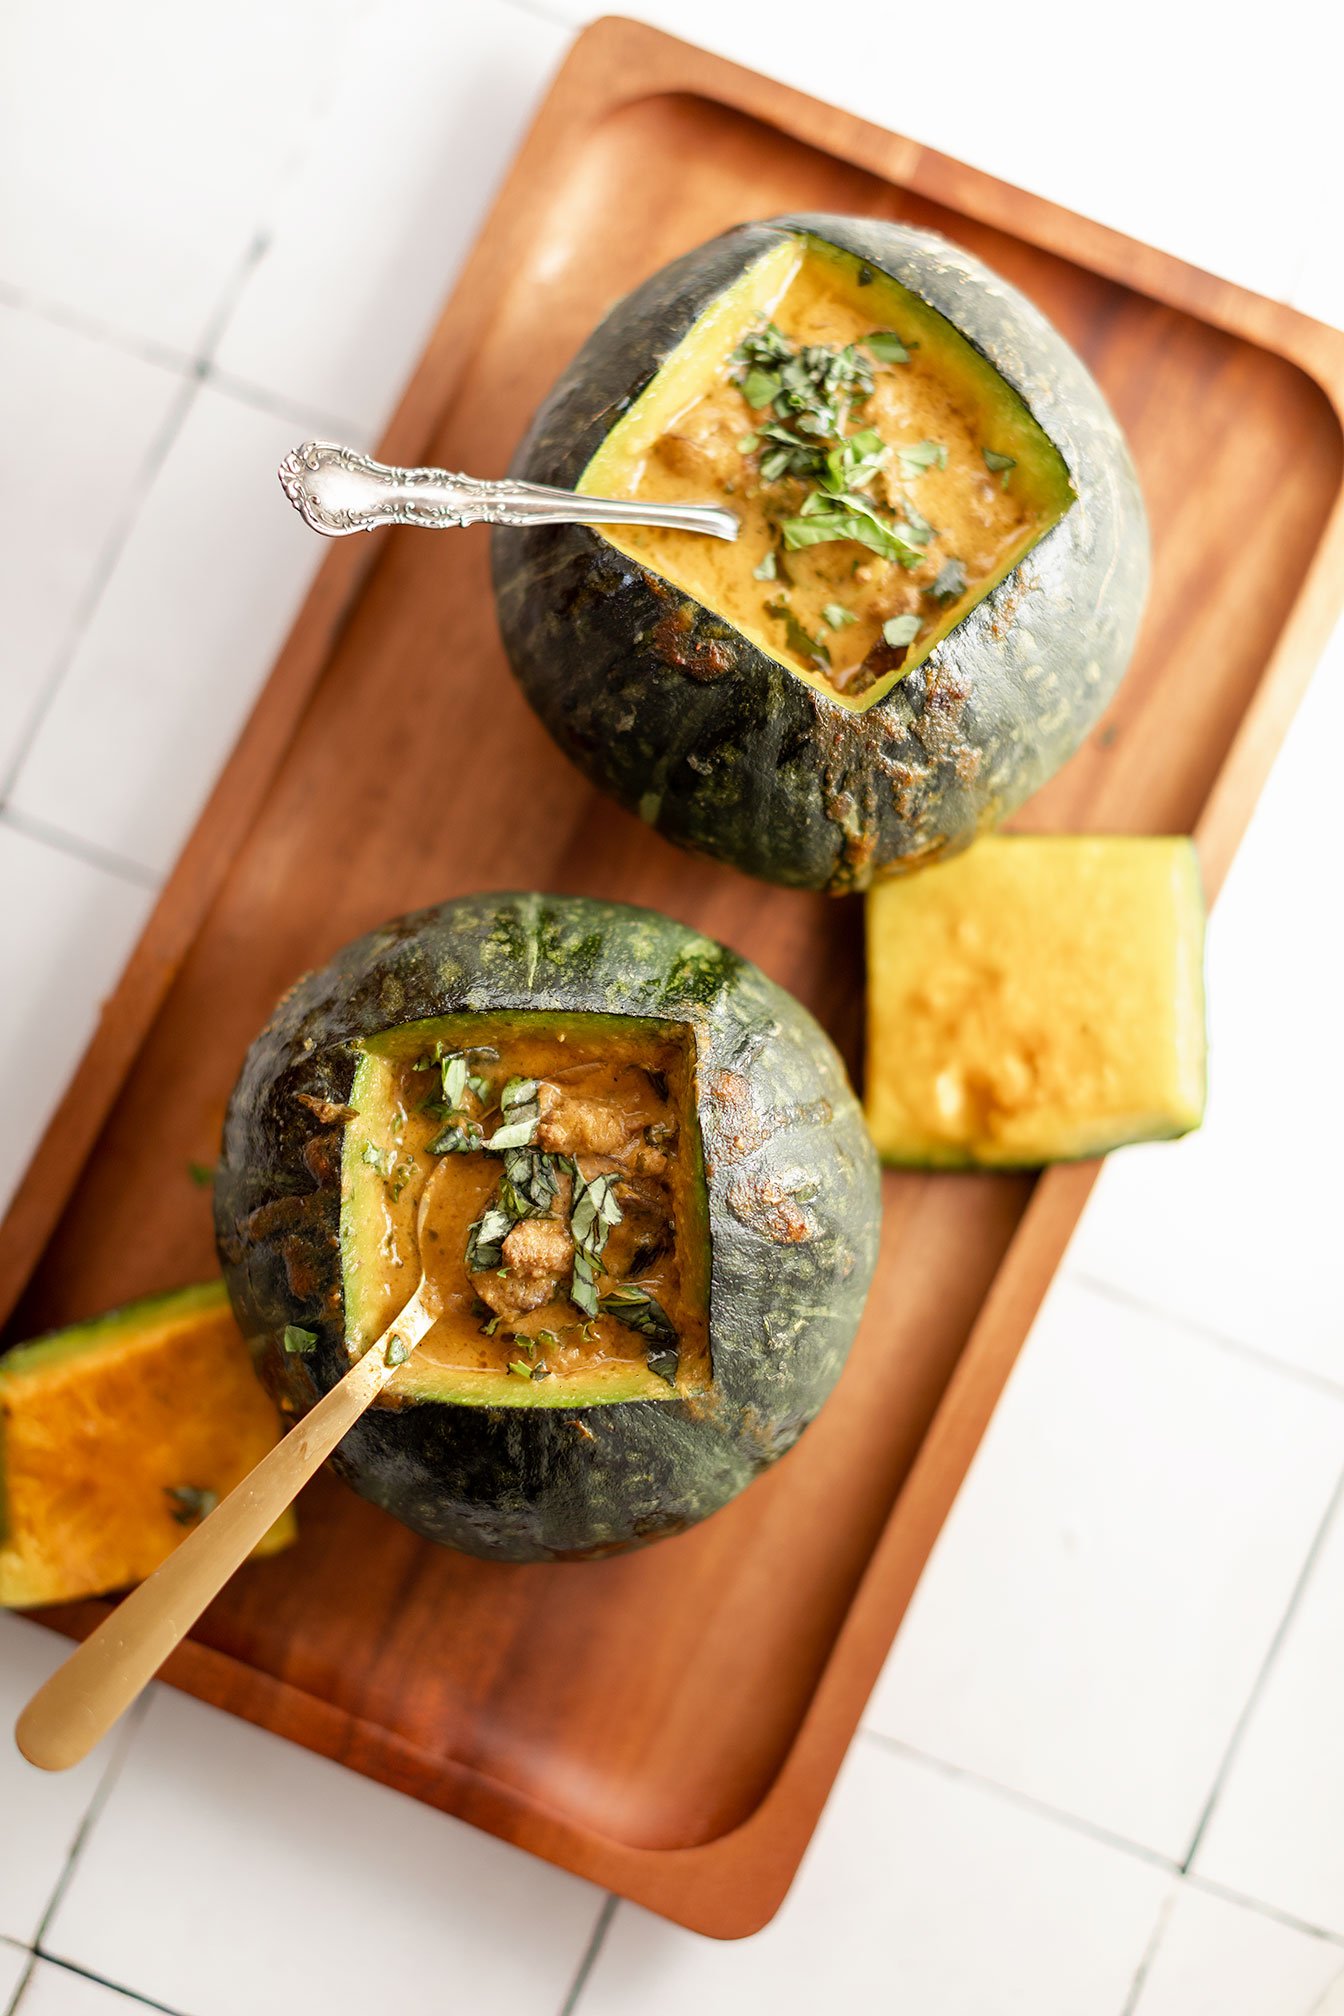
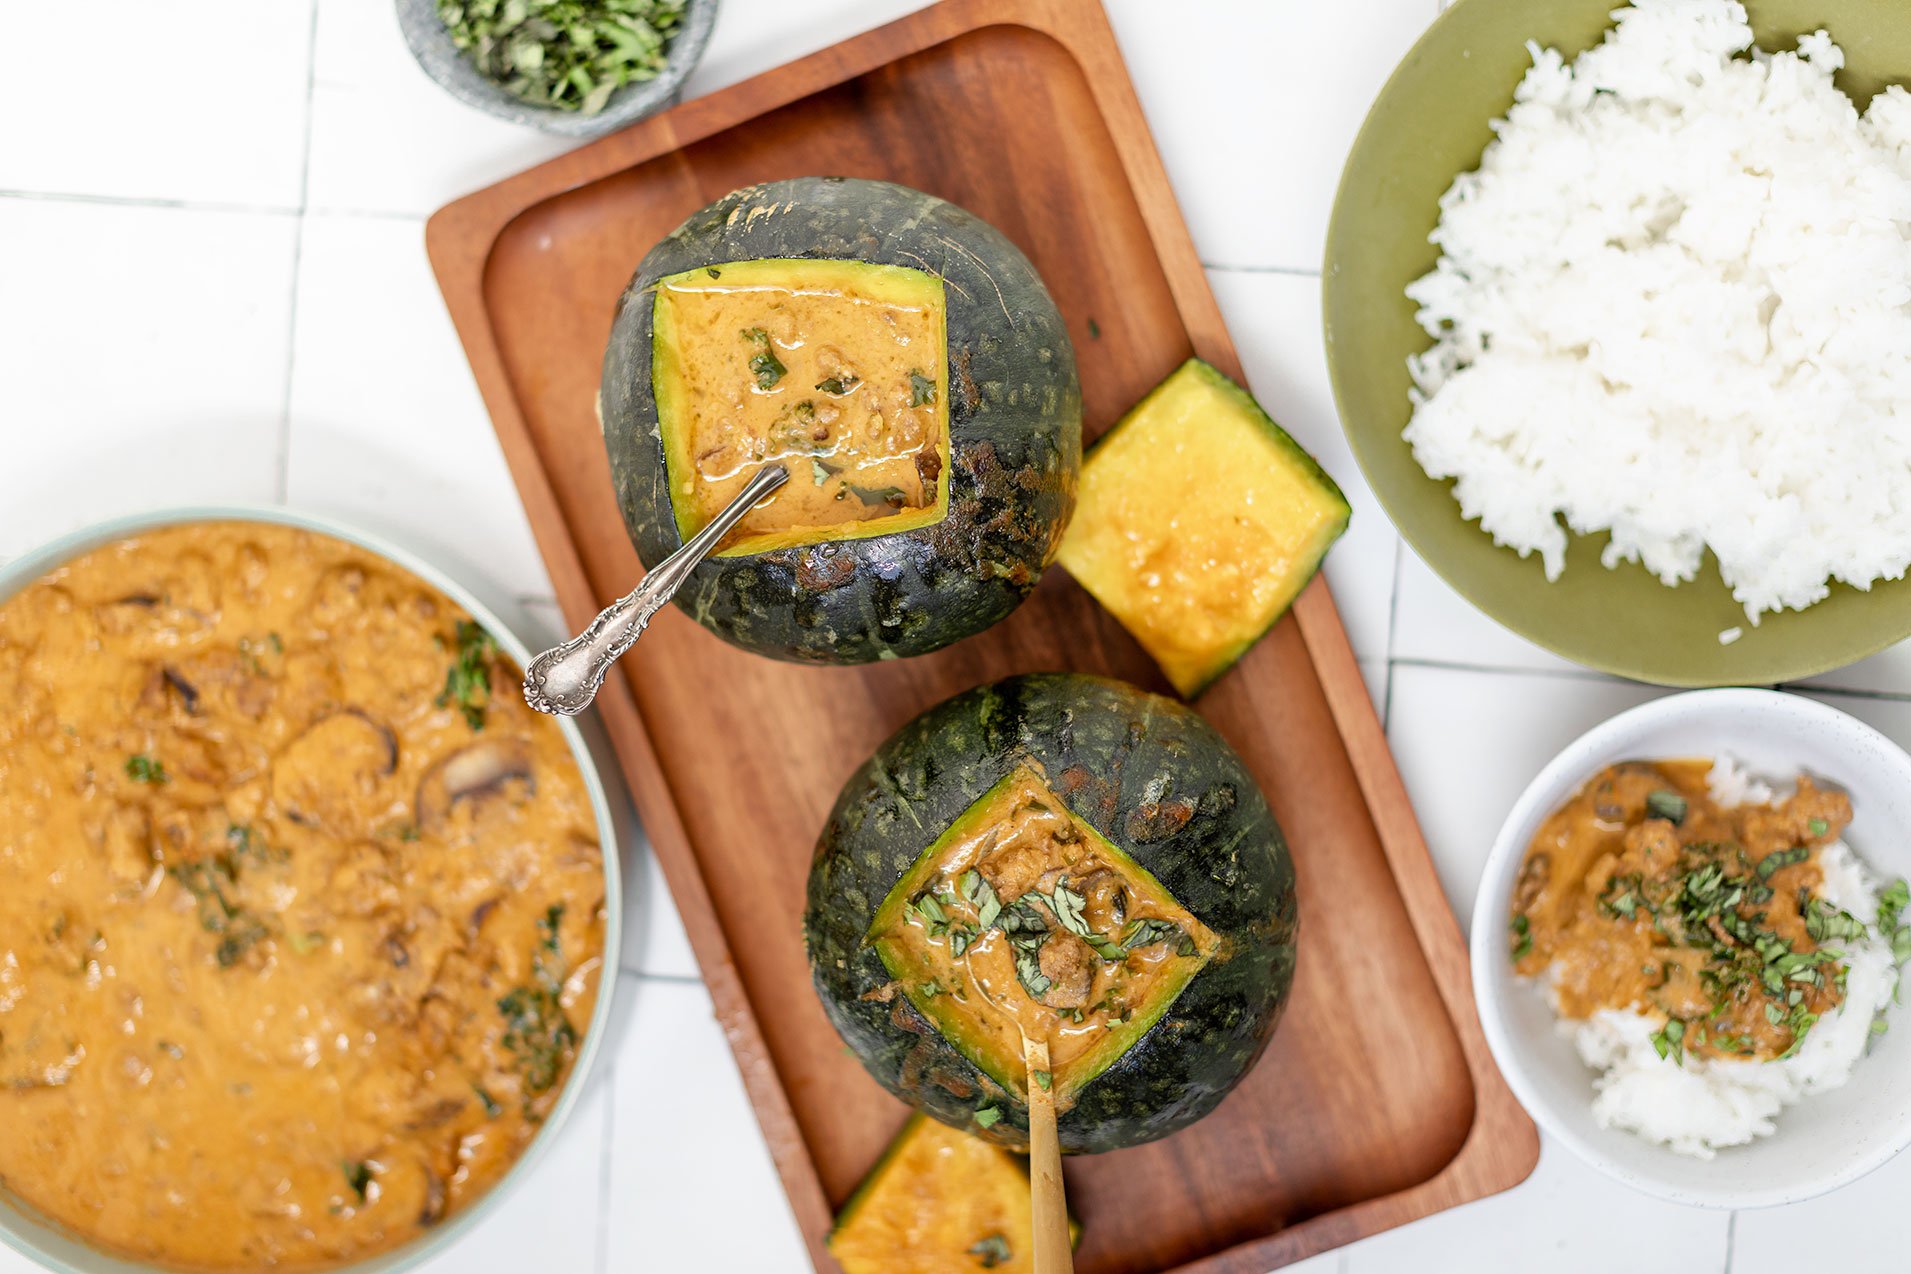
Lamb Stew Squash Bowl
that can also be served with a side of rice.
Lamb stew squash bowl has got to be the epitome of winter comfort. There is nothing like spending an hour or two in the kitchen creating a comfort dish and sharing it with your loved ones. Especially when you are using seasonal ingredients that are not only nourishing for the body, but for the soul.
For this recipe, I used kabocha squash as they are the perfect “bowl” size for this dish but you can also use: pumpkin, acorn, butternut, delicata, or even zucchini. Random thought but if you have a large family or fun gathering, using a large pumpkin for this dish would definitely be the star on the table as well as a crowd pleaser!
Nourishing and hearty lamb stew squash bowl that can also be served with a side of rice.
Lamb stew squash bowl has got to be the epitome of winter comfort. There is nothing like spending an hour or two in the kitchen creating a comfort dish and sharing it with your loved ones. Especially when you are using seasonal ingredients that are not only nourishing for the body, but for the soul.


For this recipe, I used kabocha squash as they are the perfect “bowl” size for this dish but you can also use: pumpkin, acorn, butternut, delicata, or even zucchini. Random thought but if you have a large family or fun gathering, using a large pumpkin for this dish would definitely be the star on the table as well as a crowd pleaser!

Squash not accessible or not keen on squash? Feel free to prepare a side of rice, quinoa or roasted sweet potatoes to go with the stew!
Now that we are on the stew topic, I could literally drink this smooth, creamy flavor bomb of a stew just on its own! I’m telling you, there is nothing like roasting your veggies prior to blending into a cream sauce. Just saying!

If you try this recipe, let us know! Leave a comment, rate it, and don’t forget to tag a photo to #fromtherootsblog on Instagram. We love seeing what you come up with!
Nourishing and hearty lamb stew squash bowl that can also be served with a side of rice.
Servings: 4-6 | Prep Time: 20 min | Cook Time: 1 hour
Ingredients
1 lb ground lamb or meat of choice
2 small kabocha squash or squash / pumpkin of choice
1 8 oz container baby bella mushrooms, sliced
2 cups kale or collard greens, shredded
1 can coconut milk, unsweetened
1 onion
2 large tomatoes
6 cloves garlic
1 .5 oz organic fresh basil (small container)
1 Tbsp favorite go-to seasoning
1-2 Tbsp grass-fed butter
Kosher salt and pepper
Directions
Preheat the oven to 400 degrees.
Clean out both squash and line the inside and lid with butter, set aside.
Slice tomatoes and onion in half, and place on a cookie sheet with crushed cloves of garlic. Drizzle oil and kosher salt and cook in the oven for 25 minutes.
While the tomato mixture is cooking, crumble ground meat in a large skillet over medium heat. Add the seasoning and saute until the lamb meat is fully cooked. Set aside but keep rendered fat in the skillet.
After the roasted veggies have cooled down, remove the outer skin from the onion and transfer everything to a blender. Add in the coconut milk and basil and blend until smooth. Taste test and add additional salt if needed.
Add mushrooms and kale to the skillet with reserved lamb fat and set over medium heat. Saute for about 5 minutes and pour in the blended cream mixture and cooked lamb meat. Remove from heat and transfer the mixture into your buttered squashes.
Place filled squash bowls on a cookie sheet with the lids on top and cook in the oven for 25 minutes.
At this time, if you have leftover lamb stew, feel free to make a side of steamed rice.
Remove from the oven and garnish with basil chiffonade and enjoy! Don’t forget to scrape the inside of your squash as you eat!

Massaged Kale Salad
If you are wanting to level up your salad game, then you need to hop on the massaged kale train! This leafy green is absolutely packed with vitamins like A, C, and K, fiber forward, antioxidants and a powerful anti-inflammatory food. But if you are not familiar with eating kale, it can be a tough food to swallow - no pun intended!
Level up your salad game using massaged kale!

If you are wanting to level up your salad game, then you need to hop on the massaged kale train! This leafy green is absolutely packed with vitamins like A, C, and K, fiber forward, antioxidants and a powerful anti-inflammatory food. But if you are not familiar with eating kale, it can be a tough food to swallow - no pun intended!

Luckily for you, using the massaging technique, will have you eating and loving the vegetable in no time.
Kale, being a cruciferous veggie, has a rough texture by nature so to help physically break down the kale to make it easier to digest, we use the massaging method.

Massaging prior to eating is like pre-digesting the kale. All you have to do is give your kale some love by using your hands.
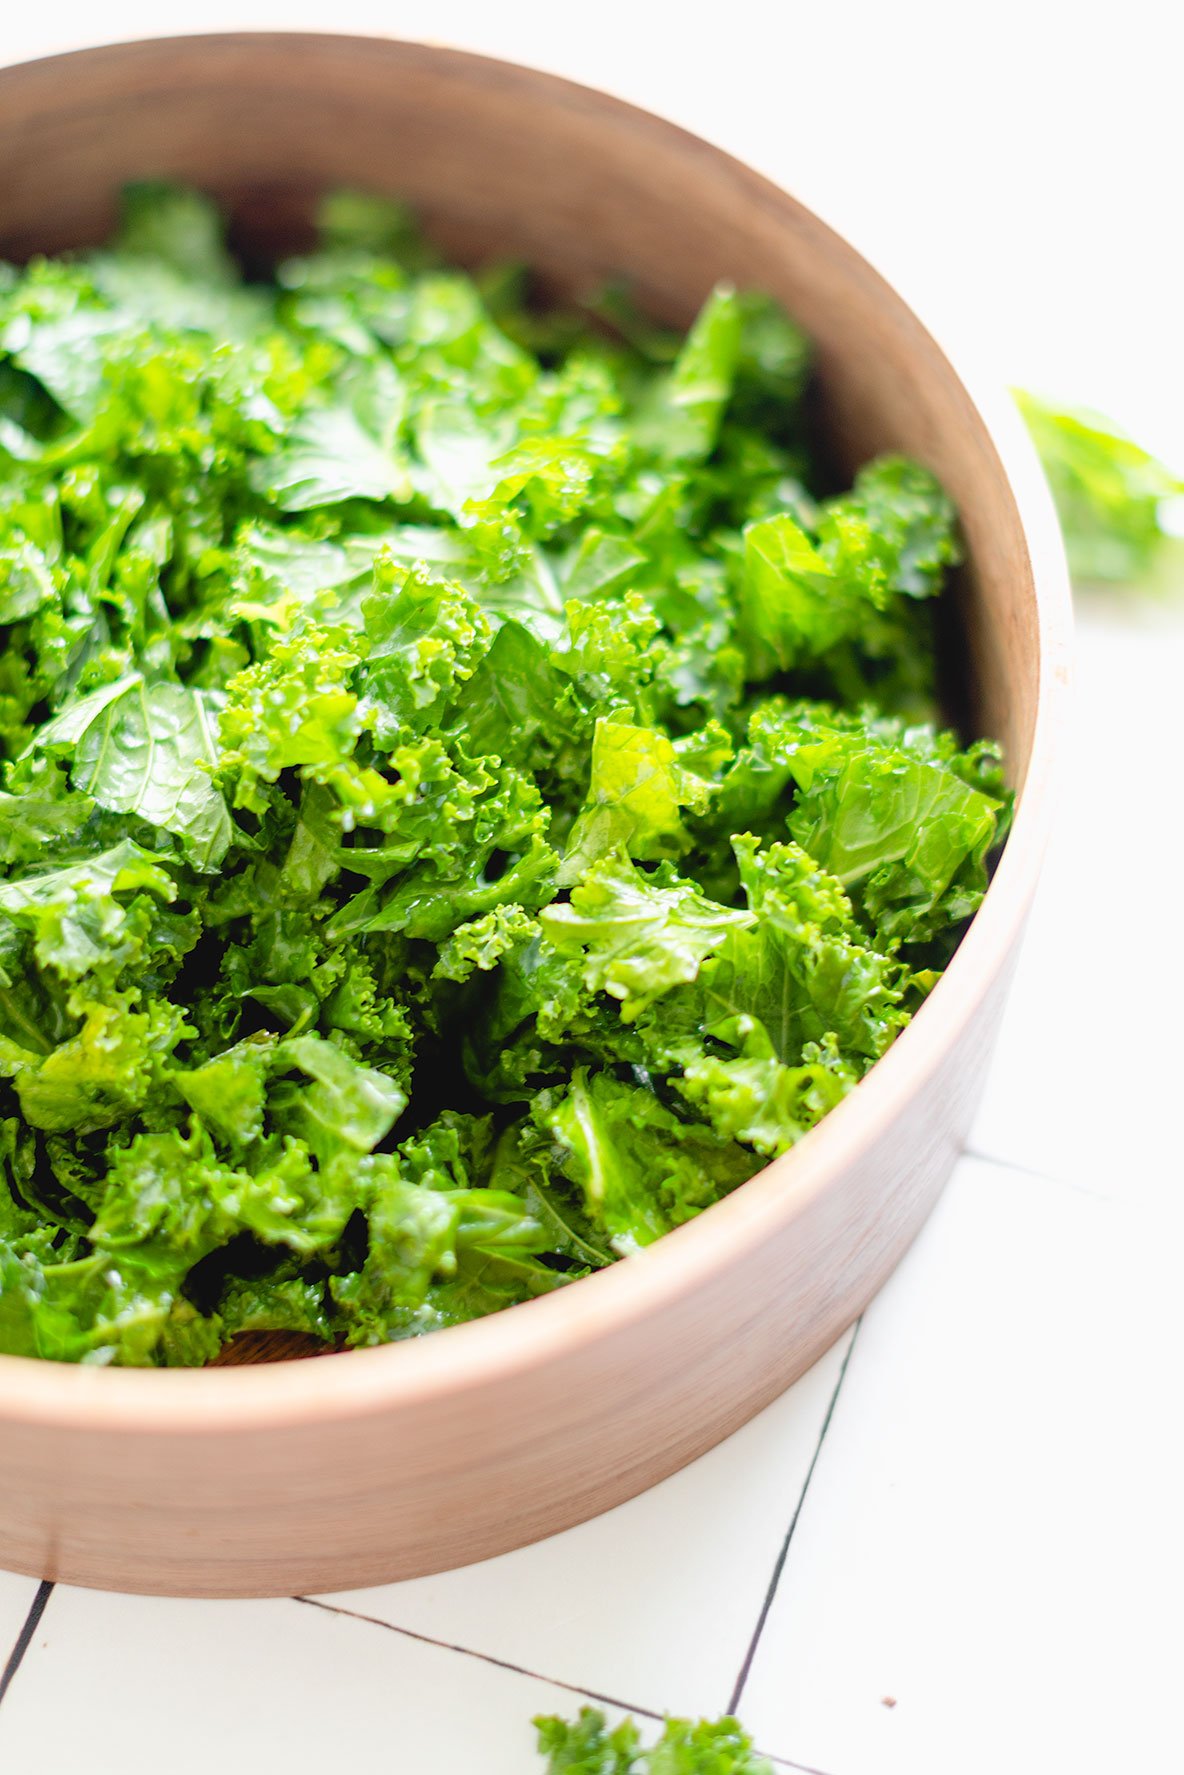
We do this by massaging oil + salt + lemon juice in the kale to help break down the tough, fibrous content in the kale. The kale will visually change before your eyes into a vibrant green and will feel softer in texture.
A bonus about using this method is that it will stay in the refrigerator for a good week even after massaging - unlike other more delicate leafy greens which tend to wilt and become soggy after chopping. Kale will keep its soft but chewy texture without becoming mushy.
That is why, in my new cookbook: The Nourished Cookbook, I show you many ways in how you can add massaged kale into your nourish bowls! It’s a great non-starchy carbohydrate source to batch cook and to pair with so many other base meals! Here are some other massaged kale salad recipes on the blog: Fall Harvest Grain Bowl, Summer Burger Salad, Winter Pear Salad with Citrus Dijon Vinaigrette, and Butternut Squash, Kale, and White Bean Lasagna Soup.

If you try this recipe, let us know! Leave a comment, rate it, and don’t forget to tag a photo to #fromtherootsblog on Instagram. We love seeing what you come up with!
Level up your salad game using massaged kale!
Servings: 4-6 | Prep time: 10 min | Cook time: N/A
Ingredients
4 cups or 3 handfuls of organic raw kale
1-2 tsp olive or avocado oil
Juice of ½ lemon
1 tsp sea salt
Directions
Wash kale thoroughly to remove dirt and de-stem kale leaves. Transfer to a large bowl. Add in the lemon juice and salt. Lightly pour oil onto your hands to coat.
Using a massaging action (similar to kneading bread dough), start to tear the leaves apart and massage. Continue massaging for about 2-5 minutes or until the kale turns a vibrant green and the leaves are soft.
Notes
Can be used as a side dish, a salad base, or as a topping of your choice for a complete meal in a bowl.
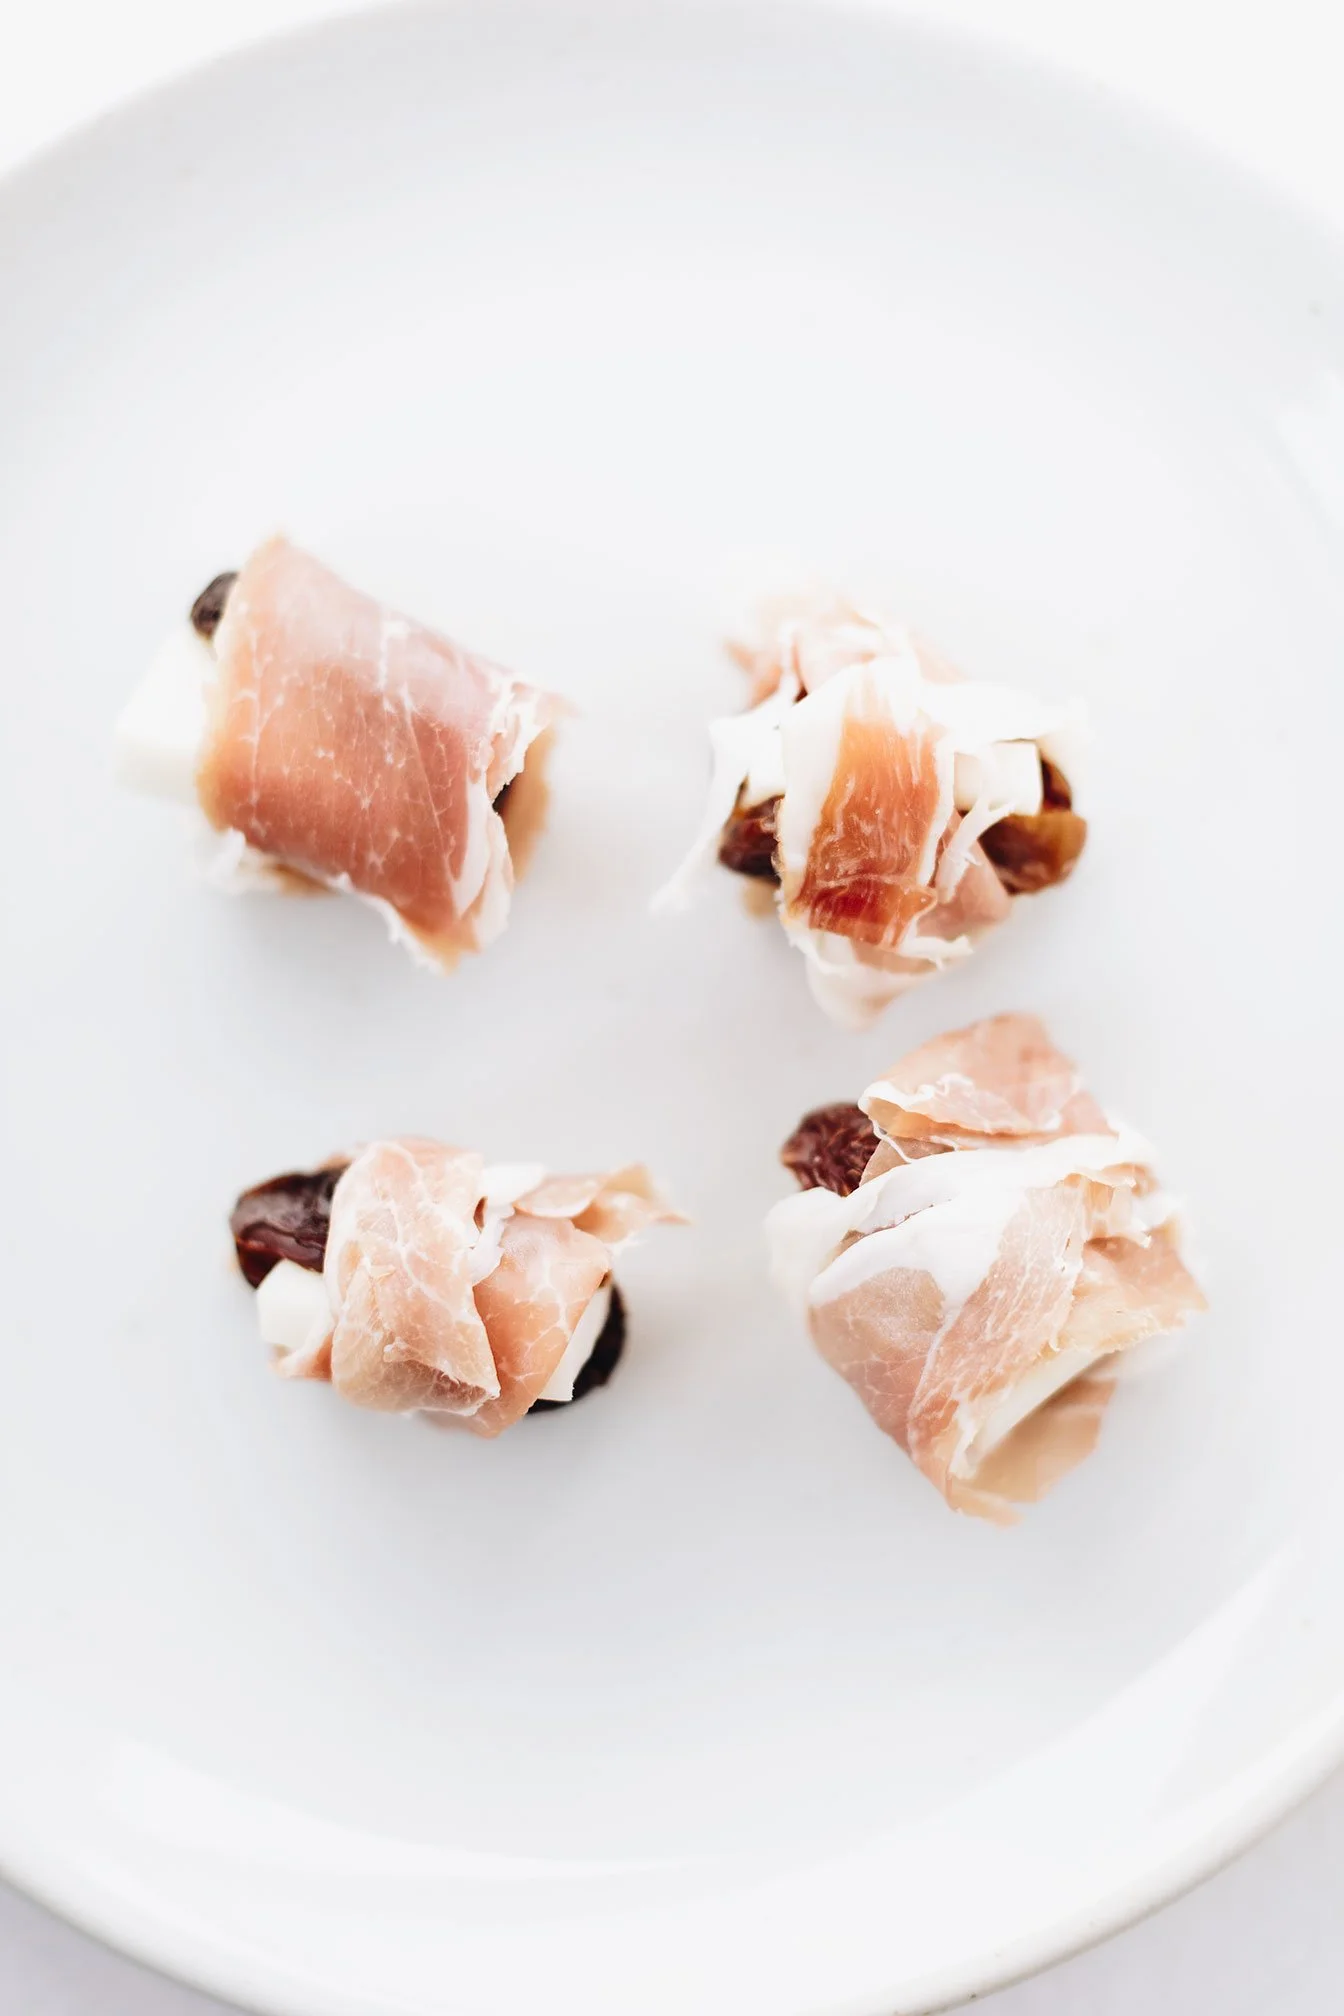
Medjool Date Snacks
Snacks don’t have to be complex and include every ingredient in your pantry. If anything, snacks need to be simple. They need to be a quick grab-and-go and something to whip up fast as you need something ready before or after your workout, to help stabilize blood sugar, or to tie you over before a late dinner reservation.
So that is why I’m showing you my favorite carb source - medjool dates and the many medjool date snack ideas you can do to make sure your date is macro balanced, less than 5 ingredients, and is a quick grab and go snack!
Medjool Date Snacks - 10+ easy and healthy ways to create the perfect mates for dates!

Snacks don’t have to be complex and include every ingredient in your pantry. If anything, snacks need to be simple. They need to be a quick grab-and-go and something to whip up fast as you need something ready before or after your workout, to help stabilize blood sugar, or to tie you over before a late dinner reservation.


So that is why I’m showing you my favorite carb source - medjool dates and the many medjool date snack ideas you can do to make sure your date is macro balanced, less than 5 ingredients, and is a quick grab and go snack!

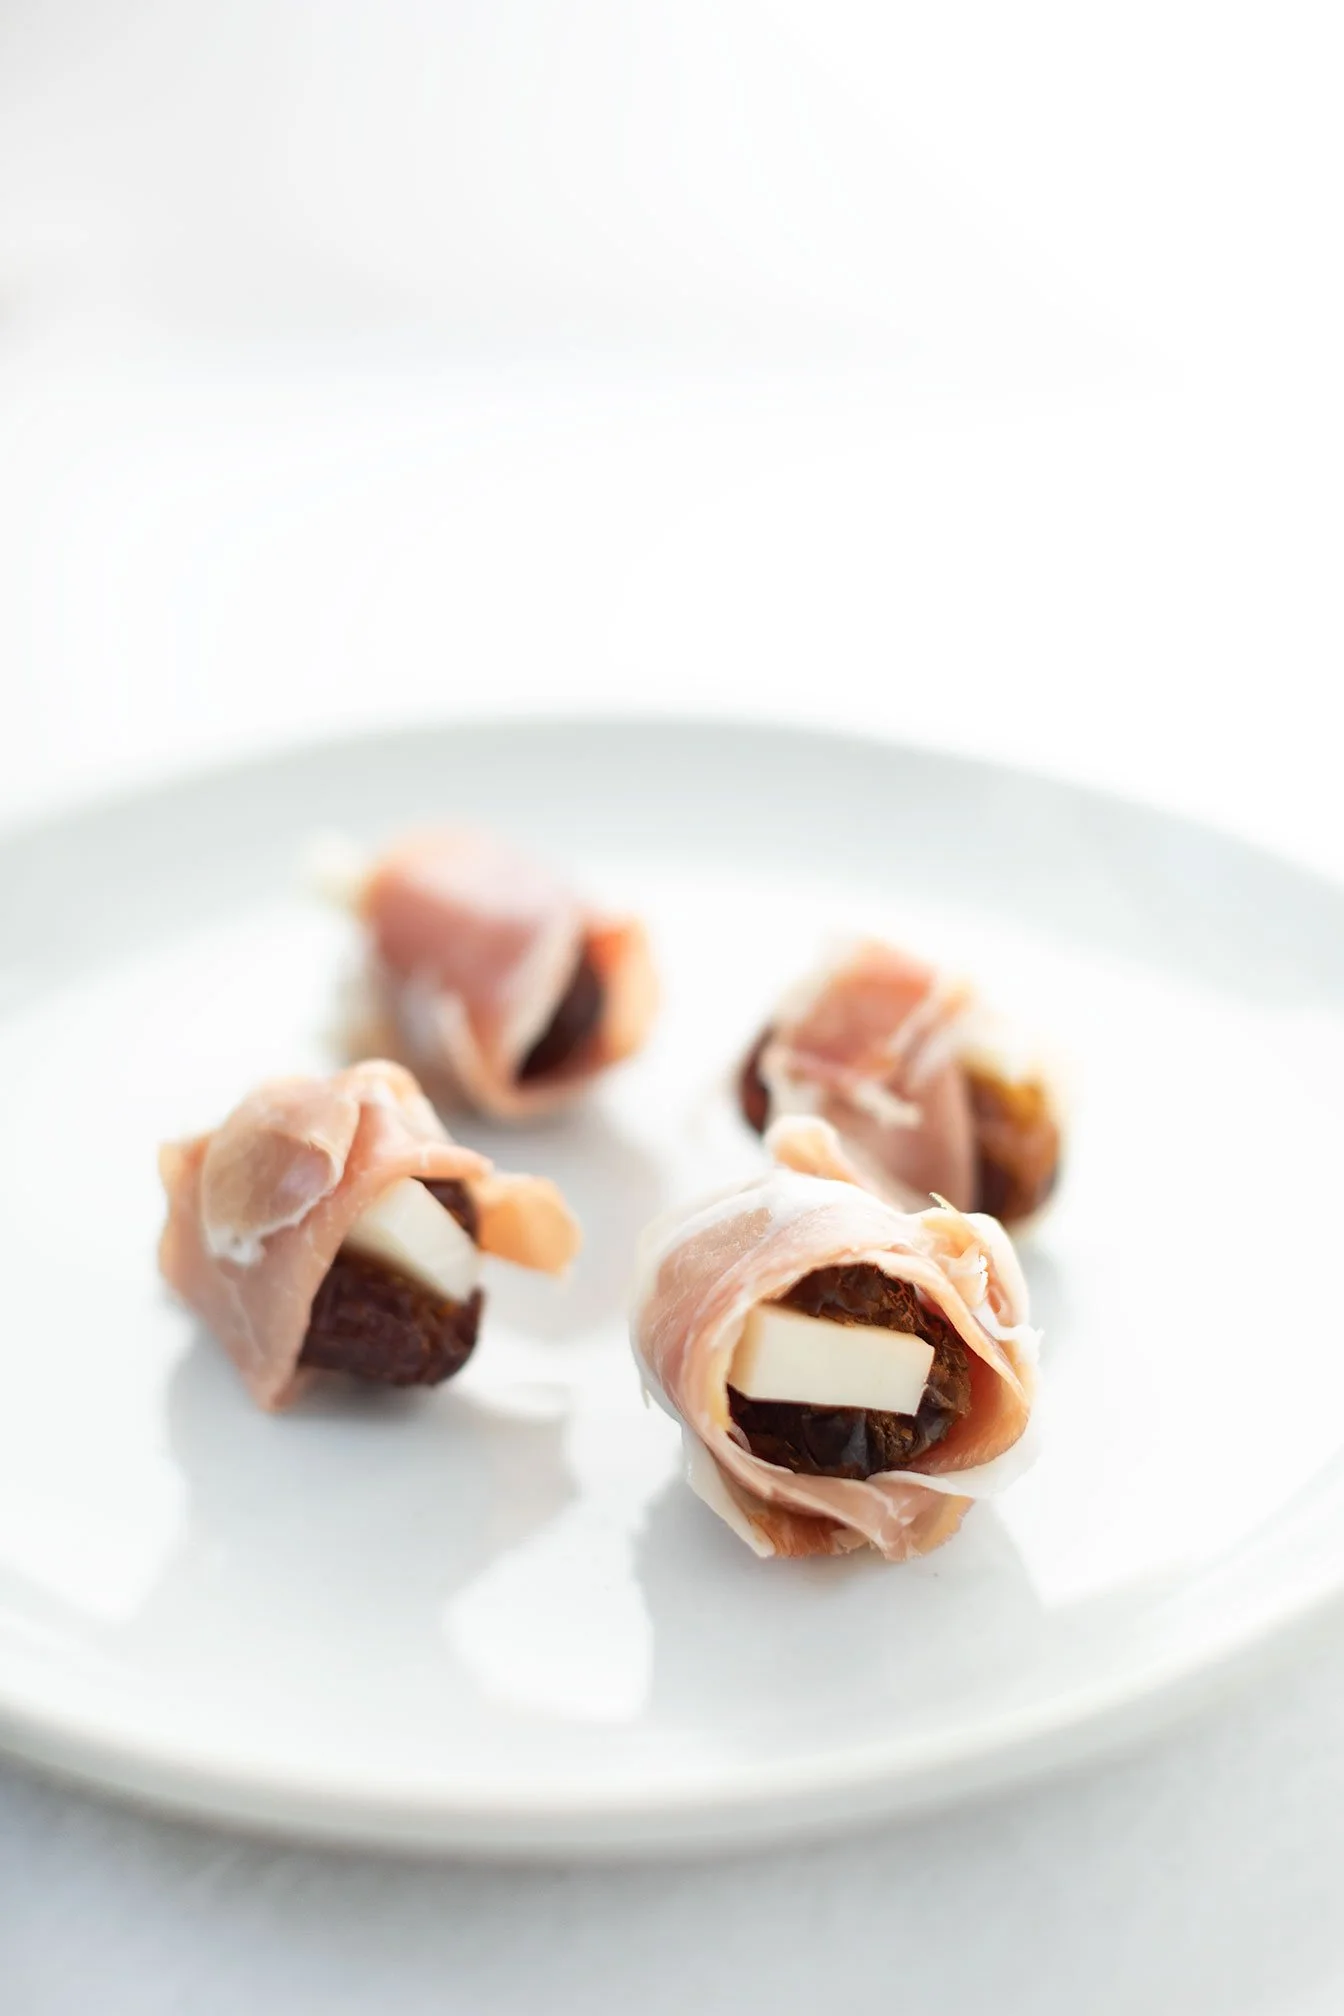
The OG lately, medjool date + goat cheddar cheese + prosciutto. The perfect blend of sweet, smokey and salty! I also like it because it’s very reminiscent of having a charcuterie board in one bite! (*bonus if you elevate it with honey or balsamic glaze drizzle and crushed nuts like pistachio.)

Other great medjool date snack combinations are:
salted chocolate peanut butter date
Ex: stuff the date with peanut butter and top with an almond and some crunchy sea salt and dip the bottom in dark chocolate
Cheese + nut combo date
Ex: Stuff the date with cheese like a slice of brie and a nut like pecan.
Italian inspired date
Ex: Stuff the date with goat cheese and some sun-dried tomato pieces, and top with basil chiffonade.
Wrapped in bacon date
Ex: Stuff the date with cheese of choice like goat cheese, wrapped in bacon and cook in the oven for 350 degrees - 10 min on both sides or until bacon is crispy! Sprinkle with pistachio and honey if desired.


S'mores Cookies
Fun fact about me that not many people know is that I am a pyro! Maybe that is why I am a volunteer firefighter but I just absolutely love fires - campfires, bonfires, having a fake fire scene playing in the background, the sound of fire food crackling … I’m obsessed!
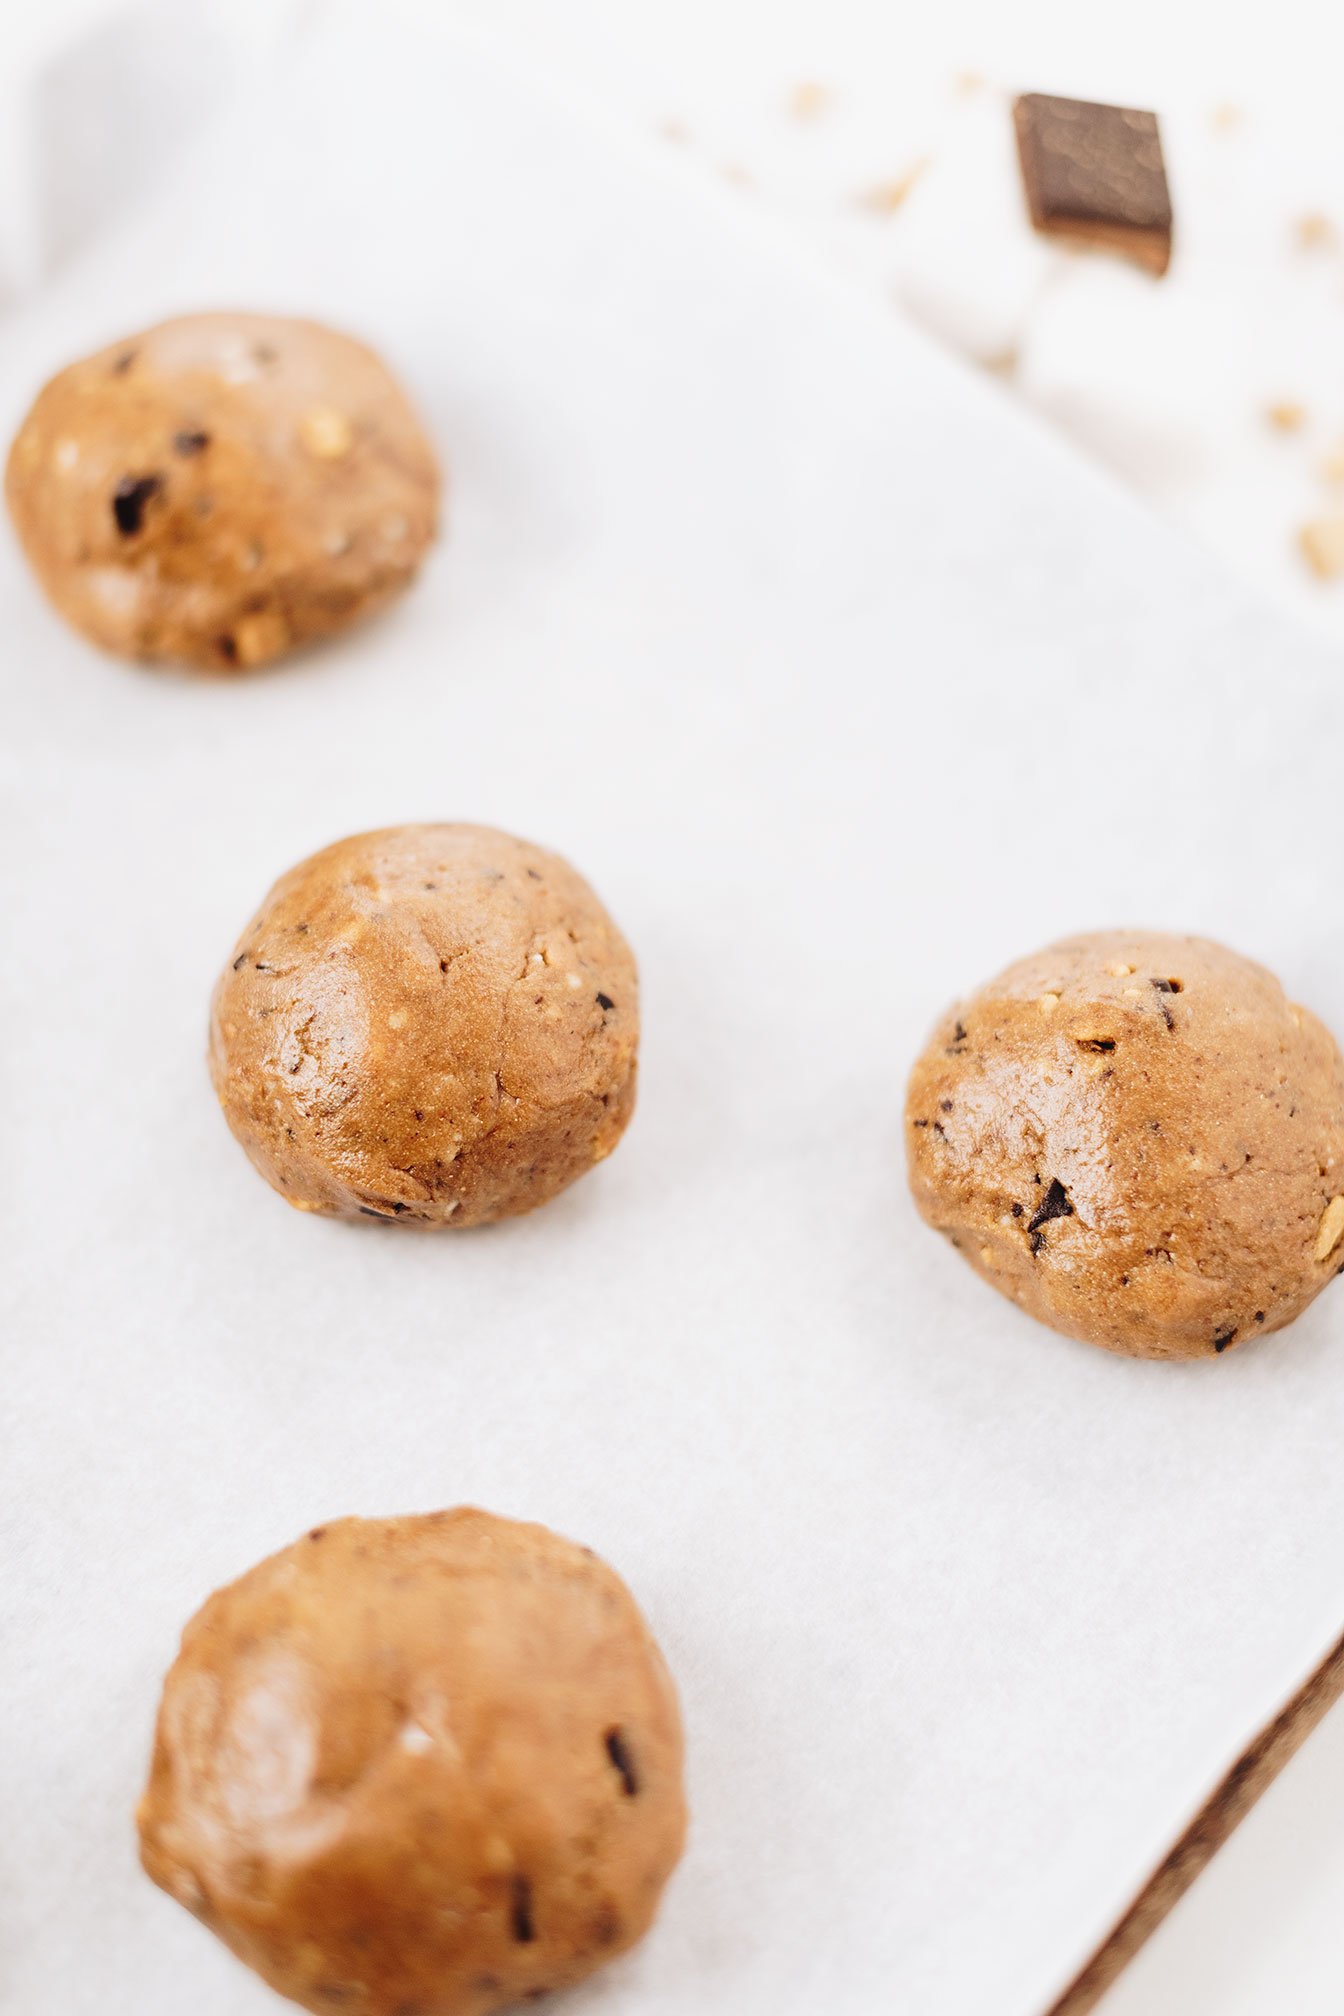
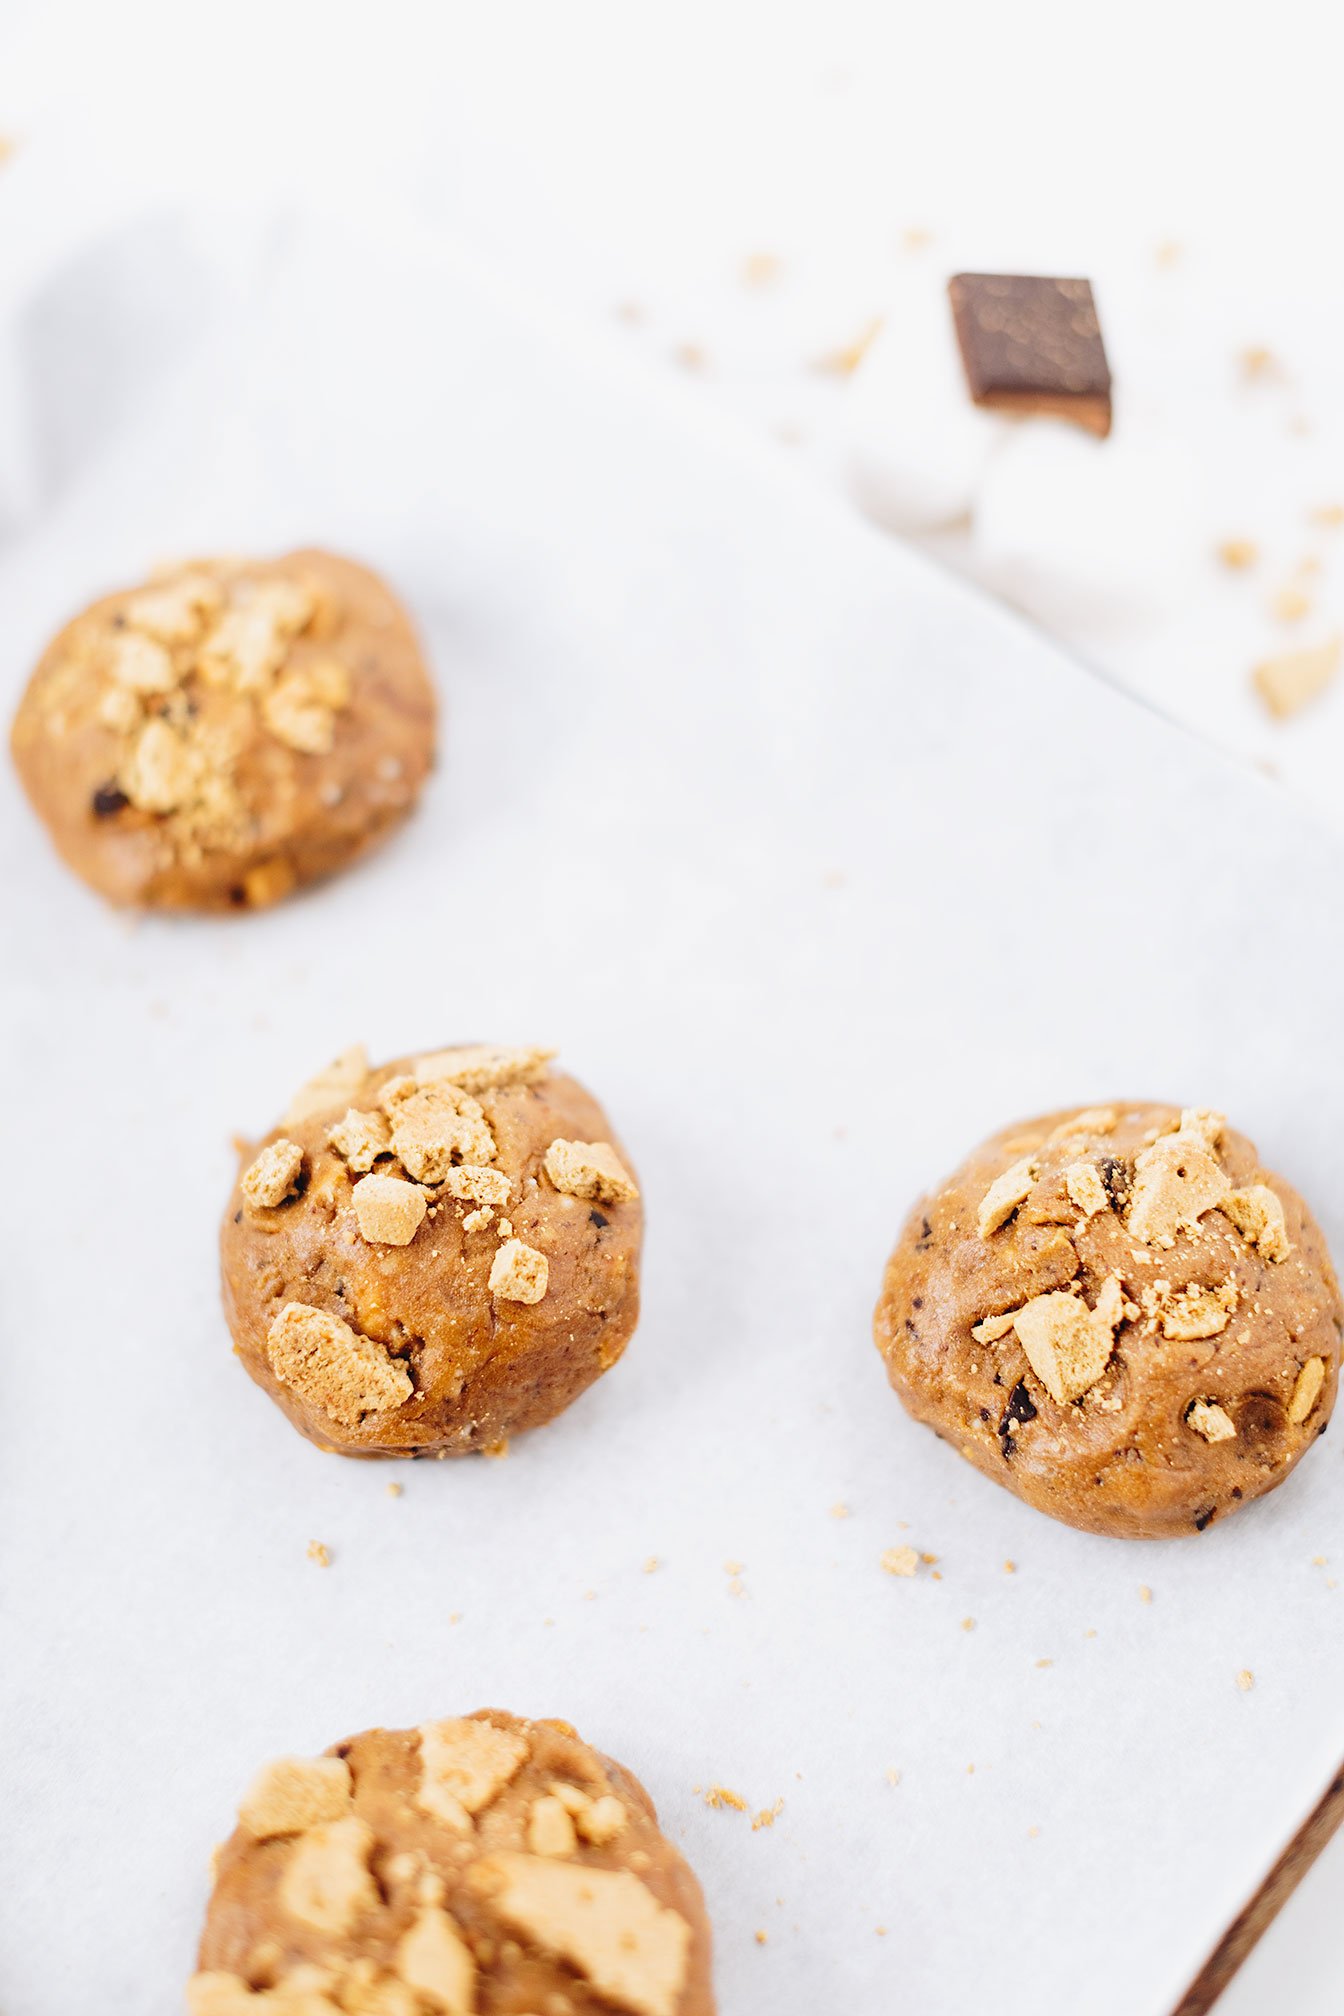
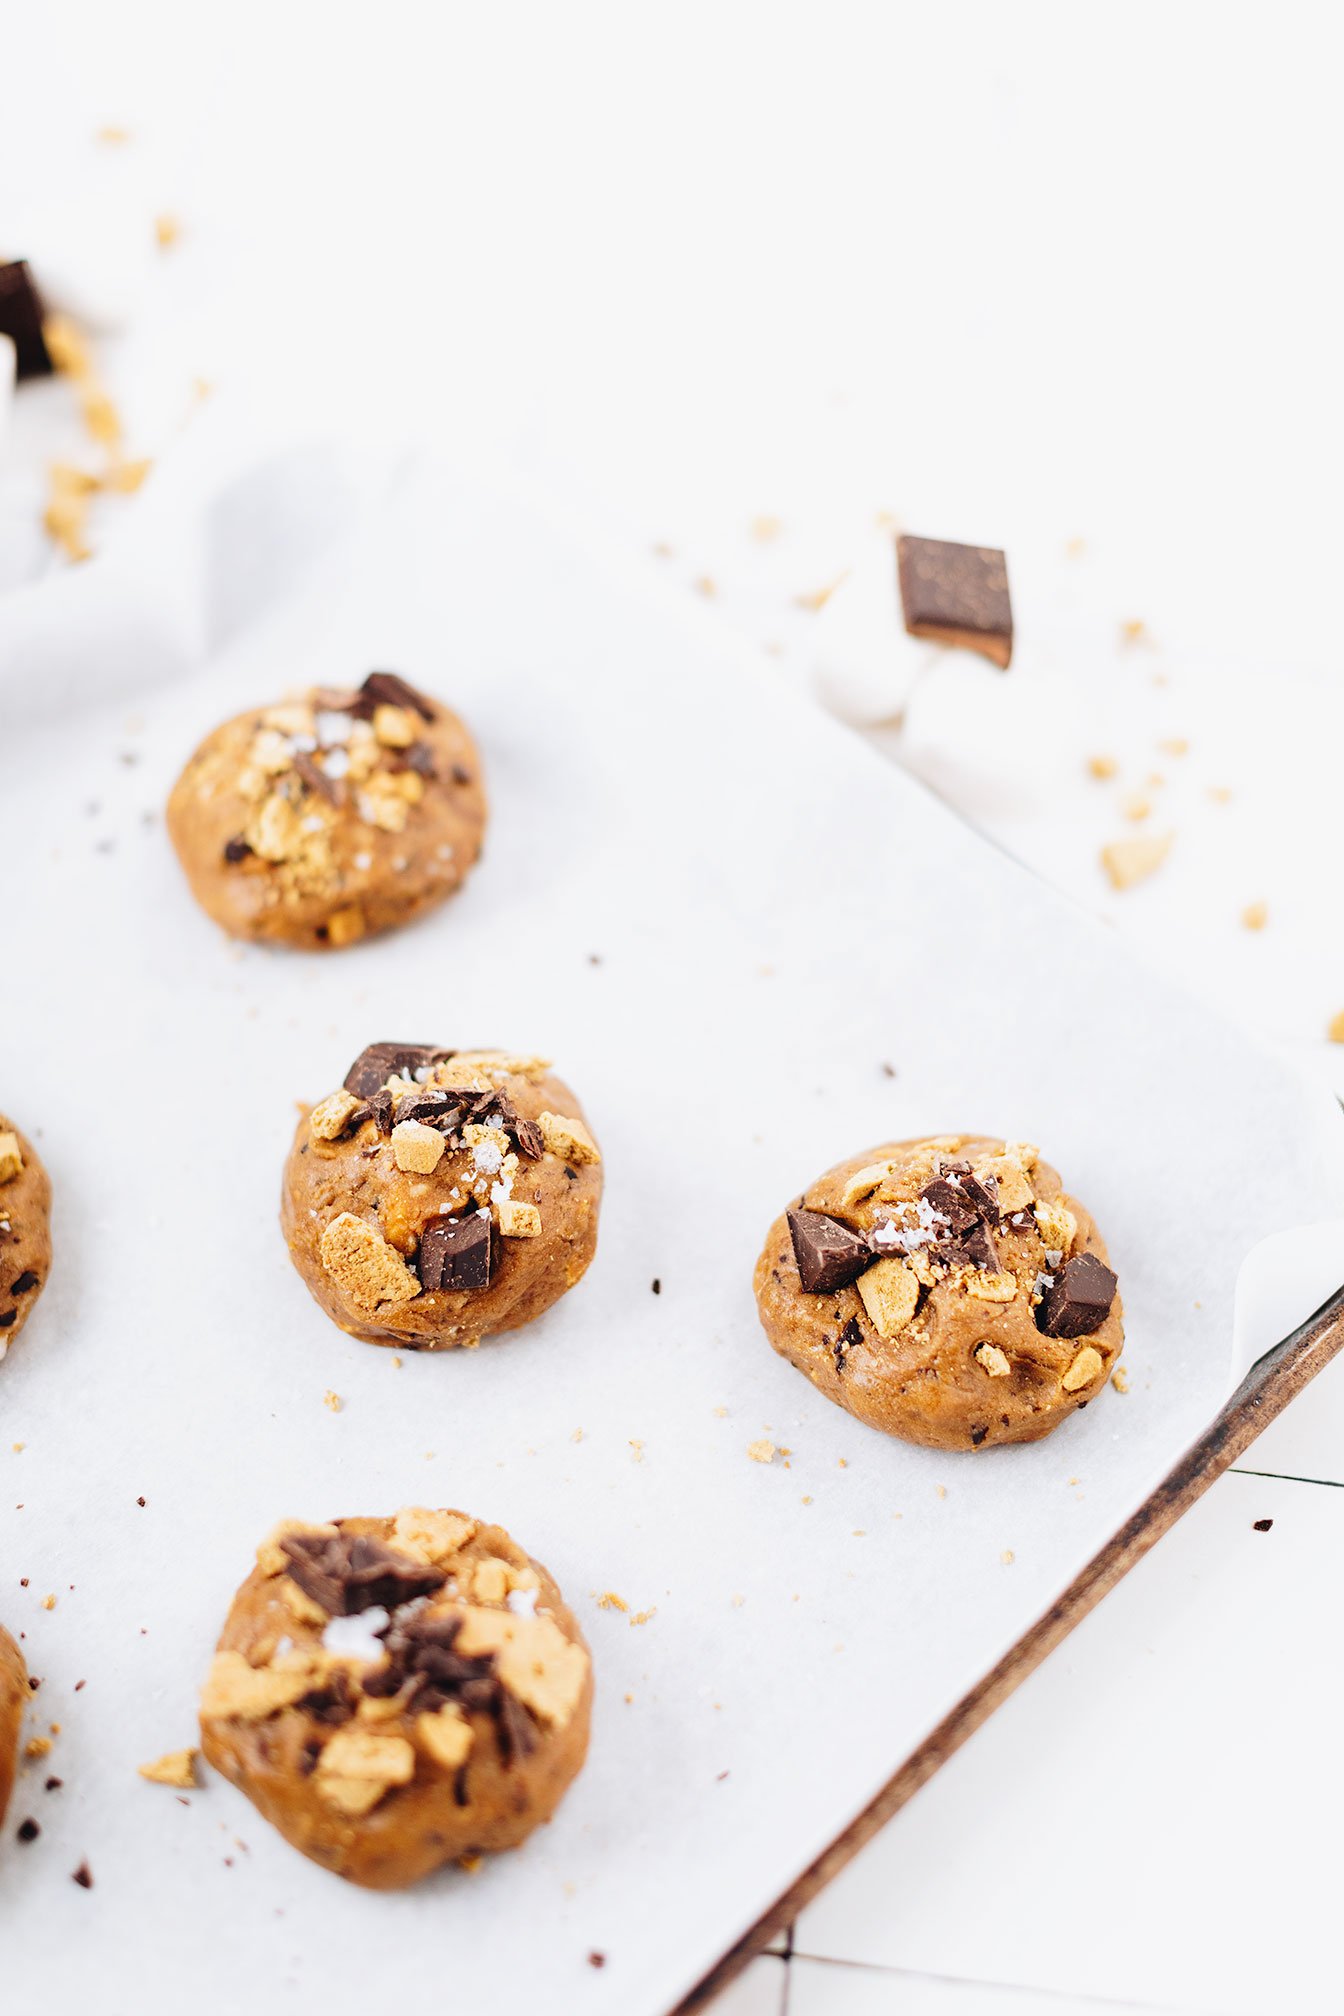
S’mores cookie with a surprise marshmallow filling you cannot resist. Gluten-free, dairy-free friendly, refined sugar-free and no campfire needed!

Fun fact about me that not many people know is that I am a pyro! Maybe that is why I am a volunteer firefighter but I just absolutely love fires - campfires, bonfires, having a fake fire scene playing in the background, the sound of fire food crackling … I’m obsessed!


And now that I have niece and nephews close by, I take full advantage of spoiling them with campfire treats - s’mores being #1!
So when we had Thanksgiving this past week, I wanted to surprise them with a dessert that I knew they were going to love. Because why try to give them traditional desserts like pumpkin pie when we know they aren’t going to like it or try it? Why not just make them something fun and that they will actually enjoy!


And that is why I created this s’mores cookie recipe! They couldn’t believe that a cookie was also a s’more! And to top off the mindblown effect, when I ripped the cookie apart - they couldn’t believe that there was a gooey, melted marshmallow inside and that I didn’t have a fire to produce that sort of effect!
All this to say, that if you are wanting major Aunt brownie points - you should make these cookies! And selfishly for yourself - that is why they are gluten-free, dairy-free, and naturally sweetened. They will not know the difference!


And if you are unfamiliar with gluten-free or plant based s’more products to look for - I have added the products I used at the bottom of the recipe for reference. I will say that the Hu Kitchen stuffed dark chocolate bars just really elevate this recipe - especially if you are team peanut butter cup in your s’more stack!

If you try this recipe, let us know! Leave a comment, rate it, and don’t forget to tag a photo to #fromtherootsblog on Instagram. We love seeing what you come up with!
S’mores cookie with a surprise marshmallow filling you cannot resist. Gluten-free, dairy-free friendly, refined sugar-free and no campfire needed!
Serving: 2 Tbsp scoop = 8 large cookies, 1 Tbsp scoop = 16 regular cookies | Prep Time: 5 min | Cook Time: 10 min
Ingredients
1 ½ cup gluten-free 1 to 1 flour
¾ cup coconut sugar
½ cup dark chocolate chips or bar, chopped
½ cup mini marshmallows or 8 large marshmallows
½ cup graham crackers, crushed/chopped
1 egg, room temperature
3 Tbsp milk of choice, I used coconut milk
3 Tbsp coconut oil, melted
1 tsp pure vanilla extract
½ tsp baking soda
½ tsp baking powder
½ tsp pink himalayan sea salt
Directions
Preheat the oven to 350 degrees F and line a baking sheet with parchment paper.
In a large bowl, combine flour, baking soda and powder, and salt. In a medium bowl, combine egg, coconut sugar, milk, oil, and vanilla.
Stir the dry ingredients into the wet. Gently stir in the chocolate chips, graham crackers and marshmallows if you are doing mini.
Using a cookie scoop or 1 Tbsp, scoop out 2 Tbsp worth and flatten dough out to place a large marshmallow in and fold the rest of the dough over the marshmallow until fully covered. If you added mini marshmallows, scoop out 1 Tbsp, and place dough onto a greased or parchment lined baking sheet. Add a few extra chocolate chips, graham crackers and kosher salt flakes on top to make the cookies look pretty.
Bake for 10 minutes until golden brown.
Let them cool for at least 15 minutes so that the cookies can firm up. Transfer to a wire wreck to cool completely and enjoy!
SHOP OUR FAVORITE INGREDIENTS FOR THIS RECIPE!


Venison Curry Stew
If you are familiar with hunting game or are accustomed to eating game animal, then you will automatically love this recipe. But for those that aren’t familiar or would like to learn more, what is venison?
Although deer comes to mind when referring to venison, the term venison technically refers to the meat from any game animal including caribou, antelope, and elk. The latin word venari, means to hunt or pursue. Portion cuts are similar to beef including steaks, roasts, ground meat and stew meat.
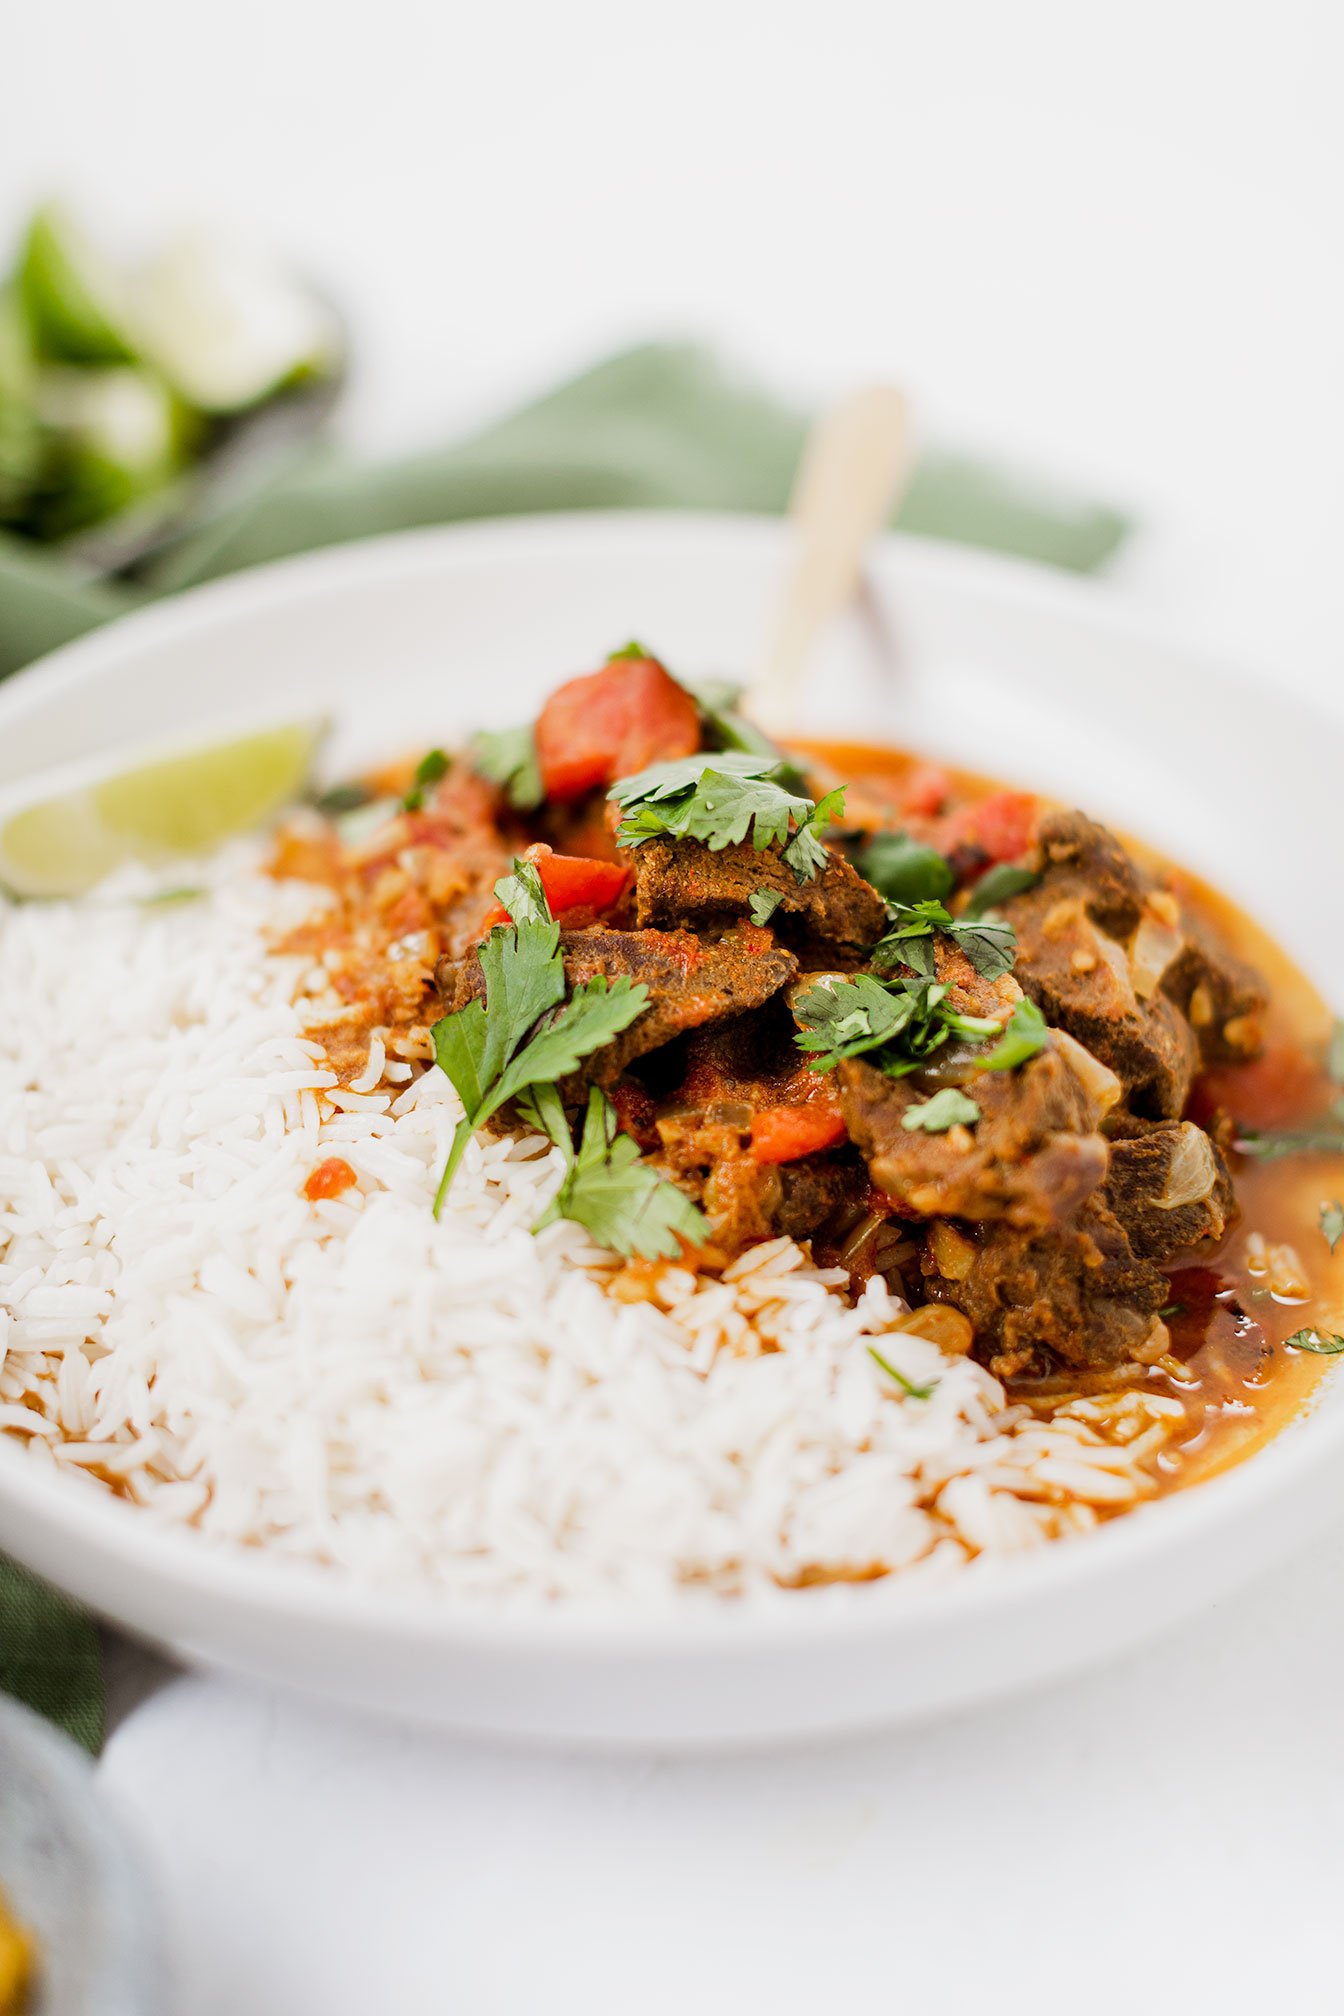
Venison Curry Stew recipes elevates the hunt by capturing new flavors and pairings to those that might not traditionally associate with venison.

If you are familiar with hunting game or are accustomed to eating game animal, then you will automatically love this recipe. But for those that aren’t familiar or would like to learn more, what is venison?
Although deer comes to mind when referring to venison, the term venison technically refers to the meat from any game animal including caribou, antelope, and elk. The latin word venari, means to hunt or pursue. Portion cuts are similar to beef including steaks, roasts, ground meat and stew meat.
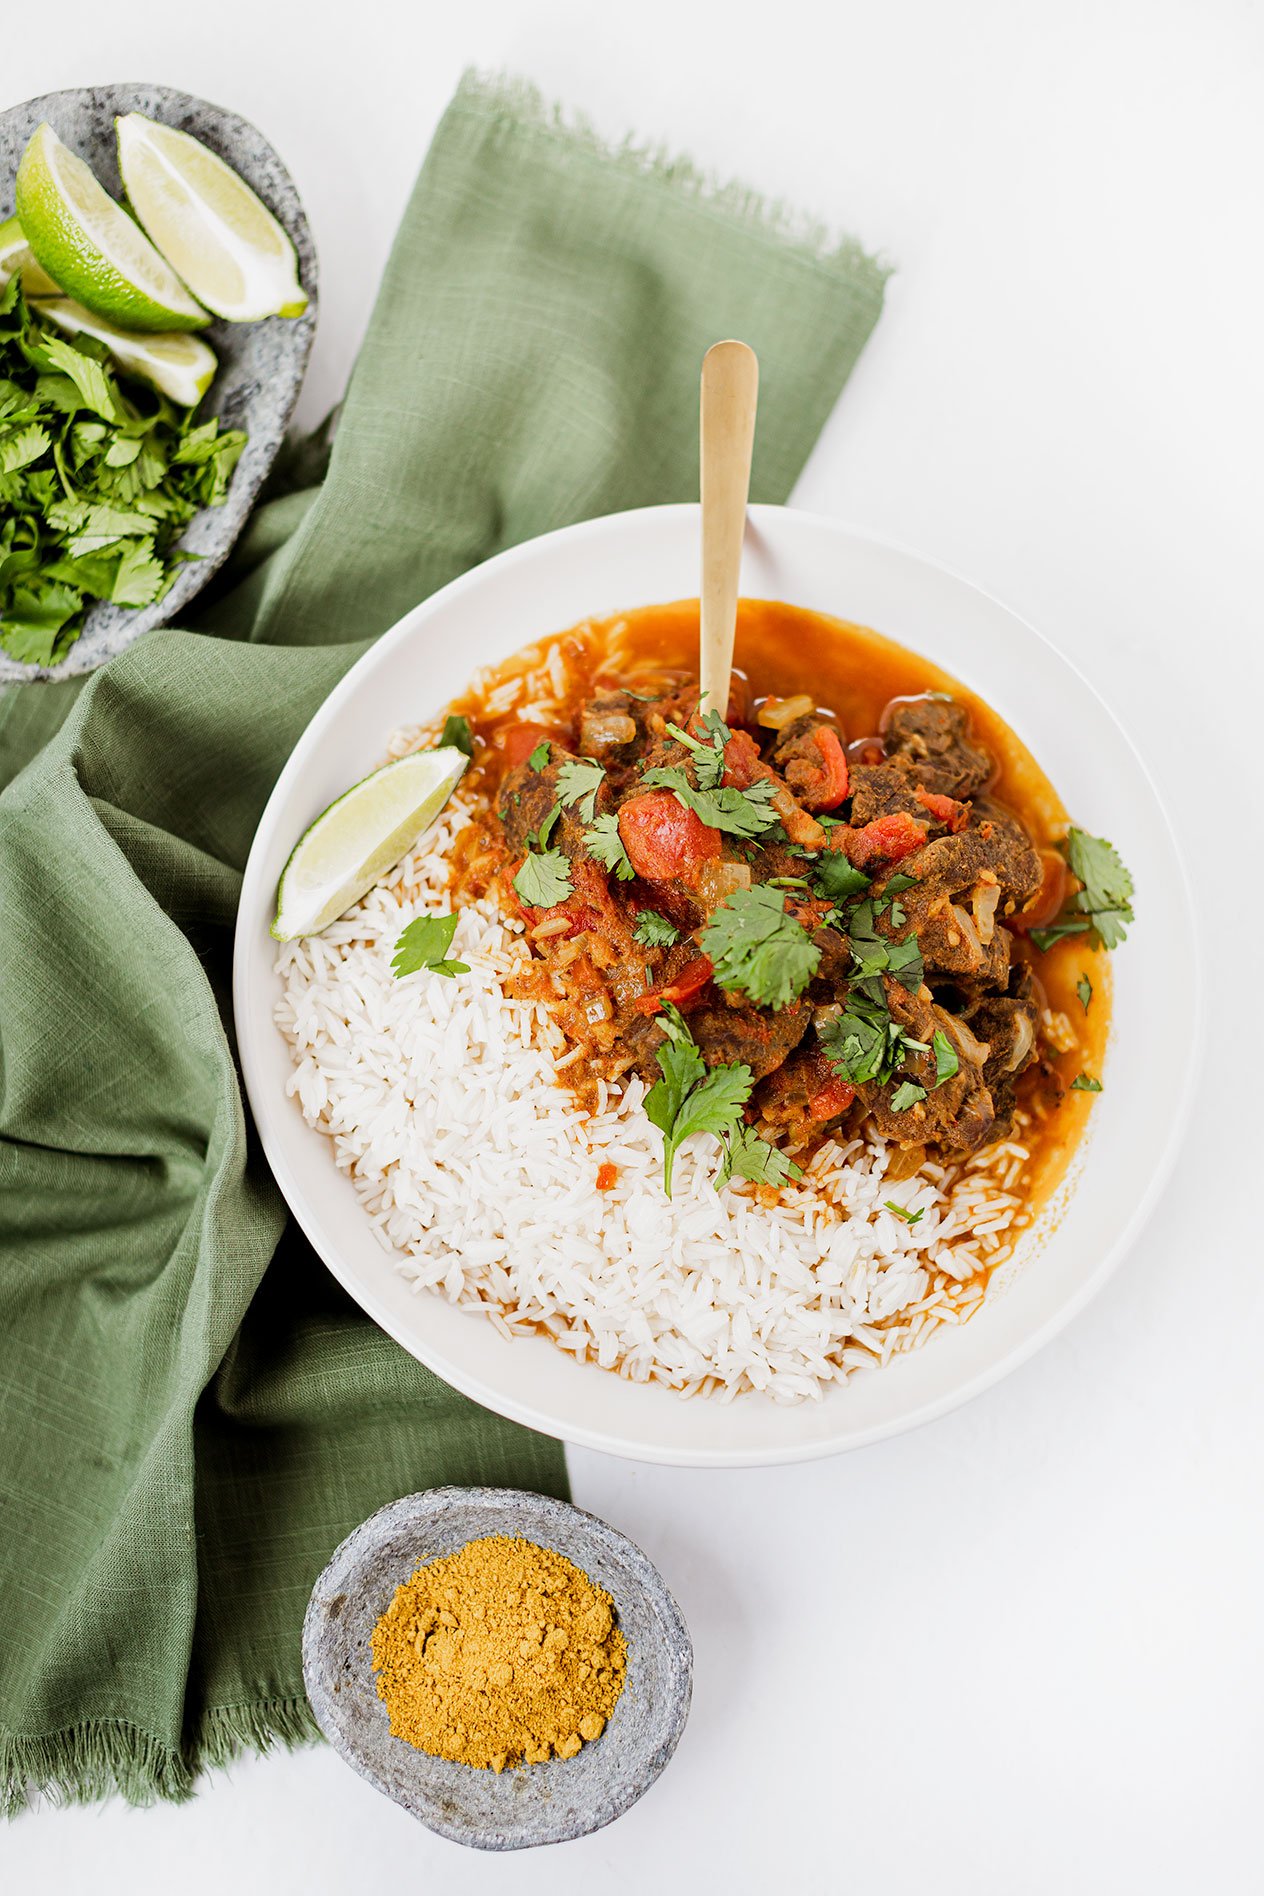
So if you don’t have access to game meat, you can use lean beef for this recipe.
Does it taste like beef?
Even though the portion cuts are similar to beef, the flavor profile is not. Venison has a distinct earthy, almost rich “gamey” flavor - owing to a deer’s diet. It has a firm, smooth texture, but since it’s much leaner than beef, it tends to not be as juicy.
That is why I love cooking venison, curry based as the exotic flavors somewhat mask the “gamey” flavor of the meat.
Last thing before you rush to make this recipe is that venison is healthy for you! Not only is it slightly higher in protein and contains higher levels of vitamin B6 and B12, omega 3 fatty acids, riboflavin, iron and niacin but it’s an abundant source of selenium which is a powerful mineral and antioxidant.

If you try this recipe, let us know! Leave a comment, rate it, and don’t forget to tag a photo to #fromtherootsblog on Instagram. We love seeing what you come up with!
Venison Curry Stew recipes elevates the hunt by capturing new flavors and pairings to those that might not traditionally associate with venison.
Serving:6-8 | Prep Time: 10 | Cook Time: 50 min
Ingredients
1.5-2 lb venison roast, cut into chunks
½ white onion, chopped
1 cup beef bone broth
1 can (14.5 oz) fire roasted tomatoes
½ cup coconut cream (creamy white part that is at the top of canned coconut milk)
2 Tbsp curry powder
1 Tbsp red curry paste
1 Tbsp garlic, minced
1 Tbsp coconut aminos
1 tsp salt
Garnish
Cilantro, lime, red chili sauce (optional)
Serve with
Rice or naan bread
directions
Season venison chunks with salt and curry powder. Turn on the Instant Pot to saute mode and add 1 Tbsp oil. Saute venison chunks halfway and then add in the chopped onion and minced garlic. Scrape the juicy bits from the bottom and add in broth, tomatoes, cream, aminos, and curry paste. Stir to combine.
Place the lid onto the Instant Pot and lock it in place. Pressure cook on high for 25 min, then naturally release for 15 min. If needed, you can quick-release after 15 min.
While the curry is cooking, cook the rice or naan and set aside.
Open the lid and stir. Serve with rice and/or naan and garnish with cilantro and lime wedge.