Sort by Category
- October 2025
- September 2025
- August 2025
- June 2025
- August 2024
- July 2024
- June 2024
- May 2024
- February 2024
- January 2024
- December 2023
- November 2023
- October 2023
- September 2023
- August 2023
- July 2023
- March 2023
- February 2023
- January 2023
- December 2022
- November 2022
- October 2022
- September 2022
- August 2022
- June 2022
- May 2022
- April 2022
- March 2022
- February 2022
- January 2022
- December 2021
- November 2021
- October 2021
- September 2021
- August 2021
- July 2021
- June 2021
- May 2021
- April 2021
- March 2021
- February 2021
- January 2021
- December 2020
- November 2020
- October 2020
- September 2020
- August 2020
- July 2020
- June 2020
- May 2020
- April 2020
- March 2020
- February 2020
- January 2020
- December 2019
- November 2019
- October 2019
- September 2019
- August 2019
- July 2019
- June 2019
- May 2019
- April 2019
- March 2019
- February 2019
- January 2019
- December 2018
- November 2018
- October 2018
- September 2018
- August 2018
- July 2018
- June 2018
- May 2018
- April 2018
- March 2018
- February 2018

Watermelon Lime Refresher
This drink was actually made by mistake as I was creating an agua fresca recipe which is coming to the blog soon!
Here’s the story if you are interested: I only had thirty minutes to make the recipe, take pictures of my lovely creation, and clean up before working out so I had to go fast! My husband helped me out by walking the dogs so that I could focus. As soon as he came back I would be done. It would have been perfect timing!
Watermelon lime refresher is just that! A refreshing drink that is sure to cool you down and keep you hydrated during the summer time!

This drink was actually made by mistake as I was creating an agua fresca recipe which is coming to the blog soon!
Here’s the story if you are interested: I only had thirty minutes to make the recipe, take pictures of my lovely creation, and clean up before working out so I had to go fast! My husband helped me out by walking the dogs so that I could focus. As soon as he came back I would be done. It would have been perfect timing!

https://fromtherootsblog.com/watermelon-lime-refresher/
Well, we executed our plan. When he came back inside, I let him sip the drink and he was like, “This tastes amazing, but weren’t you supposed to be making a thicker drink?”
That’s when I noticed I used a cheesecloth to strain the pulp from the juice. (face slap!)

Even though it wasn’t my originally planned agua fresca drink, it was still refreshing, tastes way better than just regular water, AND is perfect for mixing in my pre-workout powder!
I highly recommend using this watermelon lime refresher for your pre-workout powder or just to drink on its own before or after a workout. Watermelon contains the amino acid citrulline which promotes blood flow, which leads to improved circulation and reduces muscle soreness. Also, watermelon is about 90% water -- hello, hydration!

I also played around with my new popsicle molds and made this drink into watermelon lime refresher popsicles! They were a hit at a summer picnic I hosted last month (blog post coming soon on that! :) ) The frozen juice created a beautiful stained glass appearance with bright, summery colors!
Regardless if you make these watermelon lime refreshers for a pre/post-workout drink, popsicles, or just sipping by the pool, they are great in promoting hydration and kicking boring water to the curb!
If you try this recipe, let us know! Leave a comment, rate it, and don’t forget to tag a photo to #fromtherootsblog on Instagram. We love seeing what you come up with!
Watermelon lime refresher is just that! A refreshing drink that is sure to cool you down and keep you hydrated during the summer time!
INGREDIENTS
Half of one small seedless watermelon (rind cut off)
Juice of 2 limes
2 Tbsp fresh mint
1-2 cups filtered water
1-2 Tbsp pure maple syrup (optional for sweeter taste)
DIRECTIONS
Put all ingredients into a high powered blender and blend until smooth.
Transfer mixture into a cheesecloth covered bowl. Strain mixture until you are left with just the juice.
Pour juice over ice and enjoy!

Grilled Shrimp Summer Salad
The grill is my kitchen during the spring and summer seasons. Grilling is a straightforward process -- it’s easy and quick. Plus who wouldn’t want to be outside with sun rays and the amazing aroma of grilled food in the air?
Grilled shrimp summer salad is loaded with protein, antioxidants and summer produce that will quickly become a summer meal staple!

The grill is my kitchen during the spring and summer seasons. Grilling is a straightforward process -- it’s easy and quick. Plus who wouldn’t want to be outside with sun rays and the amazing aroma of grilled food in the air?

That’s why this grilled shrimp summer salad has been playing on repeat all summer long! When my husband and I come home after our evening workout, we usually just want to eat something light yet nutrient dense to replenish our bodies, but we don’t want to be slaving away in the kitchen while we are starving! A salad is a perfect solution to this dilemma.

What’s great about salads is that they are versatile so even if you do not have all the ingredients or the produce is no longer in season, you can add whatever you like.
Aside from the grilled shrimp, this recipe has three components: pineapple salsa, blueberries, and basil vinaigrette. So, for example, if pineapples are not in season, use another fruit like peaches or oranges. Have fun with the ingredients and customize this salad to YOUR preference!

Another great thing about salads is that if you make everything in bulk then it just takes minutes to prepare a salad each night. Just put everything in containers and add/take away things to your salad depending on what mood you are in!

If you try this recipe, let us know! Leave a comment, rate it, and don’t forget to tag a photo to #fromtherootsblog on Instagram. We love seeing what you come up with!
Grilled shrimp summer salad is loaded with protein, antioxidants and summer produce that will quickly become a summer meal staple!
INGREDIENTS
Grilled Shrimp Marinade
12 oz large raw shrimp (peeled and deveined)
1/2 tsp cayenne
1/2 tsp onion powder
1/2 tsp smoked paprika
1/2 tsp chili powder
1/2 tsp salt
1/4 tsp cumin
2 dashes red pepper flakes
Juice and zest of 1 lemon
2 Tbsp EVOO
Pineapple Salsa
1 cup fresh pineapple
1 jalapeno
1 small bunch cilantro
1 large red tomato
1/2 red onion
Juice of 1/2 lime
S&P to taste
Blueberry and Basil Vinaigrette
3/4 cup fresh blueberries
4-8 basil leaves (depending on preference)
1/2 lemon
1 tsp dried minced onion
1-2 tsp honey
1 tsp apple cider vinegar
1/4 cup EVOO
S&P to taste
Grilled Shrimp Marinade
Combine shrimp, seasonings, lemon, and oil to a Ziploc bag-making sure the shrimp is fully covered. Refrigerate for at least 30 minutes. Meanwhile, soak 6-10 small skewers in water.
From the shrimp from the fridge and thread 6-8 shrimp on each damp skewer.
Very lightly brush a cast iron griddle or grill grate with oil. Heat the grill to medium. Grill the shrimp for 5-7 minutes, turning over once halfway through.
Place the shrimp skewers on a plate to cool. Sprinkle additional red pepper flakes if you like!
Pineapple Salsa
Finely dice all ingredients and in a bowl, combine all ingredients. Store in fridge until ready to use.
Blueberry and Basil Vinaigrette
Put all ingredients in a blender or food processor and blend until smooth and creamy. Add additional oil or water if the mixture is too thick.
* Due to the natural pectin found in the blueberries, this dressing will quickly begin to gel. Use immediately or blend in additional liquid to make it pourable.
Directions:
Prepare your salad by adding greens, alfalfa sprouts, grilled shrimp skewers, pineapple salsa, vinaigrette and your favorite toppings! Enjoy!

Lavender Scones and Lavender Latte
I’m not quite sure why I don’t make scones enough. They’re super easy to make, with simple ingredients, and they taste amazing! Let me show you how!
I have tried many lavender baked goods in my time and what I have found is that it is too easy to use too much lavender! It seems as though the flavor is overpowering, “soapy” tasting, or just nonexistent. The best way to use lavender is to use it sparingly so it adds the perfect hint of flavor and aroma. In this recipe, I simply infuse the milk with the dried buds, resulting in just the right amount of the lavender flavor.
Lavender scones and lavender latte, need I say more! Lavender scones are flaky and buttery without the guilt. Lavender latte made with lavender-infused coconut milk that is sure to wake you in the best way!

I’m not quite sure why I don’t make scones enough. They’re super easy to make, with simple ingredients, and they taste amazing! Let me show you how!
I have tried many lavender baked goods in my time and what I have found is that it is too easy to use too much lavender! It seems as though the flavor is overpowering, “soapy” tasting, or just nonexistent. The best way to use lavender is to use it sparingly so it adds the perfect hint of flavor and aroma. In this recipe, I simply infuse the milk with the dried buds, resulting in just the right amount of the lavender flavor.

On the subject, it is best to cook with dried culinary lavender rather than fresh. I love using lavender for many uses so I purchase this bulk dried lavender brand from Amazon.
The next thing you need to know is that scones are not like most pastries. The dough doesn’t require a lot of kneading and doesn’t need to rise. Actually, the less you mess with the dough the better!

These lavender scones are healthier than the typical scone as some of the classic main ingredients are swapped for healthier options. For example, a scone cannot be a flaky, buttery scone without cold cubed butter. I have tried this recipe with cold vegan butter but what I have found to be healthier and actually better tasting is using cold coconut oil. I also use 100% stone ground whole wheat pastry organic flour which I have found is the best base for this scone. Bob’s Red Mill brand is what I use for this recipe.


Before putting the scones in the oven, you’ll need to use your leftover infused lavender milk mixture and brush the mixture over the top of each scone. Sprinkle coarse sugar on top and dried lavender to pretty them up! The lavender milk and sugar will help create a crunchy outer layer which pairs great with the flakey, butteriness of the scones.
If you have leftover lavender milk mixture, why not make a lavender latte to pair with your scone!? It's super easy -- just add some to your choice of coffee!

You really don’t need a glaze for these scones as they stand on their own but if you must, I love drizzling honey over them. If you have been following me on Instagram, you’ll see that I love putting lavender honey over my scones to take it to the next level. Savannah Bee Company is what I use!


If you try this recipe, let us know! Leave a comment, rate it, and don’t forget to tag a photo to #fromtherootsblog on Instagram. We love seeing what you come up with!
Lavender scones and latte, need I say more! Lavender scones are flaky and buttery without the guilt. Lavender latte made with lavender-infused coconut milk that is sure to wake you in the best way! |Dairy Free|
INGREDIENTS
Lavender Scones
1 1/2 cup whole wheat pastry organic flour
1 Tbsp baking powder
1/2 tsp salt
2 Tbsp organic cane sugar
6 Tbsp cold coconut oil ((small cubed))
1 can unsweetened coconut milk
1 Tbsp vanilla extract
2 Tbsp dried lavender flowers
Lavender Latte
8 oz hot coffee
1-2 Tbsp lavender coconut milk*
1-2 Tbsp sweetener (honey, maple syrup, cane sugar)
DIRECTIONS
Lavender Scones
*In a small saucepan, combine coconut milk, vanilla, and lavender flowers and heat until boiling. Just when the mixture boils and the lavender is fragrant, turn the burner off and let steep for about 10 minutes. Strain the mixture using a fine strainer and let cool to room temperature.
Preheat oven to 375 degrees and line a baking sheet with parchment paper.
In a large mixing bowl, whisk together flour, powder, salt, and sugar.
Add the small cubed coconut oil and cut into the pastry using your hands or two knives moving in opposite directions resulting in a crumbly dough mixture.
Make a well in the center of the mixture and add 1 cup of the room temperature lavender milk mixture. Gently mix using your hands until the dough is fully incorporated (do not over knead!)
Transfer the dough to a lightly floured surface and form into a circle just under 1-inch thick. Cut into 8 wedges and transfer them to the parchment lined baking sheet. Brush the tops of each scone with the lavender milk mixture and sprinkle with pink organic cane sugar.
Bake for about 20-25 minutes until the scones rise and turn golden brown. Remove from the oven and place on a cooling rack to cool.
Once scones have cooled, eat right away or drizzle honey over them and enjoy!
Lavender Latte
To a Vitamix blender or milk frother, add 8 oz hot coffee, 1-2 Tbsp lavender milk mixture, and 1-2 Tbsp honey or maple syrup.
Blend until fully incorporated, showing signs of milk froth.
Enjoy right away with a scone or two!
NOTES
I prefer making the lavender coconut milk mixture a day before and keeping it in the fridge until I am ready to make the scones. It’s best to have the milk on the cooler side as coconut oil melts very quickly.
Must use cold coconut oil because if the oil melts when kneading the dough then your scones will be very hard and dry.

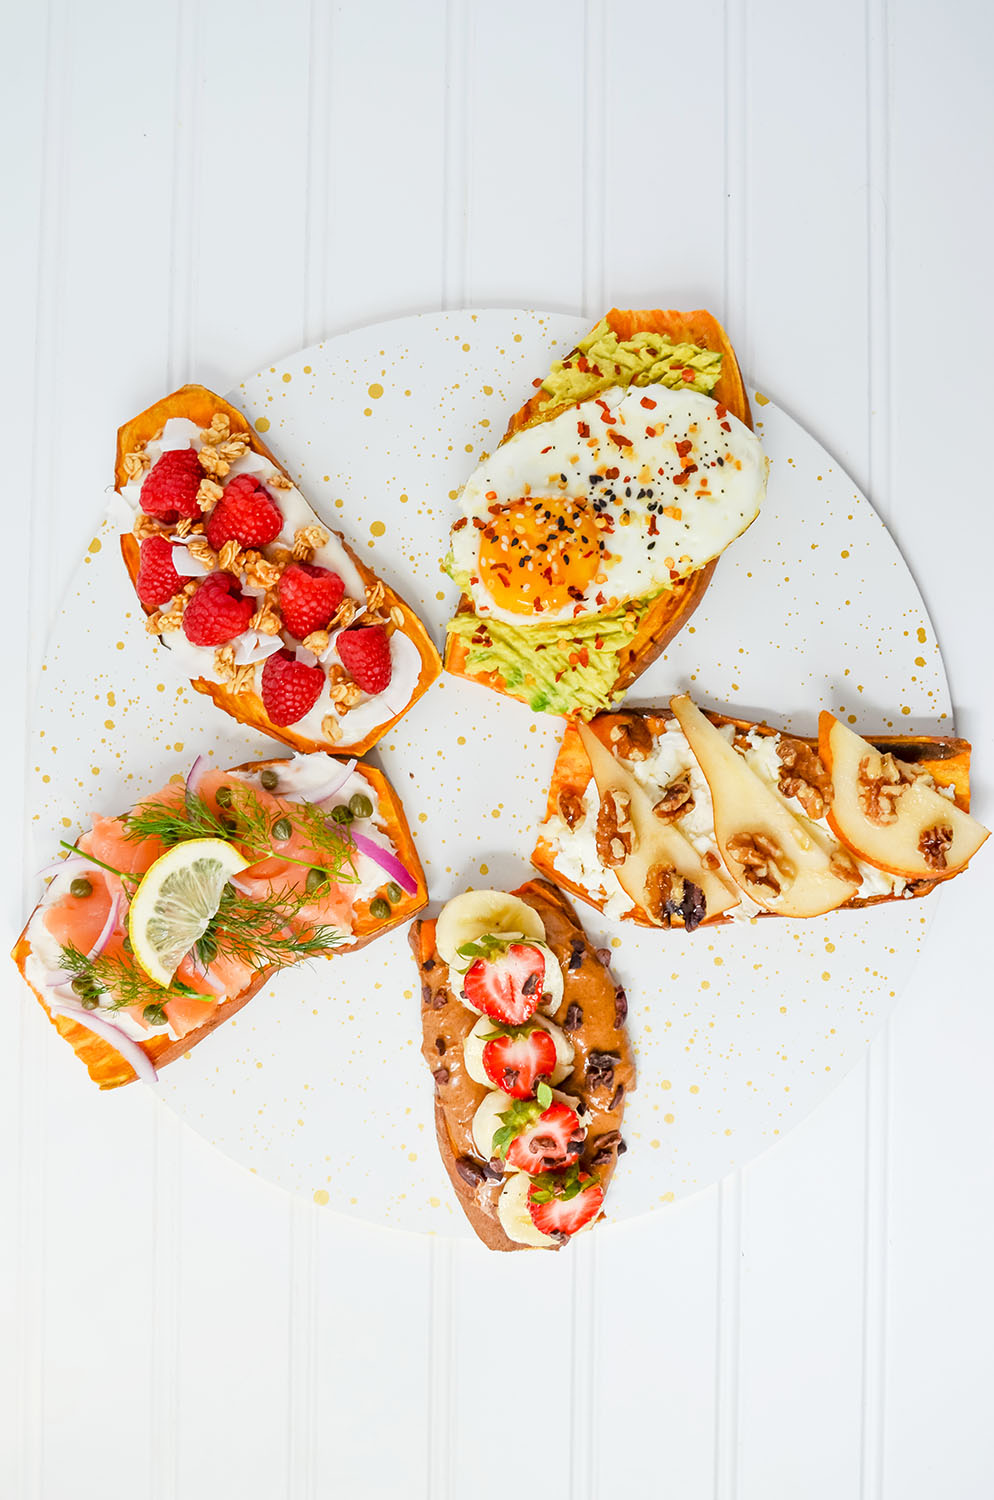
Sweet Potato Toast 5-Ways
I might be a little late on the sweet potato toast (SPT) train but I am so glad I got on! Here is a From the Roots spin on this trendy recipe that is circulating the web.
Sweet potato toast is a great bread substitute to get in the added nutrition of vitamin A and fiber. It’s also nice for people who are gluten intolerant, tired of eating regular toast or wanting a little more fiber in their diet. The sweet potato slices cook evenly in the toaster and can hold up toppings really well. The subtle sweetness in the sweet potato compliments most flavor combinations - like the ones that are featured here!
How to make sweet potato toast plus five different topping combinations.
I might be a little late on the sweet potato toast (SPT) train but I am so glad I got on! Here is a From the Roots spin on this trendy recipe that is circulating the web.
Sweet potato toast is a great bread substitute to get in the added nutrition of vitamin A and fiber. It’s also nice for people who are gluten intolerant, tired of eating regular toast or wanting a little more fiber in their diet. The sweet potato slices cook evenly in the toaster and can hold up toppings really well. The subtle sweetness in the sweet potato compliments most flavor combinations - like the ones that are featured here!
Most people cook the sweet potato by simply cutting both ends off and slicing lengthwise about ¼ inch thick. You can cook them in the toaster by setting the toaster on high and then flip them twice. You can also set your oven to 350 degrees and bake 15-20 minutes per side until the sweet potato is tender and cooked through.
Now that your sweet potato is cooked to perfection - let’s get to the fun part - the toppings!

The Parfait Sweet Potato Toast
Almond milk yogurt (or yogurt of choice)
Raspberries
Granola
Honey

The Classic Sweet Potato Toast
Avocado
Fried egg
Red pepper flakes + Pink Himalayan salt
Everything but the bagel seasoning (Trader Joe's)

The Ultimate PB&J Sweet Potato Toast
Almond butter
Bananas
Strawberries
Cacao Nibs
Honey

The Lox Sweet Potato Toast
Dairy-free cream cheese (or cream cheese of choice)
Smoked salmon
Capers
Fresh Dill
Red onion
Lemon

The Honey Goat Sweet Potato Toast
Goat cheese
Pear
Walnuts
Honey
I love them all but if I had to choose a favorite, it would definitely be the Lox. I’m a sucker for anything salty and smoked so this one gets my heart every time!
If you try this recipe, let us know! Leave a comment, rate it, and don’t forget to tag a photo to #fromtherootsblog on Instagram. We love seeing what you come up with!

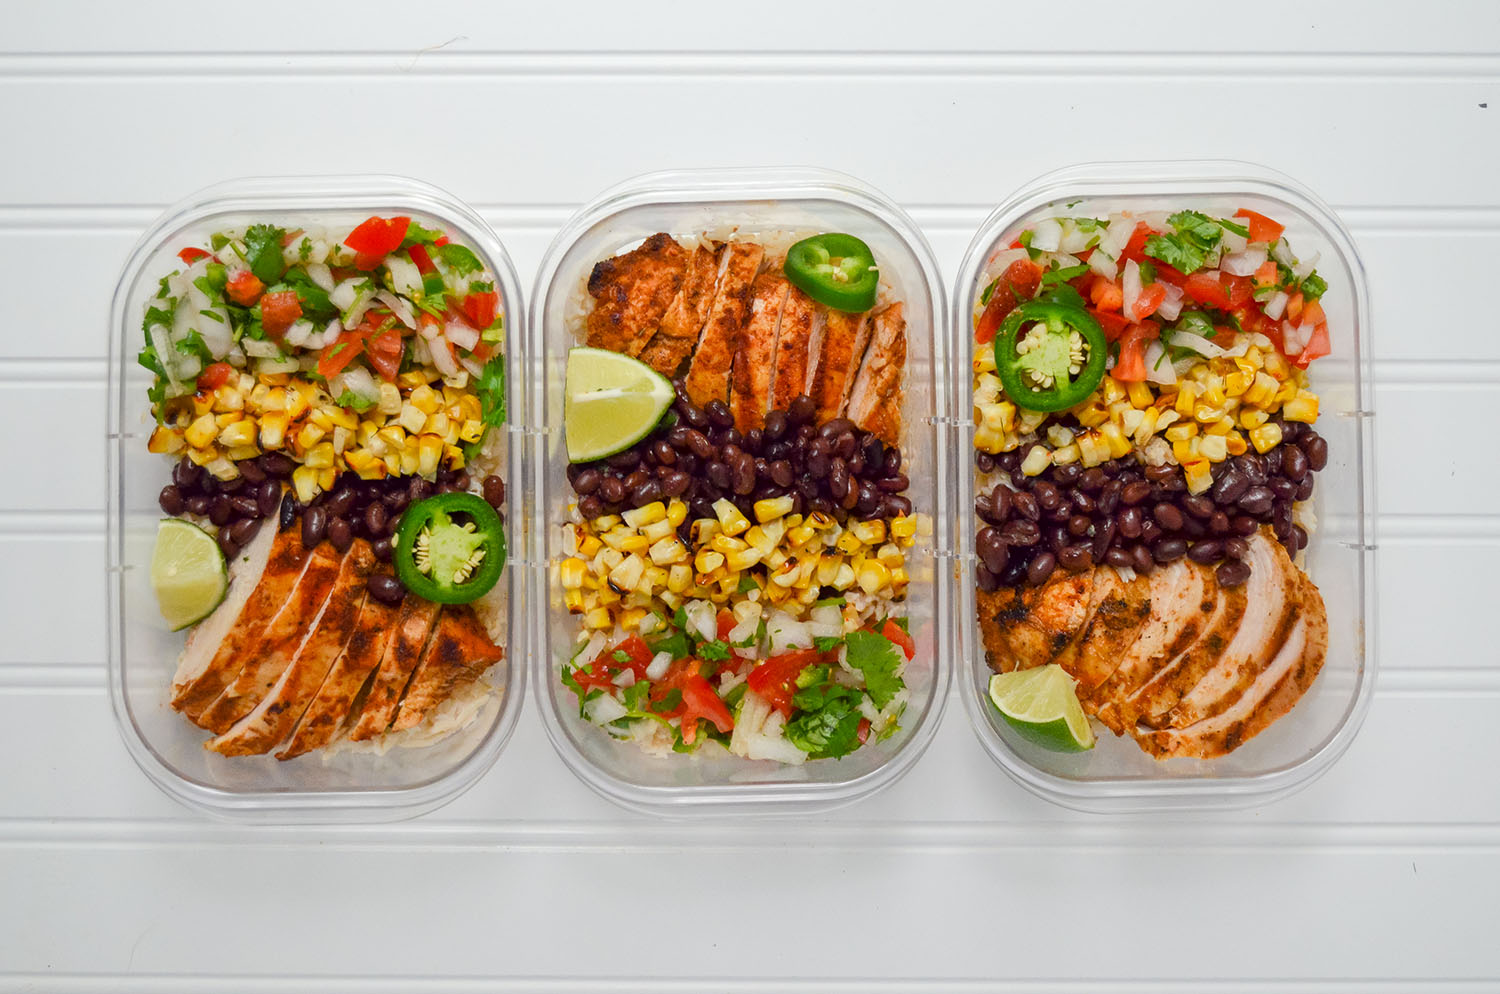
Grilled Chicken Burrito Bowls
This grilled chicken burrito bowl was inspired by the notable chain restaurants Chipotle and Moe’s. It can be so tempting to go through their lines and simply tell them what you want: Your choice of protein, black or brown beans, white or brown rice, and finish it off with toppings (hello, Pico de Gallo!). Well, this recipe is just like that -- tailor it exactly how you want it, or even add things that Chipotle/Moe’s, etc. may not have! With this recipe, I’m making it with my personal preferences and a special grilled chicken marinade recipe. I’ll even show you how easy it is to make Pico de Gallo.
Grilled chicken burrito bowls with Pico de Gallo made easy at the comfort of your own home!

This grilled chicken burrito bowl was inspired by the notable chain restaurants Chipotle and Moe’s. It can be so tempting to go through their lines and simply tell them what you want: Your choice of protein, black or brown beans, white or brown rice, and finish it off with toppings (hello, Pico de Gallo!). Well, this recipe is just like that -- tailor it exactly how you want it, or even add things that Chipotle/Moe’s, etc. may not have! With this recipe, I’m making it with my personal preferences and a special grilled chicken marinade recipe. I’ll even show you how easy it is to make Pico de Gallo.

My grilled chicken burrito bowl recipe is gluten and dairy-free using clean and simple ingredients that, in my opinion, is much healthier than eating out while saving you a lot of money!

As you know, a burrito bowl is complex in flavor because there are many components like veggies, protein, and carbs that each play a different role. I would say this recipe can take up to 40 minutes to make, but that’s only if you are making rice. You can cut some time off by using instant rice, or by preparing the ingredients ahead of time. I often tend to have my veggies already cut and ready to use in the fridge, so if you’re like me, then this burrito bowl can be made very quickly.
If you try this recipe, let us know! Leave a comment, rate it, and don’t forget to tag a photo to #fromtherootsblog on Instagram. We love seeing what you come up with!
Grilled chicken burrito bowls with Pico de Gallo made easy at the comfort of your own home!
INGREDIENTS
Grilled Chicken Marinade
1 lb boneless skinless chicken breast
2 tsp cumin
1 tsp smoked paprika
1 tsp chili powder
1 tsp garlic powder
1 tsp salt
1/4 tsp cinnamon
1/2 tsp pepper
juice of one lime
2 Tbsp EVOO
Pico de Gallo
1/2 white onion (diced)
2 roma tomatoes (diced)
1/4 cup chopped fresh cilantro
juice of 1/2 lime
1 jalapeno diced ((spicy version))
Cilantro Lime Rice
1 cup sprouted brown rice
2 cups water or low sodium chicken broth
1/4 cup chopped fresh cilantro
juice of 1/2 lime
S&P to season
Toppings
grilled corn
sliced avocados
lime wedges
hot sauce
romaine lettuce
black beans
diced jalapenos
DIRECTIONS
Grilled Chicken
Combine seasonings, EVOO, lime, and chicken into a gallon size Ziploc bag and sit in the fridge to marinate for two hours or overnight (preferred).
Cook chicken on the grill on medium heat for 5-7 minutes and flip for an additional 5-7 minutes or until cooked through.
Let sit until you are ready to assemble the burrito bowl.
Pico de Gallo
Combine all ingredients and sit until ready to assemble.
Cilantro Lime Rice
Add rice and water (or broth) to a rice cooker and cook on the brown rice setting until fluffy and fully cooked. If you do not have a rice cooker then cook in a medium saucepan for about 30-35 minutes or until rice is fully cooked.
Toss in cilantro, lime, and seasonings until fully mixed and set aside.
Grilled Chicken Burrito Bowl
Meal prep - Divide chicken, pico de gallo, rice and toppings into meal prep containers.-Tip: separate cold toppings like avocado, lime wedges and lettuce into Ziploc bags or stasher bags to keep fresh before eating.