Sort by Category
- May 2024
- February 2024
- January 2024
- December 2023
- November 2023
- October 2023
- September 2023
- August 2023
- July 2023
- March 2023
- February 2023
- January 2023
- December 2022
- November 2022
- October 2022
- September 2022
- August 2022
- June 2022
- May 2022
- April 2022
- March 2022
- February 2022
- January 2022
- December 2021
- November 2021
- October 2021
- September 2021
- August 2021
- July 2021
- June 2021
- May 2021
- April 2021
- March 2021
- February 2021
- January 2021
- December 2020
- November 2020
- October 2020
- September 2020
- August 2020
- July 2020
- June 2020
- May 2020
- April 2020
- March 2020
- February 2020
- January 2020
- December 2019
- November 2019
- October 2019
- September 2019
- August 2019
- July 2019
- June 2019
- May 2019
- April 2019
- March 2019
- February 2019
- January 2019
- December 2018
- November 2018
- October 2018
- September 2018
- August 2018
- July 2018
- June 2018
- May 2018
- April 2018
- March 2018
- February 2018

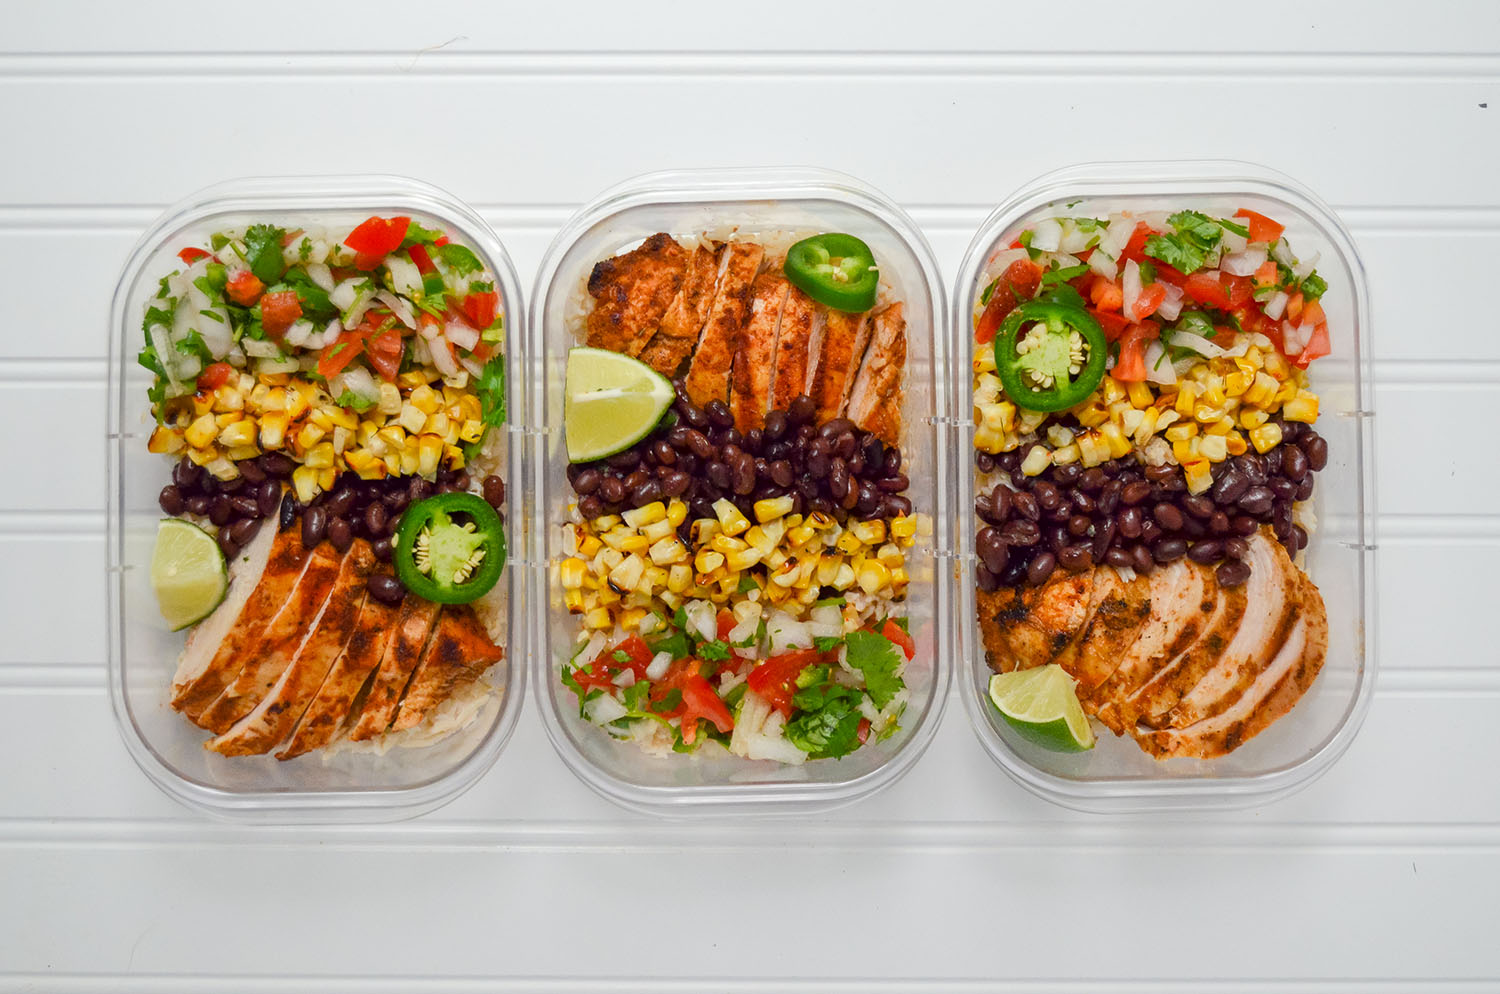
Grilled Chicken Burrito Bowls
This grilled chicken burrito bowl was inspired by the notable chain restaurants Chipotle and Moe’s. It can be so tempting to go through their lines and simply tell them what you want: Your choice of protein, black or brown beans, white or brown rice, and finish it off with toppings (hello, Pico de Gallo!). Well, this recipe is just like that -- tailor it exactly how you want it, or even add things that Chipotle/Moe’s, etc. may not have! With this recipe, I’m making it with my personal preferences and a special grilled chicken marinade recipe. I’ll even show you how easy it is to make Pico de Gallo.
Grilled chicken burrito bowls with Pico de Gallo made easy at the comfort of your own home!

This grilled chicken burrito bowl was inspired by the notable chain restaurants Chipotle and Moe’s. It can be so tempting to go through their lines and simply tell them what you want: Your choice of protein, black or brown beans, white or brown rice, and finish it off with toppings (hello, Pico de Gallo!). Well, this recipe is just like that -- tailor it exactly how you want it, or even add things that Chipotle/Moe’s, etc. may not have! With this recipe, I’m making it with my personal preferences and a special grilled chicken marinade recipe. I’ll even show you how easy it is to make Pico de Gallo.

My grilled chicken burrito bowl recipe is gluten and dairy-free using clean and simple ingredients that, in my opinion, is much healthier than eating out while saving you a lot of money!

As you know, a burrito bowl is complex in flavor because there are many components like veggies, protein, and carbs that each play a different role. I would say this recipe can take up to 40 minutes to make, but that’s only if you are making rice. You can cut some time off by using instant rice, or by preparing the ingredients ahead of time. I often tend to have my veggies already cut and ready to use in the fridge, so if you’re like me, then this burrito bowl can be made very quickly.
If you try this recipe, let us know! Leave a comment, rate it, and don’t forget to tag a photo to #fromtherootsblog on Instagram. We love seeing what you come up with!
Grilled chicken burrito bowls with Pico de Gallo made easy at the comfort of your own home!
INGREDIENTS
Grilled Chicken Marinade
1 lb boneless skinless chicken breast
2 tsp cumin
1 tsp smoked paprika
1 tsp chili powder
1 tsp garlic powder
1 tsp salt
1/4 tsp cinnamon
1/2 tsp pepper
juice of one lime
2 Tbsp EVOO
Pico de Gallo
1/2 white onion (diced)
2 roma tomatoes (diced)
1/4 cup chopped fresh cilantro
juice of 1/2 lime
1 jalapeno diced ((spicy version))
Cilantro Lime Rice
1 cup sprouted brown rice
2 cups water or low sodium chicken broth
1/4 cup chopped fresh cilantro
juice of 1/2 lime
S&P to season
Toppings
grilled corn
sliced avocados
lime wedges
hot sauce
romaine lettuce
black beans
diced jalapenos
DIRECTIONS
Grilled Chicken
Combine seasonings, EVOO, lime, and chicken into a gallon size Ziploc bag and sit in the fridge to marinate for two hours or overnight (preferred).
Cook chicken on the grill on medium heat for 5-7 minutes and flip for an additional 5-7 minutes or until cooked through.
Let sit until you are ready to assemble the burrito bowl.
Pico de Gallo
Combine all ingredients and sit until ready to assemble.
Cilantro Lime Rice
Add rice and water (or broth) to a rice cooker and cook on the brown rice setting until fluffy and fully cooked. If you do not have a rice cooker then cook in a medium saucepan for about 30-35 minutes or until rice is fully cooked.
Toss in cilantro, lime, and seasonings until fully mixed and set aside.
Grilled Chicken Burrito Bowl
Meal prep - Divide chicken, pico de gallo, rice and toppings into meal prep containers.-Tip: separate cold toppings like avocado, lime wedges and lettuce into Ziploc bags or stasher bags to keep fresh before eating.

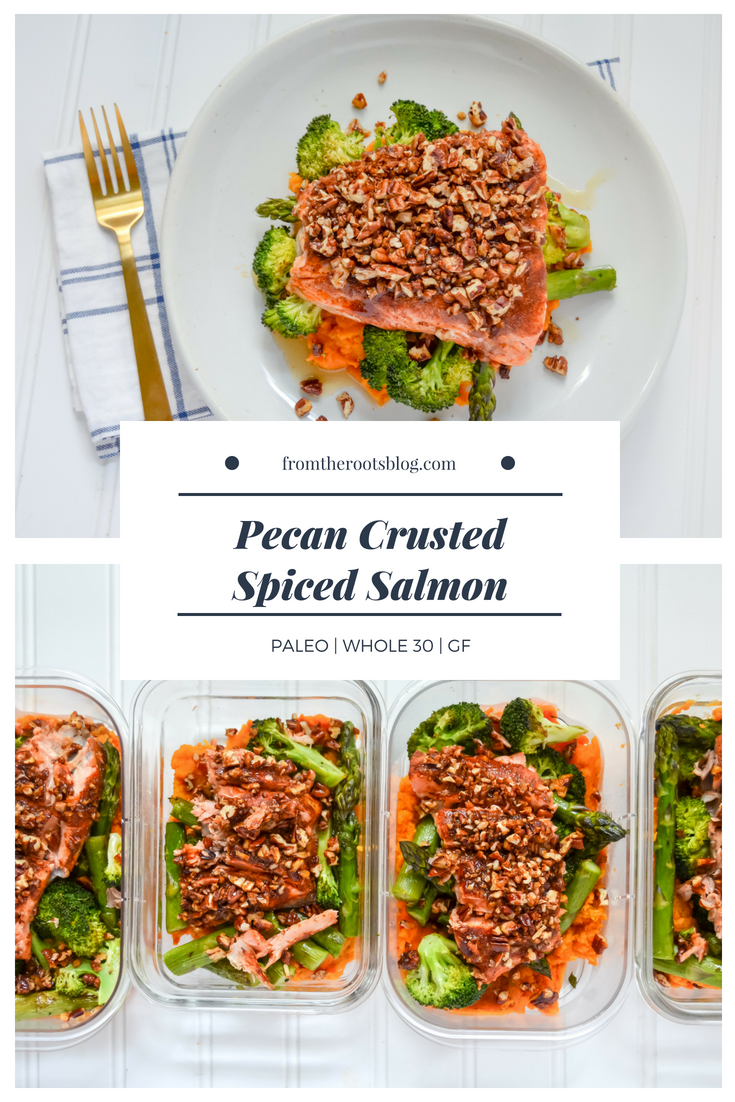
Pecan Crusted Spiced Salmon
Ever since Katie Lee from the Kitchen on Food Network made brown sugar spiced salmon, I have been obsessed with the concept! The salmon looks professional and complex yet super easy to make.
The only thing stopping me from eating it so much is that it calls for ½ cup of brown sugar! That’s why I recreated this recipe using coconut sugar instead of brown sugar while also adding pecans for texture and crunch.
Pecan crusted spiced salmon is loaded with flavor, juicy and oh so tasty! This salmon is great for a quick dinner or lunch meal prep!
Ever since Katie Lee from the Kitchen on Food Network made brown sugar spiced salmon, I have been obsessed with the concept! The salmon looks professional and complex yet super easy to make.
The only thing stopping me from eating it so much is that it calls for ½ cup of brown sugar! That’s why I recreated this recipe using coconut sugar instead of brown sugar while also adding pecans for texture and crunch.

I usually pair the salmon with sweet potatoes because the caramelized pecans complement the flavor and texture of the sweet potato. It’s also great to make this for lunch or for your meal prep as the dish is filled with healthy fats, protein, and complex carbohydrates to keep you satisfied and full of energy!

If you are incorporating this recipe into your meal prep, I would recommend eating the salmon at least two days after it has been cooked. If you are anything like me, I like to have my salmon cooked on the raw side so fewer days in the fridge is best!

To make this into a lunch/dinner meal prep: simply boil two peeled sweet potatoes until mushy. Add salt and pepper to your potatoes. Next, saute the rest of your vegetables until halfway cooked through with salt and pepper. Assemble by adding mashed sweet potatoes, vegetables and salmon on top. Enjoy!

If you try this recipe, let us know! Leave a comment, rate it, and don’t forget to tag a photo to #fromtherootsblog on Instagram. We love seeing what you come up with!
Pecan crusted spiced salmon is loaded with flavor, juicy and oh so tasty! This salmon is great for a quick dinner or lunch meal prep!
ingredients
1 lb fresh salmon
1/2 cup chopped pecans
2 Tbsp coconut sugar
1/2 tsp smoked paprika
1/2 tsp salt
1/2 tsp garlic powder
1/4 tsp cinnamon
1/4 tsp pepper
directions
Sprinkle seasonings on the pink side of the salmon.
Add oil to a pan on medium-high heat. When hot, place seasoning side down on the skillet and cook for 5 minutes.
Add salt and pepper to season the skin part of the salmon and flip.
Mix sugar and pecans and sprinkle the mixture on top of the salmon. Cover with a lid and set the temperature to low-medium and cook for 5-10 minutes or until desired pink and the sugar has melted.
*If the coconut sugar has not caramelized, place the skillet in the oven with the broiler on low. Cook for 1-2 minutes but make sure you keep an eye on it!
Let cool and serve with mashed sweet potatoes and steamed vegetables!
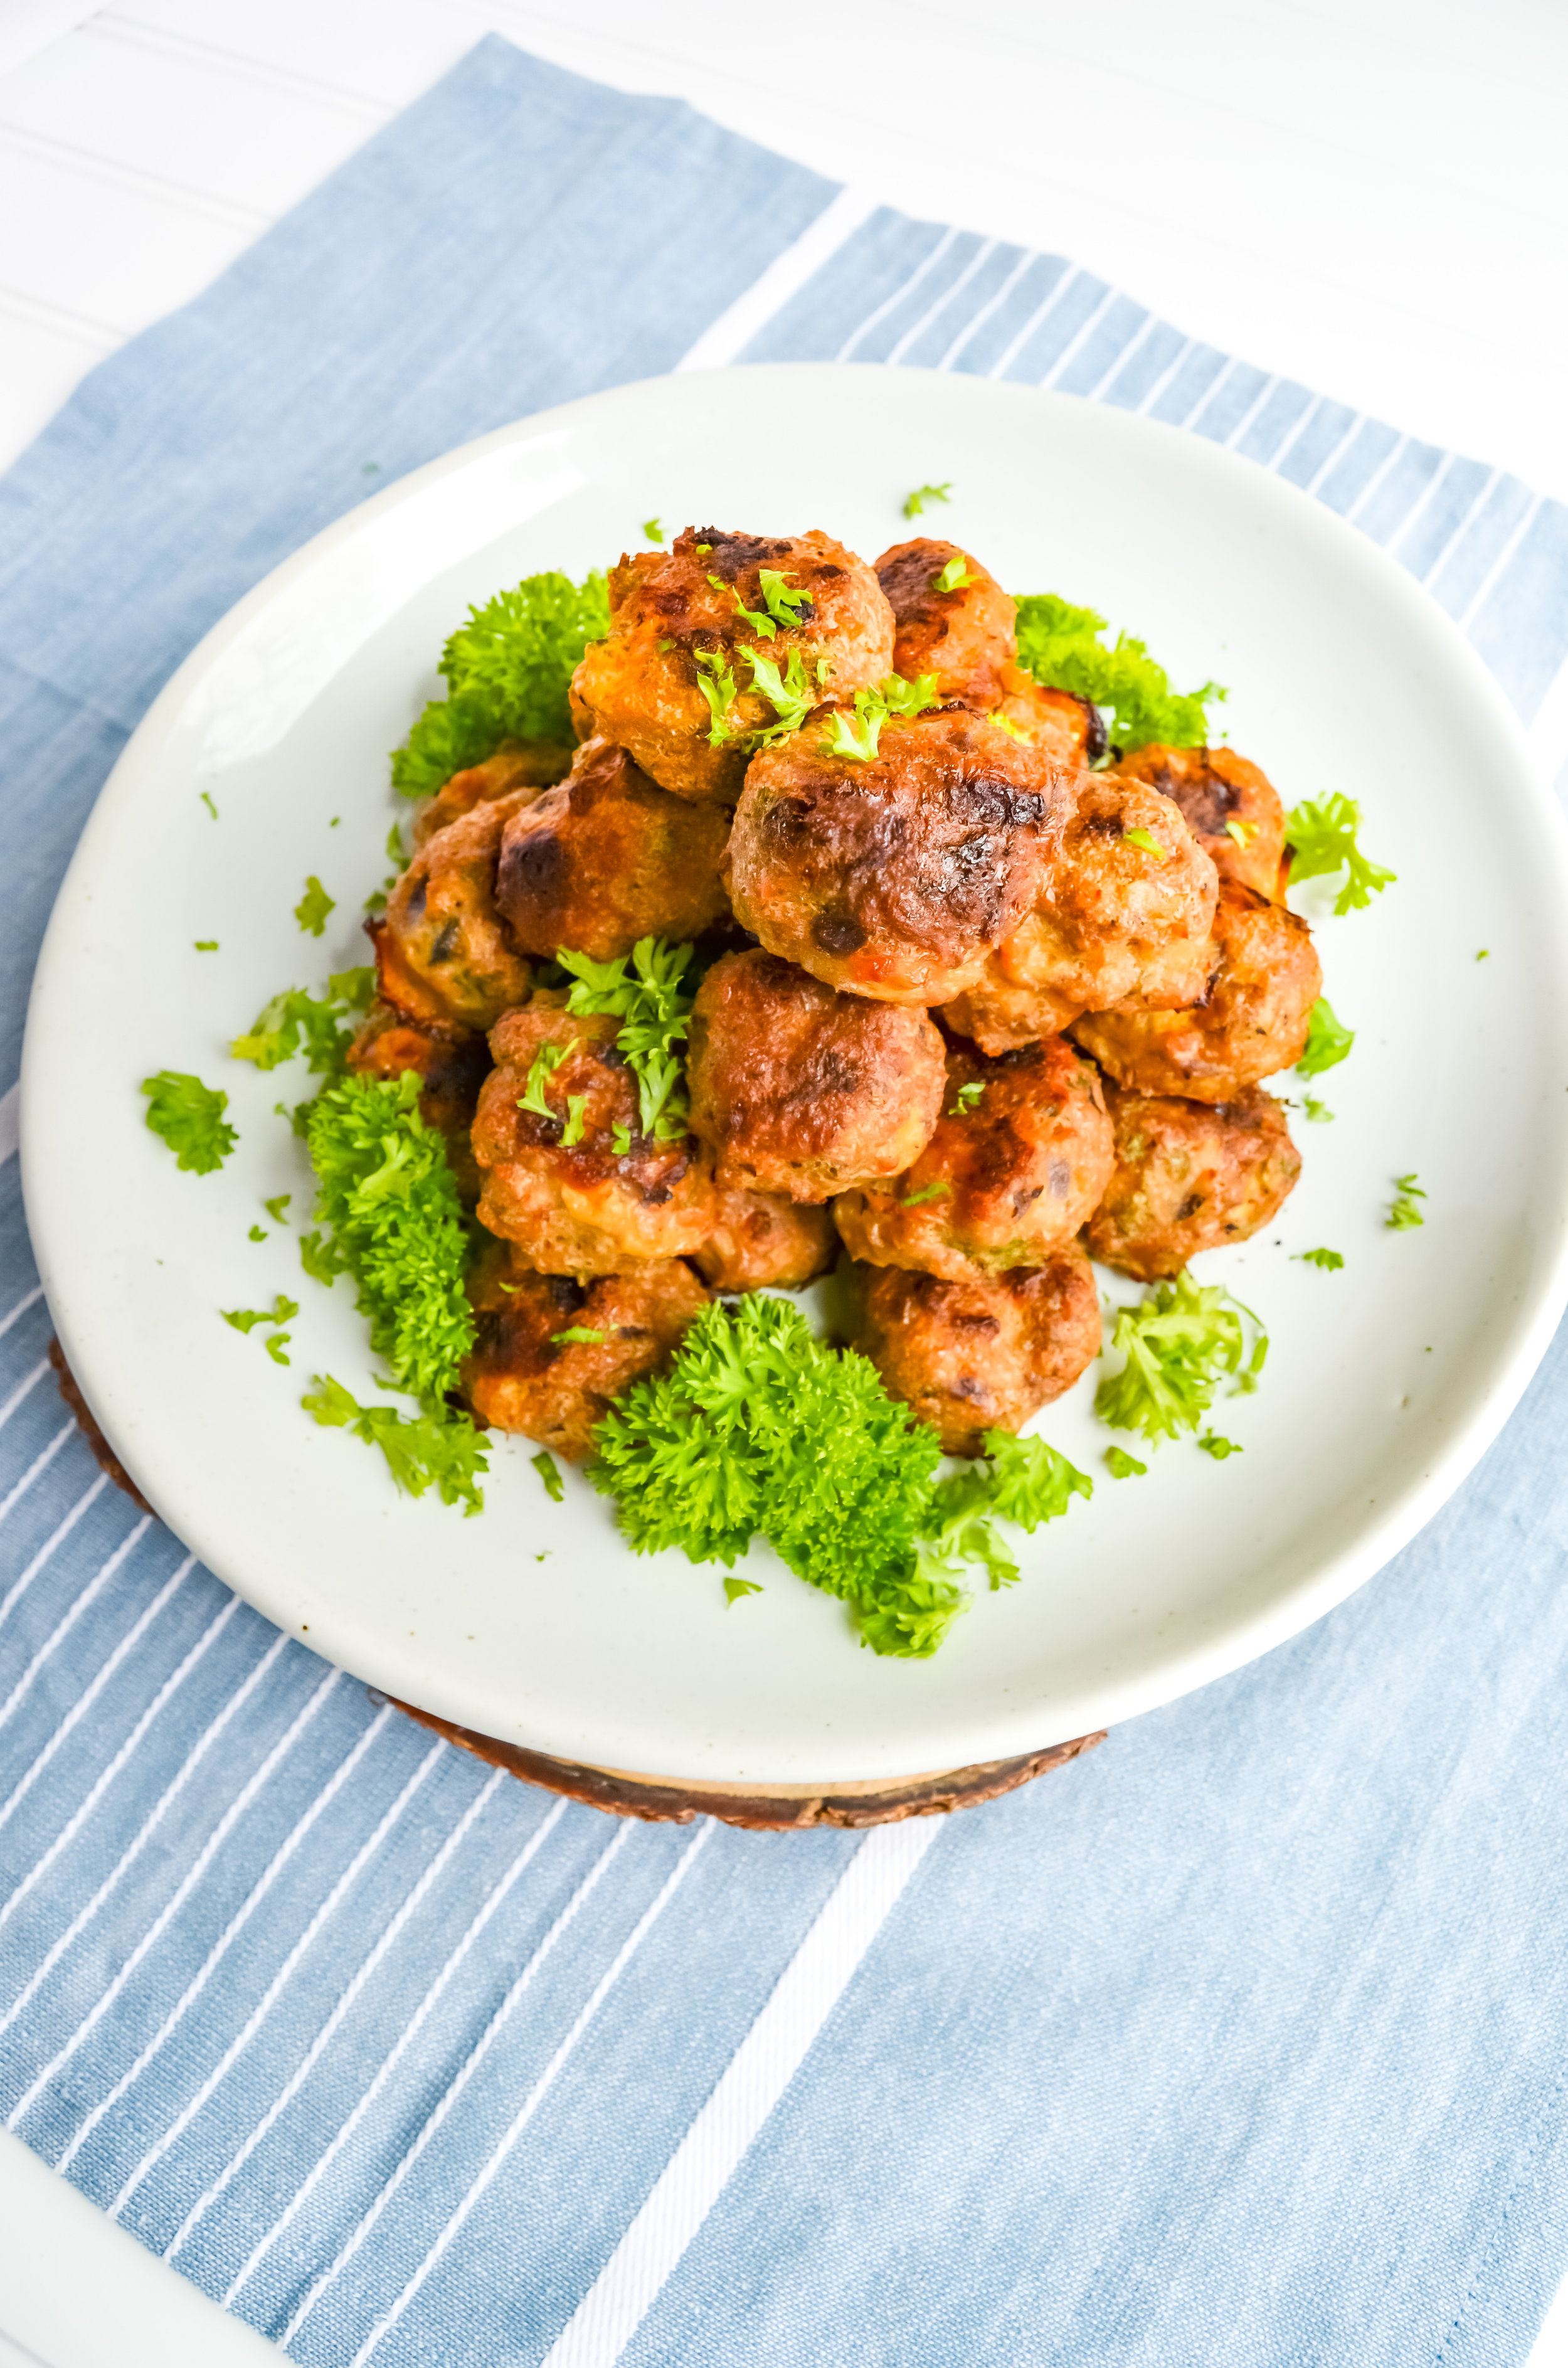
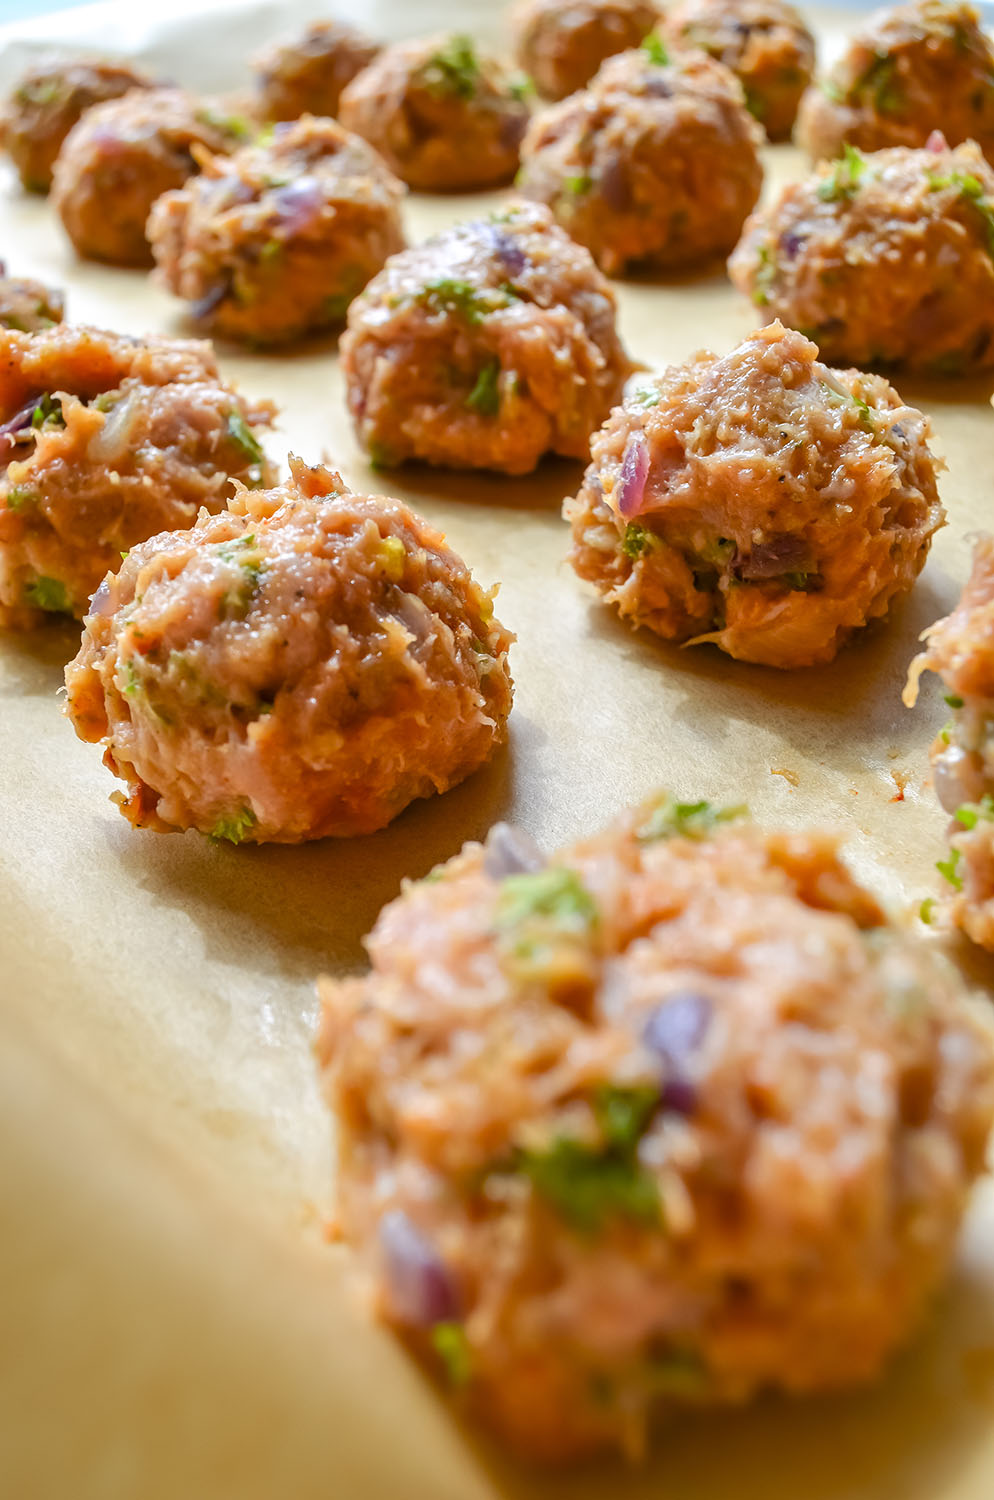
Turkey Meatballs
Turkey meatballs are one of the easiest recipes ever! I usually end up making these when I meal prep at least a few times a month… This recipe will make about a dozen meatballs, but I usually double the recipe if I decide to meal prep. I’ll make one big ol’ batch of meatballs and I am set!
Healthy baked turkey meatballs that will just melt in your mouth!

Turkey meatballs are one of the easiest recipes ever! I usually end up making these when I meal prep at least a few times a month… This recipe will make about a dozen meatballs, but I usually double the recipe if I decide to meal prep. I’ll make one big ol’ batch of meatballs and I am set!

You’ll see that I often choose to use ground turkey instead of beef. I prefer using ground turkey because it’s inexpensive, lean, and can be easily influenced flavor-wise based on the number of spices and herbs you put into it.

Since ground turkey is naturally mild in flavor, spices and herbs are key to making a juicy and tender meatball. For this recipe, everyday spices and herbs like parsley, coriander, and ground mustard are incorporated to create a classic meatball that can be used in all kinds of recipes, whether it’s for your basic spaghetti and meatballs, or as an appetizer for a large party. I choose to bake the meatballs rather than pan fry to make them a healthier option. I also find that baking them saves me time because I don’t have to keep a close watch, endlessly worrying if I’m burning them!

If you are wanting to make these turkey meatballs for your meal prep, consider adding them to 100% whole wheat pasta, bean-based pasta, or zoodles! Simply spiralize zucchini to create noodles, add your meatballs, and top it all off with some organic no-sugar-added pasta sauce and cooked mushrooms. Before I seal my meal prep containers, I like to sprinkle some nutritional yeast on top to provide a cheesy flavor component!


Tips for making your meatballs super moist:
Make sure each meatball are equal in size to ensure they cook evenly.
Fresh herbs are best! Using dry parsley will not provide the same amount of flavor compared to fresh parsley; trust me, it’s a game changer!
Don’t overmix! Since ground turkey is a leaner meat, overmixing your ingredients can make the meatballs tough. I prefer using my hands to mix the ingredients.
Want to make these turkey meatballs ahead of time for an event? Freeze them! To freeze the turkey meatballs, follow the recipe as normal and then let them cool. Once cooled, add meatballs to a freezer Ziploc bag and store them in the freezer for up to one month. You can thaw them by moving them to the refrigerator. You could reheat the meatballs by microwave, but I prefer using the oven by setting it to 375 degrees and baking the meatballs for about 15 to 20 minutes.

If you try this recipe, let us know! Leave a comment, rate it, and don’t forget to tag a photo with #fromtherootsblog on Instagram. We love seeing what you come up with!
Healthy baked turkey meatballs that will just melt in your mouth!
INGREDIENTS
1 lb ground turkey
2 eggs
1/2 cup gluten free breadcrumbs (I use the Schar brand)
Small handful fresh curly leaf parsley (finely chopped)
Half small red onion
Squeeze ½ lemon
4 cloves garlic (finely minced)
1 Tbsp coconut oil
1 tsp smoked paprika
1 tsp ground pepper
1 tsp coriander
1 tsp ground mustard
1 tsp salt
DIRECTIONS
Preheat oven to 375 degrees.
Place coconut oil in a skillet over medium-high heat. Cook garlic and onions until aromatic and the onions are translucent.
Place all the ingredients into a large bowl along with the cooked onions and garlic.
Using your hands, mix ingredients until fully incorporated but remember to not overmix.
Form meatball mixture into golf-sized balls. You can use a cookie scooper to help you measure out the mixture.
Line a baking sheet with parchment paper and place meatballs on top.
Bake for 25-30 minutes and then flip them for an additional 10 minutes or until fully cooked, reaching an internal temperature of 165 degrees.
NOTES
This recipe makes about 12-16 meatballs. Consider doubling the recipe if you are meal prepping!
Glass containers for meal prep

Classic Healthy Chicken Salad
Make your busy life manageable with this quick and healthy classic chicken salad that is sure to fill you up and save you time and money!When I worked at a spa in West Georgia, I would grab lunch at Chicken Salad Chick and get their amazing chicken salad that was quick and super refreshing. Sometimes, I would indulge and get the not-so-healthy chicken salad options. Nonetheless, everything was amazing and I miss it dearly! Now that I live in Kentucky where unfortunately Chicken Salad Chicken does not exist, I make my own chicken salad at home, saving time and money. With this recipe, all is good in the world!
My healthy take on the classic chicken salad is loaded with nutrient dense fruits and veggies as well as healthy fats that will keep you full all day long without weighing you down!

Make your busy life manageable with this quick and healthy classic chicken salad that is sure to fill you up and save you time and money!When I worked at a spa in West Georgia, I would grab lunch at Chicken Salad Chick and get their amazing chicken salad that was quick and super refreshing. Sometimes, I would indulge and get the not-so-healthy chicken salad options. Nonetheless, everything was amazing and I miss it dearly! Now that I live in Kentucky where unfortunately Chicken Salad Chicken does not exist, I make my own chicken salad at home, saving time and money. With this recipe, all is good in the world!


My healthy take on the classic chicken salad is loaded with nutrient dense fruits and veggies as well as healthy fats that will keep you full all day long without weighing you down!There are many ways to prepare chicken salad, but for this recipe, I have found that red onions, carrots, granny smith apples, sunflower seeds, and grapes are the perfect classic combination. As far as seasonings go, I keep it simple but use fresh herbs like dill and smoked paprika which I believe separates my classic chicken salad from the rest!
You can use whatever creamy component you prefer depending on your allergies/preferences. I have tested this recipe with avocados, vegan mayonnaise, and greek yogurt, so you are good on all fronts if you would like to change things up. Additionally, you can either shred the chicken or dice them. I prefer dicing as it saves a little bit of time and I appreciate the texture. Now, onto the recipe!
This recipe makes 4-6 servings and is a good choice if you want to meal prep it for the week. I like to use chicken salad for sandwiches, pairing it with tomato slices, mixed greens, alfalfa sprouts, and pickles on 100% whole grain bread. You can also add it to a salad or even have it as a snack with crackers!
If you try this recipe, let us know! Leave a comment, rate it, and don’t forget to tag a photo with #fromtherootsblog on Instagram. We love seeing what you come up with!
My healthy take on the classic chicken salad is loaded with nutrient dense fruits and veggies as well as healthy fats that will keep you full all day long without weighing you down!
INGREDIENTS
1 lb boneless skinless chicken breast
1 Tbsp coconut oil
1 Tbsp poultry and citrus seasoning
1/2 lemon with zest
1/2 small red onion (diced)
1/2 granny smith apple (diced)
1 cup fresh dill (chopped) (less or more depending on preference)
2 carrots (shredded)
1/4 cup raw sunflower seeds
1/2 cup grapes (halved)
1 tsp smoked paprika
1 tsp garlic powder
1/2 cup vegan mayonnaise (I use Primal Kitchen or Just Mayo) (or use greek yogurt or ripe avocado)
Garnish
Micro greens, pickles, alfalfa sprouts, mixed greens, slices of tomato
DIRECTIONS
Heat 1 Tbsp coconut oil in a skillet over medium-high heat. Prep chicken by seasoning with poultry and citrus seasoning and s&p.
Grill chicken on both sides for about 3-5 minutes or until brown and completely cooked through. Remove chicken from skillet; let chicken rest and cool.
Add the remainder of the ingredients to a large bowl.
Dice chicken after it has cooled (or shred with two forks if you prefer!)
Add chicken to large bowl with the rest of the ingredients and mix until fully combined.
Store in an airtight container and keep in the fridge for up to one week.
NOTES
If you are using avocados in place of mayonnaise, the fridge life will be shorter as avocados brown in the fridge.
You can cut down the time to make this salad even faster by using rotisserie chicken instead of grilling chicken as well as purchase pre-shredded carrots instead of shredding by hand.
I have recently noticed that Walmart does not carry the organic poultry and citrus seasoning anymore so I have used this brand instead.
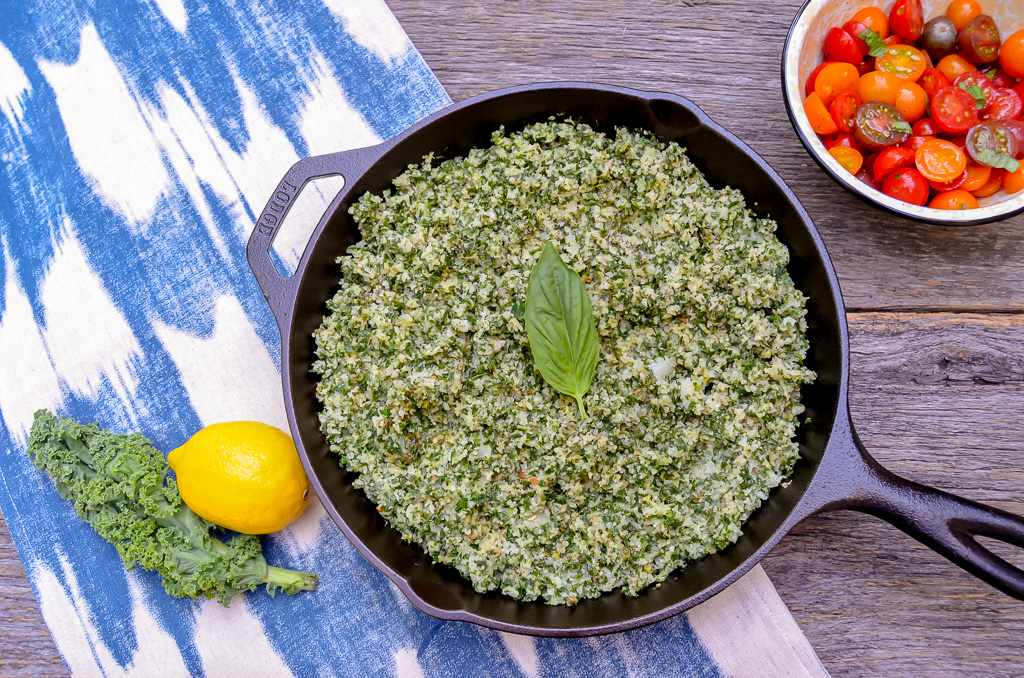
Kale and Pesto Cauliflower Rice
Cauliflower rice has become the new “it” vegetable. Not a day goes by where I don’t see a new cauliflower rice recipe being passed around by all the low-carb, veggie lovers. Even though it may seem like a trend, I am not so sure it will fade away anytime soon. I believe cauliflower rice is here to stay and I am perfectly okay with that! It has become a staple for my dinners as it lowers my carb intake. I also use cauliflower rice when I batch cook since it is so easy to prepare!
Cauliflower rice is cooked with kale and pesto for a low carb, gluten-free, easy and healthy dish!


Cauliflower rice has become the new “it” vegetable. Not a day goes by where I don’t see a new cauliflower rice recipe being passed around by all the low-carb, veggie lovers. Even though it may seem like a trend, I am not so sure it will fade away anytime soon. I believe cauliflower rice is here to stay and I am perfectly okay with that! It has become a staple for my dinners as it lowers my carb intake. I also use cauliflower rice when I batch cook since it is so easy to prepare!

So, what’s with the hype for this smelly vegetable? Here are some quick facts about cauliflower:
Cauliflower ranks one of the highest powerhouse vegetables according to the Centers for the Disease Control and Prevention’s Aggregate Nutrient Density Index (Ranks food based on nutrient content in relation to calorie total.)
The entire cauliflower (florets, leaves, and stalks) are edible!
Just one cup of cooked cauliflower can provide 73% of your daily recommended amount of vitamin C.
Great source of fiber!
Despite knowing how healthy it is to eat cauliflower, the taste sometimes discourages me from eating it. There is just something about the taste of plain cauliflower that my taste buds do not agree with which is why I have created this recipe in such a way that adds zest and boosts the nutritional value. The wonderful thing about cauliflower is that it’s a vegetable that will take on whatever flavor you add. In this cauliflower rice recipe, I have combined it with my quick and easy 5 ingredient pesto sauce. Kale is used to amp up the veggie and fiber intake, and finally, I add lemon to complement the pesto sauce and bring out the savory taste of kale.
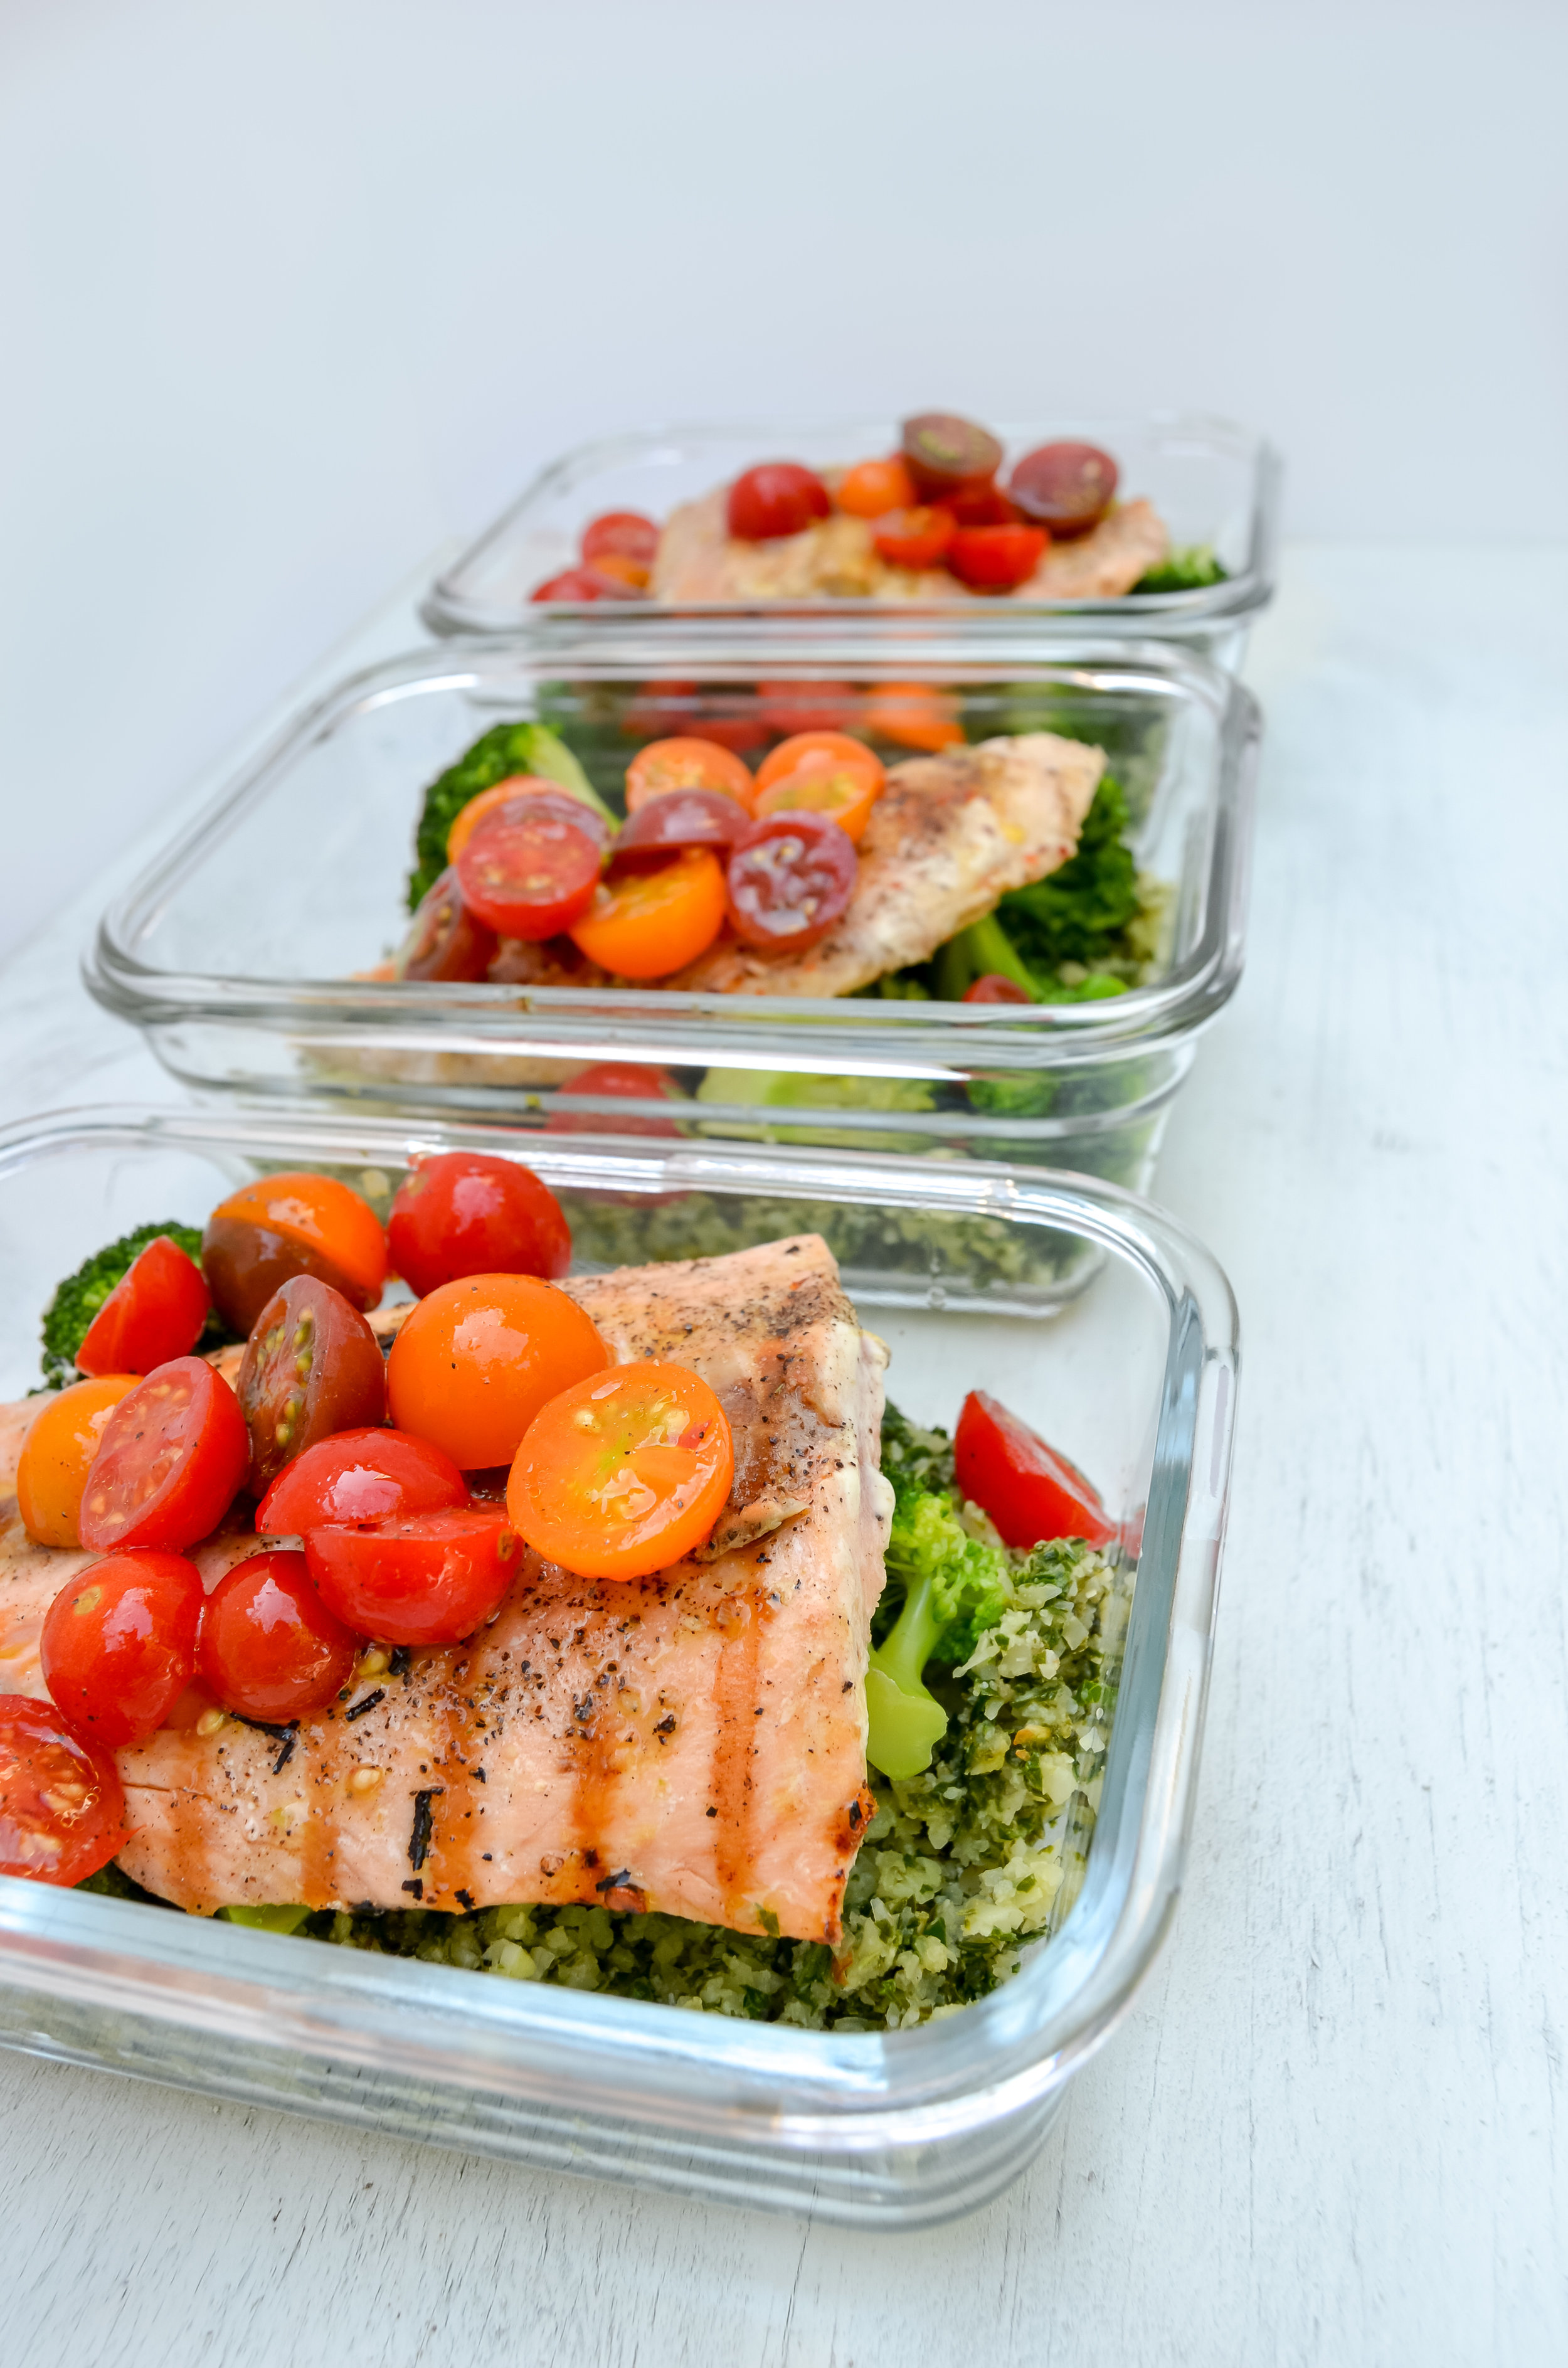
You can use cauliflower rice to substitute your typical heavy carb sides. Here, I have made kale and pesto cauliflower rice for dinner along with grilled chicken, roasted cherry tomatoes, and steamed broccoli.

Cauliflower rice is so easy and quick to make that I often prepare it when I batch cook on Sundays!

If you try this recipe, let us know! Leave a comment, rate it, and don’t forget to tag a photo with #fromtherootsblog on Instagram. We love seeing what you come up with!
Cauliflower rice is cooked with kale and pesto for a low carb, gluten-free, easy and healthy dish!
INGREDIENTS
1 cauliflower head ((or 16 oz bag frozen cauliflower rice))
1 large bunch fresh kale ((stem out))
1-3 Tbsp pesto (less or more depending on preference)
1 tsp coconut oil
1/2 lemon
DIRECTIONS
Begin by bringing about ¼ inch of water to a boil in a large frying pan.
Add ½ tsp fine sea salt and cauliflower florets* (or frozen cauliflower rice)
Cover and steam for about 3-8 minutes until desired tenderness
Drain the cauliflower rice and add back to the frying pan with 1 tsp of coconut oil on medium-high heat. Cook for about 5 minutes.
Add kale, pesto sauce, and S&P. Stir and cook for about 5-10 minutes until rice is crispy, kale has wilted and rice is fully coated with pesto sauce.
Take off heat and garnish with freshly squeezed lemon.
NOTES
*If using fresh cauliflower, cut into florets and then briefly pulse in the food processor until they are the size of grains of rice.
This recipe will make four servings. With that in mind, if you would like to use this in meal prep, divide up your protein, roasted cherry tomatoes with avocado oil and basil, and steamed broccoli.