Sort by Category
- October 2025
- September 2025
- August 2025
- June 2025
- August 2024
- July 2024
- June 2024
- May 2024
- February 2024
- January 2024
- December 2023
- November 2023
- October 2023
- September 2023
- August 2023
- July 2023
- March 2023
- February 2023
- January 2023
- December 2022
- November 2022
- October 2022
- September 2022
- August 2022
- June 2022
- May 2022
- April 2022
- March 2022
- February 2022
- January 2022
- December 2021
- November 2021
- October 2021
- September 2021
- August 2021
- July 2021
- June 2021
- May 2021
- April 2021
- March 2021
- February 2021
- January 2021
- December 2020
- November 2020
- October 2020
- September 2020
- August 2020
- July 2020
- June 2020
- May 2020
- April 2020
- March 2020
- February 2020
- January 2020
- December 2019
- November 2019
- October 2019
- September 2019
- August 2019
- July 2019
- June 2019
- May 2019
- April 2019
- March 2019
- February 2019
- January 2019
- December 2018
- November 2018
- October 2018
- September 2018
- August 2018
- July 2018
- June 2018
- May 2018
- April 2018
- March 2018
- February 2018

Protein Breakfast Biscuits
Finding fun, relevant, and delicious high-protein breakfast options can be a challenge for my clients. Typically, the go-to sources of protein for breakfast are eggs, protein powder, or cottage cheese. While these are all excellent protein sources when they are of high quality, it's understandable that people want to switch things up now and then. This is especially true for my clients who want to honor their southern roots while also eating healthily.
That is why I have come up with this high protein breakfast biscuit that ticks all the boxes!
These delectable turkey high-protein breakfast biscuits pack an impressive 20g of protein per serving. Moreover, they are gluten-free, dairy-free, and grain-free, making them an excellent choice for individuals with dietary restrictions.

Finding fun, relevant, and delicious high-protein breakfast options can be a challenge for my clients. Typically, the go-to sources of protein for breakfast are eggs, protein powder, or cottage cheese. While these are all excellent protein sources when they are of high quality, it's understandable that people want to switch things up now and then. This is especially true for my clients who want to honor their southern roots while also eating healthily.
That is why I have come up with this high protein breakfast biscuit that ticks all the boxes!


WHAT MAKES THESE BISCUITS PROTEIN PACKED
High-protein biscuits can be make using plain Greek yogurt, eggs, turkey sausage, almond flour, and nutritional yeast.
The recipe suggests using lactose-free plain Greek yogurt and nutritional yeast to mimic a cheddar cheese flavor for those who are lactose intolerant, but I have make suggestions in the note section to use regular plain Greek yogurt and cheddar cheese who are not lactose intolerant.


TIPS FOR PAIRING FOOD WITH PROTEIN BISCUITS
Breakfast: Eat one biscuit with a side of eggs, smoothie, side of yogurt, or cut straight in the middle and make and egg and bacon breakfast sandwich!
Snack: Great as a snack as they are macro balanced (close ratio of fats to protein to carbs).
Dinner: You can serve these biscuits alongside soup, stew or a salad.
HOW TO WARM OR REHEAT BISCUITS
Place biscuits in a warm oven or toaster oven for 5-10 minutes.
If you try this recipe, let us know! Leave a comment, rate it, and don’t forget to tag a photo to #fromtherootsblog on Instagram. We love seeing what you come up with!
Get ready to gobble up some turkey-tastic protein breakfast biscuits, packing a whopping 20g of protein per biscuit! Best of all, they're gluten-free, dairy-free, and grain-free.
Servings: 12 Prep: 5 MIN Cook time: 15 MIN
Ingredients
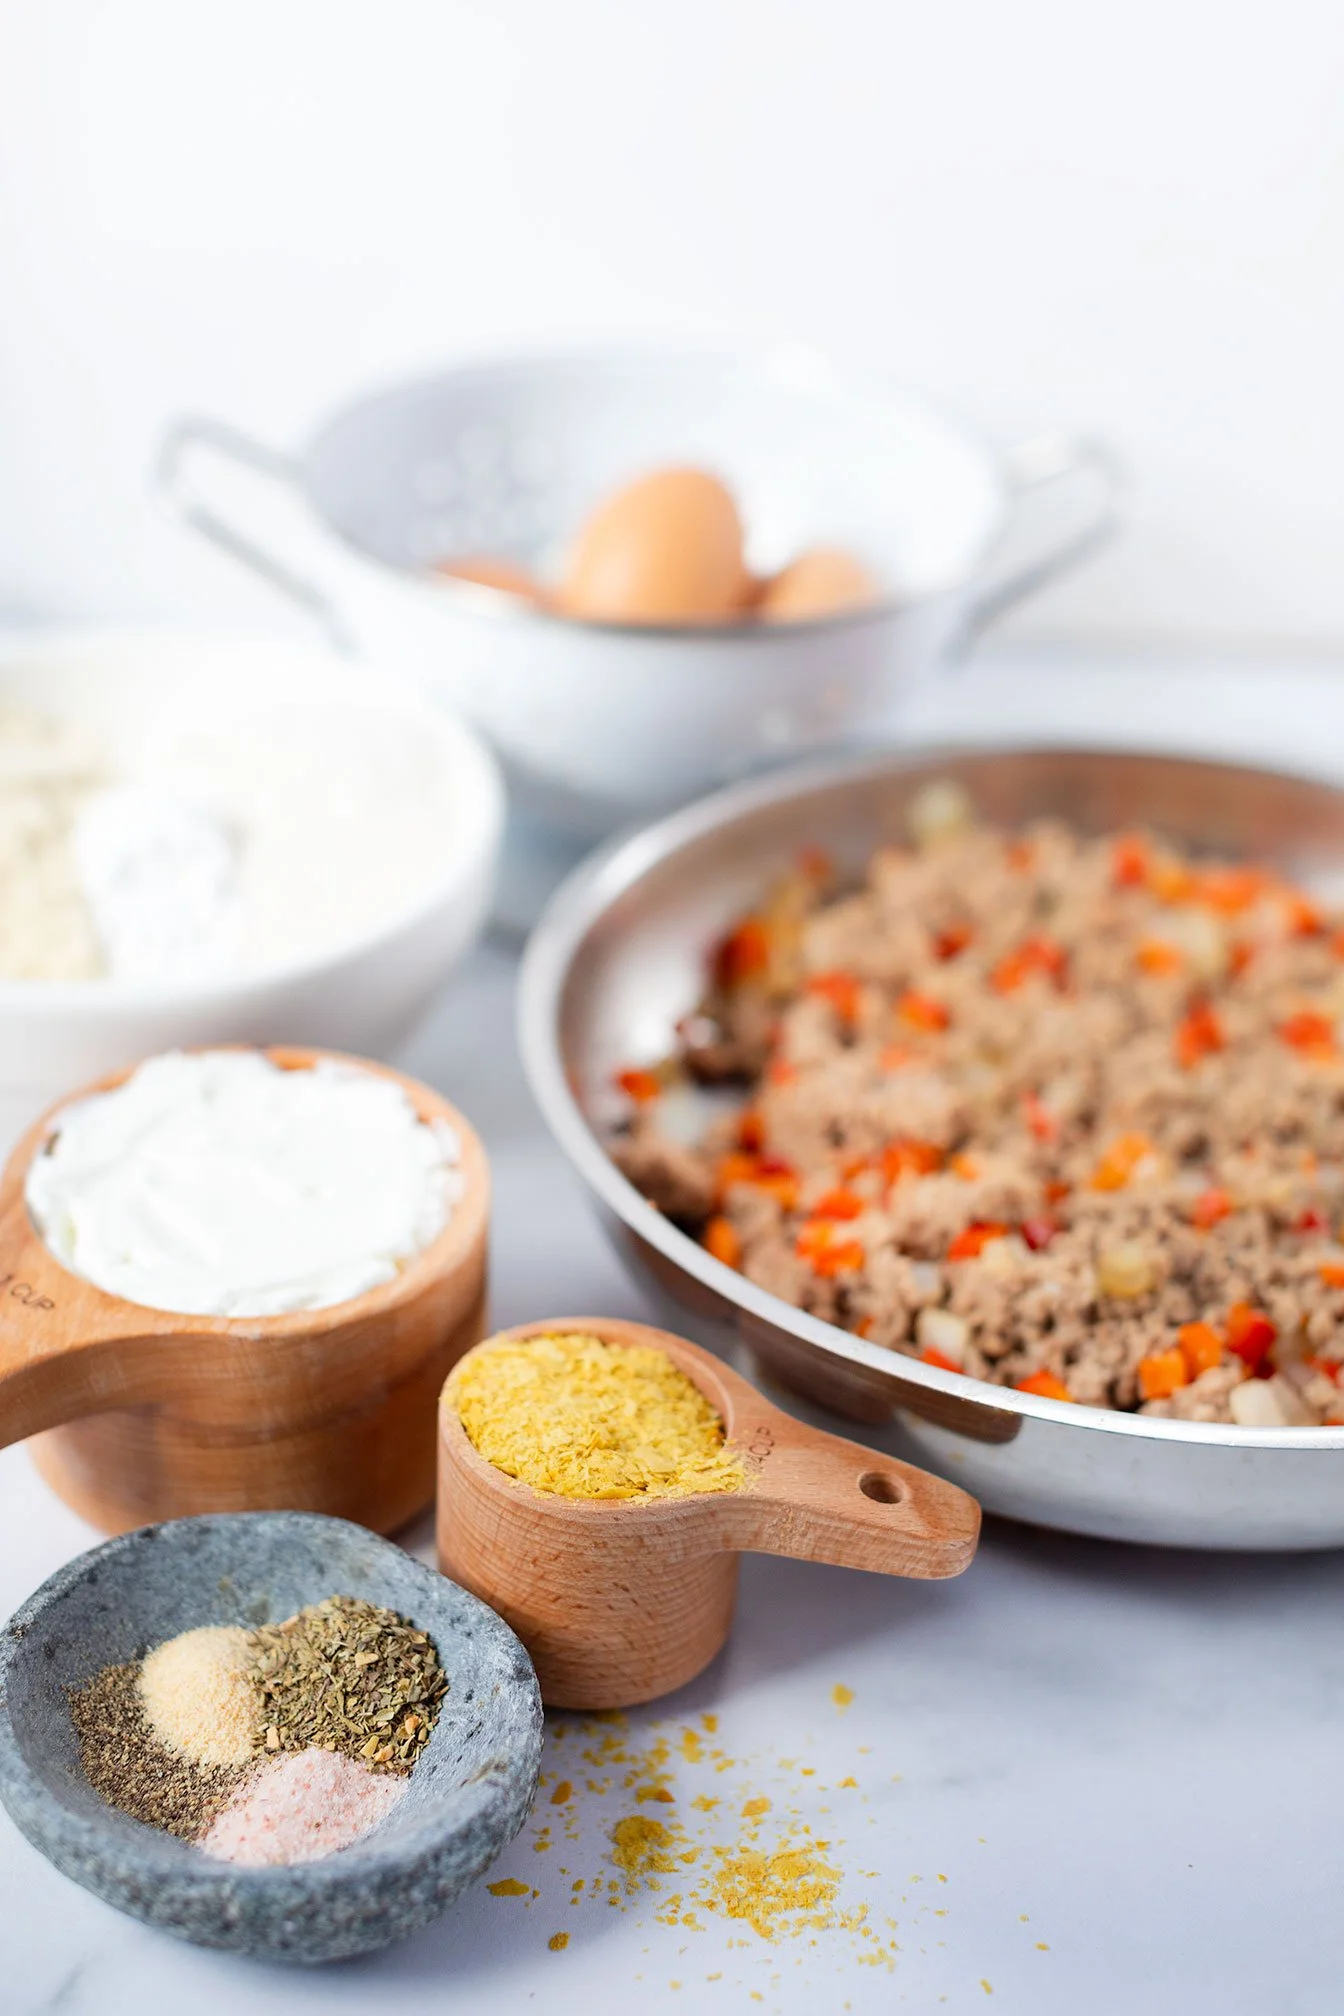
1 lb ground pork or ground turkey or chicken
6 eggs, beaten
1 cup greek yogurt
1 red bell pepper, diced
½ yellow onion, diced
1 + ½ cups almond flour
½ cup coconut flour
¼ cup nutritional yeast
2 tsp baking powder
1 tsp salt
1 tsp garlic powder
½ tsp black pepper
½ tsp Italian seasoning or thyme
Directions
Preheat oven to 400 degrees and line a baking sheet with parchment paper.
To a medium skillet, heat oil over medium heat and sauté onion and peppers for about 5 minutes. Move sauté veggies to the side and add turkey sausage to the center, crumbling the meat. Let cook, stirring and crumbling meat until meat is completely browned, for about 10 minutes. Turn heat off and let mixture to cool.
In a large mixing bowl, whisk together eggs and yogurt. Add in turkey mixture and incorporate. Add in the rest of the dry ingredients: almond and coconut flour, nutritional yeast, baking powder, and seasonings using a spatula until combined.
Using ¼ - ½ cup or large cookie scoop, make 12 evenly sized balls and place them on the sheet pan. Place in the oven for 12-16 minutes until slightly browned all over.
Remove from the oven and let cool completely before storing in an airtight container in the fridge for up to 5 days.
Notes
If you can tolerate dairy, you can sub nutritional yeast for 1 cup of cheese and top each biscuit, before going into the oven, with shredded cheese if desired.
Lactose-Free vs. Dairy-Free: This recipe was originally written with lactose-free Greek yogurt, which helps those who are lactose intolerant, but it’s not the same as being fully dairy-free. Lactose-free yogurt is still made from dairy milk — the lactose is just broken down to make it easier to digest.
Dairy-Free Option: If you need the recipe completely dairy-free, substitute with a thick plant-based yogurt. Unsweetened coconut, almond, or cashew “Greek style” yogurts work well. Make sure to choose one that’s plain and unsweetened to keep the flavor balance. If your yogurt is thinner, you can stir in 1–2 teaspoons of arrowroot or tapioca starch to thicken it up.
DIY Alternative: Blend silken tofu with 1 teaspoon lemon juice (per cup) for a protein-rich, tangy substitute.
Nutrition: Calories per biscuit: 192 | Total fat: 11g | Total carb: 8g | Dietary fiber: 4g | Sugar: 2g | Protein: 17g (nutritional facts will vary)

Homemade Ginger Ale
A refreshing twist on ginger ale: Homemade healthy version
Experience the perfect blend of sweet, spicy and refreshing flavors with this gut-friendly ginger ale. You don't have to sacrifice taste for health when it comes to this classic soda!
Do you ever find yourself craving ginger ale during a flight, even if you're not a soda person? Just me?
It could be because ginger is known to help with motion sickness.
experience the perfect blend of sweet, spicy and refreshing flavors with this gut-friendly ginger ale. You don't have to sacrifice taste for health when it comes to this classic soda!

Do you ever find yourself craving ginger ale during a flight, even if you're not a soda person? Just me?
It could be because ginger is known to help with motion sickness.
HEALTH BENEFITS OF GINGER
Ginger is more than just a tasty spice; it also offers a range of health benefits. Studies have indicated that ginger and its compounds can boost digestive activity, speed up stomach emptying, and even alleviate nausea. Ginger is an anti-inflammatory agent, which can help improve digestion, support the release of blood-pressure regulating hormones, and enhance overall wellness.
INGREDIENTS
This simple recipe only uses 4 ingredients: ginger root, lime juice, honey and sparkling water.
The carbonated soda fizz in this drink is due to the sparkling water. Even when it isn't a high-calorie beverage, the bubbles make it feel like a treat.

If you try this recipe, let us know! Leave a comment, rate it, and don’t forget to tag a photo to #fromtherootsblog on Instagram. We love seeing what you come up with!
A refreshing twist on ginger ale: Homemade healthy version
Experience the perfect blend of sweet, spicy and refreshing flavors with this gut-friendly ginger ale. You don't have to sacrifice taste for health when it comes to this classic soda!
Servings: 4-8 Prep: 10 MIN Cook time: 20 MIN
Ingredients
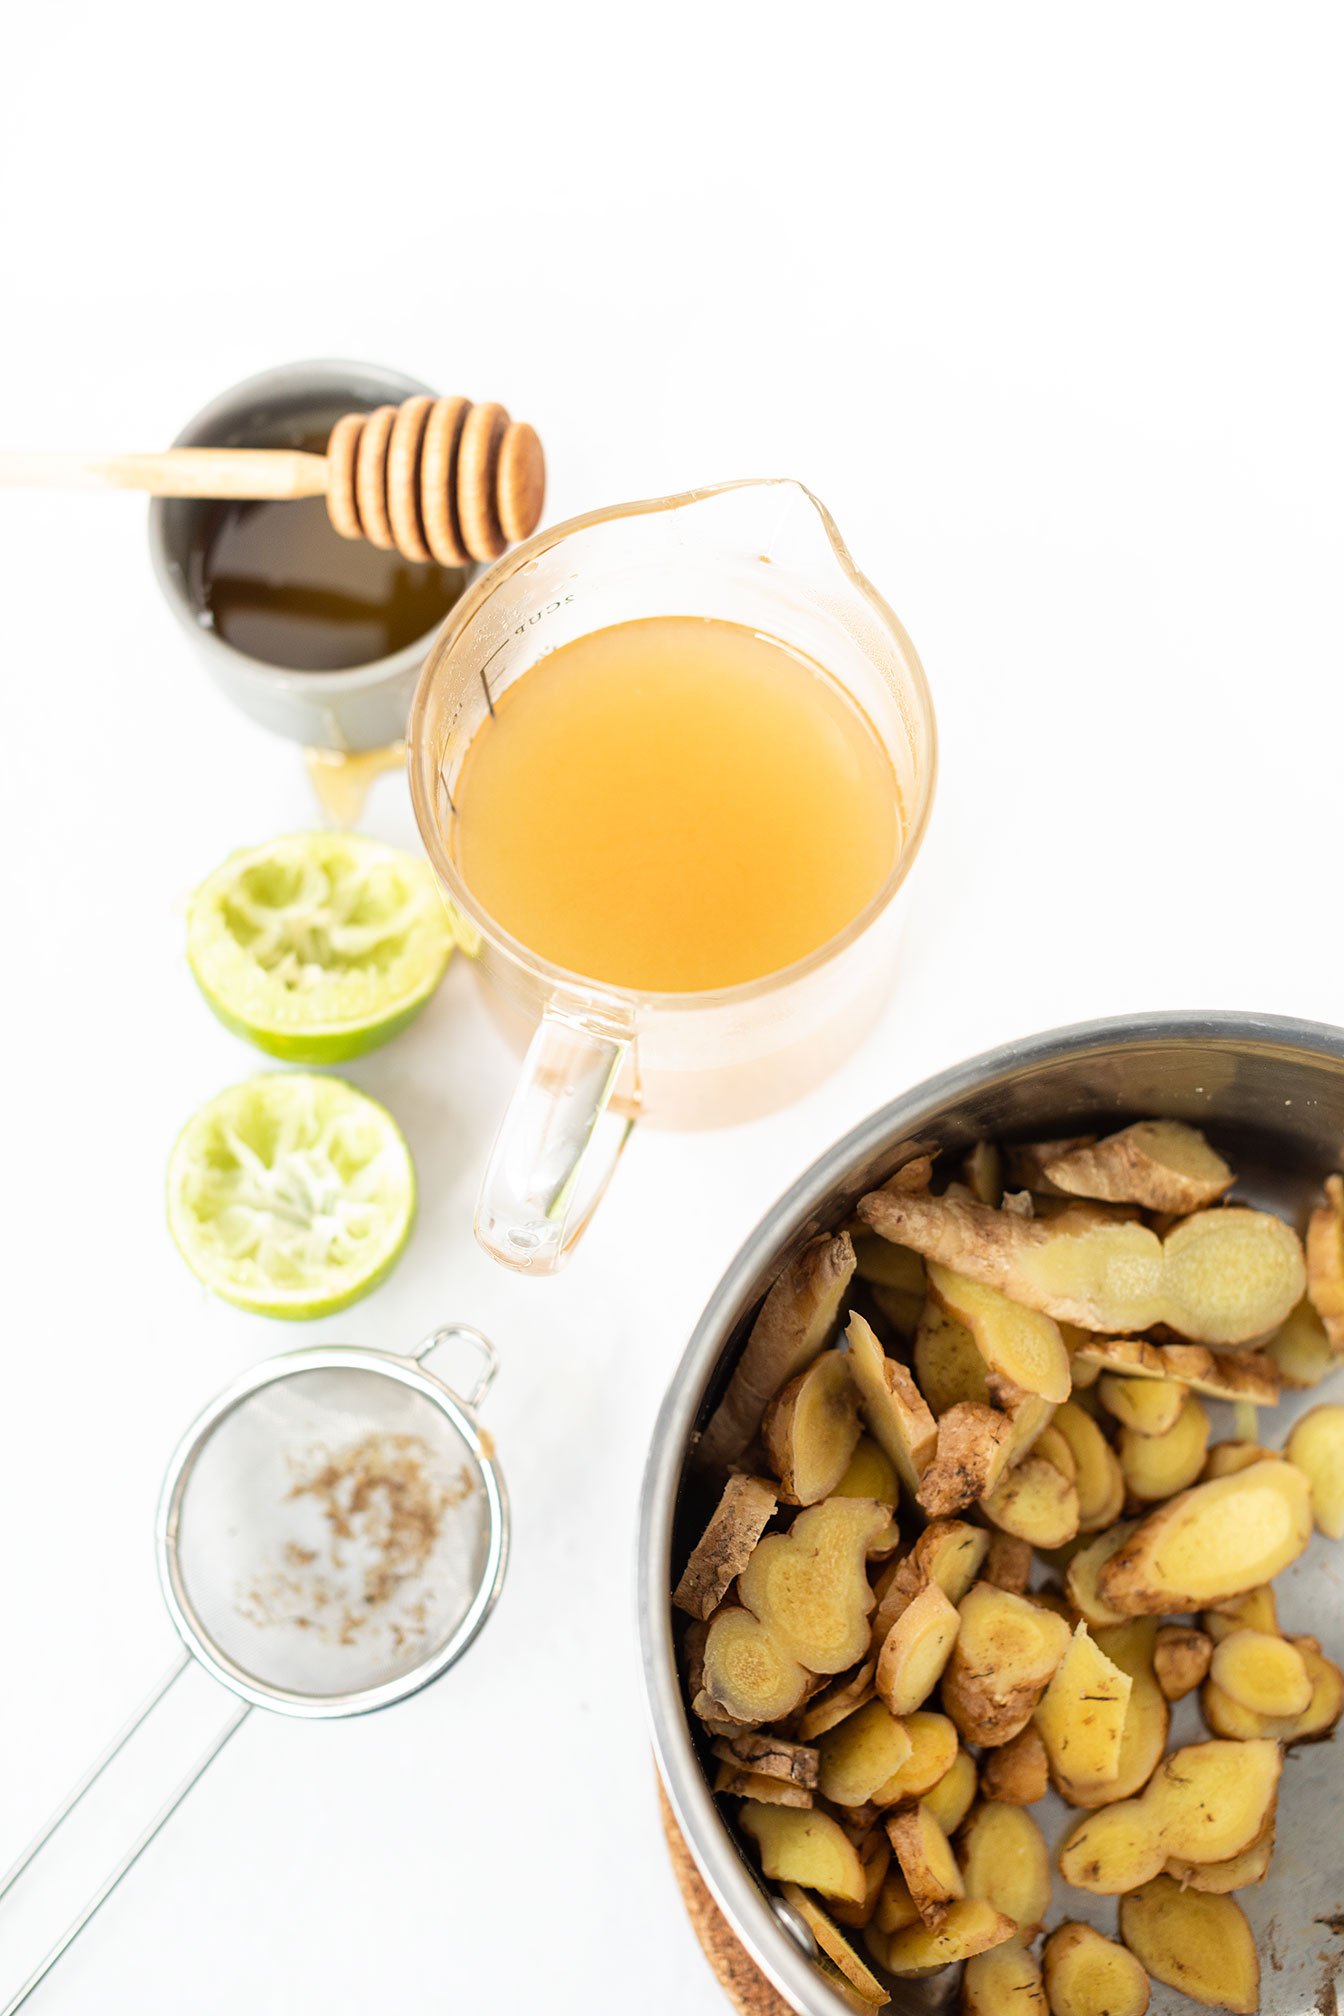
1 cup of ginger root, washed well, unpeeled and sliced
2 cups filtered water
2-4 Tbsp honey
Juice of ½-1 lime
sparkling mineral water
DIRECTIONS
To a small saucepan, add sliced ginger and water and simmer over low heat for 20 minutes.
Strain the ginger juice into a glass measuring cup. Allow it to cool for 5 minutes and then stir in the honey and lime juice.
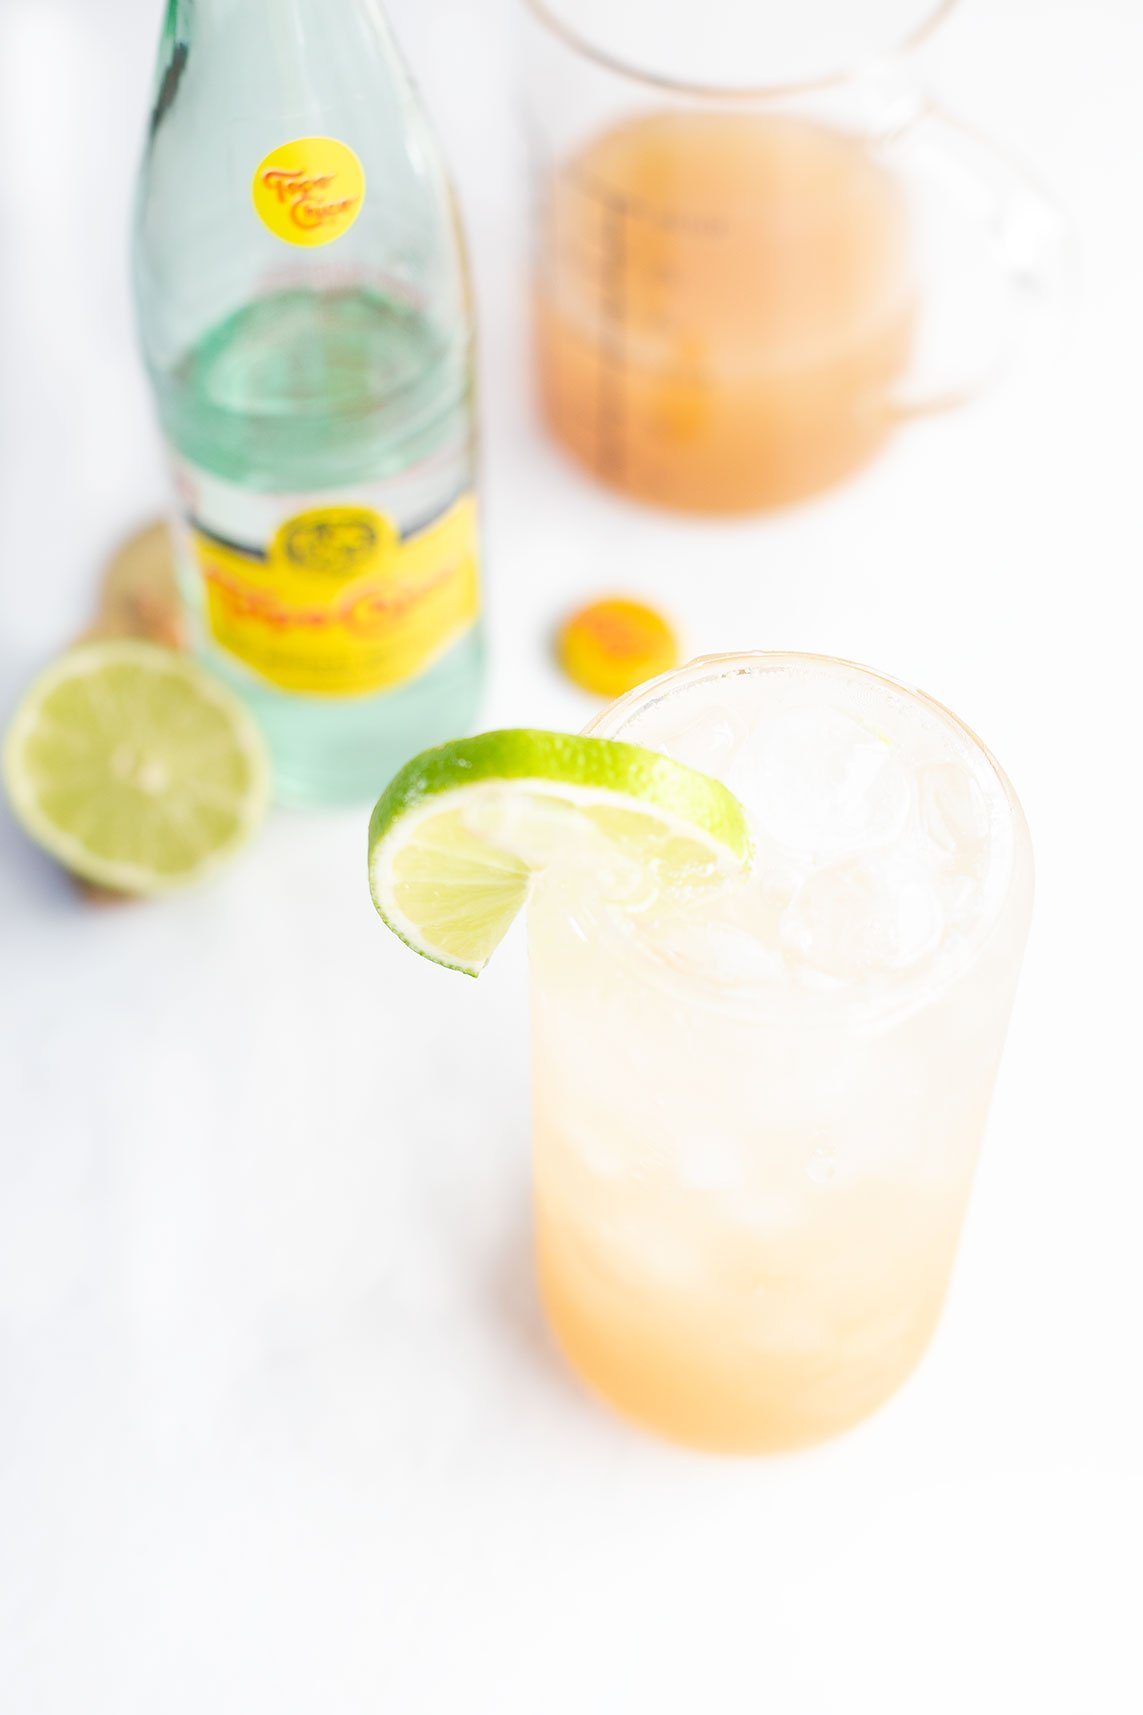
Chill for at least 30 minutes. When ready to serve, pour about 2-4 Tbsp of ginger syrup into a glass filled with ice.
Top with sparkling mineral water and mix with a glass straw or spoon.
Garnish with a lime wedge, fresh mint or ginger root and enjoy!
Notes
Are you planning to serve a beverage at an upcoming event? Here is a great tip: triple the recipe the night before, so that the syrup is ready and chilled. This not only saves time but also guarantees that the drink will be refreshingly cold. Plus, tripling the recipe ensures that everyone can have more than one glass!

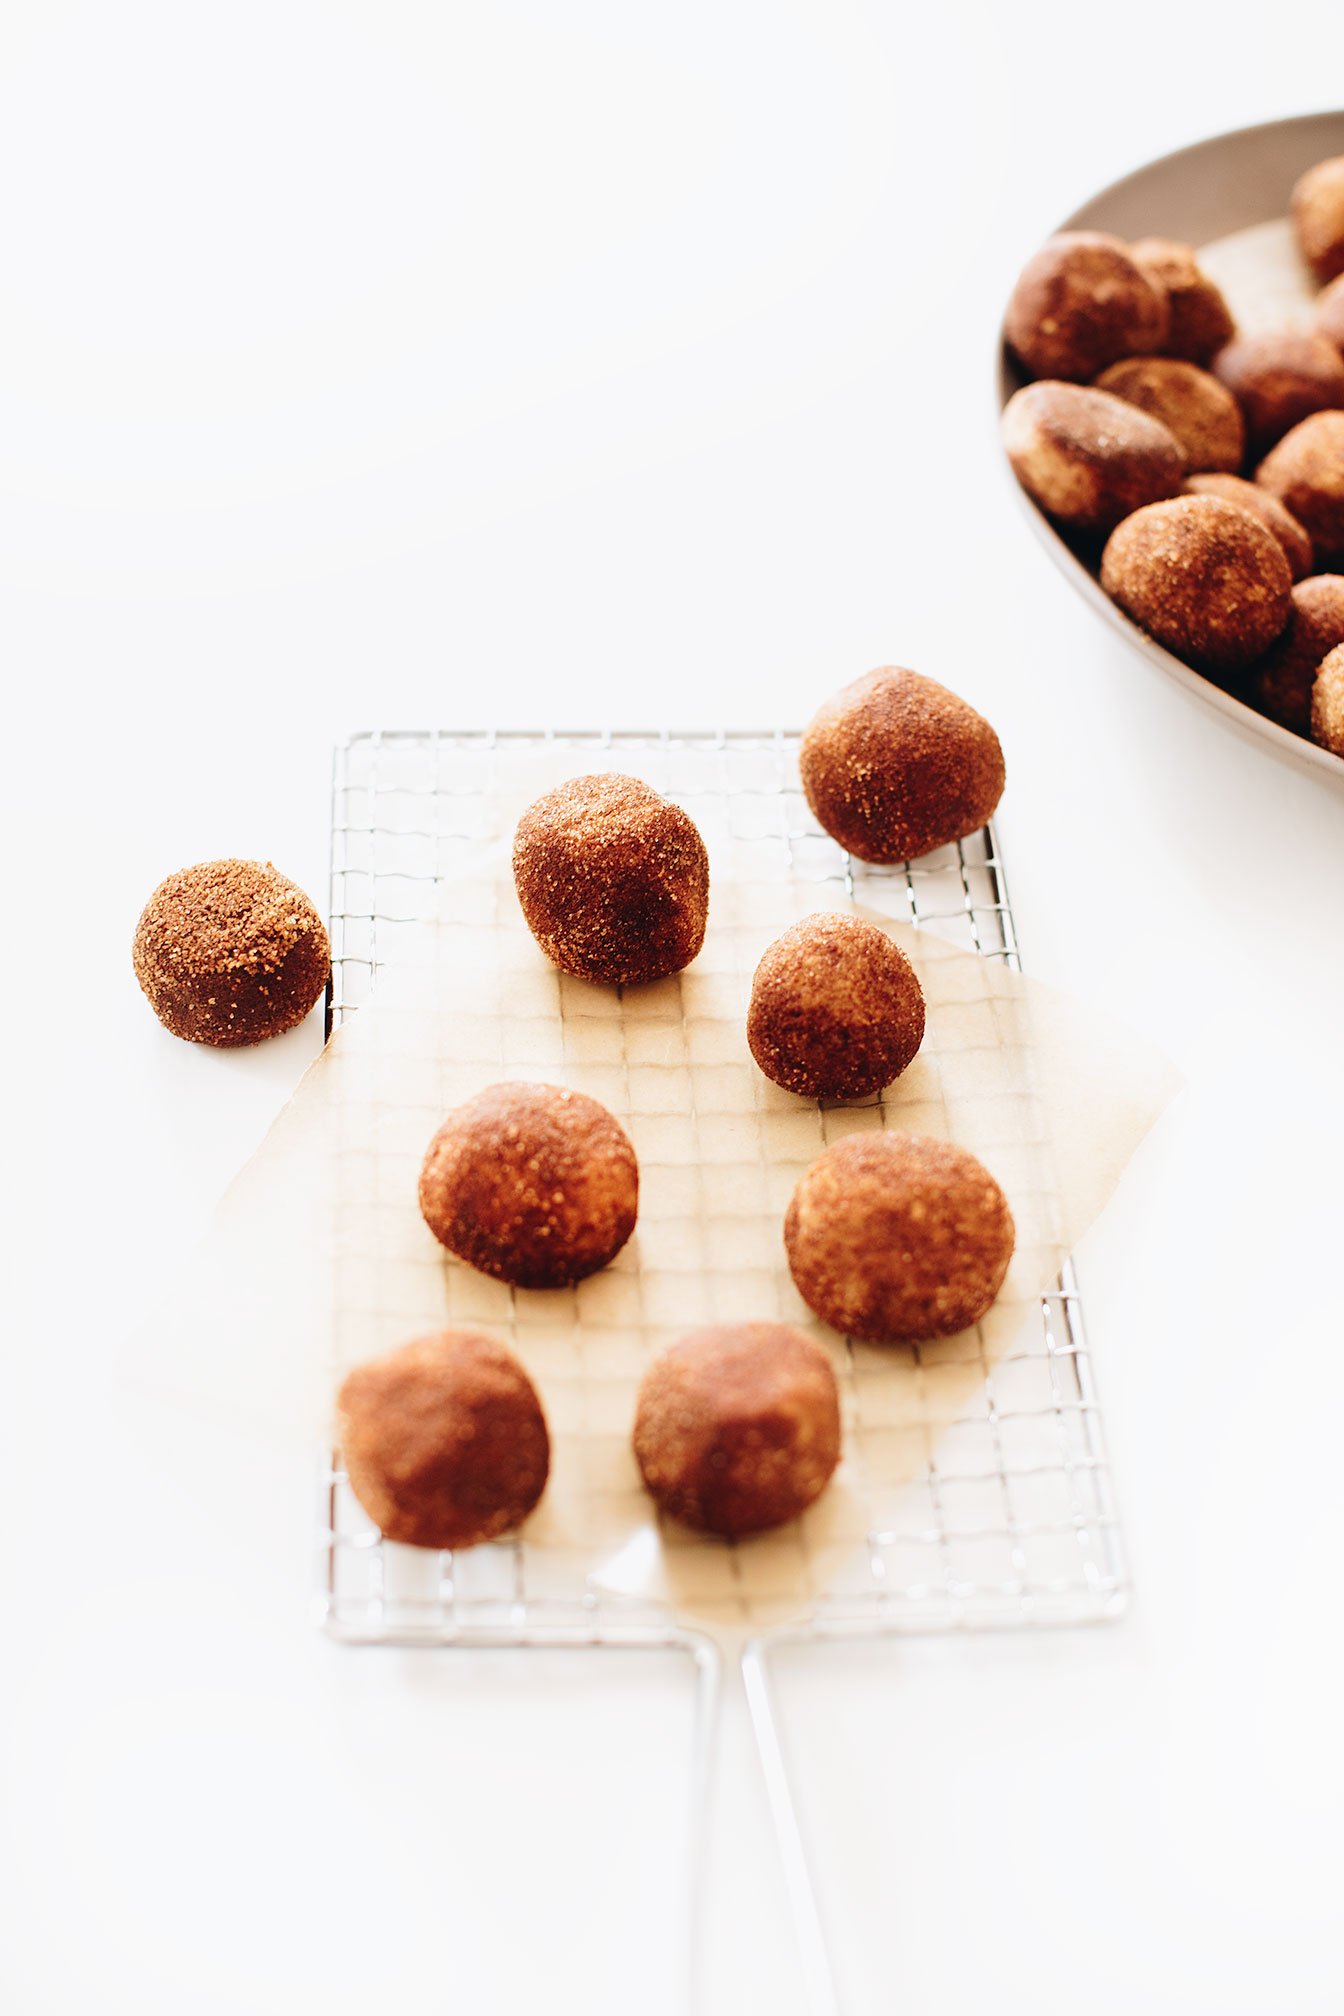
Snickerdoodle Protein Balls
#1 favorite protein ball recipe that the girls at the gym absolutely love! And rightfully so because who doesn’t love the flavor combinations of cinnamon and sugar?!
Cinnamon and sugar are what makes a snickerdoodle, but that doesn’t mean we have to stick to the traditional unhealthy, sugar filled dessert.
Because these snickerdoodle protein balls are good for you! Not only are they made with natural sweeteners like pure maple syrup and coated with coconut sugar but they are also gluten-free, dairy free and filled with lofts of healthy fats, flavor and protein.
Satisfy your sweet tooth with snickerdoodle protein balls - A no-bake, healthy treat that will keep you full!

#1 favorite protein ball recipe that the girls at the gym absolutely love! And rightfully so because who doesn’t love the flavor combinations of cinnamon and sugar?!
Cinnamon and sugar are what makes a snickerdoodle, but that doesn’t mean we have to stick to the traditional unhealthy, sugar filled dessert.

Because these snickerdoodle protein balls are good for you! Not only are they made with natural sweeteners like pure maple syrup and coated with coconut sugar but they are also gluten-free, dairy free and filled with lofts of healthy fats, flavor and protein.


HOW TO MAKE SNICKERDOODLE PROTEIN BALLS
Let me give you the easy answer. Add all of the ingredients to the food processor and blend until the mixture is thick and creamy. Roll into balls and that’s it!
Main reason why I love these protein balls so much is because it doesn’t require baking, using only one kitchen equipment and takes less than 10 minutes to prepare.

WHEN TO EAT
Pre | Post workout - Need a quick bite before or after a workout to tie you over? Well, these protein balls are perfect in a pinch. Packed with protein and complex carbs to drive better performance at the gym!
Afternoon delight - If I am needing a snack or feel sluggish around 3PM, 1-2 of these protein balls will push me through with energy before dinner time.
Dessert alternative - Sometimes I will have a sweet tooth after dinner and these balls come in clutch!
If you try this recipe, let us know! Leave a comment, rate it, and don’t forget to tag a photo to #fromtherootsblog on Instagram. We love seeing what you come up with!
Satisfy your sweet tooth with snickerdoodle protein balls - A no-bake, healthy treat that will keep you full!
Servings: 40 balls | Prep: 5 MIN | Cook time: NA
Ingredients
3 cups oats (or oat flour)
1 cup vanilla protein powder
½ cup pure maple syrup
1 ½ cup nut butter
½ cup coconut oil
2 Tbsp ground cinnamon
1 tsp vanilla extract
½ tsp sea salt
Cinnamon sugar coating (optional)
¼ cup coconut sugar
1 tsp ground cinnamon
Instructions
To a food processor, (if not using oat flour), add oats to the processor and blend on high until oats have turned into oat flour. Add all of the ingredients, except cinnamon sugar coating, and blend on high until completely incorporated.
If its too dry, add more honey or water and if it’s too wet, add 1 tbsp increments of oat flour.
Using a tablespoon or cookie scooper, form into balls and place on a plate.
If making the cinnamon sugar coating, add both ingredients in a small bowl and toss until incorporated. Add 3-4 balls in the cinnamon sugar mix and roll each ball around until fully coated.
Store in an airtight container for up to one week or in the freezer for up to a month.
Notes
My favorite protein powder is Equip Foods! Use code ROOTS for 15% off your first order at this link.

Halloween Munch Dark Chocolate Bark
Halloween bark recipe is as simple as they come! Using only 3-ingredients to make the bark, and topped with your favorite go-to halloween candy products or venturing out into the healthier but still spookier side!
Halloween munch dark chocolate bark is a fun and creative way of using healthier Halloween candy products!

For October’s virtual cooking class, I wanted to create a fun, festive and kid friendly dessert using healthier candy products. It’s so easy to switch out sugar and overly processed-filled Halloween candy products with healthier brands like Yum Earth, That’s It, Hu Kitchen and so much more (product recommendations for this recipe at the bottom!)


Halloween bark recipe is as simple as they come! Using only 3-ingredients to make the bark, and topped with your favorite go-to halloween candy products or venturing out into the healthier but still spookier side!

FAQs and tips on making dark chocolate bark:
After the chocolate has cooled, it is hard to spread or for toppings to stick so work quickly while your chocolate is still warm!
Storage? If the chocolate bark is set out at room temperature for too long, it will start to melt so best to store in the fridge for about a week or the freezer for 2 months. Don’t expect it to last that long in your house, though!
A spatula or back of a spoon are the best tools to spread the chocolate across a parchment paper lined baking sheet.
You can obviously use a double broiler to melt your chocolate but the fastest and easiest method is simply using a microwave! Microwave in 30 second increments while stirring until melted.


Other great Halloween recipes: spookylicious green smoothie
If you try this recipe, let us know! Leave a comment, rate it, and don’t forget to tag a photo to #fromtherootsblog on Instagram. We love seeing what you come up with!
Halloween munch dark chocolate bark is a fun and creative way of using healthier Halloween candy products!
SERVINGS: 6-8 | PREP TIME: 5 MIN | COOK TIME: N/A
Ingredients
2 cups dark chocolate chips (about 12 oz)
1/3 cup white chocolate chips
1 Tbsp+ 1 tsp coconut oil
1/4 cup candy corn
1/4 cup gummy worms
1/4 cup popcorn
Halloween sprinkles
Directions
Line a medium/large baking sheet with parchment paper or aluminum foil leaving overhang on at least two sides.
Add the chocolate chips and 1 Tbsp coconut oil to a microwave-safe bowl and microwave for 30 sec. Stir with a spoon and continue to warm in 30 sec increments until melted.
Spread the melted chocolate across the prepared baking sheet and use a rubber or offset spatula to smooth into an even layer.
Melt the white chocolate and 1 tsp oil in a separate bowl for 30 sec increments until smooth.
Drizzle the white chocolate in a “spiderweb or mummy style” across the baking sheet of melted dark chocolate.
Place candies, popcorn, and sprinkles on top of the bark while melted then place the baking sheet in the fridge or freezer for 1 hr to harden. Once hard, use a knife to cut into pieces of bark and enjoy!
Notes
Keep bark in an airtight container in the fridge or freezer until ready to eat!
SHOP OUR FAVORITE INGREDIENTS FOR THIS RECIPE!


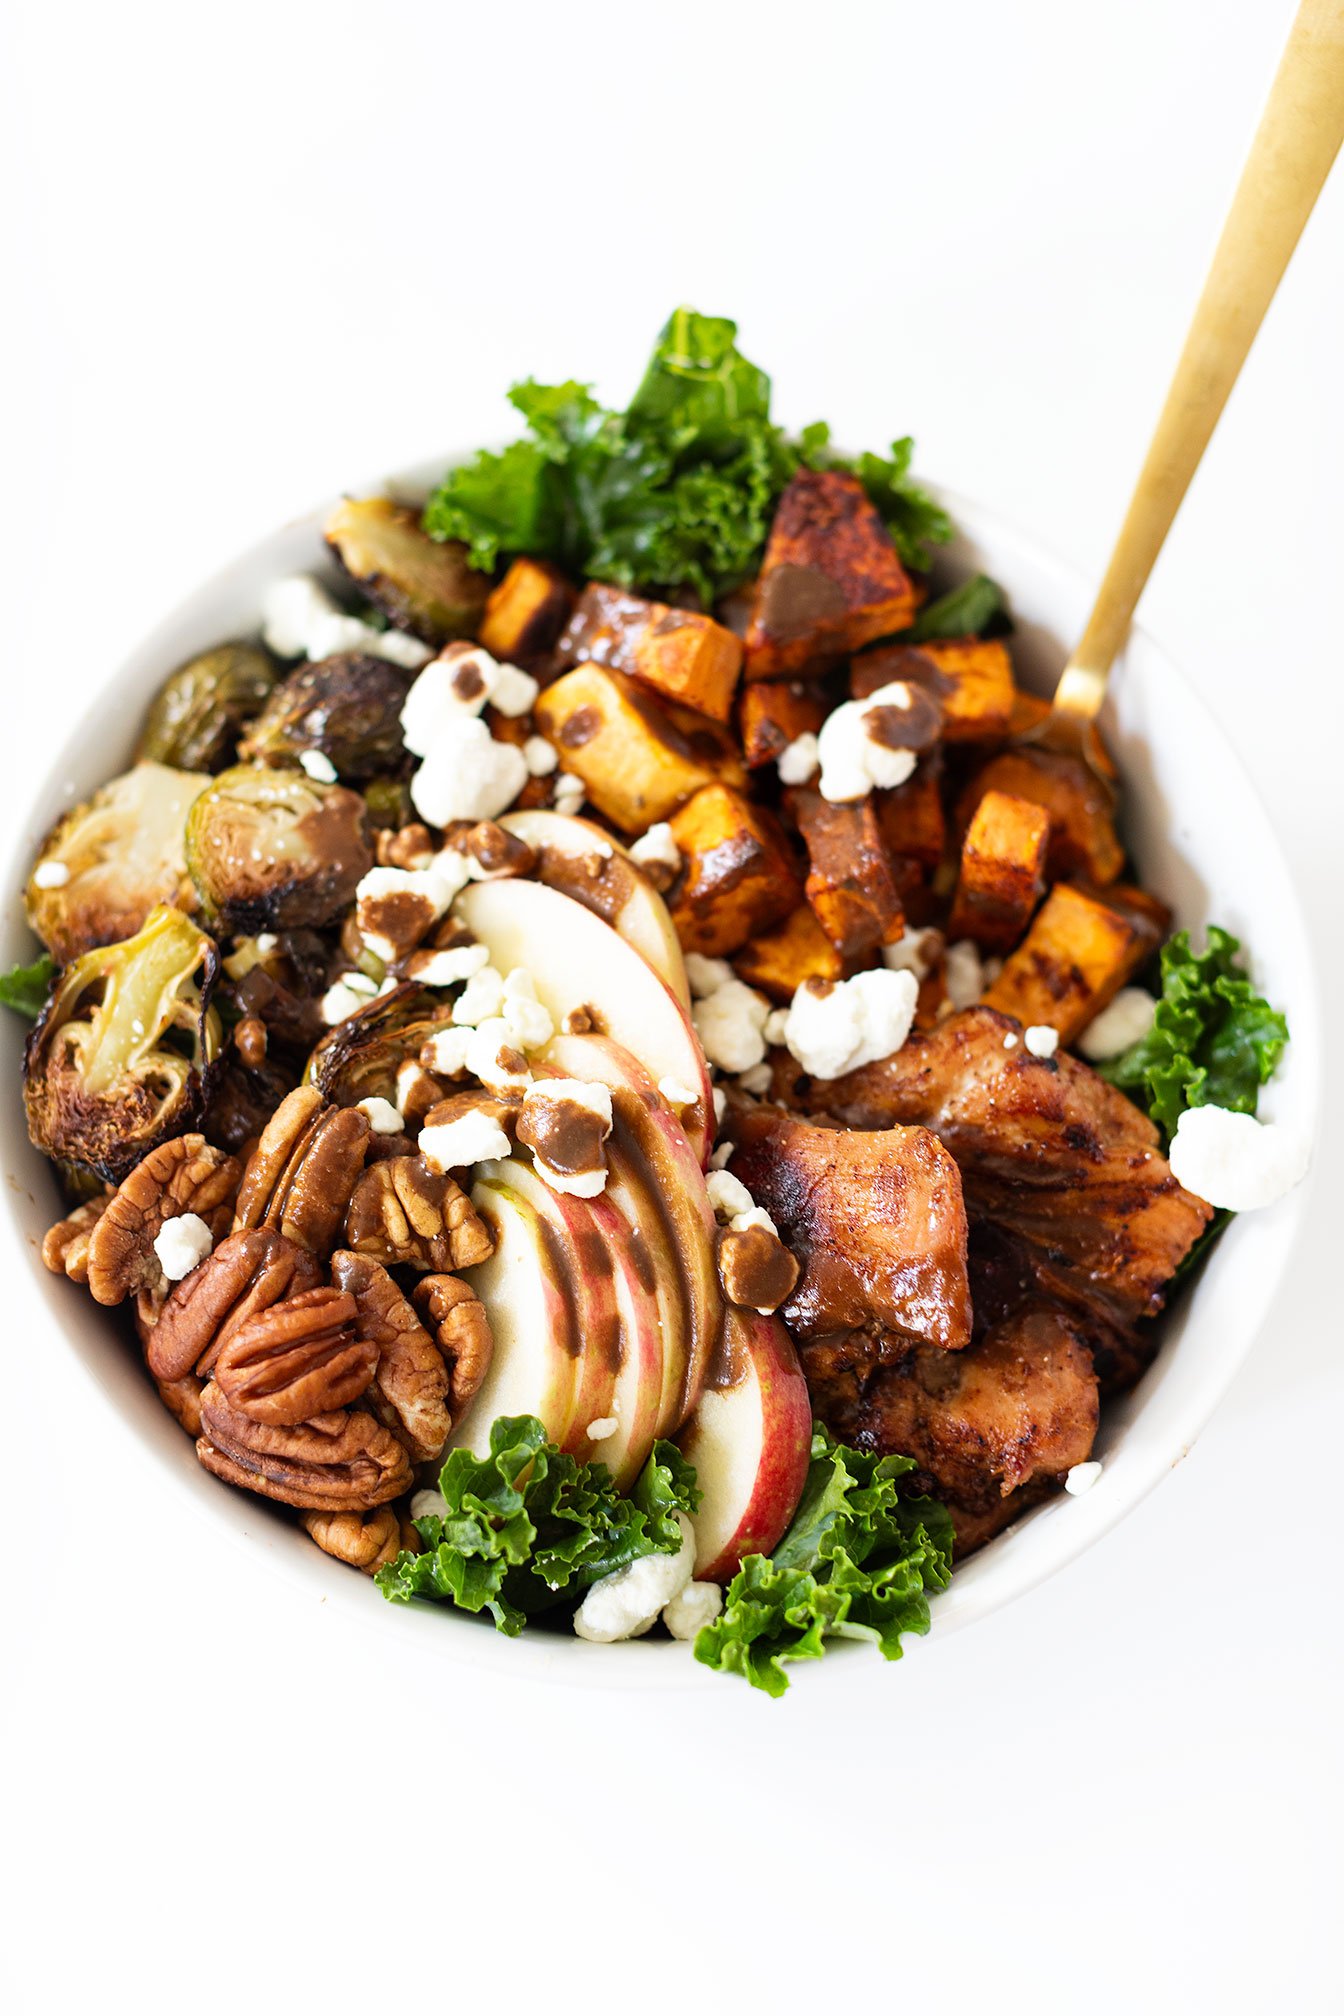
Chicken Harvest Bowl
Chicken Harvest Bowls with juicy marinated chicken thighs, roasted brussels sprouts and sweet potato, massaged kale, goat cheese, pecans, apple and a creamy balsamic dressing.
This harvest bowl is packed with delicious fall flavor influences that is perfect for a healthy lunch meal prep option or dinner. Gluten-free, grain-free, macro balanced and dairy-free friendly.
Chicken Harvest Bowl with juicy marinated chicken thighs, roasted Brussels sprouts and sweet potato, massaged kale, goat cheese, pecans, apple and a creamy balsamic dressing.


This harvest bowl is packed with delicious fall flavor influences that is perfect for a healthy lunch meal prep option or dinner. Gluten-free, grain-free, macro balanced and dairy-free friendly.
If you know anything about me, you know that nourish bowls are my favorite! From the Nourished Cookbook to the Nourishment Program - I absolutely love the art of batch cooking.

If you can allocate one or two days out of your week to prepare batch cook items, you will have the freedom to create different meals so that you won’t have to eat the same meal twice if you don’t want to! How fun and easy is that?!
With that said, here is a fall inspired nourish bowl that you can create for lunch meal prep or for dinner!
Chicken harvest bowl components based on the Six Senses Nourish Meal Template from The Nourishment Program:
Starchy + sugary carbs: sweet potatoes, honey, apple
Non starchy carbs: massaged kale, brussels sprouts
Protein: Chicken thighs + pecans + goat cheese
Fat: oil, chicken thighs, goat cheese, nut butter
Flavor: seasonings galore! Coconut aminos (or teriyaki sauce)
Probiotics: balsamic vinegar
If you try this recipe, let us know! Leave a comment, rate it, and don’t forget to tag a photo to #fromtherootsblog on Instagram. We love seeing what you come up with!
Chicken Harvest Bowl with juicy marinated chicken thighs, roasted Brussels sprouts and sweet potato, massaged kale, goat cheese, pecans, apple and a creamy balsamic dressing.
SERVINGS: 4 | PREP TIME: 15 MIN | COOK TIME: 45 MIN
Ingredients
Chicken marinade
1 lb chicken thighs
1/3 cup coconut aminos or teriyaki sauce
1 tsp garlic powder
S&P
Sweet potatoes
2-4 sweet potatoes, cubed
1 tsp each smoked paprika & garlic powder
dash of cinnamon
1 Tbsp oil
Brussels sprouts
1 lb brussels sprouts
1 tsp garlic powder
1 Tbsp oil
Balsamic dressing
1/4 cup balsamic vinegar
2 Tbsp nut butter
1-2 Tbsp water
1 Tbsp honey
S&P
Bowl components
1/2 cup pecans
1/2 cup goat cheese
1 large apple
massaged kale or regular leafy greens
Directions
Marinate your chicken first by seasoning chicken thighs generously with S&P. Mix marinade ingredients in a Ziploc bag and transfer chicken to the bag. Seal bag, massage chicken in juices while sealed and place in the fridge to marinate for 30 min or up to 8 hrs.
Preheat the oven to 400 degrees and line a large baking sheet with parchment paper.
Add diced sweet potatoes in seasoning mixture and halved Brussels sprouts in seasoning mixture on baking sheet. Toss in oil and roast in the oven for 35-45 min until tender.
You can either roast chicken thighs in the oven at the same time and on a different baking sheet or grill / cook in a skillet.
To make dressing: add the balsamic vinegar, nut butter, salt, honey and 1 Tbsp water to a small mason jar. Shake vigorously and add more water if you want a thinner consistency.
Prep the remaining ingredients: dice the apple, crumble goat cheese, roughly chop pecans and follow massaged kale recipe if not using leafy greens.
Assembly! Evenly divide the greens, chicken, roasted veggies, apples, goat cheese and nuts. Serve with creamy balsamic dressing and enjoy!