Sort by Category
- October 2025
- September 2025
- August 2025
- June 2025
- August 2024
- July 2024
- June 2024
- May 2024
- February 2024
- January 2024
- December 2023
- November 2023
- October 2023
- September 2023
- August 2023
- July 2023
- March 2023
- February 2023
- January 2023
- December 2022
- November 2022
- October 2022
- September 2022
- August 2022
- June 2022
- May 2022
- April 2022
- March 2022
- February 2022
- January 2022
- December 2021
- November 2021
- October 2021
- September 2021
- August 2021
- July 2021
- June 2021
- May 2021
- April 2021
- March 2021
- February 2021
- January 2021
- December 2020
- November 2020
- October 2020
- September 2020
- August 2020
- July 2020
- June 2020
- May 2020
- April 2020
- March 2020
- February 2020
- January 2020
- December 2019
- November 2019
- October 2019
- September 2019
- August 2019
- July 2019
- June 2019
- May 2019
- April 2019
- March 2019
- February 2019
- January 2019
- December 2018
- November 2018
- October 2018
- September 2018
- August 2018
- July 2018
- June 2018
- May 2018
- April 2018
- March 2018
- February 2018

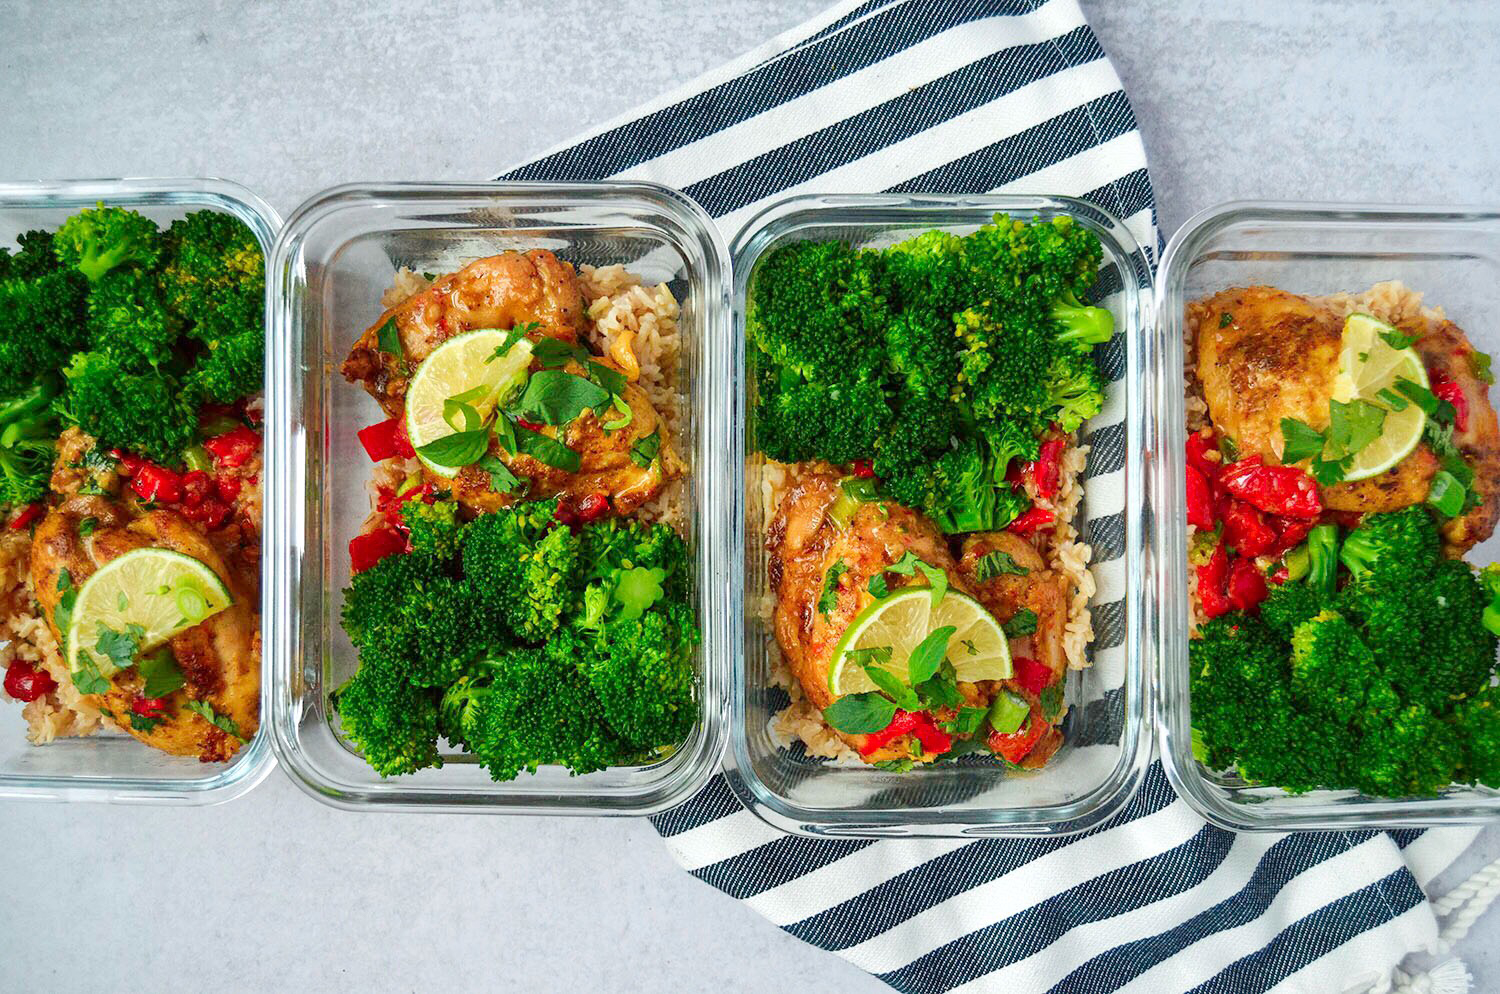
Creamy Coconut Lime Chicken Thighs
Do you ever get tired of cooking chicken the same way over and over again? As someone who is married to a man that works in the poultry industry BOTH of my hands are up! I would think even someone who develops new recipes every day can fall guilty to this routine.
To get me out of this rut, I often turn to Thai cuisine. One of my favorite thai dishes is Tom Kha Gai soup. If you’ve had this traditional thai soup then you know the flavors of coconut and lime are at the forefront. I’ve taken those components of Tom Kha Gai soup and incorporated it with chicken. So, there you have it -- a delicious Thai-inspired chicken recipe that pairs well with cauliflower rice or sprouted brown basmati rice and broccoli for lunch or dinner!
Creamy coconut lime chicken thighs - 30 minute, one pan meal that is perfect for meal preps or for a quick dinner! Dairy-free, gluten-free, and paleo-friendly.

Do you ever get tired of cooking chicken the same way over and over again? I would think even someone who develops new recipes every day can fall guilty to this routine.
To get me out of this rut, I often turn to Thai cuisine. One of my favorite thai dishes is Tom Kha Gai soup. If you’ve had this traditional thai soup then you know the flavors of coconut and lime are at the forefront. I’ve taken those components of Tom Kha Gai soup and incorporated it with chicken. So, there you have it -- a delicious Thai-inspired chicken recipe that pairs well with cauliflower rice or sprouted brown basmati rice and broccoli for lunch or dinner!

You may have noticed that the sauce color isn’t the prettiest but you shouldn’t be discouraged because we are focused on flavor over appearance. I’ve followed recipes similar to this one but they skip the best part which is thoroughly developing flavors in the cast iron. Don’t wipe away those brown bits after browning your chicken! That is the best part, I’m telling you!
My friends describe this recipe perfectly - it’s reminiscent of a good southern meal but with flavors of something exotic. I think that’s a perfect description because I wanted to create a recipe that is wholesome and hearty but with more depth. You can bring these spicy, floral, and fragrant flavors to your table easily using curry powder, ginger, and cilantro.

If you try this recipe, let us know! Leave a comment, rate it, and don’t forget to tag a photo to #fromtherootsblog on Instagram. We love seeing what you come up with!
INGREDIENTS
1 lb skinless boneless chicken thighs
Salt, pepper, yellow curry powder to season
SAUCE
1 can unsweetened coconut milk
1 red pepper (diced)
4 cloves garlic (minced)
½ tsp salt
1 small knob fresh ginger (minced)
1 lime (juice)
1 Tbsp arrowroot flour + mixed in with 1 Tbsp water
GARNISH
Fresh cilantro, green onions, lime wedges
DIRECTIONS
Heat 1 Tbsp oil in a cast iron skillet over medium high heat.
While your pan is getting hot, generously season chicken thighs on both sides with salt, pepper, and yellow curry powder.
Add the chicken thighs to the skillet and sear for 5-7 minutes. Remove the chicken from the skillet and set aside on a plate. The chicken doesn’t need to be fully cooked at this point - we will be returning it back to the skillet shortly.
Turn the heat down to medium and add more oil to the pan. Add garlic to the pan and saute for 2-3 minutes. Add chopped peppers. Make sure to scrape the brown bits into the garlic and pepper mixture.
Once peppers start to sweat, add coconut milk, salt, fresh ginger, and lime. Bring to a boil then add the arrowroot flour + water mixture. Once your mixture has thickened, place chicken thighs back into the pan.
Cook for 10-15 minutes on medium heat or until your chicken thighs have reached an internal temperature of 165 degrees Fahrenheit.
Garnish with cilantro, green onions, and lime. Serve over brown or cauliflower rice.
NOTES
If meal prepping for 4 servings, cook 4 servings of brown or cauliflower rice and one broccoli head.
Some coconut milk brands can provide different consistencies. I prefer using Thai Kitchen.
Feel free to spice up the recipe with chili oil or fresh chilies!

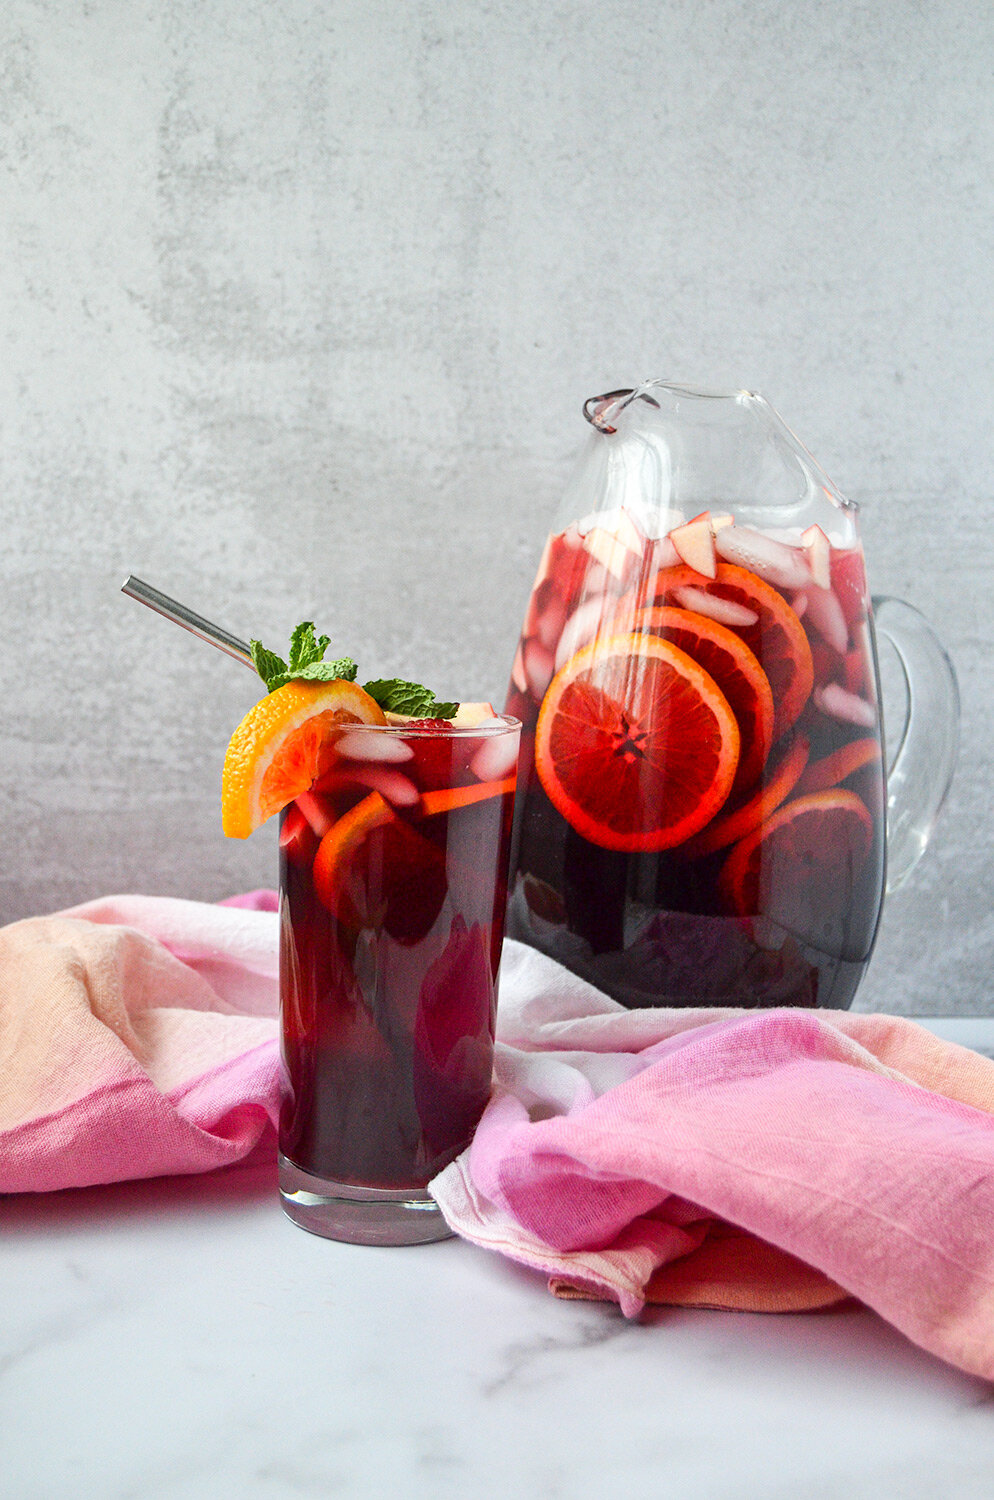
Citrus Hibiscus Sangria
Having From the Roots just turned 1 yesterday and the website getting a face-lift, I wanted to celebrate with something, fun, fruity, and flavorful. What better way to celebrate than with a drink?
From the Roots has become way more than I have ever imagined. I started out just posting recipes I have created throughout the years and now it has turned into so much more. Within this year, we have been invited to do pop-up events, catered for parties and grand openings for businesses, collaborated with major health product companies, became a brand ambassador for Further Food, Banza, Manitoba Harvest Hemp Foods, and have connected with so many amazing people - YOU!
I couldn’t have done this without YOU, so thank you so much! Well, I could keep rambling, but let’s get to the recipe! I made this into a mock-tail form originally for a Galentine’s Day event. It was such a big hit! But TBH, it would be an even more hit if you added wine or prosecco to it… But you can do whatever you like! ;)
CHEERS TO A HEALTHY, SEASONAL SANGRIA MOCKTAIL. CAN MAKE INTO COCKTAIL VERSION TOO IF THAT’S YOUR THING!
Having From the Roots just turned 1 yesterday and the website getting a face-lift, I wanted to celebrate with something, fun, fruity, and flavorful. What better way to celebrate than with a drink?
From the Roots has become way more than I have ever imagined. I started out just posting recipes I have created throughout the years and now it has turned into so much more. Within this year, we have been invited to do pop-up events, catered for parties and grand openings for businesses, collaborated with major health product companies, became a brand ambassador for Further Food, Banza, Manitoba Harvest Hemp Foods, and have connected with so many amazing people - YOU!

I couldn’t have done this without YOU, so thank you so much! Well, I could keep rambling, but let’s get to the recipe! I made this into a mock-tail form originally for a Galentine’s Day event. It was such a big hit! But TBH, it would be an even more hit if you added wine or prosecco to it… But you can do whatever you like! ;)

When making sangria, it is best to use seasonal produce so that you can the best, full-bodied flavor from the fruits you are using. For this recipe, I cut up blood oranges, apples, and lemons. The tea I used is Stash’s Wild Raspberry Hibiscus so I added fresh raspberries and fresh mint for a refreshing beverage.
You can also make this drink ahead of time by brewing the hibiscus tea with mint the night before to store in the fridge. When you are ready to make the drink, add the hibiscus tea with the juices and mineral water with fresh cut fruits. It’s that easy!

Want more drink recipes? Check out The Holiday Mule, Strawberry Watermelon Mint Agua Fresca, and Watermelon Lime Refresher.
If you try this recipe, let us know! Leave a comment, rate it, and don’t forget to tag a photo to #fromtherootsblog on Instagram. We love seeing what you come up with!
Ingredients:
4 wild raspberry hibiscus tea bags
4 cups filtered water
½ cup organic cane sugar
½ cup fresh mint leaves
1 liter sparkling mineral water
1 qt 100% pure juice (pomegranate, strawberry lemonade, cranberry)
Orange
Lemon
Garnish
Apples, raspberries, fresh mint, blood orange, lemon, lime, grapes, blackberries
Directions:
In a small saucepan, add water and sugar and bring to a boil over medium high heat; stirring until sugar has dissolved.
Remove from heat; add hibiscus tea and fresh mint. Cover and let steep for 15 minutes.
Pour tea mixture through a fine sieve into a bowl or large pitcher and add ice.
Stir in mineral water, juice, and freshly squeezed juice of orange and lemon.
Chill drink in refrigerator until completely cold.
30 minutes before serving, add sliced fruits for presentation and added flavor!
Notes:
I like using Santa Cruz and R.W. Knudsen 100% juice brands. My favorite combo is mixing ½ qt. pomegranate and ½ qt. strawberry raspberry juice.
For tea - I like using Stash’s wild raspberry hibiscus tea.
To make this into a cocktail, replace mineral water with red wine or prosecco.


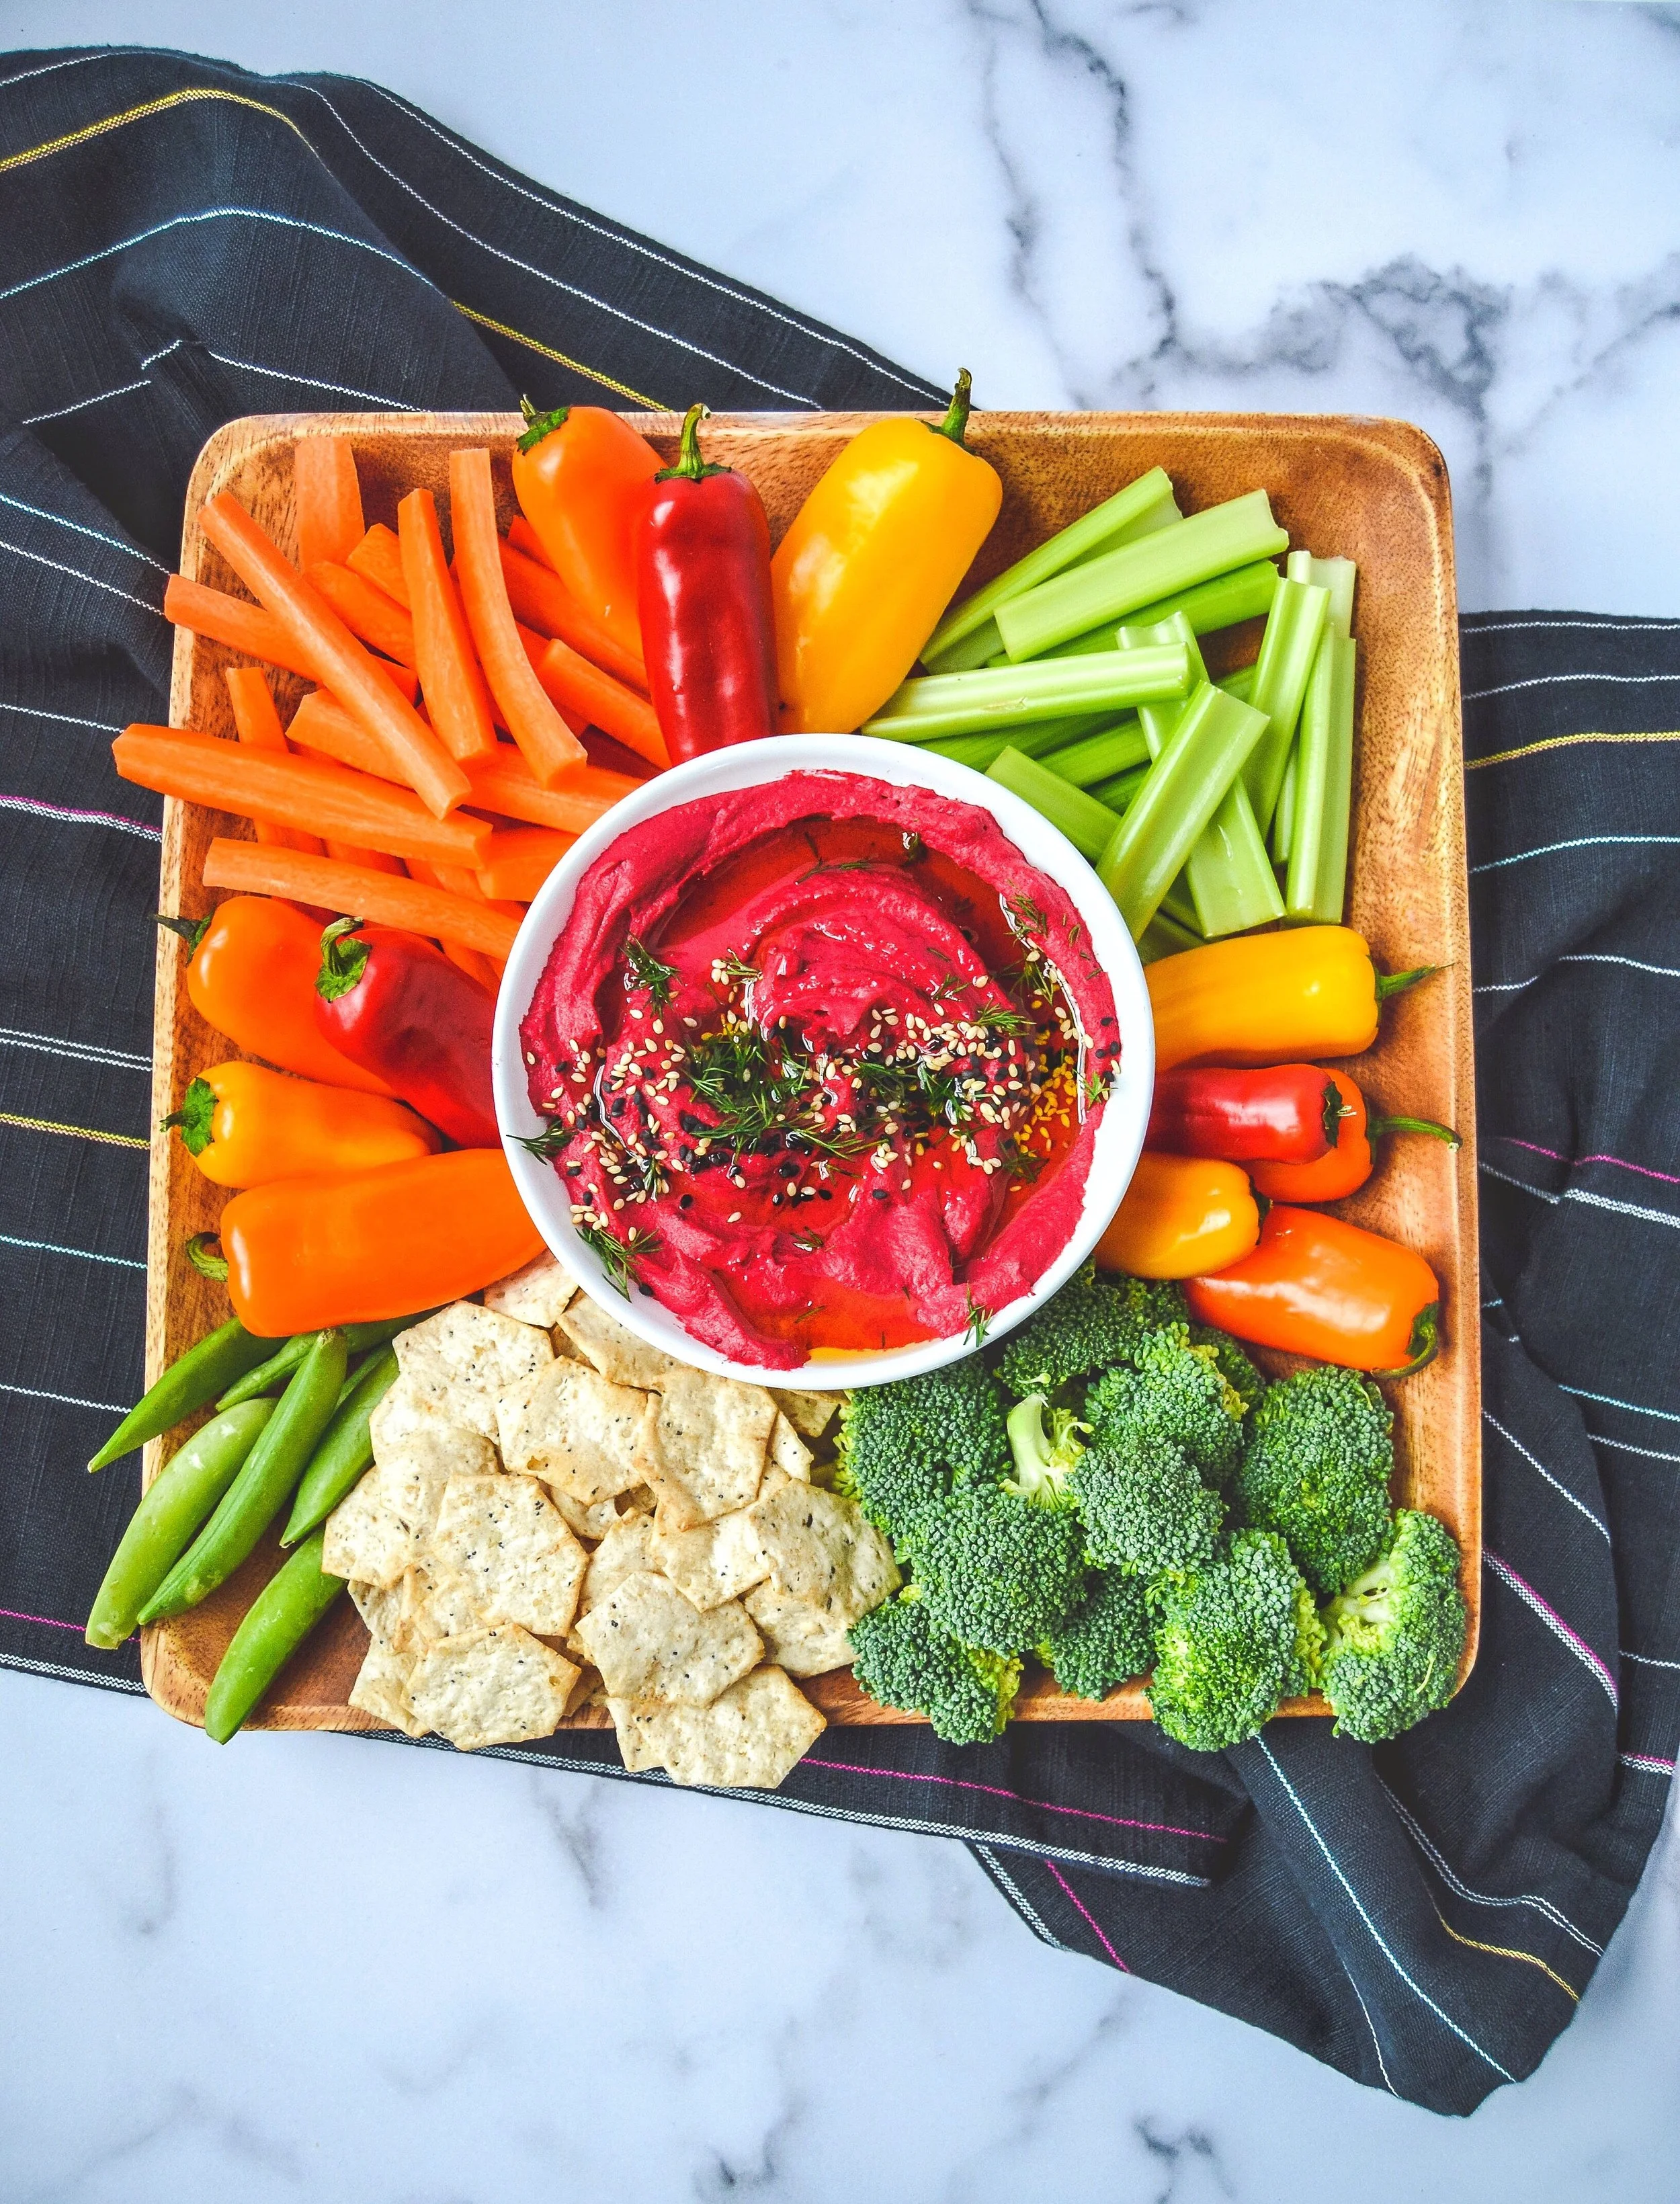
Roasted Beet Hummus
I can’t stop staring at this hummus. It is just too beautiful to eat. It almost makes me feel like this isn’t even hummus at all, but rather magical food made for unicorns! But once you take off your rose-colored glasses, you see that this is, in fact, made with beets.
Now, don’t beets have an earthy taste? Yes, they do. However, once you add citrus and umami flavors to this dish you will see their best side and not their dirty, earthy side.
As healthy as it is beautiful!

I can’t stop staring at this hummus. It is just too beautiful to eat. It almost makes me feel like this isn’t even hummus at all, but rather magical food made for unicorns! But once you take off your rose-colored glasses, you see that this is, in fact, made with beets.
Now, don’t beets have an earthy taste? Yes, they do. However, once you add citrus and umami flavors to this dish you will see their best side and not their dirty, earthy side.

As you can see, you can make roasted beet hummus for Valentine’s day, girl’s night out, Sunday brunch, #bachelormonday… you get my drift!

Making this for my weekly meal prep is a breeze. There are so many people asking me for healthy snacks and this one is it! I love taking ½ cup to work with veggie sticks and peppers to for my afternoon snack. With the tahini, chickpeas, and beets, this snack is super filling. Bonus - it’s a conversation starter at your job, too!

If you are obsessed about beets like I am, check out these beet recipes: refrigerator pickled beets and avocado deviled eggs.
If you try this recipe, let us know! Leave a comment, rate it, and don’t forget to tag a photo to #fromtherootsblog on Instagram. We love seeing what you come up with!
ingredients
1 can chickpeas (drained, rinsed, and deshelled*)
2 small beets
1/3 cup tahini
1/4 cup extra virgin olive oil
1/2 fresh lemon
1 Tbsp white miso paste
3 clove garlic (minced)
S&P to taste
instructions
Preheat oven to 425 degrees.
Wrap the beets in tin foil and roast for 45 minutes to 1 hour until cooked through.
When beets have slightly cooled, remove the skin away.
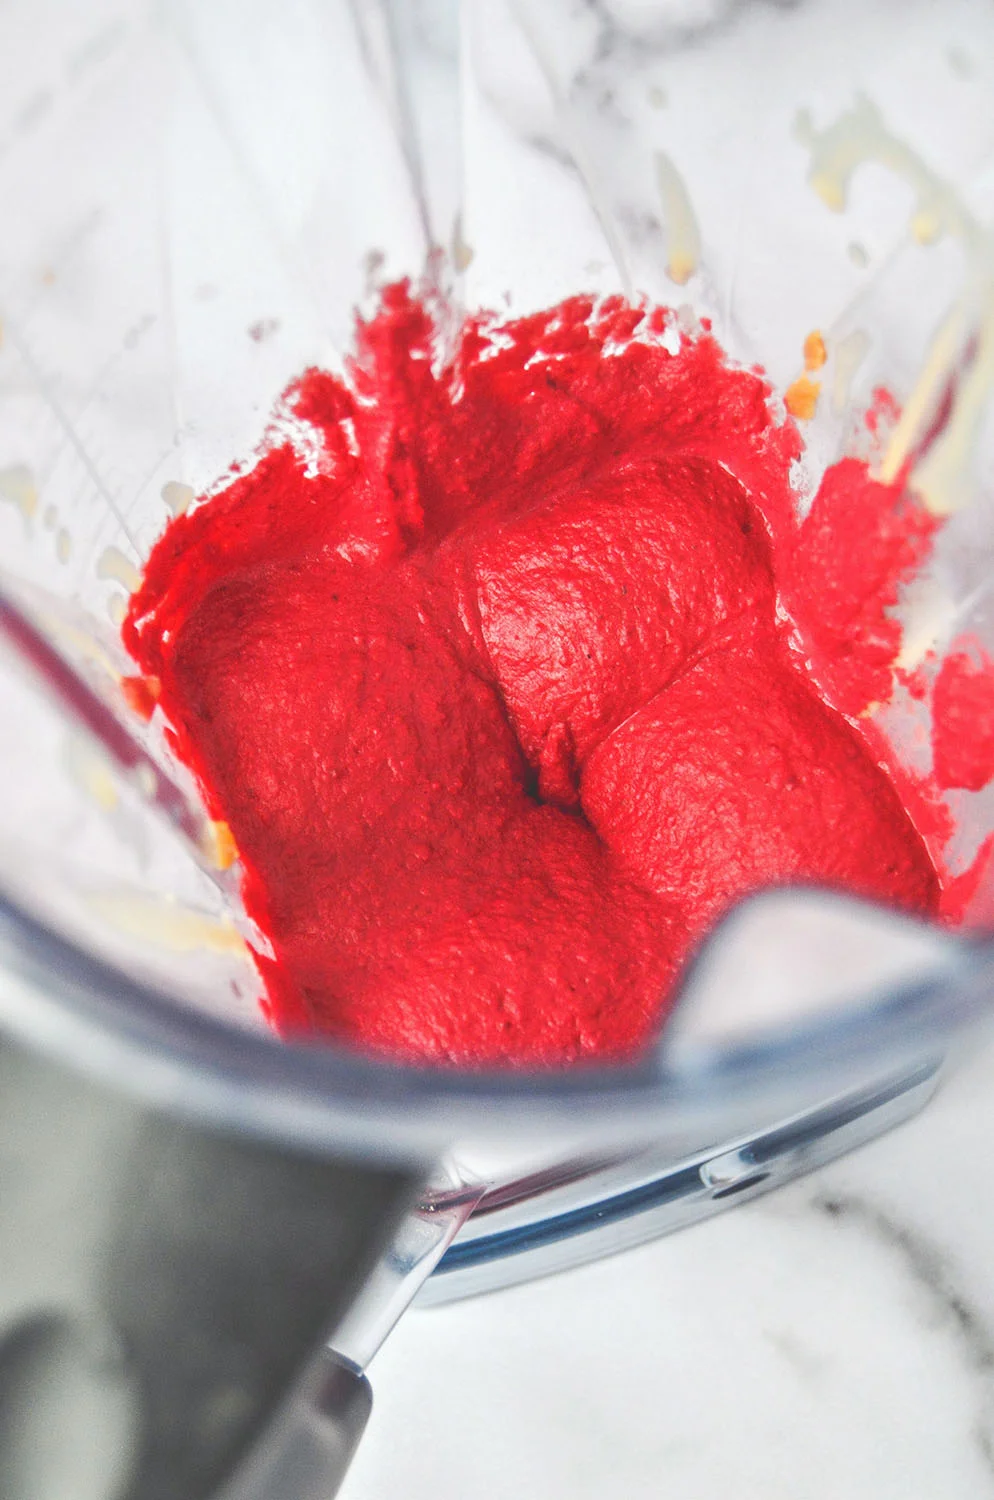
To a Vitamix or food processor, add the chickpeas, roasted beets, tahini, lemon juice, miso, and garlic. As the mixture is blending, slowly add the olive oil. Blend until smooth and creamy; scrape the sides down if necessary.
Add S&P to season as you are blending. At this point, you may want to add more lemon juice or garlic depending on your preference. I like to blend for at least 5 minutes to ensure the consistency is smooth. You may need to add more olive oil or water to thin the hummus.
When you have reached the desired, creamy consistency, transfer hummus to a bowl and add fresh herbs and toppings like dill, parsley, sesame seeds, pine nuts, and extra olive oil.
The hummus will keep for up to one week in the fridge.
*This step is optional but if you have the time, it’s worth it! For a super creamy hummus, de-shell as many chickpeas as you can when rinsing.


Strawberry Basil & Goat Cheese Crostini
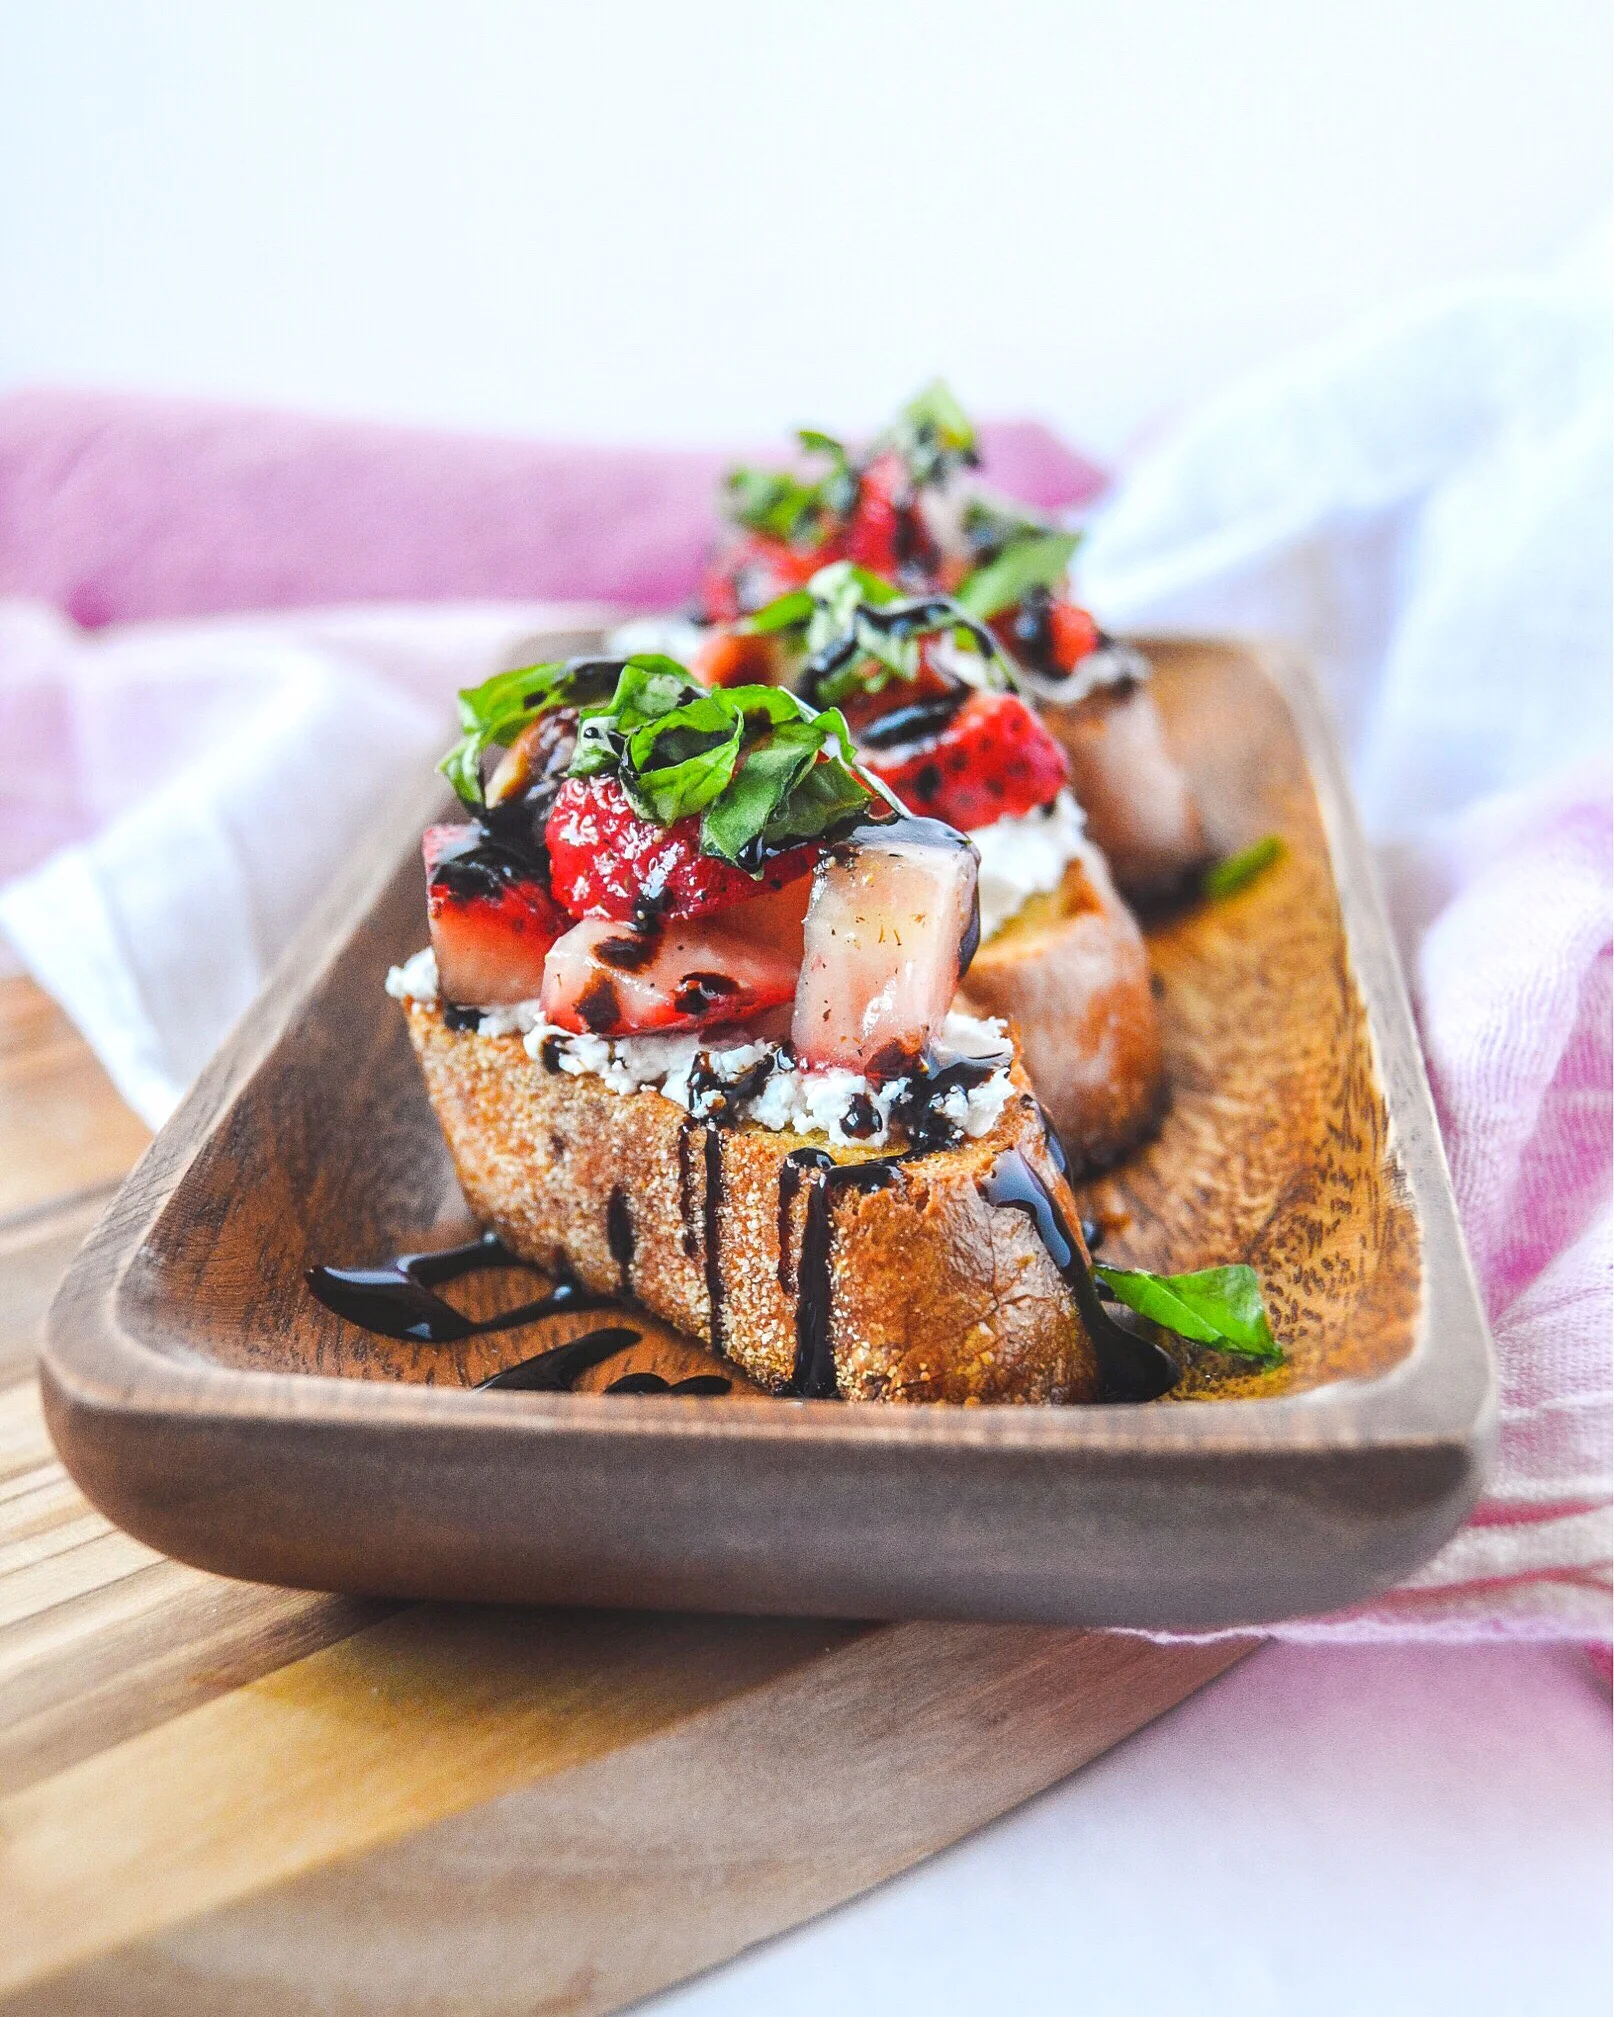
A crostini is a small piece of toasted bread that is best served with toppings. You can really do any toppings for this crostini, but my favorite is with this strawberry basil and goat cheese.
This recipe is similar to bruschetta given the tomatoes, basil, and garlic. However, instead of your regular bruschetta, I’ve added a twist with the strawberries, goat cheese, and balsamic glaze. The tartness in the goat cheese pairs really well with the sweetness of strawberries. What really takes this crostini to the next level is rubbing the toasted bread with garlic. All you have to do is simply cut a garlic clove in half and gently rub the cut side of the garlic clove over the toasted bread. What a game changer!
An elegant and simple appetizer to serve or to bring to any party!

A crostini is a small piece of toasted bread that is best served with toppings. You can really do any toppings for this crostini, but my favorite is with this strawberry basil and goat cheese.

This recipe is similar to bruschetta given the tomatoes, basil, and garlic. However, instead of your regular bruschetta, I’ve added a twist with the strawberries, goat cheese, and balsamic glaze. The tartness in the goat cheese pairs really well with the sweetness of strawberries. What really takes this crostini to the next level is rubbing the toasted bread with garlic. All you have to do is simply cut a garlic clove in half and gently rub the cut side of the garlic clove over the toasted bread. What a game changer!

Strawberry basil & goat cheese crostinis make the perfect appetizer for any party or occasion! Whether it’s for a romantic Valentine’s dinner, a picnic, or a small get together, know that these crostinis won’t take much of your time but will still impress!

If you try this recipe, let us know! Leave a comment, rate it, and don’t forget to tag a photo to #fromtherootsblog on Instagram. We love seeing what you come up with!
Ingredients
1 whole grain bread (or baguette)
4 oz goat cheese (softened)
2 garlic cloves
1/4 cup fresh basil (chiffonade)
1 cup chopped strawberries
1 cup chopped cherry tomatoes
1 Tbsp extra virgin olive oil
1 Tbsp pure maple syrup (or honey)
S&P
extra virgin olive oil (for cooking)
balsamic glaze
instructions
Preheat oven to 375 degrees.
Slice your bread and place them on a baking sheet. Spray or brush both sides of bread with olive oil.
Bake the bread for 12-15 minutes until golden brown, flipping the bread slices halfway through to ensure both sides are toasted evenly.
While bread is baking, in a small bowl, combine chopped strawberries, cherry tomatoes, and basil to olive oil, maple syrup, and salt and pepper until fully combined. Taste the mixture to make sure the desired full flavor is there.
Once the bread has slightly cooled, gently rub garlic cloves on each slice.
Spread softened goat cheese on each slice and top with the strawberry basil mixture.
Drizzle balsamic glaze on top and enjoy!
Notes
I like using this balsamic glaze brand but you can get this at any grocery store in the condiment/vinegar section!

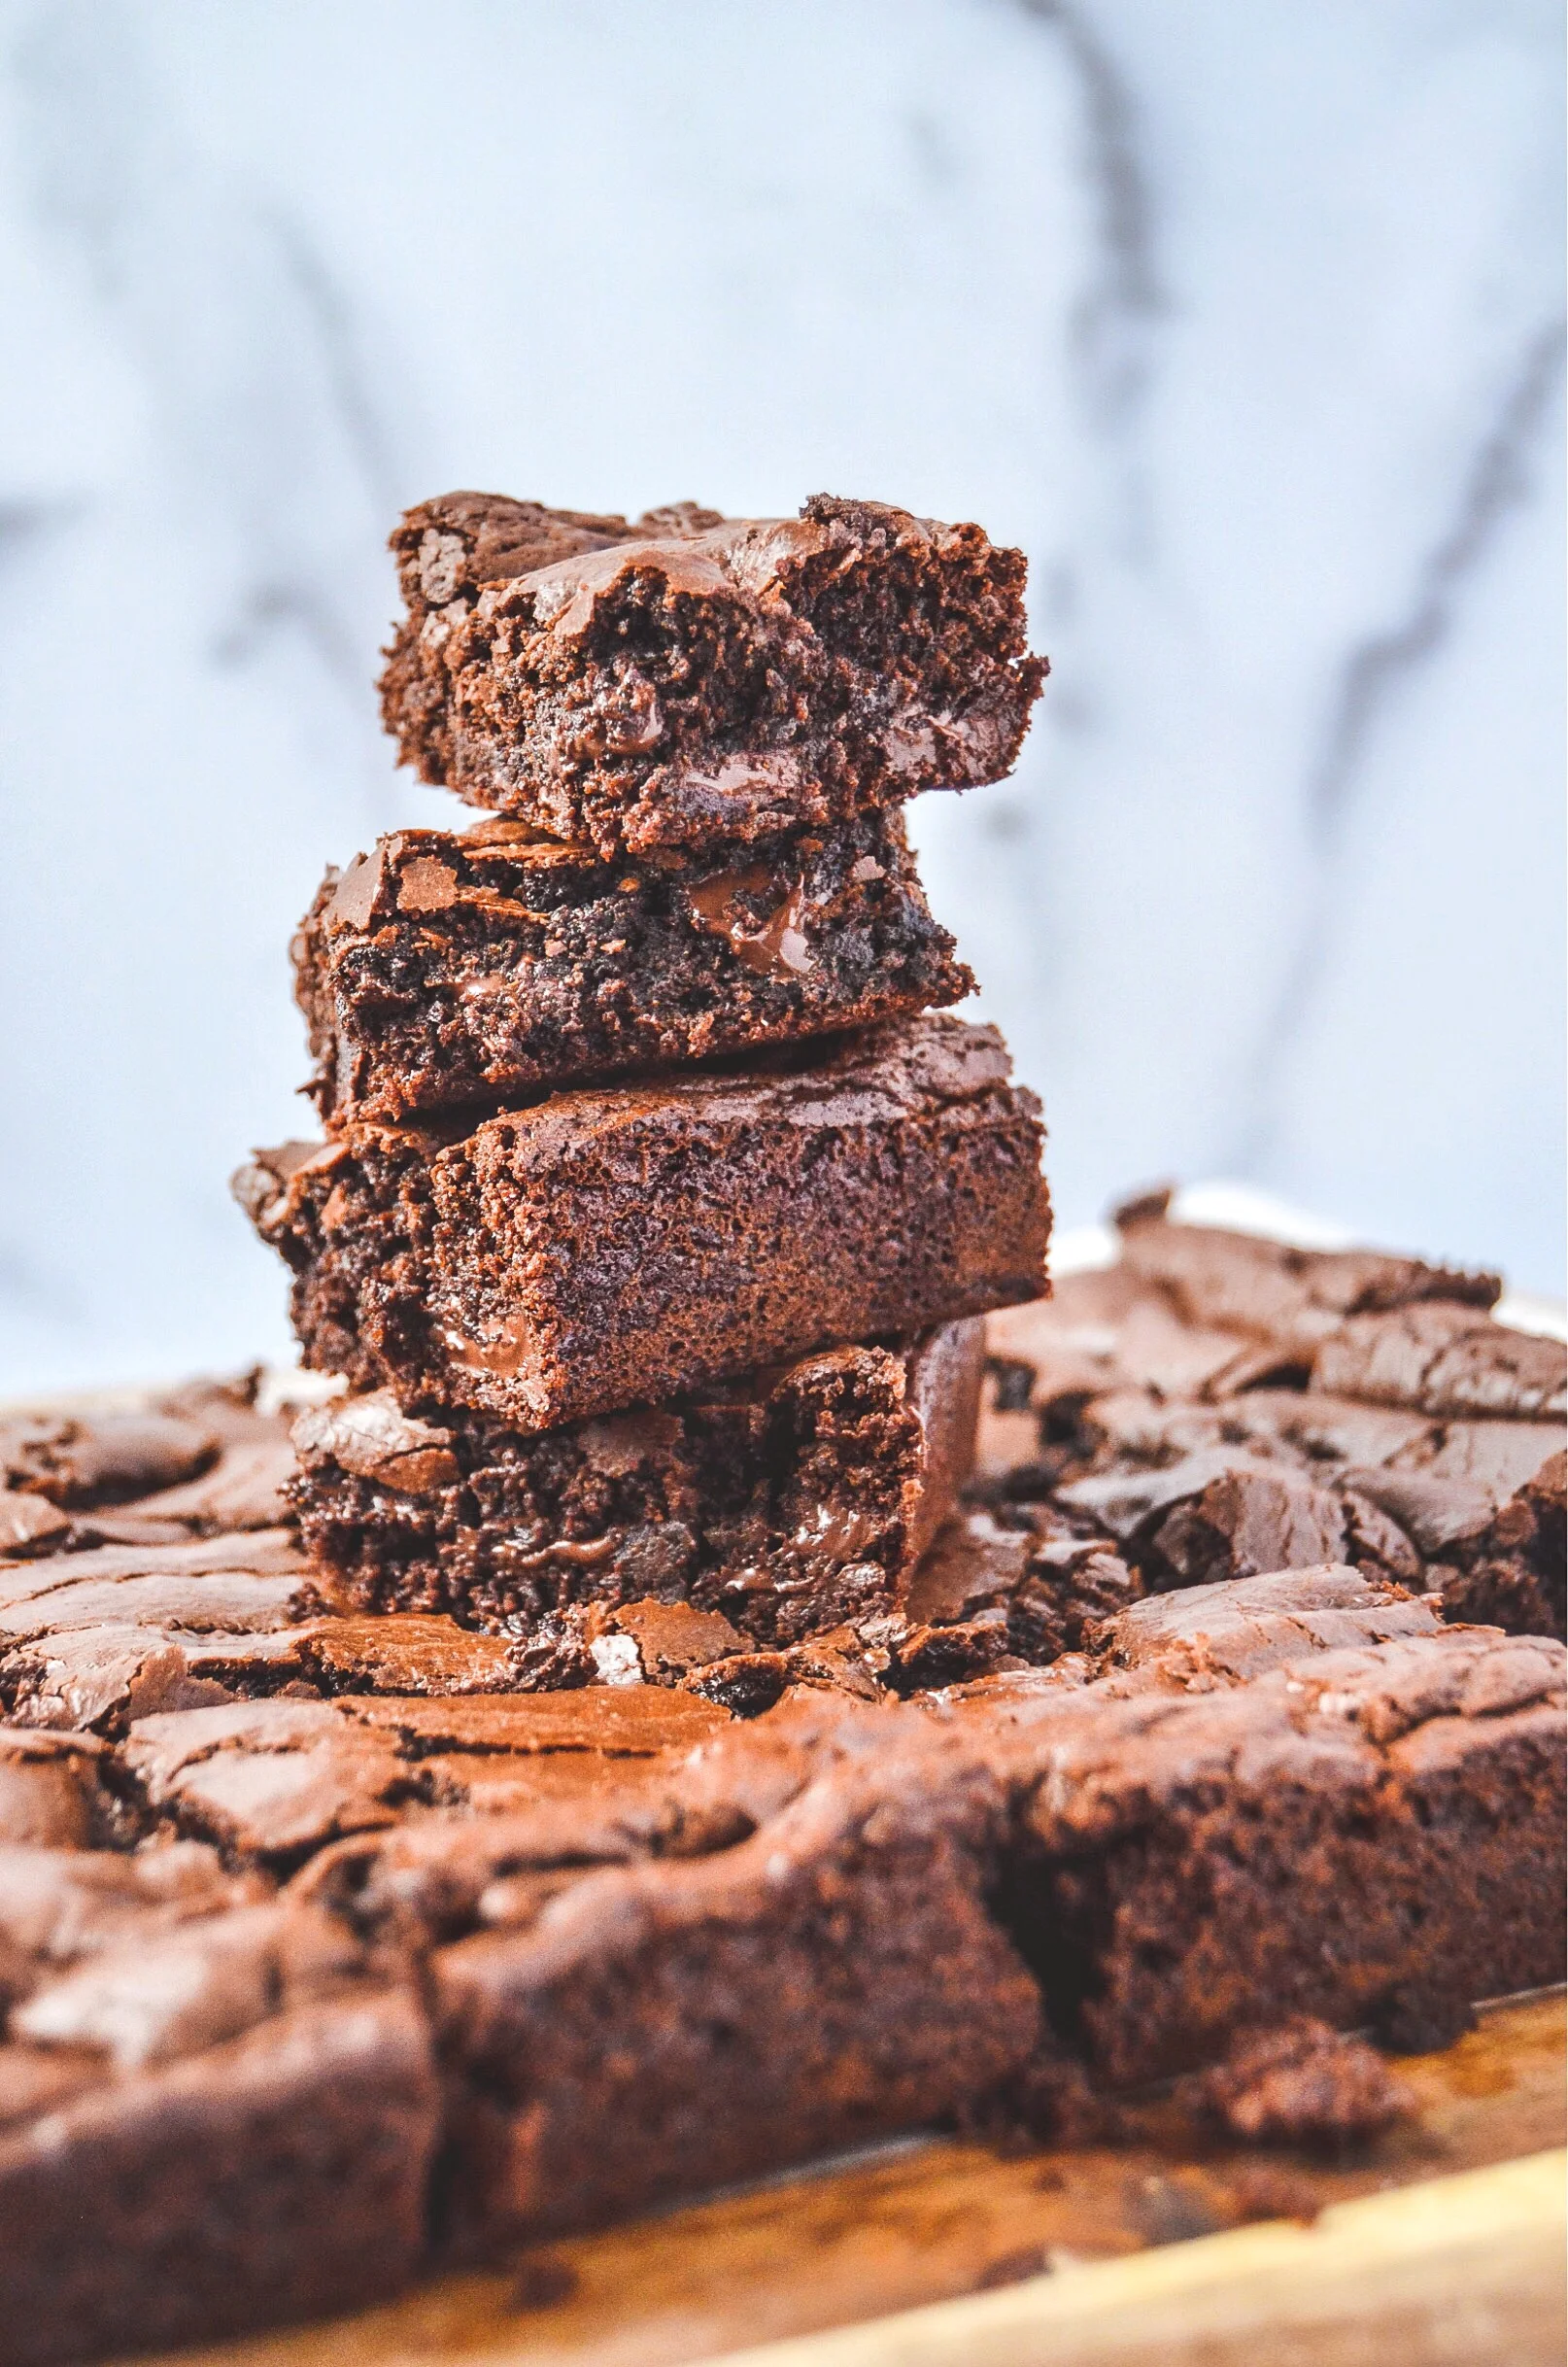
Fudgy Paleo Brownies
Growing up, brownies were my least favorite dessert. Maybe because the flavors were too rich or the texture was too dry, but nonetheless, I stopped eating them. Of course I would get the judgy looks and sneers but hey, they didn’t taste good to me! That is, until I had a fudgy vegan brownie at this bakery in Atlanta and I was floored! It was like the heavens opened up with arms wide open and sucked me in!
Foolproof staple brownie recipe that is also gluten-free, dairy-free, and nut-free!

Growing up, brownies were my least favorite dessert. Maybe because the flavors were too rich or the texture was too dry, but nonetheless, I stopped eating them. Of course I would get the judgy looks and sneers but hey, they didn’t taste good to me! That is, until I had a fudgy vegan brownie at this bakery in Atlanta and I was floored! It was like the heavens opened up with arms wide open and sucked me in!

Too much? Well, that’s how I feel about these brownies! Now, this recipe didn’t happen overnight (perfection doesn’t happen overnight). As a food blogger, sometimes recipes can be made simple and it just clicks. Other times, not so much.
This recipe did not instantly click. It started out as a Mexican hot chocolate cookie that had the batter of a brownie but baked similar to a cake and ultimately dried out after a day or two. But the flavor was there and that’s where I went. Long story short, here we are and I am so glad!
Adding a healthy twist to an old fashioned brownie can be cumbersome at times. Luckily, this brownie is free of everything “bad” yet it tastes just like your typical sugar-filled brownie. This way, we can still ride that amazing “sugar high” but not feel so bad.

How do we get there? Well, we adapt and understand the ingredients that we are using. For example, coconut flour is used to replace all-purpose white flour. Coconut flour absorbs liquid so we only use ¼ cup. Baking powder is a great leavening agent but since this is a paleo recipe, we use coconut sugar, eggs, and vanilla extract instead. This combination gets whipped until a “ribbon stage” is reached.

If you try this recipe, let us know! Leave a comment, rate it, and don’t forget to tag a photo to #fromtherootsblog on Instagram. We love seeing what you come up with!
Ingredients
2/3 cup coconut sugar
2 eggs
1 tsp vanilla extract
8 oz dark chocolate chunks
1/4 cup coconut oil
1/4 cup coconut flour
1/4 cup cocoa powder
1/2 tsp salt
1/2 tsp baking soda
1/2 cup dark chocolate chunk
instructions
Preheat oven to 350 degrees and line a 9x9 baking pan with parchment paper. Spray with a non-stick spray and set aside.
In a small saucepan or small bowl, melt 8 oz dark chocolate and oil in 30-second increments if using the microwave or low heat on stove top until smooth and glossy. Remove from heat and set aside to cool slightly.
Using a hand mixer or KitchenAid mixer, combine coconut sugar, eggs, and vanilla extract and whisk together until the mixture reaches the “ribbon stage” (when you lift the whisk, the mixture should stream down evenly in “ribbons”).
In a medium bowl, whisk dry ingredients (coconut flour, cocoa powder, salt, and baking soda)
With the mixer/hand mixer on low, add the melted chocolate and dry ingredients until fully combined. Fold in ½ cup dark chocolate chunks.
Pour batter into prepared pan and smooth the surface.
Bake for 17-20 minutes until edges are set and the inside is slightly underdone.
Let the brownies rest in the pan for 15-20 minutes. This is the hardest part but so worth it!
Store in fridge for up to a week or freezer for up to a month. I personally like making these to freeze so that I can have brownie bites for my ice cream!